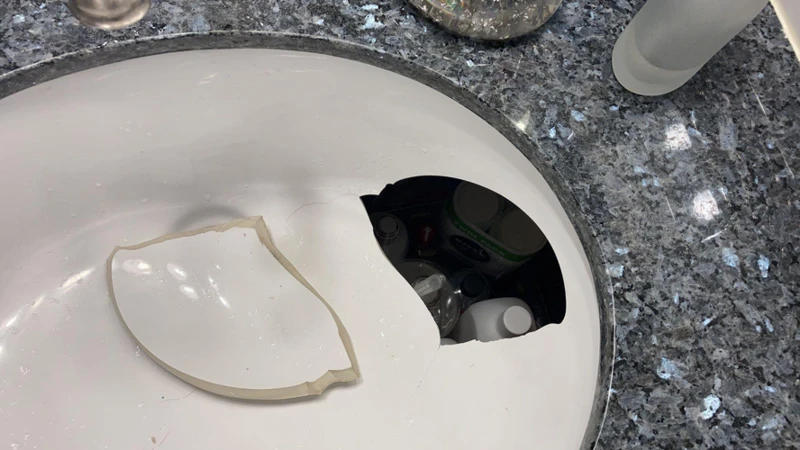
Have you noticed that your sink has a crack or a chip? It can be frustrating to see such damage on something that you use every day. But before you rush to buy a new sink, there is a solution – glue! That’s right, you can easily fix the damage with the right adhesive. However, choosing the wrong glue can lead to further damage and even cost you more money. So, what glue should you use for your sink? In this comprehensive guide, we’ll walk you through everything you need to know to choose the right adhesive and successfully repair your sink.
Understanding Sink Damage
Understanding Sink Damage
When it comes to our sinks, we all want them to be in tip-top shape. But sometimes accidents happen and they can become damaged, which can lead to leaks and even more severe issues. Understanding the different types of sink damage, along with their common causes, is crucial in knowing how to fix them properly. This guide will provide you with all the information you need to know about sink damage and how to fix it using the right adhesive. If you’re curious about how long Elmer’s wood glue takes to dry, check out our article on how long should Elmer’s wood glue dry.
Types of Sink Damage
Different types of sink damage require different types of adhesive to be fixed. It is important to identify the type of sink damage before choosing the adhesive to ensure effective and long-lasting repair. Here are some common types of sink damage:
| Type of Sink Damage | Description |
|---|---|
| Cracks | When the sink is hit hard or heavy objects are dropped onto it, it can cause cracks on the surface or even beneath it. Cracks can also be caused by extreme temperatures such as boiling water or frozen items being placed in the sink. |
| Chips and Scratches | Chips and scratches are common in sink surfaces that are made of delicate materials such as porcelain, ceramic, and enamel. These types of sinks are prone to damage from sharp objects like knives, pots, and pans. |
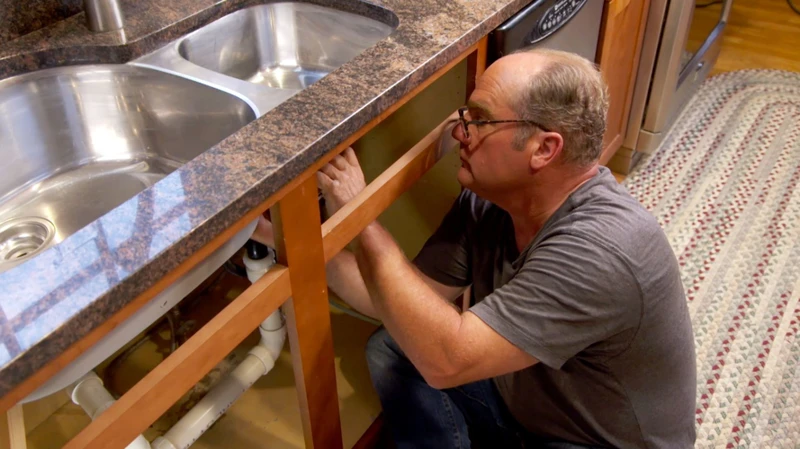
| Loose Sink | If the sink is installed improperly or the adhesive holding the sink to the countertop wears off, it may become loose, resulting in leaks and water damage. |
| Rust Stains | When there is prolonged exposure to water and other acidic substances, it can cause the sink’s surface to rust and form stains. This can weaken the sink’s structure and cause it to deteriorate over time. |
By identifying the type of sink damage, you can narrow down the types of adhesives that will be most effective in repairing it. If you’re unsure which adhesive to use for your particular sink damage, it’s best to consult with a professional or a hardware store expert to get the most accurate information.
Common Causes of Sink Damage
Common Causes of Sink Damage
If you have a damaged sink, it may be due to a few common causes. Here is a table of the most common reasons why your sink may be damaged:
| Cause | Solution |
|---|---|
| Aging sink materials | Replace the sink or use an adhesive to fix it |
| Excessive weight | Remove heavy objects and distribute weight evenly |
| Chemical damage | Do not use abrasive chemicals on the sink. Use a gentler cleaner |
| Water damage | Fix any leaks or water exposure immediately. Dry the sink properly |
| Impact damage | Cover the sink and be mindful of any potential impacts |
Keep in mind that there may be other causes for sink damage, but these are the most common. If you are curious about how to stick something without glue, you can check out our article about that exact topic.
Choosing the Right Adhesive
When it comes to fixing damage on your sink, choosing the appropriate adhesive is crucial to ensure a long-lasting repair. It can be perplexing to identify which type of adhesive to use, given the different materials and types of sink damage. Simply grabbing the first adhesive that you see in a store may not be the best solution. To help you make an informed decision, let’s take a closer look at the factors you need to consider and the different types of adhesives available. Additionally, you can learn more about why your super glue might not be working, which could prevent any future mishaps.
Factors to Consider
When choosing the right adhesive to fix your sink, there are a few factors to consider. These factors will help you determine which type of glue will work best for your specific sink damage. One of the most important factors to consider is the material of your sink. Different materials like stainless steel, porcelain, and fiberglass require different types of adhesive.
Another factor to consider is the extent of the damage. If the damage is minor, a simple adhesive like super glue or epoxy may suffice. However, if the damage is extensive, you may need a stronger adhesive like polyurethane or silicone.
The location of the damage is also an important factor to consider. If the damage is located near a heat source, you will need an adhesive that can withstand high temperatures. On the other hand, if the damage is located near water, you will need a waterproof adhesive.
Another important factor to consider is the time it takes for the adhesive to set and dry. If you need a quick fix, you will need an adhesive that dries fast like cyanoacrylate glue. However, if you have more time, you can use a slower-drying adhesive like epoxy.
Finally, consider the color and texture of the adhesive. You want an adhesive that will blend in with the color of your sink and won’t leave a noticeable texture difference. Make sure to choose an adhesive that is clear or colorless if possible.
Consider all of the above factors when choosing the right adhesive for your sink repair. This will ensure that you choose the best adhesive for your specific sink damage. Some adhesives work great on paint, but might not be the best for your sink. Make sure to read the manufacturer’s instructions before applying any adhesive to your sink.
Types of Adhesives
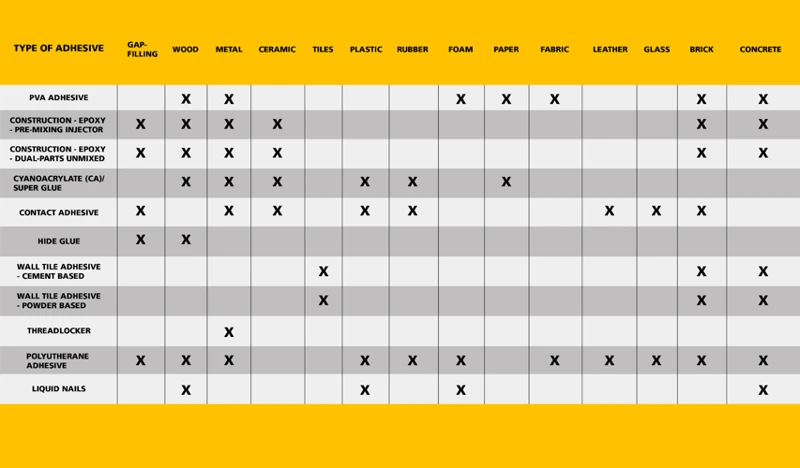
When it comes to adhesives that are suitable for fixing sinks, there are several options available in the market. Each type of adhesive has its own unique properties and suitability for specific situations. Here are some of the most commonly used adhesives for sink repairs:
- Epoxy: Epoxy is a two-part adhesive that consists of resin and hardener. It is extremely strong and provides a long-lasting bond. Epoxy is ideal for use on non-porous surfaces and can withstand high levels of heat and water. It can also be used to fill gaps and cracks in sinks.
- Silicone: Silicone sealant is a popular adhesive for sink repairs because it can withstand high levels of heat and water. It is ideal for use on surfaces that require flexibility, such as sinks made of ceramic or porcelain. Silicone can also be used to create an airtight seal around sinks and plumbing fixtures.
- Polyurethane: Polyurethane adhesive is a strong, waterproof adhesive that is ideal for use on sinks made of ceramic, porcelain, or composite materials. It can also be used to fill gaps and cracks in sinks. Polyurethane adhesive dries to a hard, durable finish and can be sanded or painted over once it has cured.
- PVC Cement: PVC cement is a fast-drying adhesive that is specifically designed for use on PVC pipes and fittings. It creates a strong, permanent bond and can be used to repair leaks in sinks that are caused by loose or damaged PVC connections.
- Cyanoacrylate: Cyanoacrylate, also known as super glue, is a fast-drying adhesive that is ideal for use on small cracks and chips in sinks. It forms a strong, permanent bond and dries clear, making it ideal for use on sinks that are visible.
It is essential to choose the right adhesive for your sink repair, so take the time to consider the properties and suitability of each type of adhesive. Additionally, factors such as the type of sink material, the size and location of the damage, and the amount of stress the sink will be subjected to should be taken into account when selecting an adhesive. Remember that poorly chosen glue or improper application can damage your sink even more.
If you’re interested in learning about other types of glue for different applications, such as how to shorten vertical blinds, how to make a wand without a glue gun, how to glue fondant, what is the glue that keeps an organization together, how to make rolling paper glue, or how to dry wood glue fast, be sure to check out our other articles by clicking on the internal links.
Applying the Glue to Fix Your Sink
Now that you have chosen the right adhesive to fix your sink, it’s time to apply it. Applying the glue correctly takes some preparation and technique to ensure a successful repair. Before we dive into the step-by-step guide, consider checking out our article on what glue to use to shorten vertical blinds for more tips on adhesive application. In this section, we will cover the necessary preparation and guide you through the process of fixing your sink.
Preparation
Before you start fixing your sink with glue, it is important to properly prepare the area. Doing so will help ensure that the glue adheres correctly and provides a long-lasting fix. Here are the steps you should take to prepare your sink:
- Clean the Sink: Use a mild detergent and warm water to thoroughly clean the area around the damaged spot. This will help remove any dirt, grime, or grease that might interfere with the adhesive’s ability to bond.
- Remove Rust and Corrosion: If the sink damage is due to rust or corrosion, use sandpaper or a wire brush to remove any loose material. Be sure to wear gloves to protect your hands during this process.
- Dry the Area: Use a clean towel to dry the sink completely. Any moisture left on the surface can prevent the glue from fully bonding.
- Make Sure the Area is Level: If the sink has a depression or uneven surface, use a filler material to level it out. This will help ensure that the adhesive adheres evenly and effectively.
- Protect Any Nearby Surfaces: Cover any nearby surfaces with a drop cloth or plastic sheeting to protect them from accidental glue spills.
By taking the time to properly prepare the area, you can help ensure that your sink repairs are successful and long-lasting. Once you have completed all of these preparations, you will be ready to move on to the next step: applying the adhesive. If you need tips on how to apply the glue, check out our step-by-step guide in the next section. If you’re looking for other creative DIY projects, check out some awesome tutorials on how to make a wand without a glue gun or how to glue fondant.
Step-by-Step Guide
After deciding on the right adhesive to use, the next step is to apply it to repair your damaged sink. Here is a step-by-step guide to help you through the process:
| Step | Action |
|---|---|
| Step 1: | Prepare the damaged area of the sink by cleaning it thoroughly. Remove any debris or dirt, and dry the area properly. |
| Step 2: | Apply the chosen adhesive onto the damaged area of the sink. Make sure to use a liberal amount of the adhesive. |
| Step 3: | Use a clamp or another tool to hold the sink in place while the adhesive dries. Refer to the adhesive’s instructions on how long it takes to dry completely. |
| Step 4: | Once the adhesive has dried, remove the clamp or tool holding the sink in place. |
| Step 5: | Check if the sink is in the right position and test if it is securely attached to the countertop. |
It is important to be patient and follow the adhesive instructions to the letter. Depending on the type of adhesive, it can take anywhere from a few hours to a day for the glue to dry and set completely.
Note: If you encounter any challenges or have questions during the repair process, do not hesitate to seek the services of a licensed plumber or handyman. Doing so can save you from causing further damage to your sink or even to the plumbing system.
Remember, prevention is always better than curing. Avoid causing sink damage in the first place by taking care when handling heavy or hard objects over your sink. If your sink is showing signs of wear and tear, have it repaired quickly to prevent further damage.
Tips and Tricks
Fixing a sink with glue can be a tricky process, so here are some tips and tricks to keep in mind:
1. Use the right amount of adhesive: Applying too much adhesive can cause a mess and won’t necessarily make your repair any stronger. Follow the manufacturer’s instructions to ensure you’re using the right amount of glue.
2. Give it time to dry: It can be tempting to rush the process, but giving the adhesive enough time to dry is crucial in making sure your repair is long lasting. Be patient and avoid using the sink for at least 24 hours after the repair.
3. Clean the area thoroughly: Before applying the adhesive, make sure the damaged area is clean and free of debris. Use a cleaning agent and a scrub brush to ensure the surface is completely clean and dry before applying the glue.
4. Use a clamp or heavy object: If you’re repairing a crack or break, using a clamp or a heavy object to hold the pieces together while the adhesive dries can help ensure a strong bond.
5. Consider replacing the sink: If the damage is too extensive or the sink is old and outdated, it may be more cost effective to simply replace it altogether.
While these tips can be helpful, it’s important to keep in mind that every sink repair is different. As such, it’s always best to follow the manufacturer’s instructions and seek professional help if necessary.
For more information on the importance of adhesive in everyday life, be sure to check out our article on what glue keeps an organization together, as well as tips for how to make your own rolling paper glue and how to speed up the drying process of wood glue.
Conclusion
Wrapping Up
As we come to the end of this comprehensive guide on the best glue to use for sink repair, we hope that you have learned valuable information to help you fix your sink properly. Remember, understanding the type of sink damage and the common causes will help you choose the right adhesive to use.
It is crucial to consider factors like the type of material your sink is made of, the amount of time you have to fix it, and the durability of the adhesive before making your final decision. Also, we highly recommend following the preparation steps and the step-by-step guide on how to apply glue to fix your sink.
If you want to explore other types of adhesives or want to learn how to make rolling paper glue, be sure to check out our website for more information. Additionally, suppose you are looking for tips on how to dry wood glue fast. In that case, we have a helpful article that you can read for more details.
In conclusion, fixing a sink is not a daunting task when you have the right tools and follow proper procedures. With the information provided in this guide, you can be confident in your ability to repair your sink and restore the functionality and aesthetics of your kitchen or bathroom.
Frequently Asked Questions
What kind of damage can occur to a sink?
Sinks can experience cracks, chips, and breaks, as well as damage to the finish.
What causes sink damage?
Sink damage can be caused by a variety of factors, including wear and tear, impact, and exposure to extreme temperatures.
Do I always need to use adhesive to repair sink damage?
No, in some cases, depending on the type and severity of the damage, a replacement sink may be necessary.
What factors should I consider when choosing an adhesive for my sink?
Factors to consider when choosing an adhesive for your sink include the type of damage, the material your sink is made of, and the level of moisture and heat resistance required.
What types of adhesives are recommended for repairing sinks?
Epoxy, silicone, and cyanoacrylate (super glue) adhesives are all commonly used for sink repair.
Can I use any type of glue for my sink repair?
No, it is important to choose an adhesive that is appropriate for the specific type of sink and the extent of the damage.
Do I need to clean my sink before applying adhesive?
Yes, you should thoroughly clean and dry the affected area before applying adhesive in order to ensure proper bonding.
What is the best way to apply adhesive to a sink?
It is generally best to apply adhesive with a small brush or plastic scraper, working in small sections and ensuring even coverage.
How long does it take for sink adhesive to dry?
The drying time for sink adhesive can vary depending on factors such as humidity and temperature, but it typically takes at least a few hours.
Can I use my sink right after applying adhesive?
It is generally recommended to wait at least 24 hours after applying adhesive before using your sink to allow the adhesive to fully cure.