Introduction

Installing wallpaper is a great way to add personality and style to your home decor. However, choosing the wrong glue can turn your DIY project into a disaster, causing unsightly bubbles, peeling, and other issues. That’s why it’s crucial to understand the different types of wallpaper glue available, as well as the factors to consider before making your final choice. In this article, we’ll provide you with a comprehensive guide to help you choose the right glue for your wallpaper installation project and provide you with step-by-step instructions for applying wallpaper glue like a pro.
Why Choosing the Right Glue is Important
Choosing the right glue is crucial for ensuring your wallpaper project’s success. Using the wrong adhesive can lead to various problems, such as peeling off, bubbling, or seams showing. Here are some key reasons why it’s important to select the right wallpaper glue:
- Bonds the Wallpaper to the Wall: The adhesive creates a bond between the wallpaper and the wall, securing it firmly in place. A weak or inappropriate glue can result in wallpaper coming loose or falling off entirely.
- Affects the Wallpaper’s Lifespan: Using the right glue can help extend the wallpaper’s lifespan by ensuring it stays in good condition for as long as possible. Poor adhesive choices can cause the wallpaper to age faster or develop unsightly blemishes.
- Impacts the Wallpaper’s Appearance: Depending on the type of glue you select, it can either enhance or diminish the wallpaper’s appearance. For instance, using a heavy-duty paste on a thin or delicate wallpaper can lead to bubbling, ruining its aesthetics.
- Ensures Ease of Removal: Some wallpaper glue formulas are easier to remove than others. If you choose the wrong glue, that might make it harder for you to remove the wallpaper later or damage the wall in the process.
To achieve the best results, you need to assess several factors before choosing the right wallpaper glue. Each type of wallpaper requires a specific adhesive formula that suits its nature and composition. Additionally, wall conditions can play a crucial role in adhesive choice, as not all glues can work on all surfaces. Lastly, the ease of use and drying time can significantly impact your ability to achieve a successful wallpaper installation.
Types of Wallpaper Glue
When it comes to wallpapering, choosing the right type of glue can make the difference between a smooth, long-lasting finish and a frustrating mess. With so many options available, from cellulose-based paste to heavy-duty wallpaper adhesive, it can be difficult to know which one is best suited to your needs. In this section of the article, we’ll explore the various types of wallpaper glue in more detail and highlight the unique properties of each one. By the end of this section, you’ll have a better understanding of which type of glue is the right choice for your next wallpapering project.
1. Cellulose-based Wallpaper Paste
Cellulose-based wallpaper paste is one of the most popular types of wallpaper glue available in the market. It is made up of cellulose powder derived from refined plant fibers and is environmentally friendly. This paste is perfect for lightweight, standard, or non-woven wallpapers and is compatible with most types of wall surfaces.
Here are some of the advantages and disadvantages of using cellulose-based wallpaper paste:
| Advantages | Disadvantages |
|---|---|
| Environmentally friendly | Not suitable for heavy or vinyl wallpapers |
| Easy to mix and apply | May require several coats for a strong bond |
| Dries clear and doesn’t stain walls | May not hold up well in high moisture areas |
| Can be easily cleaned up with water | May not be as durable as some other types of wallpaper adhesives |
Tips:
- Follow the manufacturer’s instructions for mixing the paste. Adding too much water can weaken the bond and cause the wallpaper to peel
- Avoid using cellulose-based wallpaper paste in high-moisture areas like bathrooms or kitchens
- Prime walls before applying the paste for better adhesion and durability
- Use a primer that is compatible with cellulose-based paste for best results
Cellulose-based wallpaper paste is a great option for most types of non-vinyl or heavy wallpapers. It dries clear, is easy to clean up, and is environmentally friendly. However, it may not hold up as well in high humidity areas and may require more coats for a strong bond.
2. Vinyl over Vinyl Adhesive
When it comes to hanging wallpaper, vinyl over vinyl adhesive is a popular type of glue to use. This type of adhesive is specifically designed for applying vinyl wallpaper over an existing vinyl wallpaper. It is important to note that regular wallpaper glue cannot be used for this purpose.
Composition: Vinyl over vinyl adhesive is made up of a combination of acrylic resins, solvents, and other additives that make it suitable for use on vinyl wallpaper.
Working Time: This type of adhesive typically has a longer working time than other types of wallpaper glue. This allows for adjustments to be made during the wallpaper hanging process.
Drying Time: The drying time for vinyl over vinyl adhesive can vary depending on factors such as humidity and temperature. In general, it takes around 24 hours for the adhesive to completely dry.
Advantages: One of the main advantages of using vinyl over vinyl adhesive is that it eliminates the need to remove existing vinyl wallpaper before applying new wallpaper. This can save a significant amount of time and effort. Additionally, it can help to conceal any imperfections or damage on the original wallpaper.
Disadvantages: While vinyl over vinyl adhesive has many benefits, it is important to note that it may not be suitable for all situations. For example, if the existing vinyl wallpaper is in poor condition, it may be necessary to remove it before applying new wallpaper. Additionally, if the existing wallpaper has a textured surface, using vinyl over vinyl adhesive may result in an uneven finished product.
Compatibility: Vinyl over vinyl adhesive is only suitable for use on vinyl wallpaper. It should not be used on any other type of wallpaper or surface.
Cleanup: Cleanup of vinyl over vinyl adhesive is relatively easy. Any excess adhesive can be wiped away with a damp cloth before it dries. Tools can be cleaned with warm water and soap.
Vinyl over vinyl adhesive is a useful option for those looking to update their existing vinyl wallpaper without the need for removal. However, it is important to consider the condition of the existing wallpaper and ensure that vinyl over vinyl adhesive is the right choice for the job.
3. Pre-Mixed Wallpaper Adhesive
Pre-mixed wallpaper adhesive is an excellent option for those who don’t want to spend too much time preparing their wallpaper paste. As the name suggests, this type of glue comes ready-to-use, and all you have to do is open the container and start applying. This type of adhesive is generally more expensive than other types of wallpaper glue, but it is worth the investment for those who value convenience and ease of use.
Advantages
One of the main advantages of pre-mixed wallpaper adhesive is its ease of use. You don’t have to worry about mixing the glue, which can be a messy and time-consuming process. Pre-mixed adhesive also produces fewer lumps and bumps, which can affect the overall appearance of your wallpaper. Another benefit is that this type of adhesive generally dries faster, which means you can start enjoying your newly wallpapered room sooner.
Disadvantages
On the downside, pre-mixed wallpaper adhesive is generally more expensive than other types of wallpaper glue. Additionally, pre-mixed adhesive isn’t as versatile as other types of glue, so it’s not suitable for all types of wallpaper. For example, if you’re wallpapering a heavy or textured wallpaper, you may find that pre-mixed adhesive doesn’t provide enough holding power.
Best Uses
Pre-mixed wallpaper adhesive is best for lightweight or plain wallpaper, such as non-woven wallpaper or paper-backed vinyl wallpaper. If you’re working with heavy or textured wallpaper, consider using a different type of glue, such as heavy-duty wallpaper paste or clay-based adhesive.
Pros and Cons Overview
To summarize, here are some pros and cons of using pre-mixed wallpaper adhesive:
Pros:
- Easy to use
- Dries faster
- Fewer lumps and bumps
Cons:
- More expensive
- Less versatile
Pre-mixed wallpaper adhesive is an excellent choice for those who value ease of use and convenience and are wallpapering a plain or lightweight wallpaper. However, if you’re working with heavier or textured wallpaper, you may want to consider a different type of glue to ensure that your wallpaper stays securely in place.
4. Wheat-based Wallpaper Adhesive
Wheat-based wallpaper adhesive is a popular choice for those looking for an eco-friendly and affordable option. This type of adhesive is made from natural ingredients, making it safe for use in homes with children and pets.
Advantages:
- Environmentally Friendly: Wheat-based wallpaper adhesive is biodegradable and non-toxic, making it an ideal choice for those who are environmentally conscious.
- Safe for Use: As this adhesive is made from natural ingredients, it is safe to use in homes with children and pets.
- Affordable: Wheat-based wallpaper adhesive is a great option for those on a budget, as it typically costs less than other types of wallpaper adhesive.
- Easy to Clean Up: If you spill wheat-based wallpaper adhesive while applying wallpaper, it is easy to clean up with just soap and water.
Disadvantages:
- Not Ideal for All Wallpaper Types: Wheat-based wallpaper adhesive may not be the best option for heavy or textured wallpaper, as it may not provide enough hold.
- Drying Time: Compared to other types of wallpaper adhesive, wheat-based adhesive may take longer to dry. It is important to let the adhesive dry completely before hanging wallpaper to prevent bubbling or peeling.
- Shorter Shelf Life: Wheat-based wallpaper adhesive has a shorter shelf life than other types of adhesive, so it’s important to use it before its expiration date.
Wheat-based wallpaper adhesive is an excellent choice for those who are looking for an eco-friendly and affordable option. Just be aware of its limitations and follow the instructions carefully for best results.
5. Heavy Duty Wallpaper Paste
Heavy duty wallpaper paste is a powerful adhesive that is known for its strength and durability. This type of glue is specially designed for heavy wallpaper and acts as a strong bond for the wallpaper on the wall. Here are the key features and benefits of heavy duty wallpaper paste:
- Extra strength: Heavy duty wallpaper paste is known for its extra strength as it can easily hold up the heavy vinyl or metallic wallpaper.
- Durable: The adhesive quality of heavy duty wallpaper paste makes it a durable choice for wallpapering.
- Long-lasting: When you use this paste for wallpaper, you can be sure that it will last longer and not have issues like peeling or curling.
- Water-resistant: Some heavy duty wallpaper pastes are water-resistant, which makes them an ideal choice for use in rooms with high humidity, such as bathrooms or kitchens.
- Ease of use: Despite its strength, heavy duty wallpaper paste is easy to mix and apply, making it user-friendly even for beginners.
When it comes to applying heavy duty wallpaper paste, it is essential to follow the instructions carefully. Typically, you need to mix the paste with the right amount of water and let it rest for a few minutes before using it. It is also crucial to check the manufacturer’s recommendations and to choose the right applicator for best results.
If you have decided to use heavy duty wallpaper paste, it is essential to make sure that it is compatible with the type of wallpaper that you have chosen. Also, make sure to apply the glue evenly and avoid putting too much pressure on the wallpaper while hanging it.
Heavy duty wallpaper paste is an excellent choice if you are looking for a long-lasting and durable adhesive for your wallpaper. Just make sure to choose the right type, follow the instructions, and apply it carefully for the best results.
6. Clay-based Wallpaper Adhesive
Clay-based wallpaper adhesive is a unique option that’s becoming more popular among homeowners and professionals alike. This type of adhesive is made from natural materials, including clay and other minerals. Here are some reasons why this might be the right choice for your wallpaper project:
- Natural and eco-friendly: Clay-based adhesive is made from organic materials, making it a non-toxic, eco-friendly option that’s great for those who prioritize sustainability.
- Mold and bacteria-resistant: Because of its natural composition, clay-based adhesive is naturally resistant to mold and bacteria growth. This means it’s a good option for use in high humidity areas like bathrooms and kitchens.
- Easy to clean up: Unlike other adhesives that can be difficult to clean up, clay-based adhesive is water-soluble and easy to remove with a damp cloth.
- Strong and durable: Despite being made from natural materials, clay-based adhesive is a strong and durable option that is long-lasting and won’t break down over time.
However, it’s important to note that there are some downsides to choosing clay-based wallpaper adhesive. One potential issue is that it can be more difficult to work with than other types of wallpaper glue, as it can be quite thick and goopy. Additionally, it may not be the best choice for those looking for a fast drying time, as clay-based adhesive can take longer to dry than other options.
Ultimately, whether or not clay-based adhesive is the right choice for your wallpaper project will depend on a number of factors, including the type of wallpaper you’re using, the condition of your walls, and your personal preferences. Be sure to take all of these factors into account before making your final decision.
Factors to Consider
Choosing the right wallpaper glue is important, but there are also other factors that need to be considered before making a final decision. Factors to consider include the types of wallpaper you are using, the condition of the wall, the drying time of different glues, and the overall ease of use. Ignoring any of these factors can result in a DIY wallpapering disaster or a less than perfect result. Let’s dive deeper into each of these considerations to make sure you’re fully prepared for your wallpapering project.
1. Types of Wallpaper
Before choosing the right glue for your wallpaper, it’s essential to determine the type of wallpaper you are working with. Knowing the wallpaper’s type can help you select the appropriate glue that can hold up and adhere to it well. Here are some of the most common types of wallpaper:
| Types of Wallpaper | Description |
|---|---|
| Standard wallpaper | Ordinary wallpaper made of paper, usually the most affordable option. |
| Vinyl wallpaper | A wallpaper with a vinyl coating that provides durability and resistance to moisture. Suitable for high traffic areas, bathrooms, and kitchens. |
| Grasscloth wallpaper | Made of natural materials like grasses, and other organic fibers, and provides an earthy texture. |
| Textured wallpaper | Wallpaper that has a 3D appearance or texture created with embossing, printing presses, or other techniques. |
| Anaglypta wallpaper | Textured wallpaper that provides a raised pattern that can be painted over. Great for hiding wall imperfections and adding to the uniqueness of a wall. |
When selecting the right glue, it is also essential to keep in mind the wallpaper’s thickness and weight as these factors can affect the glue’s strength and can lead to peeling or bubbling. So, with these various wallpaper types, choosing the right glue is crucial to providing a long-lasting hold to maintain your beautiful walls.
2. Wall Conditions
When choosing the right glue for your wallpaper, it’s also important to consider the condition of your wall. The wall condition plays a crucial role in the adhesion process and overall durability of the wallpaper. Here are the key factors to consider when evaluating your wall conditions:
| Wall Condition | Impact on Glue Choice |
|---|---|
| Painted Walls | For painted walls, it’s best to use a heavy-duty wallpaper paste, as it will help the glue adhere better to the surface. Make sure the paint is fully dried before applying the wallpaper. |
| New Walls | For new walls, it is important to make sure that they have been primed before hanging the wallpaper. This will ensure that the wallpaper paste adheres properly to the wall, providing a longer-lasting finish. |
| Textured Walls | Textured walls pose a challenge because the glue may not adhere to the surface properly. Consider using a heavy-duty wallpaper paste for textured walls. |
| Previously Wallpapered Walls | If you are hanging wallpaper over an existing wallpaper, you may want to use a vinyl over vinyl adhesive. This type of glue is specifically designed for wallpaper-to-wallpaper adhesion. |
| Humid or Damp Walls | For walls that are humid or damp, it’s important to use a fungicide wallpaper paste to prevent the growth of mold and mildew. This type of glue is also useful for bathrooms and other high-moisture areas. |
| Uneven or Damaged Walls | If your walls are uneven or damaged, it’s important to repair them before hanging the wallpaper. Wallpapers will not be able to hide large cracks or gaps. After repairing any cracks or dents, use a wheat-based wallpaper adhesive which helps to fill and smooth any minor imperfections. |
By considering the condition of your wall, you can easily narrow down the options of wallpaper glue to use, which ensures that the wallpaper will stick properly and last for a long time. For the best results, be sure to follow the manufacturer’s guidelines for the specific glue you use for your wall conditions.
3. Drying Time
When choosing the right glue for your wallpaper, it’s important to consider the drying time of the adhesive. The drying time can vary greatly depending on the type of glue you use, as well as the conditions in which it is applied. Here are some things to keep in mind when considering drying time:
- Type of Glue: Different types of wallpaper glue have different drying times. For example, pre-mixed wallpaper adhesive typically dries in around 24 hours, while heavy duty wallpaper paste can take up to 48 hours to dry completely.
- Wallpaper Material: The type of wallpaper material can also affect drying time. Thicker, more textured wallpapers generally take longer to dry than thin, smooth wallpapers.
- Wall Conditions: The humidity and temperature of the room can also impact how long it takes for the wallpaper glue to dry. If the room is too humid or too cold, it may take longer for the wallpaper adhesive to dry completely.
It’s important to wait for the wallpaper glue to fully dry before moving on to the next step of applying wallpaper. If the glue hasn’t dried completely, it can cause bubbling or peeling of the wallpaper. However, be careful not to wait too long, as this can also cause problems. Some wallpaper adhesives can become too dry and lose their effectiveness if they are left for too long before the wallpaper is hung.
In general, it’s best to follow the manufacturer’s instructions for drying time, as they will be based on the specific type of wallpaper glue that you are using. Keep in mind the factors above and exercise patience while waiting for the glue to dry completely before moving on to the next step of wallpaper application.
4. Ease of Use
When choosing a wallpaper glue, it is important to consider how easy it is to work with. This factor can greatly impact the overall success of the wallpaper installation process. Here is a table summarizing the ease of use of different types of wallpaper glue:
| Glue Type | Difficulty Level | Comments |
|---|---|---|
| Cellulose-based Wallpaper Paste | Easy | This type of glue is easy to mix and apply. |
| Vinyl over Vinyl Adhesive | Moderate | This glue requires that the existing wallpaper be scored and removed before application. |
| Pre-Mixed Wallpaper Adhesive | Easy to Moderate | This glue is easy to use, but the consistency may need to be adjusted before application. |
| Wheat-based Wallpaper Adhesive | Moderate | While this glue is easy to mix, it requires a longer soaking time for the wallpaper. |
| Heavy Duty Wallpaper Paste | Moderate to Difficult | This glue is thick and heavy, making it more difficult to mix and apply. |
| Clay-based Wallpaper Adhesive | Difficult | This glue requires a longer soaking time and may be difficult to mix and apply. |
As seen in the table, some glues are easier to use than others. Cellulose-based wallpaper paste is the easiest to use, while clay-based wallpaper adhesive is the most difficult. It is important to carefully consider both the ease of use and other factors when choosing a wallpaper glue to ensure a successful installation process.
Step-by-Step Guide: How to Apply Wallpaper Glue
Now that you have chosen the right wallpaper glue for your project, it’s time to start applying it. Applying wallpaper glue can be a daunting task, especially if you have never done it before. But don’t worry, we have got you covered. In this section, we will provide you with a step-by-step guide on how to apply wallpaper glue like a pro. Just follow these instructions carefully, and you’ll be able to achieve a flawless finish that will last for years to come. So, let’s get started!
1. Prepare the Wall
Before applying wallpaper glue, it is important to properly prepare the wall to ensure a smooth and long-lasting finish. This includes cleaning the wall surface and making any necessary repairs.
Clean the Wall
Start by cleaning the wall surface with a damp sponge or cloth to remove any dust, dirt, or debris. Use a mild soap solution if necessary, but avoid using abrasive cleaners that can damage the wall surface.
Repair Wall Imperfections
Inspect the wall for any imperfections such as cracks, holes, or bumps. Fill any holes or cracks with spackling compound and use sandpaper to smooth any bumps. Allow the spackling compound to dry completely before proceeding.
Apply Primer
Applying a primer to the wall surface can help the wallpaper adhere better and prevent any stains or discoloration from bleeding through. Choose a primer that is compatible with your chosen wallpaper glue and follow the manufacturer’s instructions for application.
| Step | Action | Tools/Materials Needed |
|---|---|---|
| 1 | Clean the wall | Damp sponge/cloth, mild soap solution |
| 2 | Repair wall imperfections | Spackling compound, putty knife, sandpaper |
| 3 | Apply primer | Primer, paint roller/brush |
Properly preparing the wall before applying wallpaper glue can ensure a smooth and long-lasting wallpaper finish. Taking the time to clean the wall surface, repair any imperfections, and apply a primer can make a big difference in the final outcome of your wallpaper project.
2. Mix the Glue
Before you can apply wallpaper glue, you need to mix it properly for optimal consistency. Improper mixing may lead to lumps or uneven texture, which could compromise the quality of the wallpaper installation. Here are the steps to mixing wallpaper glue:
- Read instructions: Every wallpaper glue brand has its specific instructions on the right mixing ratio and consistency. Make sure you read and understand the provided instructions.
- Wear gloves: Wear gloves to avoid irritation on your skin or getting glue stains on your hands.
- Measure the water: Use a clean bucket to measure the required amount of cold water stated on the instruction. Coldwater is essential for some wallpaper paste brands to dissolve properly.
- Add adhesive powder: Gradually sprinkle the adhesive powder into the water when the water is in motion. Remember to stir the mixture as you add the powder to prevent lumps from forming. Continue stirring until the powder is fully dissolved.
- Let the mixture rest: Depending on the brand, the mixture may require some resting time ranging from 5-30 minutes to allow for the starch to dissolve. Let it rest before stirring it again.
The ratio of water to glue powder to mix will depend on the brand of wallpaper glue you are using and the type of wallpaper you are installing. It is essential to read the instructions to ensure a proper and consistent mixture. Once mixed, you are ready to apply the wallpaper glue to the wall.
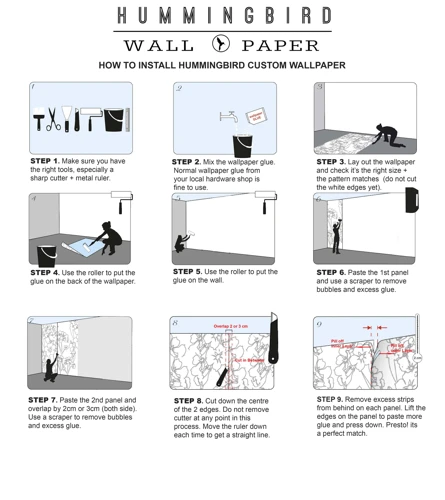
3. Apply the Glue
When it comes to applying wallpaper glue, the process can vary slightly depending on the type of wallpaper and glue being used. However, there are some basic steps that can be followed to ensure a successful application.
Step 1: Gather Your Supplies
Before applying the glue, gather all of the necessary supplies. This may include a wallpaper brush, a roller, a clean bucket, and a measuring cup.
Step 2: Mix the Glue
Refer to the instructions on the glue packaging for the correct ratio of water to glue. In general, most wallpaper glues require mixing with water before use. Measure the appropriate amount of water into the clean bucket, and slowly add the glue while stirring constantly. Continue stirring until the mixture is smooth and free of lumps.
Step 3: Apply the Glue
Using a wallpaper brush or roller, apply a thin, even layer of glue to the back of the wallpaper. Be sure to apply the glue to the edges and corners of the wallpaper as well. Avoid applying too much glue, as this can cause the wallpaper to bubble or wrinkle.
Step 4: Book the Wallpaper
After the glue has been applied, fold the wallpaper in half so that the top and bottom edges meet in the middle, with the sticky sides facing each other. Leave the wallpaper in this “booked” position for the amount of time specified by the glue manufacturer. This allows the glue to activate and the wallpaper to become more pliable.
Step 5: Hang the Wallpaper
Once the wallpaper has been booked, it is ready to be hung on the wall. Carefully align the top edge of the wallpaper with the top of the wall, and allow the wallpaper to unroll downward. Use a wallpaper smoothing tool to smooth out any bubbles or wrinkles as you go, working from the center of the wallpaper out toward the edges.
Step 6: Trim the Edges
After the wallpaper has been hung, use a sharp utility knife or scissors to trim any excess wallpaper from the edges of the walls and around windows and doors.
Applying wallpaper glue is a fairly straightforward process as long as the instructions on the glue packaging are followed carefully. By taking the time to mix the glue correctly and apply it evenly, you can ensure a smooth and long-lasting wallpaper application.
4. Hang the Wallpaper
Now that you have applied the glue, it’s time to hang the wallpaper. This part of the process may seem daunting, but with the right instructions, you can make sure that you hang the wallpaper smoothly and avoid any mistakes.
Step 1: Measure and cut the wallpaper
Measure the height of the wall, add a few inches to the length, and cut the wallpaper to that length. Make sure you are cutting straight lines and that there are no jagged edges.
Step 2: Mark a plumb line
Using a plumb line or a level, mark a straight, vertical line at the corner of the wall where you will start hanging the wallpaper. This will help you hang the first strip of wallpaper straight.
Step 3: Hang the first strip
Apply the wallpaper to the wall starting from the top and working your way down. Make sure the wallpaper is aligned with the plumb line. Use a wallpaper smoother to smooth out the wallpaper and remove any air bubbles. Trim the edges of the wallpaper using a sharp knife.
Step 4: Hang subsequent strips
Repeat the process, hanging subsequent strips of wallpaper next to each other. Make sure the pattern matches up and that there are no gaps between the strips. Use a wallpaper smoother to smooth out each strip and trim the edges as necessary.
Here’s a table summarizing the steps for hanging wallpaper:
| Step | Description |
|---|---|
| 1 | Measure and cut the wallpaper |
| 2 | Mark a plumb line |
| 3 | Hang the first strip |
| 4 | Hang subsequent strips |
By following these steps, you will be able to hang wallpaper with ease and ensure that it looks great on your walls.
5. Smooth and Trim the Edges
Once you’ve successfully hung the wallpaper, it’s time to make sure the edges are neat and smooth. This involves trimming any excess paper and ensuring that the wallpaper is flush against the wall with no air bubbles or creases. Here are the steps you need to follow:
| Step 1: | Take a sharp utility knife and carefully cut along the edges of the wallpaper. Be sure to follow the contour of the wall as precisely as possible. This will help you to get clean, straight cuts. |
| Step 2: | Use a wallpaper smoothing brush or a wallpaper seam roller to gently push the wallpaper against the wall. This will help to smooth out any air bubbles or creases. Start from the center of the paper and work your way outwards to the edges. |
| Step 3: | Use a sharp pair of scissors to trim any excess paper along the edges. You should leave about 1/8 inch of paper overlapping the edge of the wall to ensure full coverage. Be careful not to cut too much or you may end up with gaps that need to be filled with more wallpaper. |
| Step 4: | Finally, use a clean, damp sponge to gently wipe away any excess glue or adhesive that may have oozed out from under the edges of the wallpaper. This will help to give your finished project a polished look. |
Taking the time to properly smooth and trim the wallpaper edges will make a big difference in the final appearance of the room. Using the right tools and techniques will ensure that you achieve a professional-looking and seamless wallpaper application.
Common Problems and Solutions
When it comes to wallpapering, it’s not uncommon for problems to arise no matter how careful you are during the application process. These can range from bubbling wallpaper to difficulty in removing it. It’s important to know the solutions to these issues to ensure that your newly hung wallpaper looks as seamless as possible. In this section, we’ll explore some of the common problems that you may face and provide useful tips and tricks to help you solve them. So, let’s get started and learn how to address these issues!
1. Bubbling Wallpaper
Bubbling wallpaper can be a frustrating problem for homeowners who have recently wallpapered their walls. The bubbles can make the wallpaper look unsightly and unattractive. Fortunately, there are several solutions to this problem.
Causes:
- Inadequate surface preparation
- Inconsistent adhesive application
- Presence of air pockets/uneven surface
Solutions:
- Make sure the surface is clean, dry, and smooth before applying wallpaper.
- Apply the wallpaper adhesive uniformly with a brush or roller.
- Use a smoothing tool to remove air bubbles as you hang the wallpaper.
- Make sure to overlap the wallpaper edges correctly and not to stretch the material.
- Take the time to ensure that the wallpaper is straight and evenly aligned before smoothing it out.
- Using a craft knife or scissors, cut a small X-shaped incision in the center of the bulge and gently push out the air. Pat down the wallpaper with a damp cloth, then let it dry completely.
- If the wallpaper is well adhered except for small areas of peeling, apply a small amount of glue to the back of the wallpaper using a small brush and press the wallpaper back in place.
- In a more extreme case, it may be necessary to remove the wallpaper and start again to ensure a smooth and wrinkle-free finish.
By following these solutions, you can prevent and fix bubbling wallpaper for a beautiful finish on your walls. Remember, proper preparation and application are crucial for an effective wallpapering job that will last for years to come.
2. Wallpaper Peeling Off
One of the most frustrating problems with wallpaper is when it starts to peel off the wall. This can be caused by a variety of factors, but the good news is that there are ways to fix it. Here are some possible reasons why your wallpaper might be peeling off:
- Poor surface preparation: If the wall was not properly cleaned, repaired, or primed before applying the wallpaper, it may not adhere well and eventually start to peel. It’s important to clean the wall thoroughly, repair any cracks or holes, and apply a good quality primer before hanging wallpaper.
- Low-quality wallpaper glue: If you used a low-quality or incorrect type of wallpaper adhesive, it may not have a strong enough hold to keep the wallpaper in place. You need to make sure you use the right type of glue for your wallpaper material, as well as a quality brand.
- Humidity and moisture: Exposure to excessive humidity and moisture can cause the wallpaper to lose its adhesive properties and start to peel off. This is especially common in bathrooms and kitchens, where there’s a lot of moisture in the air. In such cases, you might want to consider using a moisture-resistant wallpaper or adding a dehumidifier to the room.
- Temperature changes: Extreme temperature changes can also cause the wallpaper to peel off. This is particularly common in rooms with poor ventilation or that get a lot of sunlight. To prevent this, make sure the room is properly ventilated and doesn’t get too much direct sunlight.
If your wallpaper is peeling off, don’t worry. Here are some possible solutions:
- Re-glue the edges: If only the edges of the wallpaper are peeling off, you can simply re-glue them with a small amount of glue. Use a putty knife or similar tool to gently lift the edge of the wallpaper, apply the glue, and press it back into place.
- Peel and reapply: If the peeling is more widespread, you may need to remove the entire sheet of wallpaper and reapply it. This can be a bit more time-consuming, but it’s worth it to ensure that your wallpaper stays in place.
- Consult a professional: If you’re not sure how to fix the problem yourself, or if the wallpaper damage is extensive, it’s best to consult a professional. A professional wallpaper installer can assess the situation, identify the cause, and provide you with the best solution.
In any case, it’s important to address peeling wallpaper as soon as you notice it. Ignoring the problem can make it worse, and you may end up having to replace the entire wallpaper.
3. Seams Showing
One of the most frustrating problems wallpaper installers face is seams showing after the wallpaper has been hung. Seams can be caused by a number of factors, including improper measuring and cutting of wallpaper, uneven application of glue, or poor quality wallpaper. Fortunately, there are steps you can take to prevent seams from showing.
1. Use High-Quality Wallpaper
One way to prevent seams from showing is to use high-quality wallpaper. Higher quality wallpaper typically has a thicker, more durable paper or vinyl backing that is less likely to tear or crease during the installation process. Additionally, high-quality wallpaper often has a better seam hiding capability than low-quality wallpaper.
2. Prime the Wall
Another way to prevent seams from showing is to prime the wall before hanging the wallpaper. Priming the wall can help even out any surface imperfections and create a smoother surface for the wallpaper to adhere to. This can help prevent wrinkles and air bubbles from forming, which can contribute to seams showing.
3. Use a Seam Roller
When hanging wallpaper, it is important to use a seam roller to press down on the seams and ensure they are properly sealed. This can help prevent air pockets from forming between the paper and the wall, which can cause the wallpaper to lift and the seams to show.
4. Double Cut the Seams
Double cutting the seams can help them blend together more seamlessly, making them less visible. To double cut the seams, overlap the wallpaper at the seam, cut through both layers of wallpaper, and remove the excess tape. Then, gently press the layers of wallpaper together to create a smooth, even seam.
5. Apply a Seam Adhesive
For particularly stubborn seams, or for wallpaper that is prone to showing seams, you may want to consider using a seam adhesive. Seam adhesive is a type of glue that can be applied to the edges of the wallpaper to help hold them in place and prevent them from lifting or peeling back.
Preventing seams from showing requires attention to detail and careful preparation. By using high-quality wallpaper, priming the wall, using a seam roller, double cutting the seams, and applying a seam adhesive if necessary, you can ensure that your wallpaper will look seamless and professional.
4. Difficulty in Removing Wallpaper
When it’s time to remove old wallpaper, it can be a daunting task, especially if the glue used to install the wallpaper is strong and difficult to remove. There are a few things to consider when it comes to removing wallpaper, including the type of wallpaper glue used and the condition of the wall.
Types of Wallpaper Glue and Their Removability:
| Type of Wallpaper Glue | Difficulty of Removal |
|---|---|
| Cellulose-based Wallpaper Paste | Relatively easy to remove with warm water and a scraper. However, it may require a few applications to completely remove all the glue residue. |
| Vinyl over Vinyl Adhesive | Difficult to remove. The adhesive is very strong, which is why it’s often used in high traffic areas. Removal may require the use of a wallpaper steamer and a scraper. |
| Pre-Mixed Wallpaper Adhesive | Similar to cellulose-based wallpaper paste, it can be relatively easy to remove with warm water and a scraper or wallpaper removal tool. |
| Wheat-based Wallpaper Adhesive | Like cellulose-based wallpaper paste, it is relatively easy to remove with warm water and a scraper. However, it may require several applications to remove the glue residue completely. |
| Heavy Duty Wallpaper Paste | This type of wallpaper glue is designed to withstand moisture and is therefore resistant to removal. A wallpaper steamer and scraper may be required to remove it from the wall. |
| Clay-based Wallpaper Adhesive | Clay-based wallpaper adhesive is water-soluble, which makes it relatively easy to remove with warm water and a scraper. However, it may still require multiple applications to remove it completely. |
Tips for Removing Wallpaper Glue:
– Always test a small, inconspicuous area before beginning to remove wallpaper glue to determine the best course of action for removal.
– Use a wallpaper steamer to soften the glue and make it easier to remove.
– Use warm water and a scraper or removal tool to remove the glue residue.
– If the glue is particularly stubborn, a strong wallpaper glue remover solution may be necessary.
– Be gentle when removing wallpaper glue to avoid damaging the wall surface.
The difficulty of removing wallpaper glue depends on the type of adhesive used. Some wallpaper adhesives require simple removal methods such as warm water and a scraper, while others require more intensive methods such as a wallpaper steamer or a strong chemical solution. It’s essential to assess the situation and use the appropriate removal method to avoid damaging the wall surface and make removal as easy as possible.
Conclusion
After learning about the different types of wallpaper glue and the various factors to consider when choosing the right one for your wallpaper project, it’s clear that the choice of glue can make a big difference in the outcome of your efforts.
Ultimately, it’s important to find the right glue that fits both the type of wallpaper and the conditions of your walls. Some wallpaper types require specific types of glue, such as vinyl wallpapers that require vinyl adhesive, while other wallpaper types like traditional papers may work well with a wheat-based or cellulose-based paste.
In addition, wall conditions can also play a significant role in determining the effectiveness of the glue, so it’s important to make sure you take note of factors like temperature and humidity levels before choosing a glue for your wallpaper project.
When following the step-by-step guide and applying the chosen glue, it’s best to take your time and make sure you follow each step carefully to ensure the best outcome. Whether you are gluing a whole room or just a small section, paying attention to detail can make the process go more smoothly and help prevent common problems like bubbling or peeling wallpaper.
In conclusion, by taking the time to understand the different types of wallpaper glue and the various factors to consider, you can make an informed decision and select the right glue for your wallpaper project. With proper application and attention to detail, you can achieve a beautifully finished look that will last for years to come.
Frequently Asked Questions
1. How do I know which type of wallpaper glue I need?
You should consider the type of wallpaper you are using and the condition of your walls. Each type of glue has its own unique properties and is best suited for certain types of wallpaper or wall conditions.
2. Can I use regular glue for wallpaper?
No, regular glue is not suitable for adhering wallpaper. It is important to use a wallpaper-specific glue to ensure proper adhesion and to avoid damage to your walls.
3. How long does it take for wallpaper glue to dry?
The drying time varies depending on the type of glue, as well as the humidity and temperature conditions of the room. Typically, most wallpaper glues take between 24-48 hours to dry completely.
4. Does wallpaper glue have an expiration date?
Yes, most wallpaper glues have an expiration date. It is important to check the date before using the glue to ensure it is still effective.
5. Can I apply wallpaper directly to painted walls?
It depends on the condition of the painted walls. If the walls are smooth and in good condition, you can apply wallpaper directly to them. However, if the walls are rough or have cracks or holes, it is recommended to remove the paint and prepare the walls before applying wallpaper.
6. How do I remove wallpaper that has been glued directly to the wall?
Removing wallpaper that has been glued directly to the wall can be difficult. It is recommended to use a wallpaper steamer and a scraper to remove the wallpaper. Apply steam to the wallpaper for several minutes, and then scrape it off with the scraper.
7. Can I use wallpaper glue for other DIY projects?
Yes, wallpaper glue can be used for other DIY projects such as decoupage, book binding, and papier-mâché.
8. Can I paint over wallpaper glue?
No, it is not recommended to paint over wallpaper glue. The glue could interfere with the adhesion of the paint, and the paint could also react with the glue and cause damage to the walls.
9. How can I avoid wallpaper bubbles?
To avoid wallpaper bubbles, make sure to apply the glue evenly and smoothly, and to work your way from the center of the wallpaper to the edges to remove any air pockets. Use a smoothing tool to flatten the wallpaper as you go.
10. How long will wallpaper last once it is installed?
The lifespan of wallpaper can vary depending on several factors such as the type and quality of the wallpaper, the condition of the walls, and the level of foot traffic in the room. Generally, wallpaper can last anywhere from 5-15 years if it is properly installed and maintained.