Have you ever wondered what it means to cure glue? Are you perplexed about why curing is so important when using different types of adhesives? Look no further! In this comprehensive guide, we’ll explain everything you need to know about curing glue. From the different types of glue and their curing processes to tips for achieving a strong bond, we’ve got you covered. So sit back, relax, and let’s dive into the world of curing glue.
What is Curing?
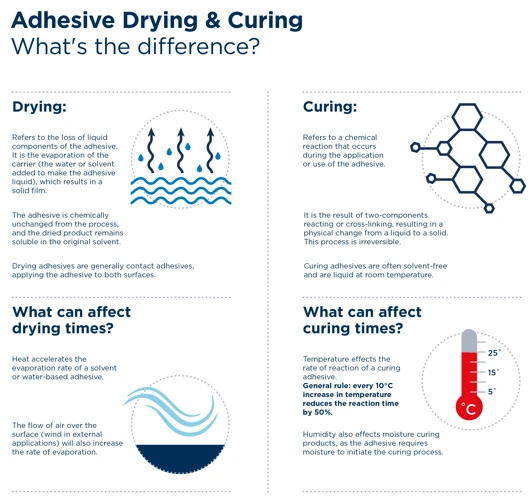
When it comes to adhesives, “curing” is a term that is often used but not always understood. Curing is a crucial step for many adhesives, including glue, that involves hardening the adhesive to create a strong bond. Essentially, it is the process that transforms the glue from a liquid or a gel-like substance to a solid state. Knowing more about what curing entails and why it is important can help you to make better decisions about which adhesives to use for different projects. In this section, we’ll take a closer look at what curing is and how it works.
Reasons for Curing
Curing of glue is important for ensuring that the adhesive material is fully bonded to the surfaces it’s intended to join. The reasons for curing are:
- Strengthens Bond: Curing hardens the glue and makes it stronger, providing a proper bond between two surfaces. The curing process gives time to the adhesive to penetrate the fibers of the surfaces, establishing a strong and lasting bond.
- Waterproofing: Most glues become waterproof after curing. For example, PVA glues are water-soluble before curing, but after curing, they become water-resistant. Curing increases the durability of the adhesive and makes it ideal for use on outdoor items.
- Heat and Chemical Resistance: Cured glue can withstand high temperatures and is resistant to chemicals, making it ideal for use in the manufacturing of electronic components, automotive parts, and other industrial applications.
- Prevents Movement: Curing prevents movement and dislodging of the glued objects. If you don’t allow the glue to cure properly, it will not hold the surfaces together, and it can cause them to move or separate.
- Enhance Paintability: Cured glue makes it easy to paint over the surfaces. If the glue is not cured, it can react with the solvents in the paint and ruin the finish.
- Prevent Shrinkage: Some types of glue have a tendency to shrink as they dry. The curing process of the glue ensures that the glue doesn’t shrink, which can cause cracks and gaps between the surfaces.
Ensuring the proper curing of glue is important for the success of any project. If you’re not sure about the curing process of the glue you’re using, you can refer to the manufacturer’s instructions on the product label or seek professional guidance.
Curing Time
Curing time is a crucial factor that must be considered when using glue in any project. It refers to the time that the glue takes to fully dry and harden, creating a strong bond between the surfaces to which it was applied. Depending on the type of glue and the conditions under which it was applied, curing time can vary significantly.
Below is a table that shows the average curing time for some common types of glue:
| Type of Glue | Average Curing Time |
|——————|—————————–|
| PVA glue | 1-4 hours |
| Cyanoacrylate glue| 10-30 seconds|
| Epoxy glue | 5-60 minutes|
| Polyurethane glue| 2-24 hours |
| Acrylic glue |24 hours |
It is important to note that the curing time may vary depending on the amount of glue applied, the type of material being bonded, and the temperature and humidity of the environment. For example, in a colder and more humid atmosphere, the curing time may take longer.
It is recommended to follow the manufacturer’s instructions for the specific type of glue being used to ensure the best result. It is also important to leave the glued surfaces undisturbed during the curing process, and avoid touching or placing any object on the glued surface before it is fully cured.
If you desire to learn more about glue curing, check out our article on ‘How to Glue Photos to Glass‘.
Factors Affecting Curing Time
When it comes to curing glue, many factors can affect the time it takes for the glue to fully harden. These factors include:
- Type of glue: Different types of glue have different chemical compositions, which can affect their curing time. For example, PVA glue may have a shorter curing time compared to epoxy glue.
- Amount of glue used: Applying too much glue can result in a longer curing time as there is more material to harden.
- Curing temperature and humidity: Higher temperatures and humidity levels can speed up the curing process, while colder temperatures and low humidity can slow it down.
- Material being glued: Some materials, such as wood, may absorb water from the glue, which can affect the curing time.
- Application method: Applying glue in thin layers can result in a faster curing time compared to thicker layers.
- Presence of air: Air can help to speed up the drying process, but too much air can slow it down.
It is important to take these factors into consideration when using glue to ensure that the curing process takes place efficiently and effectively. By understanding how these factors can affect curing time, individuals can take steps to ensure that their glue bonds are as strong as possible. If you want to learn about ‘What is glue crawler?’ follow the link.
Types of Glue and Their Curing Process
Understanding the types of glue and their curing process is important for efficient and effective bonding. Different types of glue have unique characteristics that affect their curing process. By choosing the right type of glue for your project and properly understanding its curing process, you can ensure a strong and lasting bond. In the following sections, we’ll discuss the most common types of glue and their curing process, including PVA glue, cyanoacrylate glue, epoxy glue, polyurethane glue, and acrylic glue. Whether you’re working on a craft project, woodworking, or repairing an item, this guide will help you understand how to choose the right glue and properly cure it for optimal results.
PVA Glue
PVA glue, also known as white glue or school glue, is a water-based adhesive that consists of polyvinyl acetate particles in an aqueous emulsion. This type of glue is widely used in crafts, paper mache, bookbinding, and woodworking, among other applications. PVA glue is known for its ease of use, low toxicity, and affordability.
Curing Process: PVA glue cures by evaporation of water. After applying PVA glue to the surface, the water evaporates, and the glue dries. The drying time can vary depending on the thickness of the glue layer, humidity, and temperature.
Clamping: In most cases, clamping is not required for PVA glue. However, it can be useful when gluing large or heavy objects or when working with uneven surfaces.
Curing Time: PVA glue typically dries in 30 minutes to one hour and reaches full strength in 24 hours.
Curing Temperature and Humidity: PVA glue cures best at room temperature (around 70°F) and moderate humidity. High humidity can slow down the drying process, while low humidity can cause the glue to dry too quickly.
Advantages: PVA glue has several advantages, including its low toxicity, ease of use, and affordability. It is available in different formulations, such as washable and waterproof. PVA glue is also easy to clean up with water.
Disadvantages: PVA glue is not suitable for high-stress applications. It can become brittle over time and may not be suitable for outdoor use. It also has poor heat resistance and is not suitable for gluing materials that will be exposed to high temperatures.
To learn more about different types of glue and their applications, check out our article on What is Glue?
Cyanoacrylate Glue
Cyanoacrylate glue, commonly known as super glue, is a type of adhesive that cures quickly. Its curing time is usually between 10 to 30 seconds. This type of glue is perfect for fixing broken objects, especially those made of plastic and metal. It works by creating a strong bond between the two surfaces when it comes in contact with moisture in the air.
When using cyanoacrylate glue, it is important to note that it is a flammable substance and should be used in a well-ventilated area. It is also essential to wear gloves to prevent it from adhering to your skin.
To ensure the bond is successful, it is important to prepare the surfaces properly before gluing them together. Make sure to clean the surfaces thoroughly, removing any dirt or dust present. A good way to clean the surface is with rubbing alcohol or acetone.
Table: Comparison of Cyanoacrylate Glues
| Product Name | Curing Time | Application |
|---|---|---|
| Loctite Super Glue Liquid | 10-30 seconds | Bonds non-porous surfaces like plastic, rubber, and metal |
| Krazy Glue All Purpose | 10-20 seconds | Fixes ceramic, metal, plastic, and wood |
| Gorilla Super Glue Gel | 10-20 seconds | Ideal for vertical surfaces and bonds metal, ceramic, plastic, and wood |
It is important to note that cyanoacrylate glue can discolor some materials, especially when exposed to UV light. So, it is important to apply it carefully and sparingly.
Another thing to keep in mind when using cyanoacrylate glue is that it is not waterproof. So, using it on items that will be exposed to water may cause the bond to weaken or break over time.
Cyanoacrylate glue is a great adhesive to use when a quick bond is needed. It is essential to use it correctly and take the necessary safety precautions. When using any type of adhesive, always follow the manufacturer’s instructions carefully.
Epoxy Glue
Epoxy glue, also known as two-part epoxy, is a strong adhesive that bonds materials such as metal, wood, plastic, ceramic, and glass. It consists of two components, consisting of a resin and a hardener, that must be mixed together prior to application. Epoxy glue is preferred in situations where maximum bonding strength is required.
Advantages of Epoxy Glue
Epoxy glue has several advantages, which include its high bonding strength, durability, resistance to chemicals, and water-resistant properties. It is also a great gap filler, which means it can be used to fill spaces between materials that need to be bonded together.
Disadvantages of Epoxy Glue
Although epoxy glue is a highly effective adhesive, it also has some disadvantages. One of which is that it can be messy to work with, due to the mixing process of the two components. Additionally, it requires a longer curing time compared to other types of glue. Once the two components are mixed together, they begin to cure and must be used within a specific timeframe.
Application of Epoxy Glue
Before applying epoxy glue, it is important to prepare the surface area properly. The surface should be clean, dry, and free of debris. Once the surface is prepared, the two components of epoxy glue should be mixed together according to the manufacturer’s instructions. It is important to mix the right proportions of each component, as not doing so may affect the strength of the bond.
Epoxy glue can be applied using a brush or a stick to the surfaces that need to be bonded together. After applying the glue, the surfaces should be clamped together to ensure a strong bond. The curing time for epoxy glue can vary depending on factors such as temperature and humidity.
| Pros | Cons |
|---|---|
| High bonding strength | Messy to work with |
| Durable | Requires a longer curing time |
| Resistance to chemicals | |
| Water-resistant |
If you come across the need to glue vellum paper to glass, it is recommended to use epoxy glue. For more information on how to apply PVA glue for paper mache, visit this guide.
Polyurethane Glue
Polyurethane glue, also known as PU glue, is a moisture-activated adhesive that comes in both one-part and two-part formulations. One-part polyurethane glue reacts with moisture in the air while the two-part glue requires a mixture of catalyst and resin to activate the curing process. It creates a strong, water-resistant bond, making it ideal for outdoor applications, as well as bonding materials together that are difficult to glue with other adhesives.
Advantages:
- Water-resistant
- Creates a strong and permanent bond
- Can fill gaps and spaces due to its expansion properties
- Can be used on a wide range of surfaces including wood, plastic, metal, ceramic, and more
- Excellent bonding strength
- Dries relatively quickly compared to other glues and adhesives
Disadvantages:
- Once cured, it’s difficult to remove
- Requires proper ventilation due to the fumes and vapors it releases during the curing process
- The application is more complicated compared to other glues
- Expensive compared to other glues
- May stain or discolor some surfaces
When working with polyurethane glue, it’s essential to apply it properly. Firstly, it’s vital to make sure that the surface is clean and dry. Any moisture or dirt on the surface will negatively affect the bond. Secondly, polyurethane glue needs to be used in a well-ventilated area due to the strong fumes it releases.
Moreover, polyurethane glue should be applied in thin layers as it expands during the curing process. Applying too much glue can result in the glue overflowing or creating a weak bond. The surfaces being bonded should be clamped or weighted down during the curing process to maintain a strong and permanent bond. The curing time for polyurethane glue is typically between 24 and 48 hours, depending on the temperature and humidity.
Polyurethane glue is a common type of adhesive that works by reacting with moisture. It creates strong, durable bonds that are water-resistant and can be used on various surfaces. When working with polyurethane glue, it’s essential to follow the recommended guidelines carefully to ensure a strong and permanent bond.
Acrylic Glue
Acrylic glue, also known as acrylic adhesive, is a type of glue that is particularly popular among DIYers and professionals alike. It is a versatile glue that can be used for various applications such as bonding plastic, metal, glass, and wood. Acrylic glue forms a strong and durable bond that is resistant to water, weather, and chemicals.
Here are some properties and characteristics of acrylic glue that you should know:
- Fast-curing: Acrylic glue hardens quickly, typically within 5 to 20 minutes.
- High-strength: Acrylic glue creates a strong and durable bond that is resistant to impact, moisture, and temperature changes.
- Clear: Acrylic glue dries clear, making it ideal for applications where aesthetics are important.
- Solvent-based: Acrylic glue is solvent-based, which means it requires good ventilation when using it to avoid inhaling fumes.
- Easy to apply: Acrylic glue can be applied using a brush, roller, or spray gun.
One downside of acrylic glue is that it is not always the best choice for bonding materials with different coefficients of thermal expansion. This can lead to the glue failing after prolonged exposure to heat or cold. In such cases, an epoxy glue is a better alternative.
To use acrylic glue, the surface area should be clean and dry. Apply a thin layer of glue to one surface and press the two surfaces together firmly. Clamping the materials together will help ensure a strong bond. The curing time can be affected by factors such as humidity and temperature. It is best to follow the manufacturer’s guidelines for the recommended curing time.
Reference Anchor: If you need help on how to glue vellum paper to glass, check out our tutorial here.
Tips for Curing Glue
When it comes to curing glue, there are a few tips and techniques that can make the process smoother and more effective. Whether you’re using PVA, cyanoacrylate, or epoxy glue, there are certain steps you can take to ensure that the glue sets properly and creates a strong bond. In this section, we’ll explore some of the top tips for curing glue, including cleaning the surface area, applying the glue correctly, and using clamping techniques to hold the materials in place. By following these guidelines, you can ensure that your projects turn out looking their best and lasting their longest. For example, if you want to know how to glue vellum paper to glass, make sure to check out our guide on the topic.
Cleaning Surface Area
When it comes to curing glue, cleaning the surface area before application is crucial. Proper surface preparation ensures that the glue adheres well to the surfaces and yields strong joints. Before starting the cleaning process, ensure that you have all necessary cleaning tools such as a clean rag, alcohol, sandpaper, and a brush.
| Step 1: | Remove any loose particles, dust, or debris from the surface area using a brush or a clean rag. This will help the glue to adhere properly to the surfaces. |
| Step 2: | Clean the surface area with alcohol wipes or an alcohol-soaked rag to remove any impurities that might hinder the glue from adhering. Ensure that you are thorough with the cleaning process. |
| Step 3: | Inspect the surfaces to ensure they are free of any impurities or contaminants. If necessary, sand the surfaces lightly to create a better surface for bonding. |
Quick Tip: If you are working with wood surfaces, ensure that the wood is free of any oils or waxes that might hinder the curing process. You can use sandpaper or a degreasing agent to remove such contaminants.
It is essential to note that the curing time of glue may vary depending on the application and environmental conditions. Hence, it is crucial to follow the manufacturer’s instructions for curing time and technique. Additionally, the temperature and humidity of the environment can affect the curing process; therefore, it is essential to keep the environment in which you are working conducive for the curing process.
Internal link: If you want to learn more about how to make goo out of glue and water, check out our related article.
Application of Glue
When it comes to applying glue, it is essential to follow the manufacturer’s instructions as closely as possible to ensure proper curing. Below is a table outlining some general tips for applying glue, and the recommended application methods for different types of glue.
| Tip | Recommended Application Method |
|---|---|
| Apply a thin layer of glue (excess glue can prolong the curing process) | Brush, roller, or spray |
| Apply glue to both surfaces being bonded (except one-part epoxy glues) | Brush, roller, or spray |
| Apply glue in a well-ventilated area (some glues can emit harmful fumes) | Brush, roller, or spray |
| Avoid applying glue in temperatures below the recommended range (can prolong curing time) | Brush, roller, or spray |
| PVA Glue: Apply a small amount of pressure to the joint being bonded after applying glue | Brush or roller |
| Cyanoacrylate Glue: Apply glue sparingly; it dries quickly and can bond skin instantly | Brush or nozzle tip |
| Epoxy Glue: Mix equal parts of resin and hardener thoroughly before applying | Brush or spatula |
| Polyurethane Glue: Apply glue to one surface and mist the other surface with water before joining | Brush, roller, or spray |
| Acrylic Glue: Apply a thin layer and clamp the materials being joined | Brush or roller |
Remember, proper application of glue is crucial to its performance and the longevity of the bond. Ensure that you follow the manufacturer’s instructions and the recommended application methods above to ensure the best result.
(Note: If you want more information about which loctite super glue is best, you can check our Loctite Super Glue Guide for a comprehensive overview.)
Clamping
Clamping is an important step in the curing process that ensures the two surfaces being glued together are held in place until the glue dries. This process also helps the glue bond more securely and reduces the risk of air bubbles forming between the surfaces. Below are some tips to consider when clamping:
- Choose the right type of clamp: There are many types of clamps available in the market, such as spring clamps, pipe clamps, and bar clamps. You should choose the right type of clamp depending on the size and shape of the objects you are gluing together.
- Apply pressure evenly: When clamping, make sure to apply even pressure on the glued surfaces to ensure that they are tightly held together. This helps the glue to set more effectively and creates a stronger bond.
- Do not over-tighten: Although it is important to apply enough pressure to create a strong bond, over-tightening can cause the glue to squeeze out of the joint and lead to weak spots. Make sure to clamp just enough so that the surfaces are held firmly in place without excessive pressure causing the glue to be pushed out.
- Use protective pads: When using clamps, it is important to protect the surface being glued. This can be done with the use of protective pads made of foam, wood, or other soft materials to prevent damage to the surface.
- Keep clamps in place for the recommended curing time: Depending on the type of glue you are using, there will be different recommended curing times. Make sure to keep the clamps in place for the entire recommended time to ensure that the bond is fully set and the glue is cured.
Proper clamping is essential for creating a strong bond between the two surfaces being glued together. By following these tips, you can ensure that your clamping process is effective and helps the glue bond more securely. For more information on glue and its different uses, you can check out our article on how to get paper glue.
Curing Time
Curing Time is a crucial factor that determines the strength and effectiveness of glue. It refers to the time taken by the glue to reach its maximum strength after it has been applied. The curing time can vary depending on the type of glue, the temperature, humidity, and other external factors. Understanding the curing time of the glue is important to achieve the best results.
To give you an idea of the curing time of different glues, here is a table that shows the average curing time of popular types of glue:
| Type of Glue | Average Curing Time |
|---|---|
| PVA Glue | 24 hours |
| Cyanoacrylate Glue | 10-30 seconds |
| Epoxy Glue | 5-7 minutes |
| Polyurethane Glue | 1-12 hours |
| Acrylic Glue | 24-48 hours |
It’s important to note that these are just average curing times and may vary depending on the specific brand of glue and external factors.
PVA Glue is a popular type of glue that is used in woodworking, paper crafts, and other applications. It has a relatively long curing time of 24 hours, making it ideal for projects that don’t require quick adhesion.
Cyanoacrylate Glue, also known as super glue, is a fast-setting adhesive that bonds quickly and strongly. It has an average curing time of 10-30 seconds, making it ideal for small-scale repairs and projects.
Epoxy Glue is a two-part adhesive that sets quickly and forms a strong bond. It has an average curing time of 5-7 minutes, making it ideal for projects that require fast adhesion.
Polyurethane Glue is a versatile adhesive that bonds well to a variety of surfaces. It has a curing time that can vary from 1-12 hours, depending on the specific brand and environmental factors.
Acrylic Glue is a water-based adhesive that is used in a variety of applications, including woodworking, metalworking, and plastic bonding. It has an average curing time of 24-48 hours, making it ideal for projects that require a strong, long-lasting bond.
It’s important to follow the manufacturer’s instructions for curing time, as well as environmental factors such as temperature and humidity. In some cases, you may need to wait longer for the glue to cure properly, particularly if you are working in a humid or cold environment.
If you’re unsure about the curing time of a specific brand of glue, you can check the manufacturer’s website or packaging for more information. And, if you’re looking for tips on how to make a fun and easy DIY project using glue and water, check out our article on “How to Make Goo out of Glue and Water“.
Curing Temperature and Humidity
Curing temperature and humidity are important factors to consider for the curing process of glue. The ideal temperature range for most glues is between 60-80 degrees Fahrenheit, but this can vary based on the type of glue being used. It’s important to make sure that the temperature remains fairly constant throughout the curing process to ensure that the glue dries properly.
Humidity also plays a critical role in the curing process of glue. High levels of humidity can slow down the curing process, while low humidity can speed it up. The ideal humidity range for curing glue is between 40-60% relative humidity. When the humidity is too high, it can cause the glue to become tacky, which can result in a weak bond. On the other hand, if the humidity is too low, it can cause the glue to dry too quickly, resulting in a bond that is not as strong as it should be.
To help you understand how temperature and humidity can affect the curing process, let’s take a look at the following table:
| Temperature | Humidity | Curing Time | |
|---|---|---|---|
| PVA Glue | 60-80°F | 40-60% | 24-48 hours |
| Cyanoacrylate Glue | 60-75°F | 30-50% | 3-5 minutes |
| Epoxy Glue | 70-80°F | 50-60% | 24 hours |
| Polyurethane Glue | 60-80°F | 40-60% | 24-48 hours |
| Acrylic Glue | 60-80°F | 40-60% | 24-48 hours |
As you can see, the curing time for each type of glue can vary based on the temperature and humidity levels. It’s important to pay attention to these factors to ensure that the glue dries properly and forms a strong bond. If you’re working on a project that requires specific temperature and humidity levels, it may be helpful to use a hygrometer and thermometer to monitor the conditions.
Curing temperature and humidity are important factors to consider when working with glue. By understanding how these factors can affect the curing process, you can ensure that your glue dries properly and forms a strong bond. Remember to check the recommended curing time and conditions for the type of glue you’re using to achieve the best results.
Curing Techniques
Curing techniques greatly affect the quality and strength of the bond formed, as well as the curing time. Here are some curing techniques to consider:
- Air Drying: This method involves allowing the glue to dry in normal atmospheric conditions. The curing time depends on the type of glue, as well as the humidity, temperature, and ventilation of the room. For example, PVA glue dries relatively quickly and can take up to 24 hours to cure. On the other hand, epoxy glue can take up to 48 hours to cure. If you are unsure of the curing time of a particular glue, it is best to wait for it to dry fully before using the glued material.
- Infrared Curing: Infrared curing involves using infrared radiation to speed up the curing process. This method is particularly useful in industrial settings where there is a need for fast curing times. However, it is not recommended for use at home, as infrared radiation can be harmful if not handled properly and can lead to uneven curing.
- Heat Curing: Heat curing involves exposing the glued material to high temperatures to speed up the curing process. This method is particularly effective for certain types of glue, such as cyanoacrylate glue, which cure faster under high temperatures. However, it is important to follow the manufacturer’s instructions carefully to avoid damaging the material being glued. Overheating the material can cause it to warp, bubble or even catch fire in some cases.
- Pressure Curing: Pressure curing involves applying pressure to the glued material to improve the strength and quality of the bond formed. This method is particularly useful for PVA glue, which benefits from being clamped together until it is completely cured. When clamping, it is important to apply enough pressure to ensure that the glue is spread evenly but not too much so as to prevent damage to the material being glued.
It is important to note that curing techniques vary depending on the type of glue used. Following the manufacturer’s instructions and using the appropriate curing method can ensure that the bonds formed are strong and long-lasting. For more information on curing time, you can refer to “How Long Does Carpet Glue Take to Dry?” or if you need information on what glue to use for vertical blinds, read “What Glue to Use to Shorten Vertical Blinds“.
Common FAQs about Curing Glue
As with any task or process, questions may arise. Curing glue is no exception. It can be confusing to know exactly what to do to ensure the best results. Don’t worry, we’ve got you covered! Below we have compiled a list of frequently asked questions about curing glue, along with their answers. Continue reading to learn more.
What Happens If I Don’t Wait for the Glue to Cure?
If you don’t wait for the glue to cure properly, it can result in several problems. To highlight a few, we have mentioned them below using bullet points for a better understanding:
- Weakened bond: The bond formed between the two surfaces will not be as strong as it should be. As a result, the glue joint may break easily, leading to a failed project.
- Loss of adhesion: Rushing the process can cause the glue to lose its adhesion properties. The adhesive will not stick to the surface properly, making it prone to peeling off.
- Damage to the project: Un-cured glue may still be wet or sticky, making it easy to get stuck on other surfaces. As a result, it can damage the project or other things it comes in contact with.
- Increased curing time: If the glue is disturbed or moved before it’s cured completely, it can lead to an extended curing time. You’ll have to wait more than usual for it to dry and cure properly.
- Poor finish: When you don’t wait for the glue to cure properly, it can affect the finish of the project. It can also result in bumps, wrinkles, or rough surfaces, making it look unprofessional and messy.
It’s crucial to give enough time to the glue for proper curing to ensure a strong and durable bond. Rushing the process can lead to potential dangers and harm. So, waiting for the glue to cure is always worth it in the long run.
How Long Should I Wait for the Glue to Cure?
The curing time of glue largely depends on the type of glue being used and the conditions in which it is being used. Here are some general estimates for different types of glue:
- PVA Glue: Typically, PVA glue takes between 18-24 hours to fully cure.
- Cyanoacrylate Glue: This type of glue cures very quickly, usually within a few seconds to a few minutes.
- Epoxy Glue: Epoxy glue can take anywhere from 5 minutes to 24 hours to fully cure, depending on the specific product and conditions.
- Polyurethane Glue: Polyurethane glue may take between 1-24 hours to cure completely.
- Acrylic Glue: Acrylic glue typically dries within 24 hours but may continue to cure for up to 72 hours.
It is important to note that these estimates are not set in stone and may vary depending on factors such as temperature, humidity, and the thickness of the layer of glue being used. Additionally, different brands of glue may have different curing times, so be sure to read the manufacturer’s instructions carefully.
Remember: It is always better to wait a little longer than risk compromising the strength and integrity of the bond by removing the clamps or putting stress on the glued material too soon.
What Factors Affects Curing Time of the Glue?
The curing time of glue can be affected by various factors. Here are the key factors that can affect the curing time of glue:
- Type of Glue: Different types of glue have different curing times. For instance, PVA or white glue dries faster than other types of glue, such as epoxy or polyurethane.
- Temperature: The temperature of the surrounding environment can significantly affect the curing time of glue. High temperatures can speed up the curing process, while low temperatures can slow it down.
- Humidity: Humidity levels can also affect the curing time of glue. Glue cures slower in humid environments, and faster in drier environments.
- Surface Area: The surface area that is being glued can also affect the curing time. A larger surface will have a longer curing time as there is more area to dry.
- Application Method: The way you apply the glue can also affect the curing time. Thick layers of glue take longer to cure than thin layers.
- Age of the Glue: The age of the glue can also play a role in curing time. Old glue may have a longer curing time compared to new glue.
It is important to consider these factors while working with glue. By controlling these factors, you can ensure that the glue dries quickly and binds the surfaces effectively. It is recommended to follow the manufacturer’s instructions for optimal curing time.
Can I Speed up the Curing Time of Glue?
Speeding up the curing time of glue can be tempting, especially when you’re working on a project with a strict deadline. However, it’s important to note that the curing time of glue is determined by several factors, including the type of glue, the surface area, and the environmental conditions. Here are some tips to help you speed up the curing time of glue:
- Use a heat source: Applying heat to the glued surface area can accelerate the curing time of some types of glue, such as epoxy and polyurethane. However, it’s important to note that excessive heat can also cause the glue to lose its strength, so be cautious when using this method.
- Reduce humidity: High humidity can slow down the curing time of glue. Using a dehumidifier or air conditioning can help reduce the humidity in the room and speed up the curing process.
- Use a catalyst: Some types of glue, such as cyanoacrylate and polyester resin, can be activated with a catalyst to speed up the curing process. However, it’s important to follow the manufacturer’s instructions when using a catalyst as using too much can cause the glue to become brittle or weak.
- Apply thinly: Applying glue thinly can help reduce the curing time as it reduces the amount of material that needs to cure. However, it’s important to ensure that the glue is still able to form a strong bond.
It’s important to keep in mind that while these methods can help speed up the curing time of glue, they can also affect the overall strength and quality of the bond. It’s always best to follow the manufacturer’s instructions and allow the glue to fully cure according to its recommended time frame for optimal results.
What Happens When Glue is Over-Cured?
Over-curing of glue can lead to various issues that can have a negative impact on the overall strength and durability of the bond. When glue is over-cured, it means that it has been left to cure for a longer time than necessary or subjected to higher temperature and humidity than recommended.
| Issues Caused by Over-curing | Why It Occurs |
|---|---|
| Brittleness and Cracking | The chemical bond that holds the glue together becomes too strong and rigid, causing the material to become brittle and prone to cracking under stress. |
| Reduced Bond Strength | Excessive curing can cause the glue to shrink, which can result in gaps or voids in the bond line. This, in turn, can significantly weaken the bond strength and make it more prone to failure. |
| Difficulty in Sanding or Cutting | Over-cured glue can become extremely hard and difficult to sand or cut, making it challenging to work with and potentially damaging the surrounding material. |
| Discoloration or Yellowing | Some types of glue, such as epoxy, can discolor or yellow when subjected to excessive curing, leading to an unsightly and unappealing appearance. |
| Reduced Viscosity | Over-curing can cause the glue to become too viscous or thick, making it difficult to apply and potentially resulting in an uneven bond. |
It is important to follow the recommended curing time and temperature guidelines for each type of glue to ensure that the bond is strong and durable. While it may be tempting to speed up the curing process, doing so can have significant negative effects on the final result. If you suspect that your glue has been over-cured, it may be best to remove the bond and start again with fresh glue.
Can I Sand/Cut the Glued Material before the Glue is Fully Cured?
Can I Sand/Cut the Glued Material before the Glue is Fully Cured?
This is a very common question when it comes to using glue. The short answer is no, you should not sand or cut glued material before the glue is fully cured. Doing so can compromise the bond between the materials and cause them to separate.
Glue curing time depends on several factors such as temperature, humidity, and the type of glue used. However, on average, most glue types take around 24 to 48 hours to cure completely.
While it may be tempting to sand or cut glued material before the curing time is up, rushing the process can result in several problems. The glue may not be strong enough to hold the materials together, which can cause the bond to fail when exposed to stress.
Additionally, sanding or cutting the glued material before the glue is fully cured can cause the materials to shift or move, which can lead to misalignment and a weaker bond.
In some cases, partially cured glue can gum up the sandpaper or blade, making it difficult to get a smooth finish. This can result in scratches on the surface or even damage to the materials being glued.
It is always best to wait until the glue is fully cured before sanding or cutting the glued material. This ensures a strong bond and prevents the risk of damaging the materials.
| Question: Can I sand/cut the glued material before the glue is fully cured? | Answer: No, you should wait until the glue is fully cured before sanding or cutting the glued material. |
| Why should I wait until the glue is fully cured? | Partially cured glue may not be strong enough to hold the materials together, which can cause the bond to fail when exposed to stress. Additionally, sanding or cutting the glued material before the glue is fully cured can cause misalignment and a weaker bond. |
| What could happen if I sand or cut glued material before it is fully cured? | It can cause the materials to shift or move, lead to misalignment and a weaker bond. In some cases, partially cured glue can gum up the sandpaper or blade, making it difficult to get a smooth finish. This can result in scratches on the surface or even damage to the materials being glued. |
In the end, proper curing time is crucial for the success of any project involving glue. While it may require some patience to wait for the glue to cure fully, the result will be a strong and durable bond that can withstand even the toughest conditions.
Conclusion
In conclusion, understanding the curing process of glue is crucial in ensuring the strength and durability of the bond. Waiting for the glue to fully cure is necessary for achieving maximum bond strength. Rushing the process can result in weaker bonds or even failure of the bond altogether.
Different types of glue have different curing times and require different curing techniques, and it’s important to follow the manufacturer’s instructions for the specific type of glue being used.
Factors such as temperature and humidity can also affect the curing time of the glue, and these should be taken into account when planning and executing a project involving glue.
Proper surface preparation, application, and clamping techniques can also greatly impact the quality of the bond and the efficiency of the curing process.
In summary, curing glue is an important and often overlooked step in achieving strong, durable bonds. By understanding the factors that affect curing time and the proper techniques for curing different types of glue, you can achieve the best results for your project. Remember to always follow the manufacturer’s instructions and exercise caution when working with glue.
Frequently Asked Questions
What is the main purpose of curing glue?
The main purpose of curing glue is to allow it to reach maximum strength and ensure a strong bond between materials.
How long does it take for glue to cure?
The curing time can vary depending on the type of glue, but it typically takes a few hours to several days for glue to fully cure.
What are the factors that affect curing time?
The curing time of glue can be affected by humidity, temperature, and the type of material being bonded.
Can I speed up curing time?
Yes, you can speed up curing time by increasing the temperature and humidity in the curing area or by using an accelerator or hardener.
What happens if I don’t wait for the glue to fully cure?
If you don’t wait for the glue to fully cure, the bond between materials may not be strong enough and could fail when under stress or pressure.
Can I sand or cut the glued material before the glue is fully cured?
It’s not recommended to sand or cut the glue before it’s fully cured as it could cause the bond to weaken or break.
What is the difference between PVA glue and epoxy glue’s curing process?
PVA glue cures by evaporation while epoxy glue cures through a chemical reaction and requires a hardener for full curing.
How important is cleaning the surface area before applying glue?
It’s crucial to clean the surface area before applying glue as dirt, dust, and oils can reduce the bond strength or prevent the glue from curing properly.
What’s the best curing technique for PVA glue?
The best curing technique for PVA glue is to clamp the materials together for at least an hour to ensure a strong bond.
What happens when glue is over-cured?
When glue is over-cured, it can become brittle and lose its strength, making it more prone to breakage or failure.