Have you ever seen a beautifully crafted piece of furniture or built-in shelves and wondered how it’s made? One important aspect of woodworking is gluing up panels. It may seem simple, but it’s actually a meticulous process that requires attention to detail. In this guide, we’ll show you how to glue up panels step by step, from preparing the wood to clamping the panels and finishing them. You’ll also learn about the different types of glue and clamps, and how to choose the right ones for your project. So, grab your tools and let’s get started!
What You’ll Need
Before starting your panel glue-up project, you need to gather all the necessary items to ensure a smooth and successful process. This will help you avoid any unnecessary interruptions or delays. In this section, we’ll go through the materials and tools you need. Make sure you have everything ready to start your project. You don’t want to be halfway through and realize you’re missing something essential. Let’s get started!
Materials
To successfully glue up panels, you’ll need to have the right materials at your disposal. Here are the materials that you’ll need to gather:
| Material | Description |
| Wood | The type of wood is up to personal preference and project requirements. Make sure it is prepped and ready for gluing. |
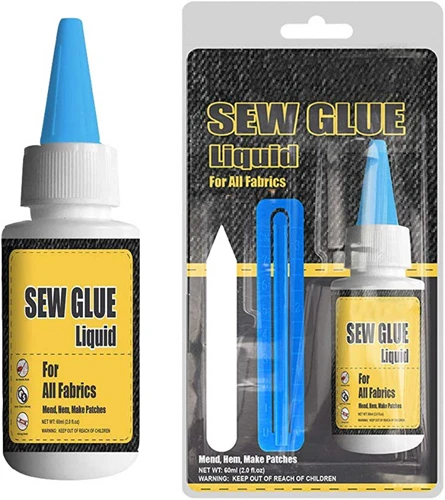
| Glue | Choose a high-quality wood glue, such as Titebond III, that is appropriate for your project. |
| Glue sticks | If using a hot glue gun, make sure you have enough glue sticks to complete the project. |
| Wood shims | Used to adjust the flatness of your panel during clamping. |
| Clamps | You’ll need enough clamps to create even pressure across the entire panel during clamping. |
| Wood filler | Used to fill any gaps or imperfections in the panel after gluing. |
| Sanding block | Used to prepare the wood surface for jointing and planing, and to sand the panel after gluing. |
| Glue gun | If using a hot glue gun, make sure it is in good working condition. |
Make sure you have all of these materials ready and at hand before beginning the gluing process. The right materials can make all the difference in achieving a high-quality glue up.
Tools
To prepare for gluing up panels, you will need a few essential tools to ensure your panels are properly aligned and secure during the process. Here are the tools you’ll need:
- Clamps: You’ll need a sufficient number of clamps to apply even pressure across the panel. The rule of thumb is to have one clamp for every foot of panel length.
- Cauls: Cauls are used to distribute clamp pressure and keep the panel flat during glue-up. You can make your own caul with scrap wood or purchase pre-made cauls from woodworking stores.
- Glue: Depending on the project, you may need different types of glue. For panel glue-up, most woodworkers use PVA glue, also known as white or yellow glue.
- Glue roller or brush: A glue roller or brush is used to apply the glue evenly onto the wood surface.
- Glue scraper: You’ll need a glue scraper to remove any excess glue from the panel before it dries.
- Jointer and planer: A jointer is used to create even edges, while a planer is used to create even thickness. These tools are crucial to ensure a tight fit between the panels.
- Sandpaper: Sandpaper is used to smooth out the wood surface after jointing and planing, ensuring that the panels fit together seamlessly.
Having all the right tools available can make your panel glue-up process much smoother and give you professional-looking results. Now that you know what tools you’ll need, it’s time to prepare the wood for gluing up panels.
Preparing the Wood
One of the essential steps in achieving strong and durable paneling is preparing the wood. Before applying glue and clamping, the wood needs to be properly jointed, planed, and sanded. These steps ensure that the panels fit perfectly and create a smooth surface for gluing. Poorly prepared wood can affect the quality of the final product, leading to cracks, gaps, or even breaks. So, grab your materials and tools and get ready to prepare your wood for gluing. And don’t worry, we won’t be making hot glue mushrooms, using glue to put balloons on walls, or discussing glue for chipboards or upholstery foam in this guide. Instead, we’ll focus on the traditional way of gluing wood panels.
Jointing and Planing
Jointing and planing is an essential process when it comes to gluing up wood panels. This step is required to ensure that the edges of the wood are straight and flat to create a seamless joint. The first step in the process is to inspect the wood for any defects such as knots or warps. Next, using a jointer, flatten one face of the board and create a straight edge to work from. Turn the board over and flatten the other side, ensuring that both faces are parallel to each other. If you don’t have a jointer, you can use a hand plane to achieve the same result, but it may take longer and require more skill.
Once both faces have been flattened, the next step is to create a square edge. This can be done using a table saw or a jointer, depending on the equipment available. If using a table saw, set the fence so that when the straight edge of the board is against the fence, the saw blade is cutting off the uneven edge. Make sure to follow all safety precautions when using a table saw.
After creating a square edge, it’s time to plane the board to its desired thickness. This can be done using a thickness planer. Set the planer to the desired thickness and feed the board through until it reaches the desired thickness. If you don’t have a thickness planer, you can achieve the same result using a hand plane, but be prepared to spend quite a bit of time and effort getting it just right.
Remember, the key to a successful glue up is to take your time and ensure that the wood is properly prepared. Jointing and planing require some skill and practice, but the effort is well worth it, as it will result in a tight and seamless joint. With the proper preparation, you’ll end up with a beautiful panel that will last for years to come.
Tip: Check out our humorous piece, “Who put this shit together? I’m the glue!” for a light-hearted take on the importance of glue in woodworking.
Sanding
When it comes to gluing up panels, sanding is a crucial step to ensure a tight fit between the pieces of wood. Sanding helps to remove any unevenness and smooth out the surfaces for optimal bonding. Here are some steps to follow when sanding your wood:
- Start with coarse grit sandpaper: Begin sanding with a coarse grit sandpaper, such as 80-grit. This will help to remove any rough surfaces, scratches, or snipes.
- Move to finer grit sandpaper: Once you’ve removed the rough surfaces, switch to a finer grit sandpaper, such as 120-grit, to create a smoother surface that’s easier to bond.
- Sand with the grain: Always sand with the grain of the wood, as going against it can create scratches that are difficult to remove.
- Use a sanding block: A sanding block helps to keep the sandpaper flat against the wood and prevents uneven sanding. You can purchase a sanding block or make your own using a scrap piece of wood and sandpaper.
- Check for smoothness: After sanding, run your hand over the wood to check for smoothness. If you feel any rough or uneven spots, continue sanding until the surface is smooth.
By properly sanding your wood, you’ll create an ideal surface for gluing and ensure a strong bond between the pieces. Remember that each type of project will require specific sanding techniques – for instance, when sanding upholstery foam to wood, you may need to use a finer grit sandpaper to avoid tearing the foam. For more information on gluing different materials, check out these tips for gluing foam core, methods for attaching balloons to walls, or instructions for gluing chipboard together.
Applying the Glue
One of the most critical steps in glueing up panels is applying the glue correctly. Without the right technique, your panels may not fully bond, and the final product could come out weak and unstable. In this section, we will walk you through the process of applying the glue. From choosing the right adhesive to spreading it evenly, you’ll learn everything you need to know to ensure a successful panel glue-up. So, let’s dive in!
Choosing the Right Glue
Choosing the right glue is crucial in ensuring that your panel doesn’t fall apart. The type of glue you need depends on the type of wood you’re using, as well as the application of the panel.
Polyurethane glue is a popular choice for panel glue-ups, as it has a long set time that allows for readjustments and creates a strong bond. It is also waterproof, making it ideal for outdoor use.
For a more traditional option, yellow PVA glue is a good choice. It’s easy to find and affordable, plus it works well with most wood types. However, it’s not as strong as polyurethane glue and doesn’t hold up as well in damp conditions.
Epoxy glue is another option for those looking for a strong bond, especially for difficult wood types. It has a short set time and is waterproof, but it’s also more expensive than other glue types.
In addition to considering the type of glue, you should also pay attention to the glue’s viscosity and transparency. Thin, clear glue is ideal for tight-fitting joints, while thicker, opaque glue can fill larger gaps.
| Glue Type | Strength | Waterproof | Set Time | Transparency/Viscosity |
|---|---|---|---|---|
| Polyurethane | Strong | Yes | Long | Clear and Viscous |
| Yellow PVA | Medium | No | Short | Opaque and Viscous |
| Epoxy | Strong | Yes | Short | Clear and Thin |
No matter which glue you choose, always make sure to read the manufacturer’s instructions carefully and wear gloves to avoid skin irritation. Now that you’ve selected the right glue for your project, it’s time to apply it to the wood.
Applying the Glue
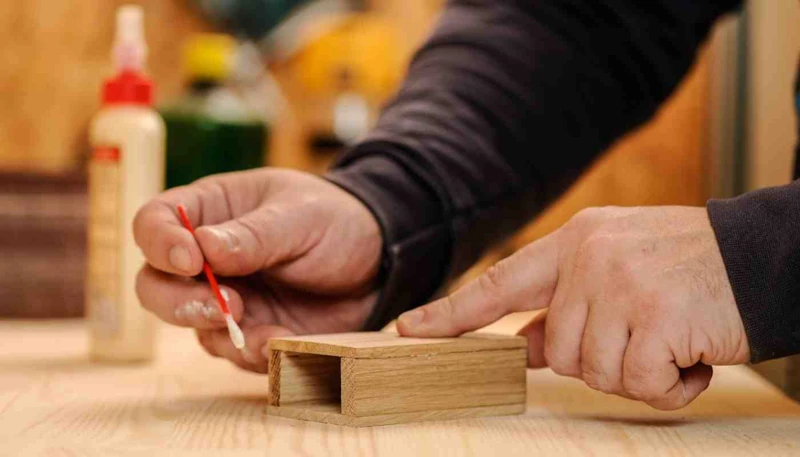
Before applying the glue, make sure the wood surfaces are clean and free from dust and debris. This will help the glue to adhere better and create a stronger bond between the panels. Use a clean, dry cloth to wipe the wood down if necessary.
Step 1: Prepare your glue by following the manufacturer’s instructions. Some glues require mixing, while others can be used straight out of the bottle. It’s important to choose the right glue for your project, depending on the type of wood and the intended use of the finished panel. You can read about choosing the right glue in more detail in the previous section.
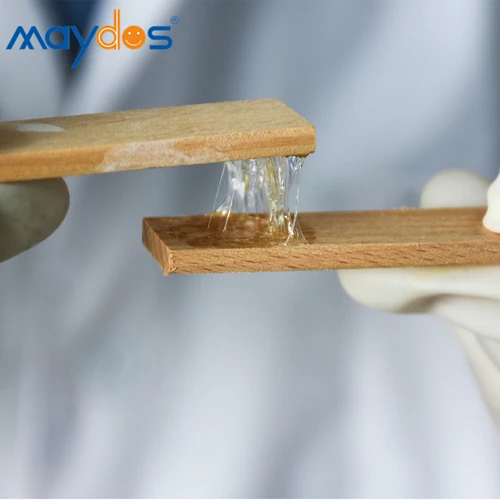
Step 2: Apply the glue to one of the wood surfaces using a brush or roller. Be generous with the amount of glue you apply, but don’t overdo it, as this can cause the wood to warp or the glue to ooze out when you clamp the panels together. A good rule of thumb is to apply enough glue so that there is a thin layer covering the entire surface.
Step 3: Spread the glue evenly across the surface using a plastic spatula or a putty knife. This will help to ensure that the glue is evenly distributed and that there are no air pockets or dry spots. Pay extra attention to the edges of the wood, which are especially prone to drying out and not adhering properly.
Step 4: Repeat steps 2 and 3 for the second wood surface that will be joined. Make sure that both surfaces are covered with a thin layer of glue and that there are no dry spots or air bubbles. If you’re working with a large or complicated panel, you may want to work in sections, joining a few boards at a time rather than trying to glue everything at once.
Remember that hot glue and foam do not mix well together. If you’re looking for information on how to glue upholstery foam to wood, check out our guide on /how-to-glue-upholstery-foam-to-wood/. Alternatively, if you’re feeling creative, you might want to learn how to make hot glue mushrooms by checking our /how-to-make-hot-glue-mushrooms/ guide.
Spreading the Glue
Once you’ve applied the glue onto one of the panels, it’s time to spread it evenly across the surface. The goal is to make sure that the glue is distributed across the entire surface area, leaving no spots uncovered. Here are the steps to spreading the glue effectively:
- Use a glue spreader: A glue spreader is a tool that is specifically designed for this purpose. It resembles a paintbrush, but has notches on the edge that help to evenly distribute the glue. Dip the spreader into the glue and apply it to the surface in smooth strokes. Keep the spreader at a right angle to the surface to ensure an even distribution of glue.
- Start at the center: Begin spreading the glue from the center of the panel, working your way outward. This ensures that the glue is distributed evenly and prevents any air bubbles from forming.
- Use a back-and-forth motion: Move the glue spreader back-and-forth across the surface of the panel to ensure an even coat of glue. Be sure to apply a moderate amount of pressure to make sure the glue is penetrating the wood fibers.
- Avoid over-applying: Be careful not to over-apply the glue, as this can result in a weaker joint. Too much glue can also cause the wood to warp or bow as it dries.
- Check for glue coverage: Once you’ve spread the glue, inspect the surface to make sure that all areas are covered. Look for any dry or bare spots, as these areas will not form a strong bond. Add more glue if necessary, and re-spread it with the glue spreader.
By following these steps, you can ensure that the glue is spread evenly across the surface of the panel. This will result in a strong and secure joint that will last for many years to come.
Clamping the Panels
Once you have applied the glue and assembled the panels, it’s time to clamp them together. This may seem like a daunting task, but with the right tools and a bit of patience, it can be accomplished with ease. The clamping process is essential for ensuring a strong and sturdy panel, and it’s important to choose the right clamps and follow the proper technique. Let’s dive into the details of clamping panels together.
Choosing the Right Clamps
The type of clamp you choose will depend on the size and shape of the panel you’re gluing. Here are some clamp options to consider:
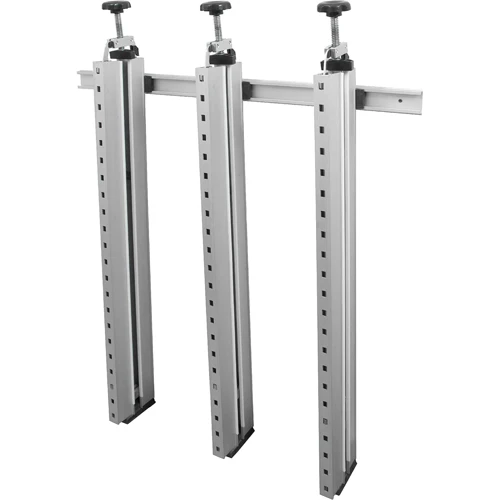
- Bar Clamps: These clamps are ideal for larger panels and can be adjusted to apply even pressure on the entire panel surface.
- Spring Clamps: These clamps are easy to use and are great for smaller panels. They’re also affordable and can be easily stored when not in use.
- C-Clamps: These clamps are versatile and can be used for a variety of panel sizes and shapes. They’re also strong enough to handle heavy pressure.
- Pipe Clamps: These clamps are used for larger panels. They work by applying pressure through a length of pipe that spans the width of the panel.
When choosing your clamps, make sure they’re long enough to span the entire width of your panel. You’ll also need enough clamps to apply even pressure along the entire length of the panel. Be sure to test your clamps before you begin applying glue to ensure they’re functioning properly and won’t slip or fail while clamping the panel. Remember, using the right clamps will ensure a successful glue-up and a strong, durable panel.
Placing the Clamps
When it comes to placing the clamps on your panels, it’s important to have a well thought-out plan in place. The placement of your clamps can greatly affect the overall quality of your final project. Here are a few tips to keep in mind:
| TIP: | Start in the middle: Begin by placing your clamps in the center of the panel and work your way out to the edges. This will help distribute pressure evenly across the panel. |
|---|---|
| TIP: | Alternate clamp sides: To prevent the panel from curving, make sure to alternate the sides on which you place your clamps. |
| TIP: | Use enough clamps: The number of clamps you need will depend on the size of your panel. As a general rule of thumb, you should use one clamp for every foot of panel length. |
| TIP: | Adjust as needed: Take a few moments to adjust the placement of your clamps as needed. Make sure they are as straight and parallel as possible to ensure an even distribution of pressure. |
By following these tips, you can ensure that your clamps are properly placed and your panel is securely held together while the glue dries.
Tightening the Clamps
Once your panel is clamped up, it’s time to start tightening the clamps. It’s important to do this step carefully and evenly to ensure the panels are properly secured. Here are some steps to follow when tightening the clamps:
| Step | Description |
|---|---|
| 1 | Start by tightening the center clamp as much as you can by hand. |
| 2 | Work your way outwards, alternating between tightening the top and bottom clamps. Use a clamp spreader to ensure even pressure across the panel. |
| 3 | Once all the clamps are tightened by hand, use a clamp handle or bar clamp to apply more pressure. Tighten each clamp slowly and evenly to prevent the panel from shifting. |
| 4 | Check the clamps regularly while drying. Tighten them further if necessary to ensure the panel remains secure. |
| 5 | Leave the clamps on until the glue has fully dried. This can take anywhere from a few hours to overnight, depending on the type of glue used. |
Remember, the key to a successful glue-up is even pressure across the panel. Take your time and ensure each clamp is tightened carefully and evenly before moving on to the next one. By following these steps, you can create a strong, stable panel that will last for years to come.
Clean-Up and Finishing
After successfully clamping up your panel, the final stage of the process is clean-up and finishing. It’s vital to carefully remove any excess glue before it dries – otherwise, it can be an eyesore on your panel. Then, finishing your panel can enhance the beauty of the wood and provide protection. Let’s delve into the necessary steps for clean-up and finishing to ensure your panel looks perfect.
Removing Excess Glue
Once you have your glued-up panel clamped and dried, it’s time to remove any excess glue that may have squeezed out during the gluing process. This may seem like a trivial step, but it’s actually quite important in ensuring a smooth and flawless finished product. Here are some steps to follow for removing excess glue:
- Wait for the glue to dry: Before you do anything, make sure the glue has fully dried. Generally, you should wait at least 24 hours for the glue to dry and cure.
- Scrape off excess glue: Once the glue has dried, use a chisel or scraper to carefully remove any excess glue that has accumulated along the edges of the panel. Be sure to angle the chisel or scraper away from the wood to avoid damaging the surface.
- Sand the panel: After you’ve removed as much excess glue as possible, use sandpaper to smooth out any remaining glue residue. Start with a coarse grit and gradually work your way up to a finer grit as necessary to avoid scratching the surface. Be sure to pay extra attention to the edges to remove any glue that may have seeped in between the panel layers.
- Inspect the panel: Once you’ve finished sanding, inspect the panel thoroughly to ensure there is no remaining glue residue. Any leftover glue can interfere with the staining or finishing process and detract from the overall appearance of the panel.
By taking the time to properly remove excess glue, you’ll be left with a clean and smooth surface that’s ready for finishing. Don’t rush this step – it’s an important part of ensuring a high-quality finished product.
Finishing the Panel
Providing a beautiful finish to the panel is your final step in the glue-up process. Here are some ways to finish the panel flawlessly:
| Step | Description |
|---|---|
| Clean the panel | Before applying any finish, ensure that the panel is completely clean and dust-free. Use a tack cloth or soft-bristled brush to remove any debris or sawdust particles. |
| Apply a wood conditioner | If you are using softwood or porous wood, applying a wood conditioner is necessary. It penetrates the wood, creating a barrier for the wood to absorb too much stain. Follow the manufacturer’s instructions and apply the wood conditioner with a brush or rag. |
| Stain, if desired | If you want to add some color to the panel, use a wood stain that complements the wood species and the environment where the panel will be used. Apply the stain with a brush or rag and wipe off the excess with a clean rag. Allow the stain to dry completely before proceeding with the next step. |
| Apply a sealant | Next, apply a clear sealer to the panel surface. The sealer protects the wood from moisture, heat, and scratches. You can choose from a variety of finishes, such as polyurethane, lacquer, or varnish. Apply the sealer with a brush or sprayer, making sure to cover the entire surface. Allow the sealer to dry overnight before touching the panel. |
| Sand and repeat | After the sealer is dry, sand the panel surface gently with 220-grit sandpaper. Wipe off the dust with a tack cloth or clean rag. Repeat the sealer application process two to three times, allowing each coat to dry completely before the next. Sand lightly between coats with a fine-grit sandpaper. |
| Buff and Wax | Finally, buff the panel surface with a clean rag. Apply a small amount of wax or polish with a clean rag and buff it with another clean rag. Waxing the panel surface will give it a glossy, polished finish and will make it easier to clean and maintain. |
Finishing the panel is an enjoyable process that helps bring out the natural beauty of the wood while adding a protective layer to ensure the panel’s longevity. Follow these steps, and your panels will look stunning and withstand the test of time.
Conclusion
In conclusion, gluing up panels can be a rewarding and satisfying experience for any woodworker. However, it’s important to keep in mind that the success of the project starts with careful planning and preparation. Before jumping into the gluing process, make sure to properly joint, plane, and sand the wood to ensure maximum adhesion. Also, selecting the right glue and clamp type is crucial for a strong and reliable bond.
When it comes to applying the glue, take your time and spread it evenly to avoid any deformities. Remember to always clean up any excess glue before it dries to ensure a smooth finish. And for the final touches, sand and finish the panel to your preferred look and feel.
Overall, gluing up panels requires patience, attention to detail, and a willingness to experiment and learn from mistakes. With the right materials, tools, and technique, you can achieve beautiful and functional panels that will serve your woodworking projects for years to come. So don’t be afraid to dive in, get creative, and enjoy the process. Happy woodworking!
Frequently Asked Questions
1. Can any type of wood be glued up?
Yes, any type of wood can be glued up. However, some woods may require special preparation or a specific type of glue.
2. How do I choose the right glue?
Choose a glue that is suitable for the type of wood you are using and the conditions it will be exposed to (e.g. indoor or outdoor use).
3. How long should I let the glue dry?
The drying time will depend on the type of glue and the temperature and humidity of your workspace. Check the manufacturer’s instructions for specific drying times.
4. Can I reuse clamps after using them for gluing panels?
Yes, you can reuse clamps after cleaning them thoroughly with a damp cloth. Make sure they are completely dry before using them again.
5. Can I glue up large panels by myself?
It is possible to glue up large panels by yourself, but it may be easier and safer to have an extra pair of hands to help with clamping.
6. Is it necessary to use a jointer and planer before gluing up panels?
No, it is not necessary to use a jointer and planer, but doing so can help ensure a tight and even joint between the panels.
7. Can I apply too much glue?
Yes, applying too much glue can cause glue to squeeze out of the joint and create a messy finish. Use just enough glue to create a strong bond.
8. How many clamps should I use?
The number of clamps you need will depend on the size of the panels you are gluing up. As a general rule, enough clamps should be used to evenly distribute clamping pressure.
9. Can I use tape instead of clamps to hold panels together while the glue dries?
No, tape is not strong enough to hold panels together while the glue dries. Using clamps is the best way to ensure a tight and secure bond.
10. What is the best way to remove excess glue?
The best way to remove excess glue is to wait until it is dry and then carefully scrape it off with a chisel or scraper.