Introduction
As DIY projects become more popular, it’s important to understand the basics of working with different materials. One such material is Styrofoam, which can be a versatile option for creating various crafts and projects. However, gluing Styrofoam can be a bit tricky. That’s why in this guide, we’ll be taking a closer look at the various steps involved in gluing Styrofoam in a comprehensive way, from choosing the right adhesive to putting it all together. So let’s dive in and learn how to glue Styrofoam like a pro!
What is Styrofoam?
Styrofoam is a lightweight material made of expanded polystyrene foam. It is widely used for insulation, crafts, and packaging due to its excellent thermal insulation and cushioning properties. Styrofoam is also known as foam board, blueboard, or beadboard. It is available in various thicknesses and sizes, and can be easily cut, shaped, and painted. However, one of the challenges of working with Styrofoam is finding the right adhesive to bond it together or attach it to other surfaces. Using the wrong adhesive can cause the Styrofoam to melt or dissolve, resulting in a messy and ineffective bond. That’s why it’s important to choose the right adhesive for your project.
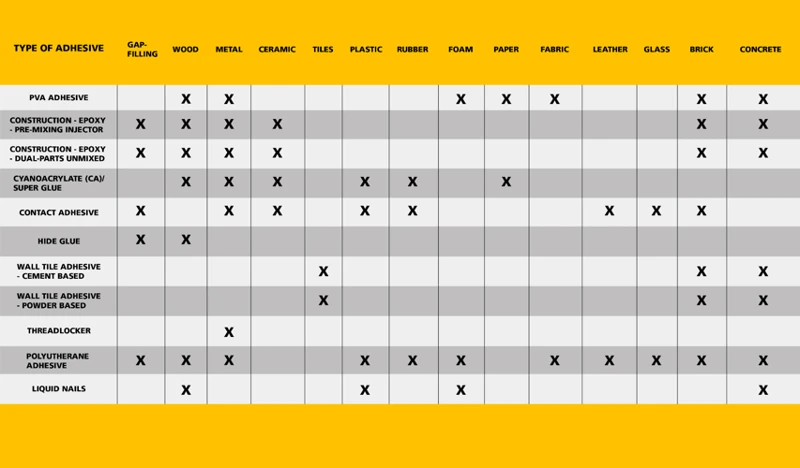
The following table summarizes the characteristics of different types of adhesives that are suitable for Styrofoam:
| Adhesive Type | Pros | Cons |
|---|---|---|
| Water-based adhesive | – Easy to find and apply – Non-toxic and safe to use – Dries clear – Can be cleaned up with water |
– May take longer to dry – Can be less strong than solvent-based adhesive |
| Solvent-based adhesive | – Bonds quickly and strongly – Can be used on a variety of surfaces – Allows for some repositioning before setting – Comes in a spray can for easy application |
– Can be toxic and emit fumes – Can dissolve or melt Styrofoam if over-applied |
| Hot glue | – Bonds quickly and strongly – Can be used for 3D projects – Can be easily removed or repositioned – Comes in various thicknesses and colors |
– Can burn fingers if not handled carefully – May not be suitable for large or heavy projects – Can harden quickly and become brittle |
| Construction adhesive | – Bonds quickly and strongly – Can be used on a variety of surfaces – Resistant to water, heat, and cold – Can fill gaps and act as a sealant |
– Can be toxic and emit fumes – Requires a caulk gun for application – May be difficult to remove or reposition |
Keep in mind that different adhesives may work better for different types of Styrofoam projects. For example, if you are working on a craft project, you may prefer a water-based or hot glue adhesive, whereas if you are building a model or prototype, you may opt for a solvent-based or construction adhesive. In the next section, we’ll discuss how to prepare the Styrofoam surface before applying the adhesive.
Why Do You Need to Glue Styrofoam?
Styrofoam is a light and versatile material that is commonly used in various crafts projects. However, because of its lightweight and porous nature, it can be challenging to join pieces of Styrofoam together which is why you need to know how to glue Styrofoam. This is especially true when you want to create large scale designs or projects that require a more secure connection.
When it comes to crafts projects, hot glue is often used because it is quick-drying and provides an instant bond. However, for longer-lasting connections, using the right type of adhesive is essential. There are various adhesives available, and the choice of which one to use depends on the requirements of the project. Here are some reasons why you need to glue styrofoam:
| Reasons | Description |
| Bonding two pieces of Styrofoam together | One of the most common applications is bonding two pieces of Styrofoam together to create a larger structure or design. |
| Attaching Styrofoam to other surfaces | Sometimes it may be required to attach a piece of Styrofoam to another surface, such as wood or metal. In such cases, using the right adhesive is crucial to create a long-lasting bond between the surfaces. |
| Increasing the durability of the project | Using the right adhesive also increases the durability of the project. A secure and robust connection ensures that the project does not fall apart, and the structure remains intact over a more extended period, increasing the longevity of the craft. |
| Aesthetics | When making decorations, like a DIY gift or centerpiece, using adhesive properly, can add beauty to the aesthetics of the project. |
No matter the reason for wanting to join Styrofoam pieces together, it is essential to choose the right adhesive and follow the proper application process. Click (insert internal link) to learn how to glue a poster to foam board, or (insert internal link) to discover how to attach a Lego base plate to wood.
Choosing the Right Adhesive
Choosing the Right Adhesive: When it comes to gluing Styrofoam, not all adhesives are created equal. It’s important to choose the right adhesive for the job to ensure a strong and long-lasting bond. There are a variety of options available, each with their own unique properties and benefits. Whether you opt for a water-based or solvent-based adhesive, hot glue, or construction adhesive, selecting the right one will make all the difference in the success of your project. Let’s take a closer look at each option and find out which one is best for your needs. If you are looking for information on how to glue poster to foam board, check out our article on how to glue posters to foam board.
Water-Based Adhesive
Water-based adhesive is a great choice if you’re looking for a non-toxic and easy-to-use option. It’s also a good choice if you’re working with small, lightweight pieces of styrofoam. One popular brand of water-based adhesive that works well with styrofoam is Aleene’s Original Tacky Glue.
When using water-based adhesive, it’s important to make sure both surfaces are clean and dry before applying the glue. This will help the adhesive stick properly. You can apply water-based adhesive with a brush or by squeezing it directly onto the surface of the styrofoam. Once the adhesive is applied, hold the pieces together firmly for at least 30 seconds to ensure a strong bond.
It’s important to note that water-based adhesive may not work well if you’re trying to glue larger or heavier pieces of styrofoam. In these cases, it’s best to use a stronger adhesive, such as construction adhesive or hot glue. If you’re unsure which type of adhesive to use, test a small area first to see how well it holds.
If you’re looking for more information about gluing objects together, check out our article on how to glue Lego base plates to wood.
Solvent-Based Adhesive
When it comes to gluing Styrofoam, solvent-based adhesives can be a good option. These adhesives work by melting the surface of the Styrofoam and fusing the two pieces together as it dries. However, it’s important to note that solvent-based adhesives can be quite strong and may not be the best choice for small or delicate projects.
One popular solvent-based adhesive for Styrofoam is cyanoacrylate glue, commonly known as super glue. This type of adhesive works quickly and forms a strong bond, but it’s important to use it sparingly, as too much can melt the Styrofoam.
Another option is to use a polyurethane-based adhesive. This type of adhesive is designed specifically for Styrofoam and is water-resistant once cured. However, it’s important to note that this adhesive can take up to 24 hours to fully cure.
Be sure to wear protective gloves and use these adhesives in a well-ventilated area, as they can emit harmful fumes.
| Pros | Cons |
|---|---|
| Forms a strong bond | Can melt Styrofoam if too much is used |
| Dries quickly | Can emit harmful fumes |
| Water-resistant once cured | Takes up to 24 hours to fully cure |
It’s important to note that solvent-based adhesives can be quite strong and difficult to remove once cured. If you make a mistake while glueing Styrofoam together, it’s best to try and fix it before the adhesive dries. If it’s already dry, you may need to use a solvent to remove it. Be sure to follow the manufacturer’s instructions and wear protective gloves when using solvents.
Solvent-based adhesives can be a good option for gluing Styrofoam, but it’s important to use them carefully and in a well-ventilated area.
Hot Glue
Using hot glue is another option for gluing Styrofoam. Hot glue is a great option because it dries quickly and provides a strong hold. However, it is important to note that hot glue can melt Styrofoam if it is not used correctly.
Here are the steps for using hot glue to glue Styrofoam:
- Plug in the hot glue gun and allow it to heat up. (source)
- Apply a small amount of hot glue to the Styrofoam surface where you want to attach the other piece of Styrofoam.
- Quickly place the second piece of Styrofoam onto the first and hold it in place for several seconds.
- Release the Styrofoam and allow the hot glue to dry fully. This typically takes only a few minutes, but it is best to wait a few hours for a stronger hold.
It is important to note that hot glue should not be used to glue Styrofoam to certain surfaces, such as plastic or metal, as it may not adhere properly. In those cases, a different type of adhesive, such as construction adhesive, may be a better option. However, using hot glue to attach Styrofoam to wood is a common practice. For tips on how to glue paper to wood letters using hot glue, check out this article.
To ensure that the hot glue provides a strong hold, it is also important to make sure that the Styrofoam surface is clean and free of any debris or dust. Additionally, roughing up the surface with sandpaper can help the hot glue adhere better. (source)
Hot glue is a great option for gluing Styrofoam, but it must be used correctly to avoid melting the Styrofoam. It is important to follow the steps outlined above and to make sure the Styrofoam surface is clean and roughed up for the best hold.
Construction Adhesive
Construction adhesive is another effective option for gluing Styrofoam. This type of adhesive is typically used for construction projects, and it is specifically designed to bond heavy materials like wood, metal, and concrete. However, it can also be used on Styrofoam.
Construction adhesive comes in both water-based and solvent-based formulations. Water-based construction adhesive is easier to clean up and has a milder odor, making it a more environmentally friendly option. Solvent-based construction adhesive, on the other hand, dries faster and creates a stronger bond.
When using construction adhesive on Styrofoam, it is important to choose a product that is labeled as safe for use on foam. Not all construction adhesives are suitable for use on Styrofoam, and using the wrong type of adhesive can cause the foam to melt or dissolve.
To apply construction adhesive to Styrofoam, follow these steps:
| Steps | Instructions |
|---|---|
| 1 | Make sure the Styrofoam surface is clean and dry. |
| 2 | Apply a thin, even layer of construction adhesive to the surface of the Styrofoam. |
| 3 | Press the surfaces together firmly, making sure the adhesive spreads evenly between the two surfaces. |
| 4 | Clamp the two surfaces together if necessary to ensure a secure bond. |
| 5 | Allow the adhesive to dry completely according to the manufacturer’s instructions before handling or moving the glued object. |
Construction adhesive can be a great option for gluing Styrofoam, as long as you choose a safe and appropriate product and follow the proper steps for application. If you are unsure whether or not construction adhesive is the right choice for your particular project, consult with a professional or do some research beforehand.
Preparing the Styrofoam Surface
Preparing the surface of the Styrofoam is a crucial step before applying any type of adhesive. Proper preparation will ensure a strong bond between the Styrofoam and the adhesive. This step cannot be skipped, as failing to prepare the surface can result in the adhesive not adhering properly, leading to a weak bond. In the next sections, we will discuss the different methods of preparing the Styrofoam surface, including cleaning and roughing up the surface. By following these steps, you can ensure a strong bond between the Styrofoam and the adhesive.
If you’re interested in learning more about adhesive types, check out our article “Which is Better: Hotfix or Glue?” or if you need help with a different project, check out our other how-to guides such as “How to Glue LED Strips”, “How to Fix a Bike Tube with Super Glue”, “How to Use a Glue Stick”, or “How to Make Hair Bows with a Glue Gun.”
Cleaning the Surface
Cleaning the surface of Styrofoam is an essential step in the gluing process. The surface must be free of any dust, debris, or oils so that the adhesive can properly bond to the material. Here are some effective ways to clean your Styrofoam surface:
| Method | Materials Needed | Instructions |
|---|---|---|
| Soap and Water | – Mild dish soap – Warm water – Clean cloth |
Fill a bucket with warm water and a few drops of mild dish soap. Dip a clean cloth into the soapy water and wring out any excess. Gently wipe the surface of the Styrofoam until it’s clean. Rinse the cloth with clean water and wipe the surface again to remove any soap residue. Let the surface dry completely. |
| Isopropyl Alcohol | – Isopropyl alcohol – Clean cloth |
Dip a clean cloth into isopropyl alcohol and gently wipe down the surface of the Styrofoam. This will remove any dirt, oils, or debris from the surface, ensuring a better bond with the adhesive. Let the surface dry completely. |
| Sanding | – Fine-grit sandpaper – Clean cloth |
Use a fine-grit sandpaper to lightly sand the surface of the Styrofoam. This will provide a rough surface for better adhesion. After sanding, wipe the surface with a clean cloth to remove any dust or debris. Be careful not to apply too much pressure while sanding, as this can damage the Styrofoam. |
It is important to note that some cleaning products such as acetone or paint thinner can melt or dissolve Styrofoam, so it’s best to avoid using them. Additionally, it’s best to avoid using any abrasive cleaners or scrubbing pads as they can also damage the surface. By using the methods listed above, you can effectively clean the surface of your Styrofoam and ensure a strong bond with the adhesive.
Roughing Up the Surface
Before applying adhesive to Styrofoam, you need to prepare the surface properly to ensure that the glue will hold firmly. One important step in the preparation process is to rough up the surface of the Styrofoam.
Why Rough Up the Surface?
Styrofoam is a smooth and non-porous material that doesn’t allow most adhesives to stick easily. When you rough up the surface of the Styrofoam, it creates tiny scratches and grooves that provide a better grip for the adhesive.
How to Rough Up the Surface?
To rough up the surface, you can use sandpaper, steel wool, or even a wire brush. However, you need to be careful not to apply too much pressure or you may end up damaging the Styrofoam.
| Material | Grit | Instructions |
|---|---|---|
| Sandpaper | 80 or 120 grit | Lightly sand the surface in a circular motion, creating small scratches and grooves. Be gentle and use a light touch to avoid breaking the Styrofoam. |
| Steel wool | Medium or fine grade | Rub the surface with the steel wool in a back-and-forth motion, creating a pattern of tiny scratches. Again, be gentle and don’t apply too much pressure. |
| Wire brush | N/A | Gently brush the surface with the wire brush to create a textured surface. Use a light touch and avoid pressing too hard. |
After Roughing Up the Surface
After roughing up the surface of the Styrofoam, you need to remove any dust or debris that may have been created during the process. Use a soft, dry cloth to wipe away any loose particles.
It’s important to note that roughing up the surface is not always necessary. Some adhesives, such as hot glue, don’t require this step. However, if you’re using a water-based or solvent-based adhesive, it’s recommended to rough up the surface for best results.
Conclusion
Roughing up the surface of Styrofoam is an important step in preparing it for adhesion. By creating tiny scratches and grooves, it provides a better grip for the adhesive to stick to. Be gentle when roughing up the surface and avoid applying too much pressure to prevent any damage to the material.
Applying the Adhesive
When it comes to applying adhesive to Styrofoam, there are several methods to choose from. It’s essential to select the right adhesive for your project to ensure a secure hold. Once you’ve selected the proper adhesive, the next step is to prepare the surface of the Styrofoam before applying the glue. And finally, the application process requires a delicate touch, as Styrofoam can be easily damaged. In this section, we’ll take a closer look at each of these steps and provide you with helpful tips and tricks along the way to make the adhesive application process as smooth and stress-free as possible.
Brushing on Adhesive
When it comes to using adhesive, brushing the adhesive on the styrofoam is a common technique. Here are some steps to follow to ensure a successful application:
- Choose the right brush: A foam brush or a small paintbrush with synthetic bristles works best for applying adhesive to styrofoam.
- Squeeze adhesive onto a palette or mixing container: This will make it easier to control the amount of adhesive being applied to the brush.
- Dip the brush into the adhesive: Make sure to not overload the brush with adhesive, as this can lead to excess adhesive pooling and dripping.
- Apply the adhesive to the styrofoam with smooth, even strokes: Start from the center of the surface and work outward, making sure to cover the entire surface evenly.
- Work quickly: Some adhesives have a short drying time, so it’s important to work efficiently and avoid letting the adhesive dry before it’s applied evenly.
- Repeat if necessary: Depending on the type of adhesive and the surface area being covered, it may be necessary to apply additional coats for a strong bond.
- Clean your brush: Rinse the brush with water or the recommended solvent immediately after use to avoid the adhesive hardening and making it difficult to remove.
Brushing on adhesive can be a simple and effective way to glue styrofoam. Just be sure to choose the right brush, control the amount of adhesive, and work quickly to ensure a strong bond.
Spraying on Adhesive
Spraying on adhesive is another method that can be used to glue Styrofoam. This method is particularly useful for large surfaces or for areas that are difficult to reach with a brush. Here are the steps to follow when using a spray adhesive:
- Step 1: Make sure the area you want to glue is clean and free from any debris.
- Step 2: Shake the can of adhesive well, following the instructions on the label.
- Step 3: Hold the can about 6-8 inches away from the Styrofoam surface and spray a light, even coat of adhesive over the entire area. Don’t spray too close, as this can create drips and pools of adhesive.
- Step 4: Wait about 30 seconds to a minute, or until the adhesive becomes tacky.
- Step 5: Carefully place the second piece of Styrofoam onto the adhesive-covered surface. Make sure to line up the edges carefully, as the adhesive will bond quickly.
- Step 6: Apply pressure to the two surfaces with your hands, or use a roller to ensure a strong bond.
It’s important to follow the instructions on the adhesive spray can carefully, as different products may have different application techniques. Also, make sure to wear gloves and work in a well-ventilated area when using spray adhesive, as the fumes can be harmful if inhaled.
Applying Hot Glue
When it comes to applying hot glue to Styrofoam, it’s important to understand that using too much heat can actually melt the foam. So it’s important to use a low-temperature hot glue gun and to apply the glue in a thin layer.
Here are the steps for applying hot glue to Styrofoam:
- Step 1: Plug in the low-temperature hot glue gun and let it heat up for a few minutes.
- Step 2: Hold the Styrofoam in position, then apply a thin line of hot glue along one of the edges that you want to bond.
- Step 3: Quickly press the other piece of Styrofoam against the glue. Be sure to hold the pieces in place until the glue has completely cooled and hardened.
- Step 4: Continue gluing the rest of the edges, one by one.
It’s important to note that hot glue is not recommended for bonding Styrofoam to other materials, as it may not provide a strong enough hold. It’s best to stick to using hot glue for bonding Styrofoam to itself.
If you do need to bond Styrofoam to another material, it’s best to use a water-based or solvent-based adhesive, or a construction adhesive.
Remember: Always work in a well-ventilated area when using any type of adhesive. And be sure to read and follow the manufacturer’s instructions carefully.
Using a Caulk Gun
When using a caulk gun to glue Styrofoam, there are a few things to keep in mind. Here are the steps to follow:
- Choose the right adhesive: Not all adhesives are suitable for use with a caulk gun. Make sure to choose one that is designed for use in a caulking gun, such as a construction adhesive or a water-based adhesive.
- Load the caulk gun: Open the caulk gun and insert the cartridge of adhesive. Make sure it is loaded correctly and securely.
- Prepare the surface: Clean the surface of the Styrofoam and rough it up slightly to ensure that the adhesive will stick.
- Apply the adhesive: Hold the caulk gun at a 45-degree angle to the surface and apply the adhesive in a thin, even line. Start at one end of the surface and work your way to the other end. Be sure to apply enough adhesive to create a strong bond, but not so much that it squishes out from between the two pieces of Styrofoam.
- Join the two pieces together: With the adhesive applied, press the two pieces of Styrofoam together firmly. Use your hands to apply pressure evenly across the entire surface.
- Clean up: Wipe away any excess adhesive with a damp cloth before it dries.
Using a caulk gun can be a great way to apply adhesive to Styrofoam quickly and efficiently. However, make sure to follow the steps carefully to ensure that the adhesive is applied correctly and the two pieces of Styrofoam are firmly joined together.
Putting it All Together

Once you have chosen the right adhesive and prepared your Styrofoam surface, it’s time to put everything together. This can be a tricky process, especially when working with delicate pieces of Styrofoam or larger items that require extra support. However, with the right techniques and a few helpful tips and tricks, you can successfully join two pieces of Styrofoam together or attach your Styrofoam creation to another surface. In this section, we will explore different methods for putting it all together using your chosen adhesive.
Joining Two Pieces of Styrofoam Together
When joining two pieces of Styrofoam together, proper preparation and adhesive selection are key. Follow these steps for a successful bond:
- Cut the pieces of Styrofoam to fit together tightly. The closer the fit, the stronger the bond will be. Use a sharp blade or hot wire cutter to make precise cuts.
- Clean the surfaces of the Styrofoam pieces to be joined. Use a soft cloth or sponge to remove any dirt or debris. Ensure the surface is dry before moving on to the next step.
- Apply adhesive to one of the surfaces. Use a brush, spray bottle, or caulk gun to apply the adhesive evenly. Be sure to apply enough adhesive to create a strong bond.
- Join the two pieces of Styrofoam. Press the adhesive-covered surface firmly against the other piece, ensuring the edges are aligned.
- Apply pressure to the pieces of Styrofoam. Use clamps or other objects to hold the pieces of Styrofoam together firmly. Leave to dry according to the adhesive’s instructions.
Remember, not all adhesives are suitable for Styrofoam, so be sure to choose the right one for your project. Following these steps will help you achieve a strong bond between two pieces of Styrofoam, ensuring your project is durable and long-lasting.
Attaching Styrofoam to Other Surfaces
When it comes to attaching Styrofoam to other surfaces, there are a few important things to consider. You want to make sure the bond is strong enough to hold the Styrofoam in place, but also flexible enough to allow for any movement or expansion. Here are some tips for attaching Styrofoam to different surfaces:
| Surface Type | Recommended Adhesive |
|---|---|
| Wood | A water-based adhesive or a construction adhesive such as Liquid Nails will work well for attaching Styrofoam to wood surfaces. Apply the adhesive to both surfaces and press them together firmly. Use clamps to hold the Styrofoam in place while the adhesive dries. |
| Metal | A solvent-based adhesive such as contact cement is a good choice for attaching Styrofoam to metal surfaces. Rough up the metal surface with sandpaper first to help the adhesive grip, and apply the adhesive to both surfaces before pressing them firmly together. |
| Concrete or Masonry | Construction adhesive is the best choice for attaching Styrofoam to concrete or masonry surfaces. Clean the surface first and rough it up with sandpaper for better adhesion. Apply the adhesive to both surfaces and press them firmly together. Use clamps to hold the Styrofoam in place while the adhesive dries. |
| Plastic | Hot glue or a solvent-based adhesive such as Super Glue works well for attaching Styrofoam to plastic surfaces. Clean and rough up the plastic surface before applying the adhesive. Apply the adhesive to both surfaces and press them firmly together. Use clamps to hold the Styrofoam in place while the adhesive dries. |
| Glass | A silicone-based adhesive such as Gorilla Glue is a good choice for attaching Styrofoam to glass surfaces. Clean the glass surface thoroughly and rough it up with sandpaper for maximum adhesion. Apply the adhesive to both surfaces and press them firmly together. Use clamps to hold the Styrofoam in place while the adhesive dries. |
Note: Always follow the adhesive manufacturer’s instructions and safety precautions when using any type of adhesive. It’s also a good idea to do a test bond on a small, inconspicuous area first to ensure the adhesive is compatible with the materials you are working with.
Tips and Tricks
When it comes to gluing Styrofoam, there are some tips and tricks that can lead to more successful results. Whether you are working with small pieces or large sheets, these tips can make the process smoother and improve the bonding strength between the Styrofoam and the adhesive. From using clamps for extra support to cleaning up excess adhesive, these helpful suggestions can take your Styrofoam project to the next level. Let’s dive into some of the most effective tips and tricks for gluing Styrofoam.
Using Clamps for Extra Support
When gluing Styrofoam, it’s important to ensure that the adhesive is able to properly bond the surfaces together. However, even the strongest adhesive may not be enough to hold certain projects together on its own. That’s where clamps come in handy. Here are some tips for using clamps to provide extra support to your glued Styrofoam projects:
- Choose the right type of clamp: There are many types of clamps available, but when it comes to Styrofoam, it’s important to choose a clamp that won’t damage or dent the delicate material. One option is to use spring clamps, which provide a firm grip without applying too much pressure.
- Apply the adhesive first: Before clamping the Styrofoam together, make sure you apply the adhesive to both surfaces and allow it to become tacky. This will help to prevent the adhesive from shifting or smudging as you clamp the pieces together.
- Position the clamps: Once the adhesive is tacky, carefully position the clamps along the edges of the Styrofoam to hold the pieces together. Make sure the clamps are evenly spaced, as this will help to prevent gaps or uneven bonding.
- Apply pressure carefully: To avoid damaging the Styrofoam, apply pressure to the clamps slowly and evenly. If you feel resistance, stop and adjust the positioning of the clamps as needed.
- Wait for the adhesive to dry: Once the clamps are in place, allow the adhesive to dry completely before removing the clamps. This may take anywhere from a few hours to overnight, depending on the type of adhesive you used.
Using clamps can be a great way to provide extra support for your glued Styrofoam projects. Just be sure to choose the right type of clamp, apply the adhesive carefully, and wait for the adhesive to dry completely before removing the clamps. With a little extra effort, your Styrofoam creations will be strong and secure for years to come.
Cleaning Up Excess Adhesive
After gluing Styrofoam, it’s important to clean up any excess adhesive. This will not only make the final product look neater, but it will also ensure that the adhesive does not interfere with the performance of the Styrofoam. Here are some tips on how to clean up excess adhesive:
| Materials Needed | Steps |
|---|---|
| Acetone or mineral spirits | Apply a small amount of acetone or mineral spirits to a clean cloth. |
| Razor blade or putty knife | Gently scrape away any excess adhesive using a razor blade or putty knife. |
| Sanding sponge or sandpaper | Once the excess adhesive has been removed, lightly sand the affected area with a sanding sponge or sandpaper to smooth out any rough spots or unevenness. |
| Warm soapy water | For water-based adhesives, use warm soapy water to remove any excess adhesive. Use a clean cloth and gently rub the affected area until the adhesive is gone. |
Remember to always wear gloves when working with acetone or mineral spirits, and use them in a well-ventilated area. It’s also important to make sure that any excess adhesive is completely removed before the Styrofoam is painted or coated, as the adhesive may interfere with the adhesion of the paint or coating. With these tips, you can ensure that your finished product looks professional and performs to its fullest potential.
Working with Large Pieces of Styrofoam
When it comes to working with large pieces of Styrofoam, it can be a bit more challenging to glue them together. But with the right steps and techniques, it can be done successfully.
Step 1: Cut the Styrofoam to the desired size
One of the first steps to take when working with large Styrofoam pieces is to ensure that they are cut to the desired size. If you need to join several pieces together, make sure they are cut to the same size and shape for a secure fit.
Step 2: Prep the surface
Similar to working with smaller pieces of Styrofoam, you want to ensure the surface is clean and dry before attempting to glue them. Dust and debris can prevent the adhesive from bonding correctly.
Step 3: Use a strong adhesive
When working with large pieces of Styrofoam, it’s recommended that you use a strong adhesive such as construction adhesive. Not only does it provide a strong bond, but it also fills any gaps between the pieces for added stability.
Step 4: Apply adhesive in sections
Applying the adhesive in sections is crucial when working with large pieces of Styrofoam. It ensures that the adhesive doesn’t dry before you have a chance to secure the pieces together. You can use a brush, spray adhesive, or a caulk gun for this step.
Step 5: Secure the pieces together
Once you’ve applied the adhesive, it’s time to join the pieces together. It’s helpful to have an extra set of hands for this step to ensure that everything stays aligned. Use clamps or heavy objects to keep the pieces in place until the adhesive dries.
Step 6: Allow ample drying time
Lastly, be patient and allow the adhesive ample drying time before handling the glued pieces. The time will vary depending on the adhesive used, so be sure to follow the manufacturer’s instructions.
| Tip | Description |
|---|---|
| Use a straight edge | When cutting large pieces of Styrofoam, use a straight edge to ensure that the cuts are even. |
| Work in a well-ventilated area | When using construction adhesive or other strong adhesives, work in a well-ventilated area to avoid inhaling fumes. |
| Be cautious when handling large pieces | Large pieces of Styrofoam can be heavy and awkward to handle, so take necessary precautions to prevent injury. |
By following these steps and utilizing the tips provided, working with large pieces of Styrofoam can be done successfully and securely.
Conclusion
In conclusion, gluing Styrofoam may seem like a daunting task, but with the right adhesive and preparation, it can be accomplished with ease. Remember to choose the appropriate adhesive for your project, taking into account the type of Styrofoam you are working with and the surfaces you need to bond. It is also important to prepare the Styrofoam surface properly, by cleaning and roughing it up to ensure a strong bond.
When applying the adhesive, consider the method that best suits your project, whether it be brushing, spraying, using a caulking gun, or applying hot glue. Be sure to use clamps for extra support, especially for larger pieces of Styrofoam, and to clean up any excess adhesive before it dries.
With these tips and tricks in mind, you will be well on your way to successfully gluing Styrofoam for your next project. Always remember to follow safety precautions when working with adhesives, such as wearing gloves and working in a well-ventilated area. Good luck and have fun creating!
Frequently Asked Questions
Can Styrofoam be glued together?
Yes, Styrofoam can be glued together with the right adhesive. Use a water-based or solvent-based adhesive, hot glue, or construction adhesive.
Which glue is best for Styrofoam?
The best glue for Styrofoam depends on the type of Styrofoam and the project. A water-based or solvent-based adhesive is good for delicate Styrofoam while hot glue or construction adhesive is best for heavier Styrofoam.
Can you use super glue on Styrofoam?
No, you should not use super glue on Styrofoam. Super glue can eat through the foam and damage it.
How do you prepare Styrofoam for gluing?
To prepare Styrofoam for gluing, clean the surface with soap and water, and rough up the surface with sandpaper or a wire brush. This will help the adhesive bond better to the foam.
Can you paint Styrofoam after gluing it?
Yes, you can paint Styrofoam after gluing it. Wait for the glue to dry completely, then paint the foam with acrylic paint.
Can you remove glue from Styrofoam?
It is difficult to remove glue from Styrofoam without damaging the foam. If you need to remove glue, try using a solvent-based adhesive remover or rubbing alcohol.
What is the drying time for Styrofoam glue?
The drying time for Styrofoam glue depends on the type of adhesive used. Water-based and solvent-based adhesives usually dry within 24 hours. Hot glue dries in seconds, while construction adhesive can take up to 24 hours to dry completely.
Can you glue Styrofoam to wood?
Yes, you can glue Styrofoam to wood. Use a construction adhesive to create a strong bond between the two surfaces.
Can you glue Styrofoam to metal?
Yes, you can glue Styrofoam to metal. Use a construction adhesive or a silicone-based adhesive to create a durable bond.
Can you make Styrofoam waterproof after gluing it?
No, it is not possible to make Styrofoam completely waterproof after gluing it. However, you can make it more water-resistant by adding a coat of sealant or using waterproof paint.