As a lover of soapstone, you may have come across the frustrating situation of having a broken soapstone item. Fear not, we have put together a step-by-step guide on how to glue soapstone together, so you can repair your beloved item back to its former glory. With patience and attention to detail, you can have a seamless and sturdy repair. Let’s dive into what you’ll need and how to get started.
What You’ll Need
Before you start gluing your soapstone pieces together, it’s essential to ensure you have all the necessary tools and materials. Having the right equipment at hand will make the whole process smoother and more straightforward. So, let’s take a look at what you’ll need to get started. Here are some essential tools you’ll require for gluing soapstone: sandpaper, a putty knife, and clamps. As for the materials, you’ll need glue, which we’ll cover in more detail later, and some soapstone pieces to glue together. If you want to learn about different types of glue for other materials, check out our guides on how to glue styrofoam to metal, how to glue resin to plastic, and how to glue stone to wood.
Tools
For the task of gluing soapstone together, you’ll need a few basic tools to ensure that your project is a success. Here are the tools you’ll need:
| Tools | Details |
| Protective gear | This includes gloves, goggles, and a breathing mask. It’s important to protect yourself when handling chemicals and using power tools. |
| Clamps | You’ll need clamps to hold the pieces of soapstone tightly together while the glue dries. |
| Power drill | For drilling pilot holes in the soapstone before gluing. |
| Sandpaper | for roughing up the surface of the soapstone before applying glue. |
| Painter’s tape | For holding the pieces in place while the glue dries or for creating a barrier around the area to prevent glue from getting on unwanted surfaces or areas. |
It’s important to note that some of these tools may vary in size or style depending on the size of your project. For example, if you’re working with smaller pieces of soapstone, you may only need a smaller clamp or sandpaper, whereas larger projects may require a more heavy-duty power drill or large clamps.
Lastly, it is always recommended that you read the instructions on the specific glue that you choose to use. Different glues may require different tools for best results, so be sure to check the label or instructions before starting your project. If you want to learn more about types of glue, you can check our article about which is stronger: epoxy or super glue or which Loctite glue is the strongest.
Materials
When it comes to gluing soapstone, there are several materials that you will need to ensure a successful bond. These materials include protective gloves, since many glues can be harmful to the skin, as well as safety goggles to protect your eyes from splashing glue.
In addition to these safety essentials, you will also need a mixing container and a mixing stick for the glue. When choosing a mixing container, opt for one that is disposable or that you don’t mind getting glue on, as some glues can be difficult to clean once they dry.
Next, you will need the glue itself. There are a few different types of glue you can use for soapstone, including epoxy glue, super glue, and silicone adhesive. Each type of glue has its own strengths and weaknesses, so it’s important to choose the right one for your project.
You’ll also need a clamping device such as a vice or a clamp to hold the soapstone pieces in place while the glue dries. If you don’t have a clamp, you can use heavy weights such as books to hold the pieces down.
Lastly, you will need sandpaper to sand the surfaces of the soapstone pieces, as well as soapstone sealer to protect the finished product. With these materials at your disposal, you’re ready to move on to the next step of preparing the soapstone for gluing.
Preparing the Soapstone
Before gluing soapstone together, there are a few important steps that need to be taken to prepare the surfaces for bonding. This will ensure that the glue adheres properly and forms a strong bond. To begin, you’ll need to clean the surfaces of the soapstone, rough them up, and fit the pieces together to check the fit. These steps are crucial to creating a long-lasting bond between the soapstone pieces. Let’s take a closer look at each step in preparing the soapstone for gluing together.
Cleaning the Surface
Before gluing soapstone pieces together, it’s important to clean the surface to ensure the best bond possible. Soapstone can have a waxy or oily surface that can prevent glue from adhering properly, so cleaning is an essential step to prepare the surfaces for gluing.
Here are the steps for cleaning the surface:
- Wipe the surfaces of the soapstone pieces with a damp cloth to remove any dirt or debris.
- Next, use a non-abrasive cleaner specifically designed for soapstone, like a mild dish soap or a stone cleaner.
- Apply the cleaner to the surface of the soapstone and use a soft-bristled brush or sponge to gently scrub the surface.
- Rinse the soapstone pieces with clean water and dry them thoroughly with a clean towel.
- Do not use any abrasive sponges or scrubs that can scratch the surface, as this will create small crevices where dirt can settle and compromise the bond of the glue.
By cleaning the surfaces properly, the glue will adhere to the soapstone more effectively, making for a stronger bond that will last longer.
Roughing Up the Surface
Roughing Up the Surface
Before gluing the soapstone pieces together, it’s important to rough up the surface to ensure that the glue will properly adhere to the stone. This step is especially important because soapstone is known for being slick and non-porous.
To rough up the surface of the stone, please follow these steps:
| Materials | Tools |
|---|---|
| sandpaper (80 grit to 120 grit) | sandpaper block or sanding sponge |
1. Take a piece of 80 grit sandpaper and rub it over the surface of the stone in a circular motion. This will create a rough, textured surface that the glue can better adhere to.
2. Once the surface has been roughed up, move on to a 120 grit sandpaper and repeat the same process. This will make sure the surface is smooth and even.
3. Take a sandpaper block or sanding sponge to sand the edges of the soapstone pieces. This will take off any sharp or jagged edges and create a better fit.
By roughing up the surface, you’re ensuring that the glue will properly penetrate the stone and adhere to it, making sure that your project stays together for a long time. If you skip this step, the glue adhesion may not be as strong, which could cause the pieces to come apart.
Fitting the Pieces Together to Check the Fit
Fitting the Pieces Together to Check the Fit:
Before applying glue, it’s important to make sure that the soapstone pieces fit together properly. This avoids any gaps or unevenness in the final product. Start by placing the pieces together in the correct order and orientation. Check if the edges of the soapstone pieces align perfectly or if there are any gaps.
If you find that there are gaps, take note of where they are and assess if they need to be corrected. You can use sandpaper to even out the edges, or use a file to shave off parts of the stone as required. If there are major deviations in the shapes of the stone, it may be necessary to recut or reshape them for a proper fit. This step will ensure that the final product fits together smoothly and flawlessly.
Important: Avoid forcing the pieces together. Forcing can damage the soapstone or cause it to crack. Take your time and work carefully to make sure that the pieces fit together evenly.
Now that your pieces are fitted correctly together, it’s time to move on to the next step- choosing the right glue for your project.
Choosing the Right Glue
Choosing the right glue can make all the difference when it comes to successfully gluing soapstone pieces together. With so many options available, it can be perplexing to know which glue is best for your project. You want to choose a glue that will provide a strong and long-lasting hold, while also considering factors such as the materials you’re bonding and the final look you’re hoping to achieve. In this section, we’ll explore the different types of glue suitable for soapstone and the factors to consider when making your decision. By the end of this section, you’ll have a clear understanding of how to choose the right glue for your soapstone project.
Types of Glue
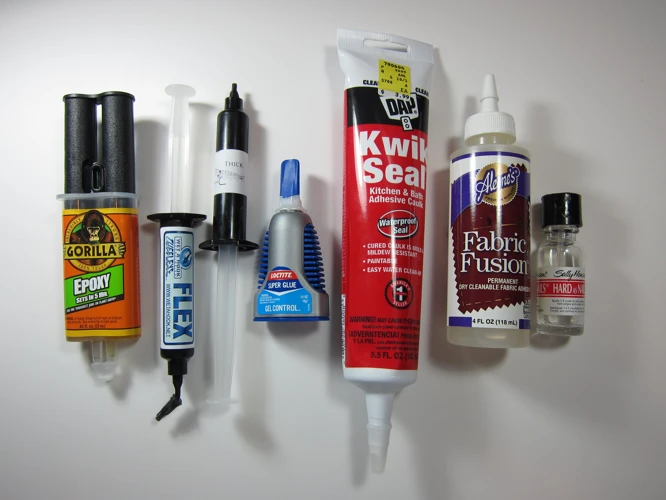
When it comes to gluing soapstone, there are several types of glue to choose from. Here are some types of glue that are commonly used for attaching soapstone:
- Epoxy glue – This two-part adhesive is known for its strength and durability. It’s also waterproof and heat-resistant, making it ideal for use on soapstone that will be exposed to moisture or high temperatures.
- Super glue – Also known as cyanoacrylate glue, super glue is a fast-drying adhesive that forms a strong bond between surfaces. It’s not waterproof, however, so it may not be the best choice for soapstone that will be exposed to moisture.
- Silicone adhesive – This type of glue is flexible and waterproof, making it a good choice for soapstone that will be exposed to moisture or temperature changes.
When choosing a glue for your soapstone project, it’s important to consider the specific needs of your project. For example, if you’re gluing two large pieces of soapstone together, you’ll want a strong adhesive like epoxy glue that will be able to support the weight of the stone. On the other hand, if you’re gluing smaller pieces together, super glue or silicone adhesive may be sufficient.
Factors to Consider When Choosing Glue
In addition to considering the type of glue you’ll use for your soapstone project, there are several other factors to consider when choosing glue. These include:
- Color – If the glue will be visible, you’ll want to choose a color that matches your soapstone as closely as possible. Some glues are available in different colors, while others can be tinted with pigment to match your stone.
- Drying time – Some types of glue dry faster than others. Consider the complexity of your project and the amount of time you have available when choosing a glue with an appropriate drying time.
- Strength – Consider the weight and size of the pieces you’re gluing together, and choose a glue with a strength that’s appropriate for the job.
- Water resistance – If your soapstone project will be exposed to moisture, you’ll want to choose a glue that’s waterproof.
By considering these factors and selecting the appropriate glue type for your soapstone project, you can ensure a strong and lasting bond between your soapstone pieces.
Factors to Consider When Choosing Glue
When considering which glue to use for gluing soapstone together, there are several factors to take into account. Here are the most important factors to consider:
| Factor | Description |
|---|---|
| Strength | You want a glue that will be strong enough to hold the pieces of soapstone together permanently. |
| Color | You might want to choose a glue that dries clear or a color that matches the soapstone to avoid noticeable glue lines. |
| Waterproofness | If the glued soapstone will be exposed to water, you’ll want to choose a waterproof glue like epoxy or silicone. |
| Temperature resistance | If the glued soapstone will be exposed to extreme temperatures, you’ll want to choose a glue that can withstand high or low temperatures. |
| Curing time | The amount of time that the glue takes to cure will determine how long you need to leave the clamps on and wait before using or moving the glued soapstone. |
Consider these factors when choosing the best glue for your project. For instance, if you are going to use the glued soapstone outdoors, you might want to use a waterproof and temperature-resistant glue like epoxy. If you need a glue that dries quickly, super glue can be a great option. Knowing what you need from the glue will help you select the best product for the job.
If you are interested in learning how to glue other materials, check out our articles on:
how to glue pot metal,
is super glue waterproof when dry,
how long does epoxy glue last,
how to glue terracotta, or
how to glue plastic bottles together!
Applying the Glue
Now that you have chosen the right glue for your soapstone and have thoroughly prepared the surface, it’s time to apply the adhesive. This step requires precision and care to ensure a strong bond between the soapstone pieces. Using the right technique, and following the manufacturer’s instructions, you can successfully glue soapstone together and create a seamless and beautiful piece. In this section, we will walk you through the step-by-step process of applying different types of glue, including epoxy, super glue, and silicone adhesive, so you can choose the best one for your project. Let’s get started!
Applying Epoxy Glue
To apply epoxy glue to your soapstone, follow these steps:
| Step | Instructions |
|---|---|
| Step 1 | Prepare the epoxy glue by mixing equal parts of the resin and hardener on a disposable surface. Mix only enough for the amount you need to avoid waste. |
| Step 2 | Apply the epoxy glue to the roughed-up surface of the soapstone with a toothpick or fine brush. Be sure to apply the glue only on the surface of the stone that will be glued together. Avoid getting the glue on any surfaces that won’t be joined together. |
| Step 3 | Join the pieces together and check the alignment before clamping them together. If you need to make any adjustments, do so quickly before the glue starts to set. |
| Step 4 | Apply pressure with a clamp to hold the pieces together while the glue sets. Be sure to place a barrier between the clamp and the soapstone to avoid damaging the surface. Leave the clamp in place for at least 24 hours or until the glue has set completely. |
Remember to wear gloves when working with epoxy glue and work in a well-ventilated area. Epoxy glue is one of the strongest adhesives available and offers a permanent bond when used properly. Make sure to follow the manufacturer’s instructions for best results.
Applying Super Glue
When it comes to applying super glue to bond soapstone pieces together, there are a few important steps to follow. Here’s a breakdown of how to do it:
- Prepare the surfaces: As with any adhesive, the surfaces of the soapstone that will be bonded together need to be clean and dry. Use a piece of fine-grit sandpaper to rough up the surfaces slightly, and then wipe them down with a clean, dry cloth to remove any dust or debris.
- Apply the super glue: Apply a small amount of super glue to one of the surfaces you’ll be bonding together. Remember that a little bit goes a long way with super glue, so only use a small amount.
- Press the pieces together: Once you’ve applied the glue, quickly press the pieces of soapstone together. Be sure to hold them in place firmly for at least 30 seconds to ensure a strong bond.
- Allow the glue to dry: Super glue sets quickly, so you won’t need to clamp the pieces together. However, it’s important to let the glue dry completely before you handle the soapstone again. This can take anywhere from a few minutes to an hour, depending on the brand of glue you use and the temperature and humidity of your workspace. Check the manufacturer’s instructions for specific drying times.
- Clean up any excess glue: If you notice any excess glue seeping out of the edges of the soapstone, use a clean, dry cloth to wipe it away carefully. Super glue bonds quickly and can be difficult to remove once it dries, so be sure to clean up any excess right away.
Remember to always follow the manufacturer’s instructions when working with any adhesive, including super glue. Be sure to work in a well-ventilated area and wear gloves and protective eyewear if necessary. With the right preparation and application techniques, you can successfully bond soapstone pieces together using super glue.
Applying Silicone Adhesive
When applying silicone adhesive to glue soapstone, it’s essential to follow the instructions on the adhesive container. Here are the general steps:
- Prepare the surface: clean and dry both pieces of soapstone that will be glued together. Then use sandpaper to rough up the surface for improved adhesion.
- Apply the silicone: spread the silicone evenly on one surface with a putty knife or a gloved finger. Use enough silicone to create a thin, even layer.
- Join the surfaces: carefully align the other piece of soapstone with the silicone-covered surface. Use masking tape or clamps to hold the pieces in place while the adhesive dries.
- Drying time: silicone adhesive typically takes longer to dry than either epoxy glue or super glue. Read and follow the instructions on the container carefully. The drying time can range from a few hours to a full day or more.
- Clean up: once the adhesive is fully dried, remove any residual adhesive using a scraper or a sharp blade. Be sure to wear gloves and work in a well-ventilated area.
It’s important to note that not all silicone adhesives are created equal, and some are better suited for certain materials than others. When selecting your silicone adhesive, consider the type of soapstone that you’re working with, and follow the manufacturer’s instructions for best results. With a little patience and care, using silicone adhesive can be an effective way to attach soapstone pieces.
Clamping and Drying
After applying the glue to the soapstone pieces, the next step is to properly clamp them together until the adhesive is dried and set. This process can seem intimidating, but with the right tools and techniques, it can be done easily and effectively. Proper clamping and drying is critical to ensuring a strong bond between the soapstone pieces. In this section, we will discuss the best practices to clamp and dry your soapstone project to achieve the best possible outcome.
Clamping the Pieces Together
When it comes to gluing soapstone together, it’s essential to clamp the pieces together tightly to ensure a strong bond. Here’s a step-by-step guide on how to clamp soapstone pieces together:
- Apply the glue: Before clamping the pieces together, ensure that you have applied the glue evenly on both surfaces.
- Align the pieces: Once the glue has been applied, align the pieces together correctly, ensuring that they fit together perfectly.
- Use clamps: Use clamps to hold the pieces together tightly. Make sure that the clamps are secured in place and not slipping or sliding.
- Position the clamps: Position the clamps strategically to exert pressure in the right areas of the soapstone. Make sure that the pressure is evenly distributed across the surfaces being joined.
- Tighten the clamps: Tighten the clamps gradually, applying enough pressure to allow the glue to set. Be careful not to apply too much pressure, as this may cause the soapstone to crack or break.
- Check for gaps: While still clamped, check for any visible gaps between the pieces. If there are any, you may need to remove the clamps, add more glue, and repeat the clamping process.
Remember, it’s essential to use the right clamps for the job. Avoid using too many clamps or clamps that exert too much pressure, as this may lead to further damage to the soapstone. A good rule of thumb is to use one clamp for every 6 inches of the soapstone being joined. Once the glue has dried, and the pieces have been clamped tightly, move on to the next step for finishing touches.
Drying the Glue
Once you have clamped the soapstone together with the glue, it’s important to let it dry completely before handling it. The drying time will depend on the type of glue you used, the temperature and humidity of your workspace, and the size and weight of the soapstone piece. Refer to the glue manufacturer’s instructions for specific drying times.
Here are some general tips for drying the glue:
| Glue Type | Drying Time | Other Considerations |
|---|---|---|
| Epoxy Glue | 24 hours | Epoxy glue requires a longer drying time, but it provides a strong and durable bond. |
| Super Glue | A few minutes | Super glue dries quickly, but it may not be as strong as other types of glue. |
| Silicone Adhesive | 24-48 hours | Silicone adhesive requires a longer drying time, but it is flexible and waterproof. |
Note: It’s important to not disturb the soapstone while it’s drying because any movement can disrupt the bond. Make sure the clamps are securely fastened and the soapstone is level.
After the glue has dried, remove the clamps and inspect the joint for any gaps or weak spots. If there are any imperfections, apply more glue and clamp the soapstone again until it dries. Once you’re satisfied with the bond, you can move on to sanding and finishing the surfaces.
Sanding the Surfaces
After the glue has fully dried, it’s important to sand down any excess glue or rough edges to ensure a smooth finish. This step is crucial in achieving a polished and seamless look.
To sand the surfaces of the soapstone, you will need the following materials:
- Sandpaper: Choose a sandpaper with a grit of at least 220. You may also need finer grits if you want to polish the surfaces further.
- Sanding block or sanding sponge: This will help you apply even pressure while sanding.
- Dust mask: Sanding soapstone can produce a lot of dust, which can be harmful to breathe in. Wear a dust mask to protect yourself.
- Eye protection: Similarly, it’s important to protect your eyes from any debris that might fly off during sanding.
To sand the surfaces properly, follow these steps:
- Put on your dust mask and eye protection.
- Use the sanding block or sanding sponge to sand away any excess glue or rough edges. Start with a coarse grit (e.g. 220) and work your way up to a finer grit if you wish.
- Sand in a circular motion and apply even pressure. Be careful not to sand too hard and make sure to sand evenly to avoid creating low spots or depressions in the surface.
- After sanding, wipe away any dust with a clean, damp cloth.
- If you want to further polish the surface, repeat the sanding process with a finer grit sandpaper.
Remember to be patient and take your time with sanding. It’s important to achieve a smooth and even surface for the best result. Once you’re satisfied with the surfaces, you can move on to the finishing touches.
Finishing Touches
As you near the end of your soapstone gluing project, it’s time to focus on the finishing touches that will make your creation shine. These final steps are crucial for achieving a professional-looking result that is both durable and visually appealing. Some of these finishing touches include cleaning and polishing the surface, as well as sealing the soapstone to protect it from damage. Keep reading to learn more about these important steps that will help you achieve the desired outcome of your soapstone project.
Cleaning and Polishing
Once the glue has fully cured and the clamps have been removed, it’s time to give your newly glued soapstone piece a final cleaning and polishing.
Cleaning: Begin by wiping the surface with a damp cloth to remove any residual glue or debris. Once the surface is clean, use a fine-grit sandpaper (such as 220 grit) to lightly sand any rough spots, working gently in a circular motion. Avoid applying too much pressure as you don’t want to scratch the surface.
Polishing: After sanding, use a dry cloth to wipe away any dust or debris from the surface. Apply a small amount of mineral oil to a soft cloth and rub it onto the soapstone in a circular motion. The oil will help bring out the natural colors and patterns in the stone, while providing protection and shine.
Below is a summary of the cleaning and polishing process:
| Step | Instructions |
| 1 | Wipe the surface with a damp cloth to remove any residual glue or debris. |
| 2 | Use a fine-grit sandpaper (such as 220 grit) to lightly sand any rough spots, working gently in a circular motion. |
| 3 | Wipe away any dust or debris from the surface with a dry cloth. |
| 4 | Apply a small amount of mineral oil to a soft cloth and rub it onto the soapstone in a circular motion. |
By following these simple steps, your soapstone piece will look its best and be ready to use or display.
Sealing the Soapstone
Sealing the Soapstone is an important step to protect it from stains and water damage. Once the glue has completely dried, you can start the sealing process. There are different types of sealers available in the market, but you must choose the right one to ensure optimal results. Below is a table summarizing the different types of sealers and their qualities:
| Type of Sealer | Qualities |
|---|---|
| Mineral Oil | A natural sealer that brings out the stone’s natural colors and patterns. Needs to be re-applied periodically. |
| Wax | Provides a protective layer that repels water and stains. Needs to be re-applied periodically. Can be used in combination with mineral oil for added protection. |
| Penetrating Sealer | Penetrates the stone’s surface to create a barrier against water and stains. Does not alter the stone’s natural appearance. Needs to be re-applied periodically. |
| Topical Sealer | Creates a protective layer on the surface of the stone to repel water and stains. Can alter the stone’s natural appearance. Needs to be re-applied periodically. |
It is important to follow the manufacturer’s instructions when applying the sealer. For best results, make sure the soapstone is completely clean and dry before applying the sealer. Use a clean, dry cloth to apply the sealer evenly in a thin layer. Allow the sealer to dry completely before using the soapstone.
Remember that even with a sealer, soapstone is a soft and porous material that requires regular maintenance to keep it looking its best. Clean up spills immediately and use coasters and trivets to protect the surface from hot dishes and pots. With proper care and maintenance, your soapstone project should last for many years to come.
Conclusion
After completing all the steps mentioned in this guide, you should have a strong and secure soapstone project that will last for years to come. Whether you’re repairing a broken soapstone kitchen countertop or crafting a new soapstone sculpture, following these guidelines will ensure that your project is a success.
However, it’s always important to keep in mind that safety should be your top priority when working with soapstone and any necessary tools and materials. Wear protective gear, such as gloves and goggles, to keep yourself safe from any potential harm.
In addition, take your time and be patient throughout the process. Rushing or cutting corners could lead to incomplete or faulty work that could ultimately affect the longevity of your project.
Remember to choose the right glue for your specific project, taking into consideration the size and weight of the pieces being glued together, as well as the conditions in which it will be used.
Once your project is complete, take the time to clean and polish the soapstone to bring out its natural beauty. Consider sealing the surface to protect it from damage and weathering over time.
Overall, gluing soapstone together may seem like a daunting task, but with the right tools, materials, and techniques, it can be a rewarding and successful experience. Take the time to do it right, and you’ll be left with a beautiful and durable soapstone project that you can be proud of.
Frequently Asked Questions
1. Can I glue soapstone together using regular glue?
No, regular glue will not work for soapstone. You need a specialized adhesive specifically designed for use on stone.
2. Can I use any type of epoxy glue on soapstone?
No, you need to choose an epoxy glue that is formulated for use on stone. Look for an epoxy with high strength and the ability to withstand water and heat.
3. Do I need to sand the surfaces before gluing soapstone together?
Yes, it is important to rough up the surfaces of the soapstone to ensure a strong bond. Use sandpaper or a sanding block to create a slightly rough surface.
4. Can I fit the pieces together without using glue to check the fit?
Yes, fitting the pieces together without glue is a good way to check if they fit together properly before applying any adhesive.
5. How long do I need to clamp the soapstone pieces together?
The length of time needed to clamp the pieces together will depend on the type of adhesive you are using. Follow the manufacturer’s instructions for best results.
6. Can I use a sealant on the soapstone after gluing it together?
Yes, using a sealant can help protect the soapstone and keep it looking its best. Make sure to choose a sealant that is safe for use on stone.
7. How do I clean soapstone after gluing it together?
Use a gentle soap and warm water to clean soapstone. Avoid using abrasive cleaners or scrubbers that may damage the surface.
8. Can I apply pressure to the soapstone immediately after gluing it together?
No, you need to allow the glue to dry completely before applying any pressure to the soapstone. Follow the manufacturer’s instructions for drying time.
9. Do I need special tools to glue soapstone together?
No, you don’t need any special tools to glue soapstone together. However, using sandpaper or a sanding block can be helpful for preparing the surfaces.
10. Is it possible to fix mistakes made while gluing soapstone together?
If you make a mistake while gluing soapstone together, it may be possible to fix it. Use a razor blade to carefully remove excess glue and then reapply the adhesive as needed.