As nature lovers, we all have a special place in our hearts for the beauty of flowers. Pressed flowers are a wonderful way to preserve their delicate form and make stunning pieces of art for various purposes. If you’re considering how to glue pressed flowers and transform them into a unique work of art, you’ve come to the right place. Gluing pressed flowers can be quite a challenge, and many factors need to be considered. But with a little patience, the right tools and techniques, and the right kind of glue, you can create something truly beautiful. In this guide, we’ll walk you through the steps on how to glue pressed flowers to perfection. Let’s get started!
Materials You’ll Need
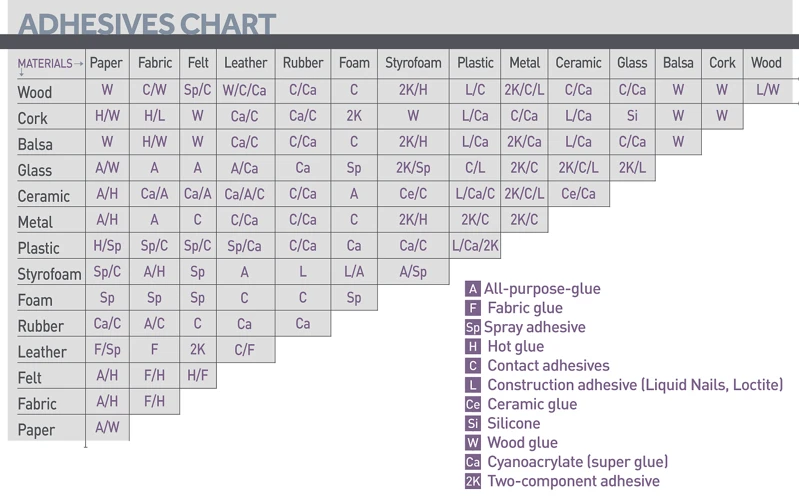
You can’t start crafting without having the right tools at hand. In order to glue pressed flowers, you’ll need a few essential materials. Here are some options for the items you will need to gather before getting started: pressed flowers, glue, tweezers, paintbrush, and paper. Of course, you might find that additional materials are useful, depending on the desired result. Before choosing the right glue, make sure to check the material you’ll be attaching your flowers to, as different surfaces require different types of glue. If you’re looking to glue flowers to various surfaces, such as car interior, wood, fabric, shirt, foam, or paper, check out this guide on the right adhesive to use.
Pressed Flowers
To create a beautiful and long-lasting pressed flower project, you’ll need to start with high-quality pressed flowers. Before you begin, make sure your flowers are fully pressed and dried. Pressed flowers can be purchased online or at most craft stores, but you can also make your own at home by using a flower press.
When selecting your flowers, look for those with vibrant colors and no signs of damage. If you’re using flowers from your garden, choose ones that are blooming at their peak and free of any bugs or dirt.
Some popular flowers for pressing include roses, daisies, lilies, and pansies. Experiment with different flowers to see what works best for your project.
Once you have your flowers, carefully handle them with a pair of tweezers to avoid damaging them. If you need to trim the stems, use a pair of scissors to make a neat cut. Make sure to also trim any excess foliage from the flower to create a clean look.
It’s important to note that some flowers may not press well, or may lose their vibrant color after pressing. If you’re unsure about a certain flower, do a test press before committing to using it in your project.
Tip: If you want to add a special touch to your pressed flower project, consider pairing it with velvet. Read our guide on how to glue velvet to wood to learn more.
Glue
Glue is the main material you will need to make your pressed flower project a success. There are many types of glue available on the market, but for this project, it’s best to use a clear-drying glue like white glue or a glue stick. These types of glue will ensure that the flowers don’t become discolored or damaged.
If you are working with delicate flowers, like small daisy petals or tiny violets, a small paintbrush may be helpful in applying the glue to the petals. For larger flowers and leaves, you can simply apply the glue directly to the surface.
Keep in mind that a little goes a long way when it comes to glue. You don’t want to use too much, which could cause the flower to wrinkle or become too saturated with glue. A thin layer of glue will securely hold the flower in place without damaging it.
If you’re using a new glue stick, gently push the glue up from the bottom of the container to make sure it is still fresh and pliable. You can test the glue to make sure it’s sticky enough by applying a small amount to a scrap piece of paper and pressing your finger onto it. It should feel tacky to the touch and hold your finger in place for a moment.
Tip: If you’re looking for other fun crafting projects where you can use glue, check out how to glue ribbon to create a beautiful wreath or how to glue photos to paper to make a special scrapbook page.
Tweezers
Tweezers are a crucial tool for handling pressed flowers, as they allow for precise placement and adjustment of the delicate petals and stems. When selecting tweezers for this task, it is best to choose ones with a fine pointed tip, such as precision tweezers. These will give you better control over the flowers and prevent them from slipping out of your grip.
It is also important to choose tweezers that will not damage the flowers. Avoid ones with rough or jagged edges that could tear or crush the petals. Instead, opt for tweezers made of gentle materials, such as stainless steel, which is durable and rust-resistant.
If you do not have tweezers on hand, you could try using a pair of fine-pointed scissors instead. However, keep in mind that this will require more skill and care, as cutting the delicate flowers can be tricky.
When working with tweezers, it is important to handle the flowers gently and avoid applying too much pressure. This could cause the petals to bend or crease. It is also helpful to have a steady hand and a good eye for detail, as precise placement is key to creating a beautiful finished product.
Looking for more ways to get creative with glue? Check out our article on how to glue feathers to paper for inspiration on adding texture and dimension to your artwork.
Paintbrush
When gluing pressed flowers, a paintbrush can come in handy. It is important to choose a small, fine-tipped paintbrush so that you can apply the glue precisely and avoid any mishaps. A synthetic brush is recommended, as natural hair brushes can leave behind fibers in the glue.
Using a paintbrush allows you to apply glue to the finer details of the flowers, ensuring that they stick properly. The glue can be applied to the petals and stem with the paintbrush, but it is important to avoid applying too much glue. Excess glue can seep through the delicate petals and ruin the appearance of the flower.
A paintbrush can also aid in positioning the flowers in the desired location. The brush can be used to move the flowers into place without damaging them or getting glue on your fingers.
After finishing the gluing, it is important to clean the paintbrush thoroughly before the glue dries on it. Rinse it with warm water and soap, and then let it air dry. This will ensure that it is ready for its next use.
A small, synthetic paintbrush is an essential tool to have when gluing pressed flowers. With it, you can be sure that you are applying the glue precisely and avoiding any unwanted messes. And who knows, maybe one day you’ll find yourself using a paintbrush for gluing fabric to wood letters, pom poms to a shirt, or even experimenting with watercolors, glue, and salt!
Paper
When it comes to gluing pressed flowers, having the right type of paper is crucial for achieving the best results. The paper you select should be sturdy enough to hold the flowers securely in place, yet thin enough to avoid adding too much bulk to your finished project. It’s best to use acid-free paper to prevent your flowers from becoming discolored over time.
Here are a few types of paper you can use for gluing pressed flowers, along with some tips for each:
- Watercolor paper: This type of paper is thick and textured, making it a great option for gluing flowers. Its surface allows for a variety of gluing techniques, and the texture can add a nice touch to your finished piece.
- Cardstock: This is a sturdy type of paper that provides a good base for your pressed flowers. It’s available in a variety of colors and can be a great option if you want to create a colorful background for your project.
- Vellum: If you’re looking for a translucent option, vellum is a great choice. It’s thin, lightweight, and can give your project an ethereal feel.
No matter which type of paper you choose, make sure it’s clean and free of any debris before adding the glue and flowers. Now that you have your paper selected, you’re one step closer to creating a beautiful piece of art with your pressed flowers.
If you’re interested in learning more about gluing different types of materials, check out our guides on how to glue foam and how to glue ribbon to paper.
Preparing the Flowers for Gluing
Before you get to the exciting part of gluing your pressed flowers, it’s essential to prepare them properly. This step is crucial to ensure your flowers remain intact and look their best once they’re glued. In this section, we’ll explore the vital steps you need to take to prepare your flowers for gluing. From choosing the right flowers to trimming and arranging them, we’ll guide you through the process to help make your project a success. So, let’s dive in!
Choosing the Right Flowers
When it comes to choosing the right flowers for gluing, there are a few things to keep in mind. It is important to select flowers that have been pressed and dried properly and are not too bulky or thick. Here are some tips to help you choose the perfect flowers for your pressed flower project:
- Size: Choose flowers that are small to medium in size. Larger flowers may be difficult to press and may not adhere to the paper as well.
- Shape: Flowers with flat or thin petals are ideal for pressing and gluing. Curled or thick petals may not stick well and can create a lumpy appearance.
- Color: Choose flowers with vibrant colors that will stand out against the paper. Avoid flowers that have faded or lost their color during the pressing process.
- Texture: Look for flowers with smooth, flat surfaces. Flowers with rough or bumpy textures may not adhere well to the paper.
- Stems: If you plan to include stems in your project, choose ones that are thin and flexible. Stems that are too thick or stiff can cause the flower to stick out from the paper.
By keeping these tips in mind, you can choose the perfect flowers for your pressed flower project and ensure that they adhere well when glued.
Pressing the Flowers
Pressing the flowers is an essential step in preparing the flowers for gluing. Here are the steps to follow:
- Choose flowers with a flat shape: Flowers with a bulging shape or thick center may not press well. Choose flowers with flat petals and minimal thickness for the best results.
- Remove excess water: If the flowers were recently picked or stored in the refrigerator, they may have excess water in them. Blot the flowers with a paper towel to remove any excess moisture.
- Prepare a flower press: You can use a traditional flower press or make your own by using a heavy book and placing the flowers between two sheets of paper. Make sure the flowers are arranged flat and not overlapping.
- Press the flowers: Once you have arranged the flowers, close the press or book. Place a heavy object on top of the press or book to apply pressure. Leave the flowers in the press for 2-4 weeks to ensure they are completely dry.
Remember to check on the flowers periodically to see if they need to be replaced or rearranged. Once the flowers are dry, they are ready for trimming and arrangement before gluing.
Trimming the Flowers
After pressing your flowers, it’s time to trim them. Trimming the flowers is an important step to make them look their best when glued. Use sharp scissors and delicate hands to trim away any excess foliage or stem.
It’s important to maintain the pressed shape of the flower while trimming it. A good rule of thumb is to leave a border of about 1/4-inch around the flower petals. This will ensure that the flower stays intact and doesn’t crumble or fall apart when being glued.
Pro Tip: Make sure to save any trimmed leaves or petals you might want to use later for decoration.
Here’s a table showcasing the steps for trimming your pressed flowers:
Step 1: | Grab your pressed flowers and sharp scissors. |
Step 2: | Carefully trim any excess foliage or stem, maintaining the pressed shape of the flower. |
Step 3: | Leave a border of about 1/4-inch around the flower petals to ensure they stay intact. |
Step 4: | Save any trimmed leaves or petals for decoration. |
Trimming your flowers can be time-consuming, but taking the time to do it right will make all the difference in the finished product.
Arranging the Flowers
Once you have chosen and pressed your flowers, it’s time to arrange them for gluing. Arranging the flowers can be a fun and creative process, and there are a few tips and tricks you can use to make sure your finished product looks beautiful.
Tip 1: Lay out your flowers on a flat surface and play around with different arrangements before gluing anything down. This will help you visualize how the finished product will look and give you a chance to make any necessary adjustments before you start gluing.
Tip 2: Consider the color and size of each flower when arranging your design. You may want to place larger flowers in the center and surround them with smaller flowers, or use contrasting colors to create a bold and eye-catching look.
To help visualize different arrangements, you can create a table in HTML to lay out your flowers before gluing them down. Here is an example of what the table could look like:
In this example, six different flowers are arranged in a 2×3 grid. You can easily modify the table to include more or fewer flowers and adjust the positioning to create different designs.
Tip 3: Don’t be afraid to experiment and get creative with your arrangements! There is no right or wrong way to arrange your pressed flowers, and the possibilities are endless. Just have fun with the process and let your creativity run wild.
Gluing the Pressed Flowers
As we come to the most exciting part of this guide, it’s time to bring all the elements together and start gluing your pressed flowers. This process requires a steady hand, patience, and a bit of creativity to make sure your final product turns out as stunning as possible. Get ready to learn some tips and tricks to ensure your flowers stick beautifully and create an eye-catching display.
Applying the Glue
One of the most crucial steps in gluing pressed flowers is applying the glue. There are different types of glue you can use, but the best one for this project is PVA glue. Before applying the glue, make sure you have prepared the flower or flowers you want to glue. Here’s how to apply the glue:
Step | Action |
---|---|
Step 1 | Squeeze a small amount of PVA glue onto a piece of paper or a palette. |
Step 2 | Use a paintbrush to pick up a small amount of glue. |
Step 3 | Create a thin layer of glue onto the area where you want to place the flower. |
Step 4 | If you need to glue more than one flower, repeat steps 2 and 3 for each flower. |
Step 5 | Make sure to apply the glue thinly and evenly to avoid clumps. |
Step 6 | Be careful and avoid applying too much glue to prevent the flower from tearing. |
Step 7 | Don’t rush the process and take your time to apply the glue properly. |
By following these simple steps, you’ll have a good foundation for gluing pressed flowers that will last a long time. Remember to use a small amount of glue, create a thin and even layer, and take your time. Rushing this process can cause a lot of problems, so be patient and enjoy the experience!
Placing the Flowers
Once you have applied glue to your pressed flowers and arranged them on the paper, it’s time to place them in their final position. Follow these steps to ensure your finished product looks beautiful and professional:
- Be gentle: Pressed flowers are delicate and can easily tear or crinkle if handled roughly. Use tweezers to gently pick up each flower and place it in its desired position.
- Start from the center: Begin by placing the largest or most prominent flowers in the center of your design. This will act as the focal point and help guide the rest of your arrangement.
- Create balance: Try to balance out your design by placing smaller or less prominent flowers around the focal point, adding depth and dimension to your piece.
- Play with color: Experiment with different color combinations to create a visually pleasing design. Consider using contrasting colors or shades of the same color to add interest to your arrangement.
- Layer the flowers: To create a multi-dimensional look, layer flowers on top of each other. Use small dabs of glue on the back of each flower to secure them in place.
- Adjust as needed: Step back and assess your design to ensure that each flower is placed in the right spot. Make any necessary adjustments before the glue dries.
By following these steps and taking the time to carefully place your pressed flowers, you can create a beautiful and unique piece of art that will last for years to come.
Letting the Glue Dry
Once you have placed the pressed flowers in their desired positions, it’s important to let the glue dry completely before moving or handling the project. Letting the glue dry properly will ensure that the flowers stay in place and prevent any damage to the project.
How long does it take for the glue to dry? The drying time of the glue will depend on the type of glue you use. In general, most glue brands recommend letting the glue dry for at least 24 hours. However, some types of glue (such as hot glue) can dry as quickly as a few minutes. It’s important to check the manufacturer’s instructions for the recommended drying time before handling the project.
To keep the flowers in place while the glue dries, you can use tweezers to hold them down gently. Alternatively, you can place a lightweight object (such as a piece of paper or a book) on top of the flowers to keep them in place. Be careful not to press down too hard and squash the delicate flowers.
Once the glue is completely dry, carefully remove any excess glue or paper scraps with tweezers or a small brush. This will ensure that the project looks neat and professional.
What happens if you move the project before the glue is dry? Moving the project before the glue is dry can cause the flowers to shift or fall off completely. This can ruin the project and may require starting over. It’s important to be patient and let the glue dry completely before handling the project.
Letting the glue dry completely is a crucial step in gluing pressed flowers. Be patient and follow the manufacturer’s instructions for the recommended drying time. Use tools like tweezers or lightweight objects to keep the flowers in place while the glue dries. Once the glue is dry, carefully remove any excess glue or paper scraps to achieve a professional look to your project.
Adding Finishing Touches
Once the glue has dried completely, it’s time to add the final touches to make your pressed flower creation even more beautiful.
Step 1: Use a soft brush to gently remove any excess glued petals or debris from the flowers.
Step 2: If desired, you can use a clear sealant or spray to protect your pressed flowers from moisture and fading. This is especially important if you plan on displaying the flowers in direct sunlight.
Step 3: Frame your pressed flowers to make a beautiful piece of art. Choose a frame that is slightly larger than your arrangement, and use acid-free matting to help preserve the colors of the flowers.
Step 4: Display your beautiful creation in a prominent location where you can enjoy it daily. Some creative ideas for displaying your pressed flowers include hanging them on a wall, using them as bookmarks or stationery, or arranging them in a shadow box.
With these simple steps, you can create a beautiful and unique piece of art that showcases the natural beauty of pressed flowers. So go ahead, get creative, and enjoy the beauty of nature in your own home.
Conclusion
After following the steps in our guide on how to glue pressed flowers, you should now have a beautiful piece of art that can be used for various decorations and crafts. Whether it’s for scrapbooking, card-making, or creating a unique piece of wall decor, the possibilities are endless.
It is important to remember that the key to successfully gluing pressed flowers is to choose the right flowers, carefully press and trim them, and apply the glue properly. This will ensure that your finished product looks stunning and long-lasting.
When choosing flowers, opt for those that have thin petals and are not too bulky. This will make it easier to press and glue them. Once you have selected the flowers, it’s important to press them properly and wait for them to fully dry before trimming and arranging them. This will help them maintain their shape and color.
When applying the glue, use a small amount and spread it evenly with a paintbrush to avoid clumps or excess glue. Carefully place the flowers onto the surface and gently press them into the glue. Allow the glue to dry completely before handling the piece further.
Before finishing your piece, take some time to play around with the arrangement and ensure that it is aesthetically pleasing. You may even choose to add some embellishments or framing to make the piece more unique.
Overall, gluing pressed flowers can be a fun and rewarding craft that is perfect for all skill levels. By following our step-by-step guide and using your creativity, you can create a beautiful and unique piece of nature-inspired art.
Frequently Asked Questions
Can I use regular glue to glue pressed flowers?
No, regular glue can discolor or damage the delicate flowers. It’s better to use specialized glue like PVA or clear-drying silicone adhesive.
How do I press flowers for gluing?
Place the flowers between two sheets of absorbent paper and press them under heavy books for a few weeks until they are completely dried.
Can I glue flowers onto any surface?
It’s better to choose a clean, flat surface like paper or cardstock. Avoid surfaces that are oily or textured as they can affect the adhesive quality of the glue.
Do I need to trim the flowers before gluing them?
Yes, trim the flowers to eliminate any bumps or irregularities. Scissors or small clippers can help to trim the stems of the flowers.
Can I arrange the flowers before gluing them?
Yes, arrange the flowers in a desired pattern and once satisfied with the placement, then glue them onto the surface.
What can I do if the glue leaves visible marks?
Wipe away any excess glue with a damp cloth or brush. You can also use a transparent glitter or baby powder to cover the marks after the glue has dried.
How long does it take for the glue to dry?
It depends on the type of glue you use. Most clear-drying adhesives take 24 hours to dry, but some can dry much faster, like a few minutes.
Can I add additional embellishments to my pressed flower design?
Yes, you can add additional embellishments like ribbons, beads, or glitter using glue or thread after the flowers have been glued onto the surface.
Can I glue flowers to fabric?
Yes, you can glue flowers onto fabric, but it’s important to use an adhesive that is specifically formulated for fabric to avoid damage or discoloration.
How long will my pressed flower design last?
Your pressed flower design can last several years if it’s kept away from direct sunlight and stored in a dry, cool place.