When it comes to woodworking projects, gluing plywood sheets together can be a crucial step in achieving a strong, durable end product. Whether you’re building furniture, crafting a custom piece, or engaging in a DIY home improvement task, understanding the right way to bond plywood is essential. This blog post aims to guide you through the process, ensuring your plywood creations stand the test of time.
Essential Tools and Materials for Plywood Gluing
Before diving into the plywood adhesive techniques, let’s outline the necessary tools and materials. You’ll need a suitable wood glue for plywood, clamps to hold the pieces together, a clean brush or spreader for the glue application, and a damp cloth for cleaning up any excess. Additionally, sandpaper or a sander will be useful for preparing the surfaces.
Preparing the Plywood Sheets for Gluing
Proper preparation of the surfaces is key to successful bonding plywood layers. Begin by ensuring that the edges to be glued are straight and smooth. If not, sand them down or use a plane to achieve an even surface. It’s also important to remove any dust or debris that could interfere with the adhesive’s ability to bind.
Plywood Adhesive Techniques

Choosing the Best Plywood Glue
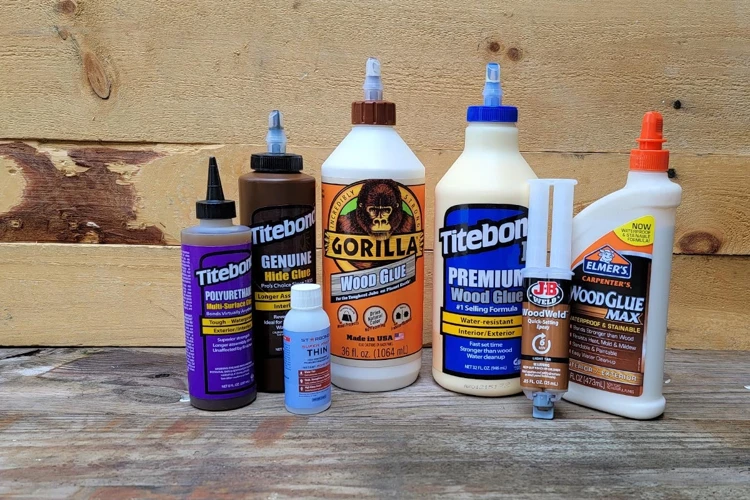
Selecting the best plywood glue is a pivotal step in the process. You’ll want an adhesive that is strong, has a suitable open time for your project, and matches the conditions in which the plywood will be used. PVA (polyvinyl acetate) glues are commonly recommended for interior projects due to their ease of use and strong bond.
Waterproof Glue for Plywood
For projects that will be exposed to moisture or outdoor conditions, waterproof glue for plywood is a must. Resorcinol and epoxy based glues are top choices, providing resilience against water and temperature variations. Make sure to follow the manufacturer’s instructions closely for the best results.
Bonding Plywood Layers Together

How to Laminate Plywood
Laminating involves bonding thin layers of plywood together to create a thicker, sturdier panel. To begin how to laminate plywood, apply an even layer of glue on one surface, place the second sheet on top, and apply pressure evenly across the surface, typically with clamps or a press.
The Plywood Glue-Up Process
The plywood glue-up process requires attention to detail. After applying the adhesive, align the sheets carefully before pressing them together. Use a rolling pin or a similar tool to remove any air bubbles and ensure a uniform bond across the entire surface.
DIY Plywood Joining Tips
Gluing Plywood Sheets Effectively
When engaging in DIY plywood joining, it’s crucial to apply glue evenly across the entire edge of the plywood. Avoid over-application to prevent excessive squeeze-out, which can be wasteful and create additional cleanup work. A thin, consistent layer is your goal for an effective bond.
Plywood Clamping Tips
Proper clamping is vital for a secure bond. Here are some plywood clamping tips to consider: use enough clamps to apply consistent pressure, protect the surface with scrap wood to prevent damage from the clamp’s jaws, and adjust the clamps to apply even pressure without warping the plywood.
Finishing the Plywood Bonding Process
Once the glue has been applied and the sheets clamped, leave the assembly undisturbed for the manufacturer’s recommended curing time. After the glue has set, remove the clamps and gently sand any uneven edges or excess glue, being careful not to damage the ply layers.
Troubleshooting Common Gluing Issues
Tips for a Stronger Bond
For a stronger bond, ensure the glue is fresh and has not passed its expiration date. Apply adequate pressure during clamping and consider using a cauls to distribute pressure more evenly across the bonding surface. Additionally, make sure the environment is conducive to the glue setting properly.
Warnings and Precautions
Always read and follow the safety instructions on the glue container. Work in a well-ventilated area, wear protective gear when necessary, and be aware of the potential for allergic reactions. Keep a first aid kit handy and know how to respond in case of accidental glue ingestion or skin contact.
If you’re diving into a woodworking project and seeking guidance on adhesives, we have several resources that could help. For general tips, our article on how to glue wood together might be just what you need. If you’re working with specific materials, such as cedar, check out our guide on how to glue cedar boards together. And for those interested in laminating surfaces, our instructions on how to glue Formica to plywood will ensure a strong bond and a smooth finish for your project.
Conclusion
Mastering the art of gluing plywood is an invaluable skill for any woodworker or DIY enthusiast. By following the guidelines outlined in this post, you can ensure that your plywood projects are not only aesthetically pleasing but also structurally sound. Remember that patience, precision, and practice are the keys to perfecting your plywood adhesive techniques and achieving professional results.