Looking to glue a ceramic mug back together? It’s not uncommon for a mug to break, whether it’s due to accidental drops or wear and tear over time. However, fixing it can be a daunting task if you’re not familiar with the right types of glue and techniques. With so many options available, it’s important to choose the right glue that will create a strong and lasting bond. In this article, we’ll explore the various types of glue suitable for ceramic mugs, prepare the mug for application, and walk you through the steps of applying and curing the glue. We’ll also cover tips and tricks for gluing ceramic mugs, so you can make sure your repair job is a success. Let’s get started!
Types of Glue for Ceramic Mugs
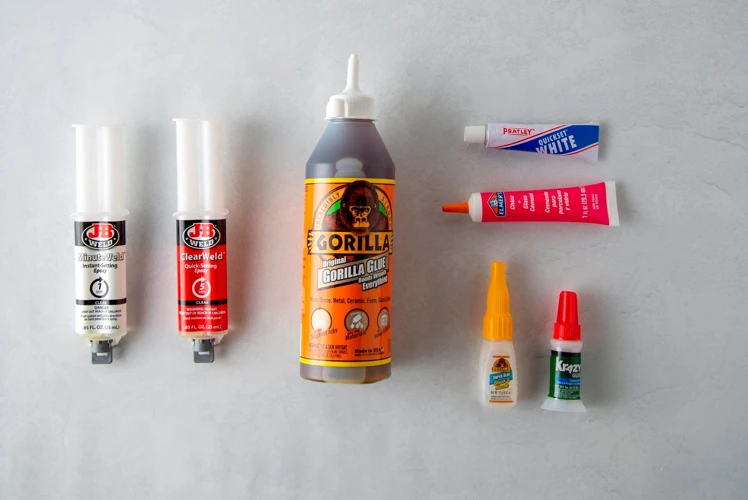
As one of the most delicate materials to work with, ceramic mugs require the right type of glue to ensure a lasting bond. The right adhesive secures the pieces together, keeping beverages contained and mug handles steadfast for many mornings to come. In this section, we’ll explore the different types of glue recommended for ceramic mugs. Whether you prefer a quick-setting glue like Cyanoacrylate (Super Glue) or a more heavy-duty adhesive like Epoxy, we’ll provide all the information you need to make an informed decision.
Epoxy
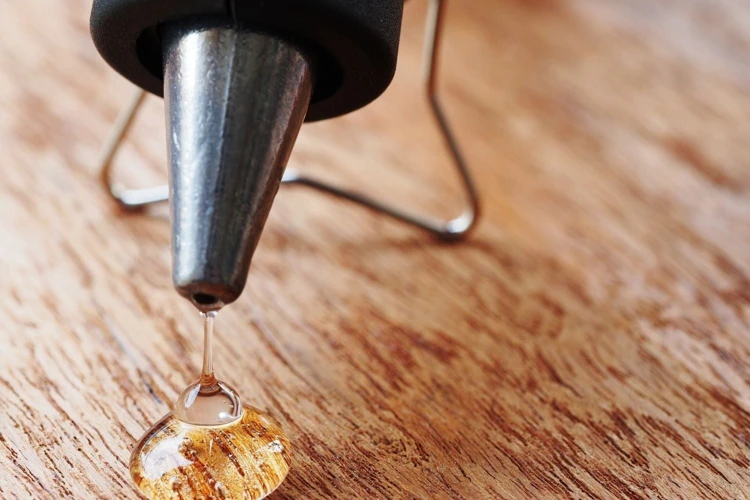
Epoxy is a two-part adhesive made up of a resin and a hardener. When these two parts are mixed together, they create a strong and durable bond. Epoxy is a great choice for gluing ceramic mugs because it can withstand high temperatures and is resistant to water and chemicals. It is also one of the strongest types of glue available, making it a reliable choice for a long-lasting bond.
Here are some tips and tricks for using epoxy to glue ceramic mugs:
| Tip | Description |
|---|---|
| Measure carefully | It’s important to mix epoxy in the correct ratio. Follow the manufacturer’s instructions, and use a small measuring cup to ensure accuracy. |
| Mix well | Mix the resin and hardener together for at least 2 minutes to ensure they are thoroughly combined. |
| Apply sparingly | Use a small amount of epoxy to avoid excess adhesive seeping out from the edges of the mug. A thin layer is typically all that is needed. |
| Use a toothpick | A toothpick can be useful for applying a small amount of epoxy to hard-to-reach areas, such as the handle of a mug |
| Clamp the Mug | After applying the epoxy, clamp the mug tightly using a rubber band or a clamp. This will help ensure a strong bond between the broken pieces. Wait for the recommended drying time before removing the clamp. |
| Fill gaps with epoxy putty | If there are any gaps in the broken ceramic, use an epoxy putty to fill them in before gluing the pieces together. This will help create a stronger bond and preserve the appearance of the mug. |
If you’re looking for more information on glue types, check out our article on “What is the Difference Between PVA Glue and Epoxy Glue?“. If you’re interested in other glue applications, check out our guides on “How to Glue Wood at 90 Degree Angle“, “How to Glue a Frame to a Mirror“, or “How to Glue Aluminum“.
Cyanoacrylate (Super Glue)
Cyanoacrylate (Super Glue) is a popular option for gluing ceramic mugs. Super glue is a type of adhesive that creates a strong and durable bond. It’s perfect for repairing cracks on ceramic mugs as it dries clear and won’t be visible once it has dried.
When using super glue, it’s essential to choose a high-quality adhesive that will be able to bond the ceramic mug’s surface. Look for a super glue that’s formulated specifically for ceramics to ensure the best results. One example of a ceramic-specific super glue is Gorilla Super Glue Ceramic.
When using super glue, it’s important to work quickly as it dries almost immediately. This adhesive bonds quickly, which can be helpful for small, precise repairs. However, it can also make it challenging to adjust the placement of the mug pieces once they’re stuck together.
Here is a table comparing the pros and cons of using cyanoacrylate (super glue) on ceramic mugs:
| Pros | Cons |
|---|---|
| Creates a strong bond | Dries almost immediately |
| Dries clear | Difficult to remove if excess glue is applied |
| Easy to use | Not ideal for large repairs |
While super glue is great for small repairs, it may not be the best option for larger breaks or cracks. In those cases, other types of adhesives, such as epoxy or polyurethane glue, may be more effective.
If you need to glue ceramic mugs frequently or regularly, it’s worthwhile to invest in a high-quality super glue that will hold up over time. However, for infrequent repairs, a standard super glue from a hardware store may be sufficient.
If you want to learn more about how to glue different materials together, you can check out other articles on our website, such as How to Glue Fiberglass: Tips and Tricks or How to Glue Body Repair Panels.
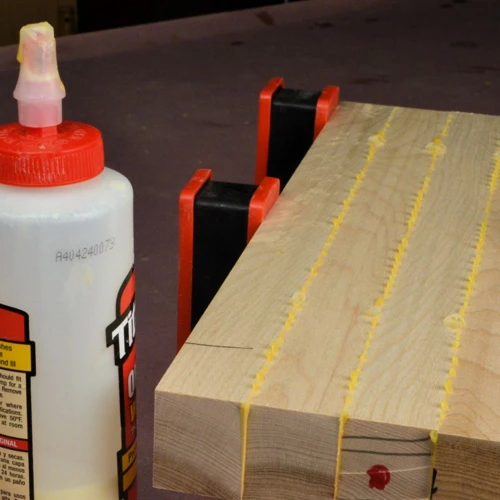
Polyurethane
Polyurethane adhesive is a popular option for gluing ceramic mugs because of its strong bonding properties. One advantage of using a polyurethane adhesive is that it will bond to almost any material, making it a versatile choice for DIY projects. The adhesive also has a high resistance to water and chemicals, which is ideal for items that will hold beverages or be washed often.
Here are some tips for using polyurethane adhesive to glue ceramic mugs:
- Make sure the mug surface is clean and dry before applying the adhesive. Any dirt or moisture on the surface can weaken the bond.
- Apply a thin layer of polyurethane adhesive to one of the surfaces you want to bond.
- Press the two surfaces together and hold them in place for several minutes to allow the adhesive to set.
- Use clamps or tape to secure the mug if needed, but be careful not to apply too much pressure and fracture the ceramic.
- Leave the mug to dry and cure for at least 24 hours before using it.
If you accidentally apply too much polyurethane adhesive, you can clean up the excess with a rag dipped in acetone or rubbing alcohol.
Remember to dispose of the rag properly to avoid fire hazards. It is also important to remember to work in a well-ventilated area and wear gloves when handling the adhesive.
Polyurethane adhesive is a great option for gluing ceramic mugs due to its strength, versatility, and resistance to water and chemicals. Its ability to bond to almost any surface makes it a popular choice for DIY projects. If you want to learn how to glue other items, check out our articles on how to glue plastic bottles together and how to glue steel.
Preparing the Mug
Before you can successfully glue ceramic mugs, it’s important to properly prepare the surface so that the adhesive can achieve maximum bonding. This step is crucial for creating a strong bond that will last for years to come. Preparing the mug for gluing involves two key steps: cleaning the surface and sanding it. This ensures that the glue adheres to the mug properly and creates a long-lasting bond. Let’s take a closer look at these steps so that you can prepare your ceramic mug for gluing in the most effective way possible.
Cleaning the Surface
Before applying glue to the ceramic surface of a mug, cleaning is crucial. Any dirt, grime or oil residue can weaken the bond between the glue and the ceramic, causing the mug to break or the glued area to detach easily in the future. Here are the steps to properly clean the surface of a ceramic mug:
| Step | Materials Needed | Instructions |
|---|---|---|
| Step 1 | Cotton balls or soft cloth | Dampen a cotton ball or soft cloth with rubbing alcohol. |
| Step 2 | Warm water and dish soap | Wash the ceramic mug with warm water and dish soap to remove any dirt or debris. |
| Step 3 | Cotton swabs or toothbrush | Dip a cotton swab or toothbrush in rubbing alcohol and scrub the cracks and crevices of the ceramic mug. |
| Step 4 | Clean water and cloth | Rinse the ceramic mug thoroughly with clean water to remove any traces of soap or alcohol. Dry it off with a clean cloth. |
It’s important to note that different types of glue may require slightly different cleaning methods, so be sure to check the product instructions before cleaning the surface. For more information on bonding surfaces, see our guide on how to glue countertop to cabinet.
One recommended cleaning agent is rubbing alcohol, which is commonly used to remove oil and grease stains from ceramic surfaces. Another cleaning option is white vinegar, which is an effective natural cleaning agent that can also remove mineral deposits and hard water stains.
When handling rubbing alcohol or any cleaning agent, it is important to work in a well-ventilated area and wear gloves to protect your skin. To learn more about the popular glue used for ceramics, check out our article on who makes E6000 glue.
Sanding the Surface
Preparing the ceramic mug for gluing is an important step that ensures successful bonding. One of the most crucial steps in the preparation process is sanding the surface of the ceramic mug. This step helps to create a rough surface, providing a better grip for the glue.
When sanding the surface, it’s advisable to use fine-grit sandpaper with a grit of between 120 and 220. Coarser grits may damage the surface of the ceramic mug and make the gluing process difficult. Fine-grit sandpaper is gentle on the surface, allowing the glue to adhere well.
Sanding the ceramic mug is a simple process that requires only a few tools. Here are the materials that you will need:
| Materials | |
|---|---|
| Ceramic mug | A mug that needs to be glued |
| Fine-grit sandpaper | Grits between 120 and 220 |
| Water | For lubrication |
| Sponge | For cleaning |
To sand the ceramic mug:
- Wet the sandpaper with water; this helps lubricate the surface, preventing damage to the ceramic mug.
- Start sanding with gentle pressure in a circular motion.
- Ensure that you cover the entire surface area that requires bonding.
- Check that the surface has become rough to the touch.
- Use the sponge to clean the surface of any sandpaper residue.
By sanding the surface of the ceramic mug, you have created a surface that will adhere better to the glue and create a stronger bond. The process is simple but crucial to the success of the entire gluing process. Remember to handle the mug with care, as any damage may affect the bonding process.
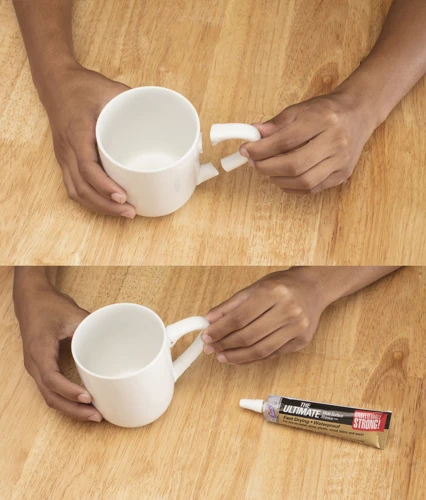
Applying the Glue
Now that you have your ceramic mug and glue ready, it’s time to apply the adhesive to fix any cracks or breaks. However, applying glue to ceramics can be tricky, especially if you want to achieve a strong and lasting bond. To ensure you do it right, follow these step-by-step instructions on how to properly apply glue to your ceramic mug. However, keep in mind that the process may vary depending on the type of glue you’re using, so be sure to check the manufacturer’s instructions. Let’s dive into the process of applying glue to your ceramic mug.
Preparation
Preparing to apply glue to your ceramic mug is an essential step that cannot be overlooked. Proper preparation will ensure a strong bond between the two surfaces and the longevity of your mug. Here are the steps you need to follow to prepare your ceramic mug for gluing:
- Clean the surface: Before you start applying any glue, you need to make sure that the surfaces of your mug are clean and free of any dirt, grease, or debris. Any residual material on the surface can prevent the glue from adhering properly and result in a weak bond. You can clean the surface using a mild detergent and water. Avoid using harsh chemicals or abrasive materials that can damage the surface of the mug.
- Dry the surface: Once you have cleaned the surface of the mug, you need to ensure that it is completely dry. Excess moisture on the surface can interfere with the bonding process and affect the strength of the bond. You can use a clean, dry cloth or paper towel to wipe the surface and remove any moisture.
- Sand the surface: Sanding the surface of the mug can help create a rough surface for the glue to adhere to, resulting in a stronger bond. Use fine-grit sandpaper to sand the surface gently. Avoid sanding too hard or for too long as it can damage the surface of the mug.
- Choose the right glue: Depending on your preference, you can choose any of the three types of glue – epoxy, cyanoacrylate, or polyurethane. Each type of glue has its pros and cons, and you need to choose the one that meets your requirements.
- Prepare the glue: Follow the manufacturer’s instructions to prepare the glue for application. Mix the two-part epoxy or apply the activator for cyanoacrylate. Polyurethane glue doesn’t require any preparation and can be applied directly.
Taking the time to prepare your ceramic mug properly before applying glue can make all the difference in the strength of the bond. Make sure to follow these steps carefully to ensure a successful gluing process. Remember, proper preparation is key to a strong bond and the longevity of your ceramic mug.
Application
When it comes to applying glue to ceramic mugs, there are a few things to keep in mind to ensure a secure bond. Here are some tips for the application process:
| Tip | Description |
| Use a small amount of glue | When applying glue, less is often more. Too much glue can result in a messy and weak bond. A small amount of glue applied evenly will suffice. |
| Apply to both surfaces | To ensure a strong bond, apply glue to both surfaces that will be joined together. This will create a stronger hold and reduce the risk of the bond breaking over time. |
| Spread evenly with a toothpick | Use a toothpick or a small brush to spread the glue evenly over the surface. This will help to ensure that the glue covers the entire surface and does not leave any gaps in the bond. |
| Don’t touch the surfaces together immediately | After applying the glue, resist the urge to immediately press the surfaces together. Instead, wait a few seconds to allow the glue to set up slightly, which will make it easier to position the pieces correctly. |
| Check for excess glue | Before clamping the pieces together, check for any excess glue. Use a toothpick or a small brush to remove any excess, as this can interfere with the strength of the bond. |
By following these tips, you can ensure a successful glue application process and create a strong, long-lasting bond for your ceramic mugs. Remember to also take proper precautions when handling glue, such as wearing gloves and working in a well-ventilated area.
Clamping
Securing the mug while the glue cures is crucial to ensure a strong bond. Clamping is the recommended technique to hold the two pieces together while drying. Here are some tips on how to clamp ceramic mugs:
| Tip | Explanation |
|---|---|
| Use a C-Clamp | A C-clamp can be used to tightly secure the handle to the mug. |
| Apply Even Pressure | Make sure to distribute pressure evenly across the entire surface of the handle. |
| Use a Soft Jaw Pad | Place a soft jaw pad between the clamp and the mug to prevent damage to the ceramic surface. |
| Leave Clamp in Place for Recommended Time | Refer to the glue manufacturer’s instructions for recommended clamping time, usually around 2-4 hours. Don’t be tempted to remove the clamp early, as this could cause the bond to weaken. |
Keep in mind that the type of clamp you use will depend on the size and shape of the mug and handle. Always ensure that the clamp is securely attached and will not slip or move during the drying process. If you don’t have a clamp available, a sturdy rubber band may also be used to hold the pieces together.
Drying and Curing
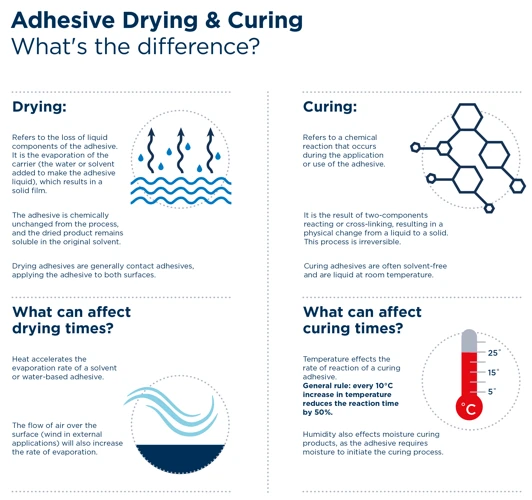
Once you have applied the glue to your ceramic mug, the next step is crucial to ensure a strong, lasting bond. The drying and curing process is where the glue solidifies and sets, creating a durable hold. Understanding the proper drying time and curing time for your chosen glue will help you achieve the strongest bond possible. In this section, we will explore the specifics of drying and curing, as well as some tips for accelerating the process.
Drying Time
Drying Time:
The drying time for ceramic mug glue depends on the type of glue and the conditions it is exposed to. Generally, it is recommended to let the glue dry for at least 24 hours before using the mug.
Here are estimated drying times for each type of glue:
- Epoxy: Epoxy dries slower than other types of glue and can take up to 24 hours to dry completely.
- Cyanoacrylate (Super Glue): Super glue dries quickly and can be dry within 10-20 seconds, but it’s important to let it sit for at least 24 hours before using the mug to ensure the bond is secure.
- Polyurethane: Polyurethane also dries slower like epoxy and can take up to several hours to dry completely, depending on the conditions.
It’s important to note that these drying times can be affected by conditions such as humidity and temperature. If the conditions are too cold or too humid, the glue can take longer to dry. If the conditions are too warm, the glue can dry faster than usual.
Tips for Accelerating the Drying Process:
If you’re in a rush and need your ceramic mug to dry faster, there are some tips that you can follow to accelerate the drying process:
- Apply the glue in a thin layer: Applying the glue in a thin layer can help it dry faster.
- Exposure to warm air: Exposing the glued area to warm air can help it dry faster. You can use a hairdryer or a fan to speed up the drying process.
- Use a drying aid: Some brands offer products that help accelerate the drying process. These products can be sprayed on the glued area to promote faster drying.
- Place in the sun: If it’s warm and sunny outside, you can place the mug in the sun to accelerate the drying process. However, be careful not to place it in direct sunlight for too long as this can cause the glue to weaken or discolor.
Remember to let the glue dry completely before using the mug to ensure that the bond is secure and long-lasting.
Curing Time
Once the glue has dried, it’s important to let it cure completely to ensure a strong bond. Curing time refers to the amount of time it takes for the glue to reach its maximum strength. This can vary depending on the type of glue used.
Here is a table to provide a general idea of curing times for the different types of glue:
| Glue Type | Curing Time |
|---|---|
| Epoxy | 24-48 hours |
| Cyanoacrylate (Super Glue) | A few minutes to an hour |
| Polyurethane | 6-8 hours |
It’s important to note that these are just general guidelines and curing times can vary depending on the specific brand and product. Always check the manufacturer’s instructions for the recommended curing time.
During the curing process, it’s important not to stress the bond too much. Avoid using or handling the mug as much as possible during this time. Once the glue has fully cured, it should be able to handle everyday use and washing.
Tips for Accelerating the Drying Process
Accelerating the drying process of your ceramic mug after gluing it can be helpful if you need to use it urgently. Here are some tips that can help you speed up the process:
- Use a Hair Dryer: Heat can help speed up the drying process. Use a hair dryer on the low to medium setting to gently blow hot air onto the glued area. Keep the hair dryer moving around to avoid any overheating or damage.
- Place it in the Sun: Sunlight can also help to dry the glue more quickly. Place the mug in a spot with direct sunlight and allow it to sit for a few hours. This method is only effective if the weather is warm and sunny.
- Turn on a Fan: Increasing air circulation around the glued area will help the glue to dry faster. Turn on a fan and point it towards the mug to facilitate air movement.
- Use a Dehumidifier: High humidity can slow down the drying of the glue. Use a dehumidifier or air conditioner in the room to remove the excess moisture from the air and accelerate the drying process.
- Apply Heat: If you have a heat gun or a small oven, heat up the mug slightly to quicken the setting of the glue. Do this carefully and slowly, since subjecting the mug to sudden changes in temperature can result in cracking or damage.
Remember to be patient and not rush the process too much. Rushing will only result in a weaker bond, and the mug may break again easily. The drying/curing time for each type of glue differs, so it’s important to refer to the manufacturer’s instructions.
Removing Excess Glue
One common issue when gluing ceramic mugs is the excess glue that can squeeze out from the bond line. Not only does it look unsightly, but it can also adversely affect the bonding strength of the glue. It’s important to remove excess glue promptly using appropriate techniques. Let’s explore some strategies for removing any unwanted glue from your ceramic mug without damaging your hard work.
Before Drying
Before Drying:
- Wipe off any excess glue using a cotton swab or a cloth. This will ensure that there are no visible blobs of glue on the mug once it dries.
- If you accidentally got any glue on your skin, use acetone or nail polish remover to remove it immediately. Do not wait for the glue to dry as it will be more difficult to remove later.
- Check the clamps to ensure that they are tight enough to hold the broken pieces of the mug together. If the clamps are loose, the glue will not be able to hold the pieces together properly.
It is important to take care of any excess glue before it dries because it will be more difficult to remove once it hardens. Additionally, if any glue comes into contact with your skin, it can cause irritation or even chemical burns. Checking the clamps is also important because they serve as the mechanism that keeps the broken pieces of the mug in place while the glue dries. If the clamps are not tight enough, the pieces may shift and cause the bond to fail.
After Drying
After drying, it’s important to inspect the bond between the two ceramic pieces to ensure that it is strong and secure. Here are some steps to take after the glue has fully dried:
- Inspect the bond carefully: Take a close look at the edges of the glued area to check if there are any gaps or visible cracks. If there are none, gently press and wiggle the two pieces to test the strength of the bond.
- Reinforce if needed: If you feel that the bond is not strong enough, you can apply another layer of glue and repeat the clamping process. This will help to strengthen the bond and create a more secure hold.
- Clean up any excess glue: If there is any excess glue on the surface of the mug, you can use a razor blade or sandpaper to gently scrape it off. Be careful not to damage the ceramic surface.
- Allow for further curing time: If the bond is not as strong as you would like it to be, you can allow for further curing time. Leave the mug in a warm and dry place for an additional 24-48 hours to give the glue more time to dry and cure.
- Consider sealing the bond: If you want extra assurance that the bond will hold, you can consider sealing it with a waterproof sealant. This will help to protect the bond from moisture, which can weaken the glue over time.
By following these steps, you can ensure that your ceramic mug bond is strong, secure, and long-lasting. Remember to always be patient and careful when working with glue and ceramics, and to take safety precautions such as wearing gloves and working in a well-ventilated area.
Testing the Bond

After carefully applying the glue and properly clamping the broken pieces of your ceramic mug together, the next and one of the most essential steps is to test the bond. This step ensures that the glue has successfully secured the pieces together and that the mug is safe to use without falling apart again. In this section, we will discuss how to properly test the bond using a few simple techniques and what to do if the bond fails to hold. It’s important to take this step seriously as it can prevent future mishaps and accidents with your favorite ceramic mug. So, let’s dive in and learn more about testing the bond!
How to Test the Bond
Testing the bond of the glued ceramic mug is an essential step to ensure its longevity. Here is a table explaining how to test the bond and what the results mean:
| Test | How to Perform | Result | Action to Take |
|---|---|---|---|
| Visual Inspection | Thoroughly examine the bond for any cracks, gaps, or separations. | If there are no visual defects, the bond is strong. | If there are visual defects, reapply glue and let it dry and cure again. |
| Tactile Test | Hold the mug and gently press and twist the glued area. | If the bond does not move or flex, the bond is strong. | If the bond moves or flexes, reapply glue and let it dry and cure again. |
| Water Test | Fill the mug with cold water, let it sit for a few minutes, and then empty the water. | If there are no leaks, the bond is strong. | If there are leaks, reapply glue and let it dry and cure again. |
Performing all three tests will provide reassurance that the bond on the ceramic mug is strong. If any of the tests indicate a weak bond, it’s important to reapply glue and let it dry and cure again. Remember, a strong bond is crucial for a long-lasting and functional ceramic mug.
What to Do If the Bond Fails
Sometimes even the best efforts to glue ceramic mugs may not hold, which can be frustrating. If the bond fails, there are a few steps you can take to rectify the situation. Here is what you can do:
- Assess the Damage: First, assess the extent of the damage. If the failure is minimal, you might be able to apply more glue and reattach the broken pieces again. However, if the damage is significant, you may need to start the gluing process from scratch.
- Remove the Old Glue: If the bond failed and you need to try again, you must remove the old glue. The old glue can prevent the new glue from bonding properly to the ceramic. Use a clean cloth and acetone or alcohol to remove the old glue. Apply the solvent to the glue and then let it sit on the surface for several minutes. Then, wipe it off with a clean cloth.
- Prepare the Surface: Once the old glue is removed, make sure you sand the surface again. This will provide a rougher surface that allows the new glue to bond more effectively.
- Reapply Glue: Apply the glue precisely as before. Make sure that you apply enough glue to create a strong bond, but not so much that it flows out of the seam. Press the broken pieces together firmly, ensuring proper alignment.
- Clamp and Dry: After the glue is applied, clamp the broken pieces again. Then, allow the glue to dry and cure completely. Follow the same drying and curing process as before.
- Test the Bond: After the glue dries and cures, test the bond to ensure the repair is successful.
Remember, know that bonding ceramic can be tricky, and there may be times when the bond is unsuccessful. But with careful assessment and proper preparation, you can create a strong bond that lasts.
Cleaning Up
After successfully gluing your ceramic mug back together, it’s crucial to clean up any remaining glue residue from both the surfaces and your tools. It can be tempting to leave the cleaning for later, but taking care of it immediately will prevent the glue from hardening and making it harder to remove later. In this section, we will cover the necessary steps for cleaning up after gluing ceramic mugs. So, roll up your sleeves and let’s get started!
Cleaning the Tools
After completing the gluing process, it’s important to clean up the tools used to avoid dried glue residue that may be difficult to remove later on. Here are some steps to follow when cleaning your tools:
- Step 1: First, wipe any excess glue off the tools using a clean, dry cloth. This will make it easier to clean them properly.
- Step 2: Next, use warm, soapy water to clean the tools. Dish soap is a good option as it’s gentle yet effective. Make sure to get into all the nooks and crannies of the tools to remove any glue residue.
- Step 3: If there is still glue residue remaining, use a solution of equal parts water and white vinegar to soak the tools for a few minutes. The vinegar will help to break down the glue and make it easier to remove.
- Step 4: Once the glue has been removed, rinse the tools thoroughly with water to remove any soap or vinegar residue.
- Step 5: Dry the tools with a clean towel and ensure they are completely dry before storing them away. Storing wet tools can lead to rust or corrosion.
Remember, taking the time to properly clean your tools after using glue will not only prolong their lifespan but also ensure that they are ready for future use when you need them again.
Removing Glue Residue from Surfaces
After gluing your ceramic mug, there may be some excess glue that needs to be removed from the surface. This can be a bit tricky, but with the right technique and tools, it can be done effectively. Here are some tips on how to remove glue residue from ceramic surfaces:
Materials Needed:
| Materials | Description |
|---|---|
| Rubbing Alcohol | 70% or higher isopropyl alcohol |
| Cotton Swabs | Small, pointed cotton applicators |
| Plastic Scraper | Gentle plastic scraper such as an old credit card or spatula |
| Warm Water | Hot tap water |
| Dish Soap | Mild dish soap such as Dawn or Ivory |
Steps to Remove Glue Residue:
- Dampen a cotton swab with rubbing alcohol and gently rub the glue residue in a circular motion. Be careful not to rub too hard, as this may damage the surface of the mug.
- If the glue residue is thick or stubborn, use a plastic scraper to gently scrape it off the surface.
- Once the majority of the glue residue is removed, use warm water and dish soap to wash the mug thoroughly.
- Rinse the mug with warm water to remove any soap residue.
- Dry the mug with a soft cloth or towel.
It is important to note that not all types of glue residue may be removed with this method. In some cases, it may be necessary to use a solvent-based adhesive remover. However, this should only be done as a last resort and with extreme caution, as some solvents may damage the ceramic surface of the mug.
By following these steps and using the right materials, you can effectively remove any excess glue residue from your ceramic mug and leave it looking good as new.
Tips and Tricks for Gluing Ceramic Mugs
When it comes to gluing ceramic mugs, there are a few tips and tricks that can help ensure a successful bond. From working in the right environment to choosing the right glue, these small details can make a big difference in the final result. In this section, we will discuss some of the best tips and tricks for gluing ceramic mugs together. Pay attention to these pointers, as they can help you achieve a strong and lasting bond every time.
Working in a Well-Ventilated Area
It is important to work in a well-ventilated area when gluing ceramic mugs. Many types of glue, including epoxy and polyurethane, release fumes that can be harmful if inhaled in large quantities.
Exposure to these fumes can cause dizziness, nausea, headaches, and even more serious health problems. It is essential to find a location that has good air circulation to minimize the risk of inhaling toxic fumes.
One way to ensure proper ventilation is to work in a room with open windows or doors. This allows fresh air to circulate, reducing the concentration of fumes in the air. Additionally, it is important to avoid working in cramped spaces where air cannot circulate freely.
Another method to promote good ventilation is to use a fan or air purifier in the room. These devices help to filter out any harmful particles that may be present in the air. When using a fan, it is important to ensure it is not directly blowing on the glue, as this can cause it to dry too quickly and affect the bond.
Overall, working in a well-ventilated area is an important safety precaution when gluing ceramic mugs. Taking the time to prepare a safe working environment will help protect your health and ensure a successful bonding process.
To summarize, the following table outlines the key points to remember when working in a well-ventilated area:
| Key Points |
|---|
| Glue fumes can be harmful |
| Find a location with good air circulation |
| Avoid working in cramped spaces |
| Use a fan or air purifier to filter out harmful particles |
Wearing Gloves
It’s important to wear gloves when gluing ceramic mugs to protect your hands from any harmful chemicals and to ensure a clean application. Different types of gloves offer different levels of protection and comfort. Here’s a breakdown of the different types of gloves and their pros and cons:
| Glove Type | Pros | Cons |
|---|---|---|
| Latex Gloves | -Offer maximum dexterity and sensitivity \n -Fits snugly on the hand \n -Inexpensive \n -Disposable |
-May cause an allergic reaction in some people \n -Not very durable \n -May tear or puncture easily |
| Nitrile Gloves | -Provide excellent resistance to chemicals \n -Stronger and more durable than latex gloves \n -Hypoallergenic \n -Disposable |
-May be more expensive than latex gloves \n -Less dexterity than latex gloves \n -May not fit as well as latex gloves |
| Vinyl Gloves | -Least expensive option \n -Fits loosely on the hand \n -Can be used for a variety of tasks \n -Disposable |
-Least durable option \n -May puncture or tear easily \n -May not provide as much protection as latex or nitrile gloves |
| Heavy-Duty Rubber Gloves | -Provide maximum protection \n -Reusable and durable \n -Can withstand harsh chemicals |
-May be uncomfortable to wear for extended periods of time \n -May limit dexterity and sensitivity \n -May be more expensive than other options |
No matter which type of glove you choose, be sure to use gloves that fit properly and are appropriate for the task at hand. Always dispose of gloves properly after use and wash your hands thoroughly after removing them. By wearing gloves while gluing ceramic mugs, you can ensure a safe and successful project.
Choosing the Right Glue
When it comes to choosing the right glue for ceramic mugs, it’s important to consider a few factors to make sure you’re getting a strong and long-lasting bond.
1. Type of ceramic: Not all ceramic mugs are created equal. Some are more porous than others, which can affect the adhesive’s ability to bond properly. Make sure to choose a glue that’s recommended for the type of ceramic the mug is made of.
2. Strength: Consider how much weight the mug will be holding and choose a glue that’s strong enough to handle the weight. For example, if you’re repairing the handle of a heavy ceramic mug, you’ll need a strong adhesive like epoxy or polyurethane.
3. Application: Some glues are easier to apply than others. Choose a glue that fits your skill level and comfort. For example, if you haven’t worked with glue before, you might prefer a glue that sets slower so you have more time to adjust the pieces.
4. Drying Time: The drying time of the glue is another factor to consider. Some glues dry faster than others, which can be helpful if you’re short on time, but also means less time for adjustments. Other glues take longer to dry but might offer a stronger bond in the end.
5. Water Resistance: If you’re repairing a mug that will be used for hot liquids or washed frequently, make sure to choose a glue that’s resistant to water and heat.
Keep these factors in mind when choosing the right glue for your ceramic mug repair. Don’t be afraid to do some research and read reviews to find the best option for your specific repair job.
Conclusion
In conclusion, gluing ceramic mugs can be a tricky task, but it is definitely possible with the right tools and techniques. It is important to choose the right type of glue for the job, depending on the extent of the damage and the material of the mug. Epoxy, cyanoacrylate, and polyurethane are all viable options, each with their own strengths and weaknesses.
Before applying the glue, it is crucial to properly prepare the mug by cleaning and sanding the surface. This will ensure that the glue adheres properly to the ceramic material. The application process should be done carefully and in a well-ventilated area, with gloves worn to protect your skin.
Once the glue has been applied and the mug is clamped together, it is important to allow sufficient time for drying and curing. Depending on the type of glue used, this process can take several hours or even days. It is important to exercise patience and to not rush this step in order to ensure a strong bond.
After the mug has fully dried and cured, any excess glue can be removed using a sharp blade or sandpaper. If the bond does not seem strong, it is important to test it before using the mug and to take the necessary steps to fix any issues.
Lastly, cleaning up after gluing ceramic mugs is an important step to ensure that your tools and surfaces remain in good condition. It is recommended to clean any tools used with acetone or a solvent meant for cleaning up glue residue.
Overall, successfully gluing ceramic mugs requires careful attention to detail and patience throughout the entire process. By following these tips and tricks, you can repair your favorite mug and enjoy it for years to come.
Frequently Asked Questions
Can you glue ceramic mugs with regular glue?
No, regular glue will not work well on ceramic mugs. You need a specialized glue that is designed to bond ceramic materials.
Is epoxy glue the best option for gluing ceramic mugs?
While epoxy glue is a popular option for bonding ceramic mugs, it is not always the best choice. It depends on the specific application and the condition of the mug. Other types of glue, like super glue or polyurethane glue, may be more appropriate for certain situations.
How do you prepare a ceramic mug for gluing?
Clean and sand the surfaces that need to be glued. Use a gentle soap and water to clean the surfaces and rinse them thoroughly with water. Sand the surfaces with fine-grit sandpaper to create a better bond for the glue.
How long does it take for glue to dry on a ceramic mug?
The drying time will depend on the type of glue being used. Epoxy glue can take anywhere from a few hours to a full day to dry, while super glue can dry in minutes. Follow the instructions on the glue product to determine how long it will take to dry.
Can you use a hairdryer to speed up the drying process?
Yes, a hairdryer can help speed up the drying process. Use the low heat setting and hold the hairdryer a few inches away from the glued area. Be careful not to overheat the mug or the glue.
What should you do if excess glue oozes out of the bond?
Before the glue dries, wipe away any excess glue with a damp cloth or paper towel. If the glue dries, you can carefully scrape away the excess with a razor blade or sand it down with fine-grit sandpaper.
How do you test the strength of the bond on a glued ceramic mug?
Try gently tapping the glued area with a metal spoon or another hard object. If the bond is strong, you should hear a clear, metallic sound. If the bond is weak, you will hear a dull thud.
Can you remove glue residue from a ceramic mug?
Yes, you can remove glue residue from a ceramic mug using acetone or nail polish remover. Soak a cotton ball or cloth in the acetone and gently rub the glue residue until it comes off.
Should you wear gloves when gluing ceramic mugs?
Yes, you should wear gloves when gluing ceramic mugs to protect your skin from the chemicals in the glue. Latex or nitrile gloves are a good option.
What is the most important tip for gluing ceramic mugs?
Working in a well-ventilated area is the most important tip for gluing ceramic mugs. Many glues contain chemicals that can be harmful if inhaled, so it’s important to work in a space with good airflow.