Gluing brass, a versatile and elegant metal, can be a bit of a challenge due to its non-porous nature and resistance to certain adhesives. Whether you’re a hobbyist working on a model, a jeweler crafting a new piece, or a homeowner fixing a brass fixture, understanding how to glue brass is essential for a successful bond. This post will explore the intricacies of brass adhesion and provide you with the knowledge to tackle your project with confidence.
Choosing the Best Adhesive for Brass
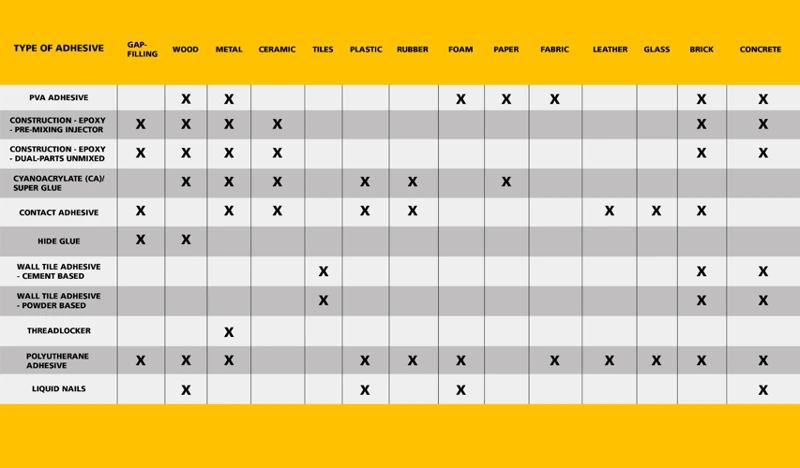
Understanding Brass to Brass Adhesive Options
Selecting the proper adhesive for brass is paramount for a strong and lasting bond. Not all adhesives are equal, and some are better suited for metal-to-metal applications. When considering how to glue brass, it’s important to choose an adhesive that can handle the smooth surface of the metal and withstand environmental factors.
Comparing Best Epoxy for Brass
Epoxy resins are often considered the best epoxy for brass due to their strong bonding properties and chemical resistance. When searching for the best adhesive for brass, it’s important to compare products based on their bonding strength, setting time, and durability. Some epoxies are designed specifically for metals and will provide a more reliable bond.
Surface Preparation for Gluing Brass
Cleaning and Sanding Techniques
- Remove any grease or oil from the brass surface with a solvent like acetone.
- Lightly sand the brass with fine-grit sandpaper to create a rough surface for better adhesion.
- Wipe away any sanding debris with a clean cloth before applying adhesive.
Applying the Adhesive for Brass
Once the surface is prepared, applying the adhesive for brass correctly is crucial. Ensure that you evenly distribute the glue over the surfaces to be bonded, and follow the manufacturer’s instructions for the best results.
Step-by-Step Guide on How to Glue Brass

Mixing and Applying the Best Glue for Brass
To begin, carefully mix your epoxy or chosen adhesive according to the package’s directions. Apply a thin, even coat to one surface, ensuring full coverage for a secure bond.
Clamping and Curing Times
After joining the pieces, use clamps to maintain pressure and ensure a tight bond. It’s essential to respect the curing time indicated by the adhesive manufacturer to achieve the best bond strength.
Special Considerations for Brass Adhesion
Glue Brass to Brass
When looking to glue brass to brass, consider the thermal expansion and conductivity of the metal. An adhesive that can accommodate these properties is ideal for a durable bond.
Glue Brass to Wood
Glue brass to wood requires an adhesive capable of bonding to both porous and non-porous surfaces. Polyurethane or epoxy-based adhesives are often recommended for these mixed-material projects.
How to Repair Brass with Adhesive
Identifying the Damage
Before you learn how to repair brass, assess the damage carefully. Check for cracks, breaks, or corrosion that may affect the integrity of the repair.
Repairing and Reinforcing with Brass to Brass Adhesive
For repairs, a brass to brass adhesive will not only fix the damage but also help reinforce the area. Apply the adhesive with precision, and use clamping methods to secure the repair while it cures.
How to Bond Brass Together for Longevity
Professional Tips for Strong Bonds
Professionals often recommend using a two-part epoxy as the best glue for brass when seeking a lasting bond. Additionally, ensure that you’re working in a well-ventilated area and wearing proper safety equipment.
Preventing Oxidation and Corrosion
Apart from choosing the right adhesive, preventing oxidation and corrosion is key to how to bond brass together for the long term. Applying a protective coating can extend the life of the bond and the brass itself.
FAQs: Common Questions About Gluing Brass
- Can you use superglue on brass? – Superglue can be used for temporary fixes, but for a stronger, more durable bond, epoxies are recommended.
- Do I need to clamp brass when gluing? – Yes, clamping is advisable to ensure a tight bond while the adhesive cures.
- How long does it take for the adhesive to set on brass? – Setting times vary depending on the adhesive, but it generally ranges from a few minutes to several hours.
If you’re a DIY enthusiast or simply need to fix something around the house, knowing how to properly glue different materials can be essential. For those interested in metalwork, our guide on How To Glue Brass offers detailed steps to ensure a strong bond. But our expertise doesn’t end there! Check out our comprehensive tutorials on how to glue nylon, how to glue marble, and how to glue leather for more tips on tackling your next project with confidence. Whether you’re repairing a cherished leather item, a marble countertop, or a piece of nylon gear, we’ve got the know-how you need.
Conclusion: Mastering the Art of Gluing Brass
Mastering how to glue brass requires patience, the right materials, and a bit of know-how. With the proper preparation, adhesive selection, and application techniques, you can achieve a strong, lasting bond. Remember to allow adequate curing time and protect your work from oxidation. With these tips, you’ll be well on your way to becoming proficient in the art of gluing brass.