Are you tired of having to throw away a perfectly good piece of furniture or decor because a nail has become loose or fallen out? Are you without a hammer and have no other tools to fix the issue? Have no fear, because gluing a nail is a simple and effective solution that can be done with just a few materials. In this ultimate guide, we will walk you through the step-by-step process of gluing a nail to ensure a longer-lasting repair. Say goodbye to nail mishaps and hello to a hands-on DIY solution.
Why Glue a Nail?
You may be wondering “Why glue a nail?” when a hammer seems like the obvious choice for securing nails. However, there are situations where glue may be a better option for a longer-lasting and more secure repair. In this section, we will explore some reasons why you may consider using glue instead of a hammer. If you’re curious about the different types of nail glue available on the market, check out what is nail glue.
When You Don’t Have a Hammer
When you find yourself without a hammer, it can be frustrating to try to complete a small DIY task that requires a nail. However, fear not! There are several household items that you can use as a substitute. A heavy book or a rock can be surprisingly effective substitutes for a hammer. Simply hold the nail in place with a pair of pliers or a folded piece of cardboard, and tap it gently with your improvised hammer until it is securely in place.
Another option is to use a screwdriver or a pair of scissors. Hold the screwdriver or scissors against the head of the nail and tap it with another tool until the nail is in place. It’s important to be careful when using this method, as it can damage the surface you’re nailing into if you’re not precise.
Before trying these methods, make sure that you have the right type of nail for your project. A finishing nail may work for lightweight items, but a framing nail is the better choice for heavier items like shelves or picture frames. Once you have the right nail, you can rest easy knowing that you don’t need a hammer to complete your project.
If you’re still having trouble with your DIY project and are in need of some guidance, check out our article on how to glue nails for alternative solutions to hammering in a nail.
For a Longer-Lasting Repair
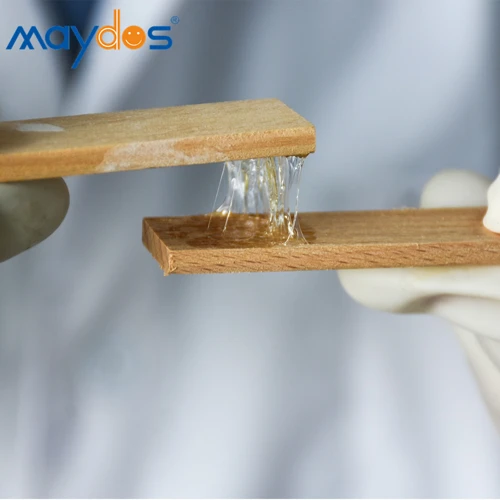
Gluing a nail can provide a longer-lasting repair compared to simply hammering it back in place. This is because glue reinforces the hold of the nail and provides added strength to the joint. However, it is important to choose the right type of glue for the job. Carpenter’s glue is a good option for wood-to-wood connections, while epoxy glue is better for metal-to-wood connections or for jobs that require a waterproof seal. Using a strong adhesive is particularly important for larger nails or if the nail will be supporting a heavy load.
It’s also important to make sure that the nail hole is properly cleaned and roughened before applying glue. This helps the glue fill in gaps and provides a better surface for the glue to adhere to. Additionally, clamping the nail after applying glue can help ensure a strong bond and a longer-lasting repair.
If you’re curious about how long nail glue can last, you can check out our guide on the topic. Alternatively, if you’re having issues with sticky nail glue, check out our article on why nail glue might be sticky. And if you’re in a hurry, you can check out our tips on how to make nail glue dry faster.
What You’ll Need
Before you start gluing a nail, you’ll need to gather a few essential supplies. With the right tools on hand, you can easily fix any broken or loose nails in no time. Glue, clamps, a nail set, and a power drill (optional) are all necessary items to have at the ready for this repair. Make sure to select high-quality supplies to ensure a strong and long-lasting bond. If you’re unsure of which type of glue to use, check out our guide on choosing the right glue for helpful advice.
Glue
When it comes to gluing a nail, choosing the right glue is essential for a secure and long-lasting repair. There are many types of glue on the market, but not all of them are suitable for the job. Here are some of the best options:
- Carpenter’s glue: This type of glue is commonly used for woodworking projects because it dries clear and creates a strong bond. It’s also water-resistant, which makes it perfect for outdoor repairs.
- Epoxy glue: Epoxy glue is a two-part adhesive that creates an incredibly strong bond. It’s ideal for heavy duty repairs and can be used on various materials, such as wood, metal, and plastic.
- Construction adhesive: This glue is designed for heavy-duty construction work, such as framing and subflooring. It’s extremely strong and can bond to almost any surface.
- Super glue: Super glue is the go-to adhesive for quick and easy repairs. It dries clear and creates a strong bond, but it’s not as durable as some of the other options.
When choosing the glue for your nail repair, make sure to consider the type of project you’re working on and the materials you’re using. It’s also important to follow the manufacturer’s instructions for application and drying time to ensure the best results.
If you’re unsure which glue to use or need more guidance, you can always check out our guide on how to open KDS nail glue. This article gives tips on how to choose and apply nail glue, as well as how to remove it if necessary.
Remember, the glue you choose can make all the difference in the outcome of your nail repair, so choose wisely and follow the instructions carefully.
Clamps
Clamps are an essential tool when it comes to gluing a nail. They help to keep the nail in place while the glue dries, ensuring a strong bond. There are a few different types to choose from, depending on the size of the nail and the amount of pressure needed. Here are some options to consider:
- Spring clamps: These are easy to use and can be adjusted to apply just the right amount of pressure. They come in a variety of sizes and are perfect for smaller nails.
- C-clamps: These are great for larger nails and provide more pressure than spring clamps. They can be a bit trickier to use, so make sure you have enough space to maneuver them.
- Bar clamps: These are the strongest type of clamp and are good for really large nails or repairs that require extra pressure. They can be a bit expensive, but they’re worth it if you plan on doing a lot of repairs.
It’s important to choose the right size and type of clamp for the job. Too much pressure can cause the nail to bend or even break, while too little pressure will result in a weak bond. Take some time to assess the situation and choose the appropriate clamp accordingly.
If you don’t have clamps on hand, don’t worry. There are a few alternatives you can use to keep the nail in place while the glue dries. One option is to use a clothespin. Simply clip it onto the nail and leave it in place until the glue has fully cured. Another option is to use a rubber band. Wrap it tightly around the nail and hold it in place until the glue is dry.
Regardless of whether you use clamps or another tool, make sure the nail is held firmly in place while the glue dries. This will ensure a strong and long-lasting repair. It’s important to note that some types of glue may take longer to dry, so be sure to follow the manufacturer’s instructions and allow enough time for the glue to cure fully.
A Nail Set
When gluing a nail, having a nail set is a useful tool to have on hand. It helps to drive the nail below the surface of the wood, making it easier to fill in the hole if necessary. Here is a list of some different types of nail sets you may come across:
- Standard Nail Set: This is the most common type of nail set. It has a tapered point that helps to guide the nail and a concave tip that allows you to set the nail flush with the surface of the wood.
- Automatic Nail Set: This type of nail set is powered by compressed air and makes setting nails a lot quicker and easier. It is commonly used in construction and carpentry.
- Micro Nail Set: If you’re working with small nails, a micro nail set may be a better option. It has a smaller tip and can be used for delicate work.
It’s important to choose the right size nail set for the job. The size of the nail set should match the size of the nail you are using. Using the wrong size nail set could cause damage to the wood.
If you are in need of softening the nail glue, take a look at our article on how to soften nail glue in the bottle. This can be helpful if your glue has hardened or dried out over time.
A Power Drill (Optional)
If you have a power drill available, it can make the process of gluing a nail much easier. Here are some things to keep in mind if you choose to use a power drill:
- Choose the Right Drill Bit: You’ll need a drill bit that matches the diameter of your nail. Using the wrong size bit can damage the wood and weaken the repair.
- Make a Pilot Hole: Use the drill bit to create a pilot hole in the center of the original nail hole. This will help guide the nail and prevent it from splitting the wood.
- Drill to the Right Depth: Measure the length of your nail and use tape to mark the depth on your drill bit. When you drill, stop when the tape reaches the surface of the wood – you don’t want to drill deeper than the length of your nail.
- Be Careful: Power drills can be dangerous, so always wear eye protection and keep your fingers away from the moving parts.
Using a power drill can save time and effort, but it’s not always necessary. If you don’t have access to one or don’t feel comfortable using it, you can still achieve a strong repair using just glue, clamps, and a nail set.
Preparing the Nail Hole
Before we can start the process of gluing a nail, we need to properly prepare the nail hole. This step is crucial to ensure that the nail will stay in place and provide a strong and lasting hold. Preparing the nail hole involves several important steps such as removing the old nail, cleaning the hole, and roughing up the surface of the hole. This will create a better adhesive surface for the glue and help it bind more securely to the materials surrounding the hole. So, let’s take a closer look at the process of preparing the nail hole.
Removing the Nail
Before you can glue a nail, you need to remove the previous nail from the hole. This will ensure that the new nail can fit properly and that the glue will hold it in place securely. Here are the steps you need to take to remove a nail from a hole:
- Gather your tools: You will need a hammer and a pair of pliers.
- Assess the nail: Look at the nail to determine how it is positioned in the hole. Is it sticking out at an angle? Is the head of the nail still visible?
- Position the pliers: Use the pliers to grip the nail as close to the surface of the wood as possible.
- Rock the nail: While holding the pliers securely around the nail, rock the nail back and forth. This will help to loosen it from the wood and make it easier to pull out.
- Use the hammer: While maintaining a firm grip with the pliers, use the hammer to gently tap the head of the nail to help loosen it further.
- Pull out the nail: Once the nail is loose, gently pull it out of the hole with the pliers.
It’s important to be careful and gentle when removing a nail, especially if the wood is soft or delicate. If you are having trouble removing the nail, consider using a pair of needle-nose pliers to get a better grip. Once the nail is removed, you can move on to preparing the hole for the new nail and glue.
Cleaning the Hole
To ensure the nail adheres properly, it’s crucial to clean the hole thoroughly. Cleaning the hole will remove debris, dust, and any other unwanted particles that can interfere with the glue and nail. Here are the items you’ll need to clean the hole:
| Item | Why you Need it |
|---|---|
| Cotton swabs or brush | For scrubbing the inside of the hole |
| Compressed air can | To blast the hole and remove dust and debris |
| Shop vacuum | To suction out any remaining dust or debris |
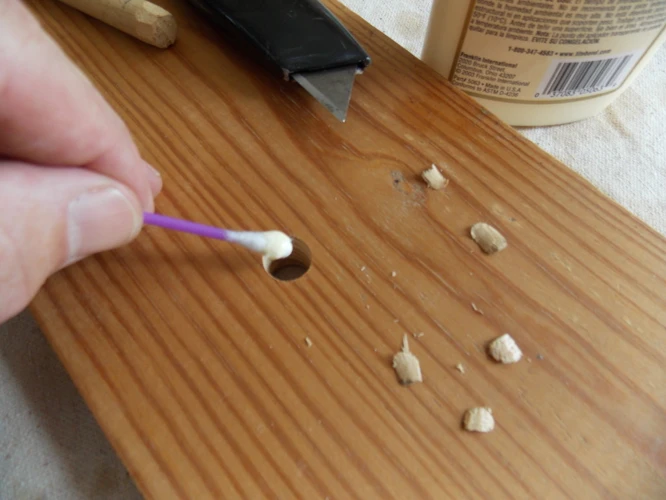
First, use a cotton swab or brush to scrub the inside of the hole. You want to remove any residue that may have been left behind from the old nail. Be sure to use a tool that can reach the innermost part of the hole and scrub it clean.
Next, use a compressed air can to blast the hole. This will remove any leftover debris or dust that may have been missed during the scrubbing process. When using the compressed air can, be sure to hold the can upright and not at an angle to avoid spraying any of the propellant into the hole.
Finally, use a shop vacuum to suction out any remaining dust or debris. Be sure to hold the wand of the vacuum close to the hole to ensure that all debris gets sucked out. Once you have cleaned the hole, you are ready to move on to the next step of the process.
Roughing Up the Hole
Before applying the glue, it’s important to rough up the hole to create a better surface for the glue to adhere to. Here’s how to do it:
1. Gather the materials: You’ll need sandpaper and a small brush.
2. Sand the surface: Take a piece of sandpaper and gently sand the inside of the hole. This will remove any remaining debris and create small ridges in the wood that will help the glue bond.
3. Clean the hole: Use a small brush to remove any sawdust or wood shavings created during sanding. This will ensure that the glue can fully penetrate the surface.
4. Apply the glue: Once the hole is clean and dry, apply a thin layer of glue to the inside of the hole.
Tip: Be sure to choose a glue that is appropriate for the type of wood you’re working with, as different types of wood may require different types of glue.
5. Insert the nail: Carefully insert the nail into the hole, making sure that it goes in straight.
Now that the nail is in place, it’s time to clamp it, which will hold the nail securely in place and allow the glue to fully dry and bond with the wood.
Applying the Glue
Now that you have prepared the nail hole, it’s time to start applying the glue. But wait, before you start squeezing glue out of the bottle, you need to make sure you have chosen the right glue for the job. The type of glue you choose will depend on the material you are working with and the conditions in which the repair will be exposed to. Once you have the right glue, applying it will be a straightforward process. But don’t rush just yet, there are a few things to keep in mind to make sure the glue adheres to the nail and the surface properly. In this section, we will guide you through choosing the right glue, applying it evenly, and inserting the nail correctly.
Choosing the Right Glue
When it comes to choosing the right glue for gluing a nail, there are a few things to keep in mind. Not all adhesives are created equal, and some will work better for this specific task than others. Here are some of the key factors to consider:
| Type of Glue | Pros | Cons |
|---|---|---|
| Epoxy Glue | Creates a very strong bond, dries clear, and can fill in gaps. | Takes a while to dry and requires mixing two components. |
| Polyurethane Glue | Expands as it dries, creating a very strong bond and filling gaps. | Takes a while to dry, can be messy to work with, and may not dry clear. |
| Super Glue | Dries very quickly and forms a strong bond on non-porous surfaces. | Not great for porous surfaces, may not be strong enough for larger nails. |
| Carpenter’s Glue | Dries clear, easy to work with, and strong enough for most nails. | May not fill in gaps or bond as strongly as other options. |
| Polyvinyl Acetate (PVA) Glue | Dries clear, easy to work with, and strong enough for most nails. | May not fill in gaps or bond as strongly as other options. |
Before selecting a glue, consider the size of the nail and the type of material it will be adhering to. If the nail is large or will be bearing weight, opt for a stronger adhesive like epoxy or polyurethane glue. However, for smaller nails or less heavy-duty applications, a carpenter’s glue or PVA glue may work just fine. It is also important to read the label and ensure the glue is suitable for the materials you will be using it on.
Choosing the right glue is an important step in gluing a nail. By considering the type of glue, size of the nail, and materials involved, you can ensure a strong and lasting bond.
Applying the Glue
Before getting into the nitty-gritty of applying glue to a nail, it’s important to understand the types of glue best suited for this task. There are many types of glue available, such as wood glue, super glue, and epoxy, but for this purpose, a PVA (polyvinyl acetate) glue is recommended.
Step 1: Squeeze a Pea-Sized Drop of Glue
Once you have selected your glue, it’s time to start applying it to the nail hole. Squeeze a pea-sized drop of glue onto a disposable surface, such as a piece of scrap wood or cardboard.
Step 2: Dip the Nail into the Glue
Next, dip the end of the nail into the glue. Make sure that the tip of the nail is completely covered in glue.
Step 3: Spread the Glue into the Hole
Using the nail as a tool, spread the glue evenly around the inside of the hole. This will help to ensure that the entire surface area of the hole is covered in glue.
Step 4: Insert the Nail into the Hole
Once the glue has been spread evenly throughout the hole, insert the nail into the hole and gently tap it into place using a nail set.
Step 5: Wipe Off Excess Glue
Before the glue starts to dry, wipe off any excess glue that may be visible around the nail hole using a damp cloth.
Step 6: Allow the Glue to Dry Completely
Finally, allow the glue to dry completely. Depending on the type of glue used, this may take anywhere from a few minutes to several hours. It’s important to resist the urge to touch or move the nail until the glue has fully dried.
Using a table can be a great way to organize information about the glues that are best for gluing a nail. Here’s an example of a table that might be included in an article like this:
| Type of Glue | Strength | Drying Time |
|---|---|---|
| Wood Glue | Strong | 30 Minutes to 2 Hours |
| Super Glue | Very Strong | Less than 1 Minute |
| Epoxy | Extremely Strong | 24 Hours or More |
| PVA (Polyvinyl Acetate) Glue | Strong | 30 Minutes to 2 Hours |
By including a table like this in the article, readers can quickly and easily compare the different types of glue and select the one that is best for their needs.
Inserting the Nail
Inserting the nail is a crucial step in the process of gluing a nail. You need to make sure that the nail is inserted correctly, or it will not hold properly. Follow these steps to ensure successful nail insertion:
- Align the nail: Before inserting the nail, make sure it is correctly aligned with the hole. The pointed end of the nail should be facing outward, away from the hole.
- Push the nail in: Using your fingers or a nail set, gently push the nail into the hole. Make sure it is inserted all the way in.
- Don’t over-insert: Be careful not to over-insert the nail, as this could cause the wood to split or crack.
- Check the alignment: After inserting the nail, check the alignment again to make sure it is still correct. Adjust if necessary before moving on to the next step.
By following these steps, you can ensure that the nail is inserted correctly and firmly anchored in place for a long-lasting repair.
Clamping the Nail
When it comes to gluing a nail, clamping is an essential step that ensures the nail stays in place and the adhesive sets properly. Using the right clamp and following the correct procedure will ensure the strongest possible bond. In this section, we will discuss the different types of clamps you can use and the steps to follow for effective clamping. Let’s dive in!
Choosing the Right Clamp
Choosing the right clamp is crucial to ensure that the nail is properly secured while the glue dries. Here are some factors to consider when choosing the right clamp:
| Factor | Description |
|---|---|
| Size | Choose a clamp that is the appropriate size for the nail and the surrounding area. A clamp that is too small may not provide enough pressure to hold the nail in place, while a clamp that is too large may damage the surrounding area. |
| Pressure | A clamp with adjustable pressure is ideal, as it allows you to control the amount of pressure being applied to the nail. This is especially important if you are working with delicate or easily damaged materials. |
| Material | Choose a clamp made of a durable material that can withstand the pressure being applied. Metal and plastic are commonly used materials for clamps. |
| Style | There are several styles of clamps available, including spring clamps, bar clamps, and C-clamps. Consider the type of project you are working on and the accessibility of the nail hole when choosing a clamp style. |
| Number | Depending on the size and complexity of the project, you may need multiple clamps to secure the nail properly. Plan ahead and determine how many clamps you will need before beginning the project. |
By taking these factors into account, you can choose the right clamp to ensure that the nail is securely held in place while the glue dries.
Placing the Clamp
When placing the clamp to hold the nail in place, precision is key. Follow these steps to ensure the clamp is in the correct position:
- Position the nail: Make sure the nail is in the correct position in the nail hole before placing the clamp. If it’s not, adjust it as necessary.
- Place the clamp: Take the clamp and position it so that it applies pressure on the nail and the wood around it. Make sure the clamp jaws are parallel to each other and not at an angle.
- Tighten the clamp: With the clamp in place, tighten it until a small amount of glue squeezes out of the joint. Don’t overtighten, as this can cause the nail to shift or the wood to warp.
- Check the alignment: Double-check that the nail is still in the correct position and that the clamp is holding it securely. If needed, make any adjustments before letting the glue dry.
By following these simple steps for placing the clamp, you can be confident that your nail repair will hold strong for years to come.
Letting the Glue Dry
After clamping the nail, you need to let the glue dry completely before removing the clamp. This is a crucial step that can make or break the repair. Rushing the drying process can cause the nail to slide out of position or weaken the bond. Here’s what you should keep in mind while letting the glue dry:
- Patience is key: Don’t rush the drying process. Depending on the type of glue you used, it may take anywhere from a few hours to overnight for the glue to set and reach its full strength. Refer to the manufacturer’s instructions for the recommended drying time.
- Don’t disturb the clamp: Avoid touching or moving the clamp while the glue is drying. Any movement can cause the nail to shift out of position.
- Keep the nail level: Make sure the nail remains level during the drying process. If it tilts or leans, the glue may not dry evenly and weaken the bond.
- Keep the area ventilated: Good ventilation can help speed up the drying process. Open a window or turn on a fan to keep the air circulating. However, make sure that there is no direct sunlight on the area.
- Check for dryness: After the recommended drying time has passed, check to make sure that the glue is completely dry. Touch the glue around the nail gently with your finger. If it feels tacky or sticky, it’s not dry yet. If it feels hard and dry, you’re ready for the next step.
By following these steps, you can ensure a strong and long-lasting bond between the nail and wood. Once the glue has dried completely, you can remove the clamp and move on to the finishing touches to make the nail repair look as good as new.
Finishing Touches
Now comes the exciting part – the finishing touches that will give your nail repair a professional look. These small but important steps will make all the difference in the final outcome of your project. By following these simple instructions, you’ll be able to not only fix your nail but make it look as good as new. So, roll up your sleeves because we’re about to take the final steps in our journey towards a perfectly repaired nail.
Trimming the Nail
Once the glue has completely dried and the clamp has been removed, the excess nail can be trimmed off to create a smooth surface. It is important to trim the nail carefully to avoid damaging the surrounding area.
To trim the nail, you will need a pair of pliers or wire cutters. Firstly, determine how much of the nail needs to be trimmed off. You can use a ruler or measuring tape to ensure the nail is cut down to the desired length.
Be cautious while trimming, as cutting too much could result in the nail becoming loose and needing to be glued again. Using a firm grip on the pliers or wire cutters, carefully snip off the excess nail until you have achieved the desired length.
After trimming the nail, inspect the surrounding area to ensure there are no sharp edges or burrs left from the trimming. If necessary, use a small piece of sandpaper to smooth out any rough spots.
Remember, you want the surface to be as smooth as possible to avoid snagging clothing or injuring yourself or others.
| Materials | Tools |
|---|---|
| Pliers or wire cutters | Ruler or measuring tape |
| Small piece of sandpaper (if necessary) |
Filling in the Hole (Optional)
After the glue has completely dried, you might want to fill in the hole left by the nail. While this step is optional, filling in the hole can make the repair look more seamless. Here are some steps to follow if you decide to fill in the hole:
- Choose the Right Filler: There are different types of fillers you can use, such as wood filler, epoxy filler, or spackling compound. Choose a filler that matches the color and texture of the surface you’re repairing.
- Apply the Filler: Follow the instructions on the filler container to apply the filler to the hole. Use a putty knife or a filler applicator to apply the filler evenly to the hole. Make sure the filler is slightly raised above the surface to allow for sanding.
- Let the Filler Dry: The drying time may vary depending on the type of filler you’re using. Follow the instructions on the container to know how long you should let the filler dry before sanding.
- Sand the Filler: Once the filler is dry, use a sandpaper to sand down the excess filler until it’s level with the surface. Start with a coarse sandpaper (around 80 to 120 grit) and finish with a fine sandpaper (around 220 to 320 grit) for a smooth finish.
Remember that filling in the hole is an optional step, and it may not be necessary depending on the size and location of the hole. However, if you do decide to fill in the hole, make sure to follow these steps carefully to achieve the best results.
Painting (Optional)
After the glue has dried and you’ve finished trimming the nail, you may want to consider painting the repaired area to make it look as good as new. This is entirely optional, but it can add a nice finishing touch.
Materials Needed:
| Paint | Paint brush | Sandpaper | Putty knife |
Step 1: Sand the Surface
Use sandpaper to gently rough up the surface around the nail hole. This will help the paint adhere better. Be careful not to sand too hard or too much, as it may damage the surrounding area.
Step 2: Fill in Any Gaps
If there are any gaps or cracks around the nail hole, use a putty knife to fill them in with a small amount of spackling paste. Smooth it out so it’s level with the surrounding surface. Allow it to dry completely before proceeding to the next step.
Step 3: Paint
Choose an appropriate paint color that matches the surrounding area. Dip the paintbrush into the paint and apply a thin coat over the area, being careful not to get any paint on adjacent surfaces. Allow the paint to dry completely before applying a second coat, if necessary.
Step 4: Finishing Touches
Once the paint is dry, you can take a step back and admire your handiwork. If you want to go the extra mile, you can use a fine-grit sandpaper to gently buff the painted surface to a smooth finish. This will give it a polished look and feel.
Remember, painting is optional and not necessary for the repair to be successful. However, if you choose to do so, take your time and follow these steps carefully for the best results.
Conclusion
After following this ultimate guide on gluing a nail, you should be able to successfully repair any nail hole in your home. Remember to always choose the right glue and clamp for the job, and follow the steps carefully to ensure that the repair will last long-term.
It’s important to keep in mind that gluing a nail should only be used as a temporary solution if you don’t have access to a hammer or if the nail holes in your walls are causing damage that regular spackling can’t fix.
If you’re experiencing recurring nail holes or other damage in your walls, it may be time to consider discussing more permanent repairs with a professional. They can offer solutions that will not only fix the immediate problem, but also prevent it from happening in the future.
As always, safety should be a top priority when working with tools and hardware. Continue to exercise caution and follow all instructions and guidelines when handling nail sets, drills, clamps, and any other equipment used in the repair process.
With these tips and a little bit of know-how, you can confidently tackle any nail hole repair in your home and keep it looking its best. Happy repairing!
Frequently Asked Questions
How long does it take for glue to dry?
The drying time of glue depends on the type and brand of glue you use. Generally, most glues take anywhere from 30 minutes to 24 hours to dry completely.
Can any type of glue be used to glue a nail?
No, not all types of glue are suitable for gluing nails. It is best to use a wood glue or a construction adhesive, as they provide strong and long-lasting bonding.
Do I need clamps to glue a nail?
While clamps are not always necessary, they can significantly enhance the strength of the bond and ensure optimal results. It is recommended to use clamps when gluing nails for the best results.
Can I use a nail gun instead of a regular nail?
If you have a nail gun, you can use it to place the nail in the hole you created. However, a nail gun doesn’t provide any extra holding power, so you’ll still need to apply glue to make the repair strong.
Is it possible to glue a broken nail back together?
While it is possible to glue a broken nail back together, it is not recommended as it may not withstand the weight and stress it once did. It is best to replace broken nails with new ones.
What should I do if the glue spills?
First, clean up the spill with a damp cloth or paper towel. If the glue has dried, sand it off carefully to avoid damaging the surrounding area.
How do I remove excess glue?
The best way to remove excess glue is to wipe it off with a damp cloth or paper towel before it dries. If the glue has dried, sand it off carefully using sandpaper or a scraper.
Can I use glue to fix a screw hole?
Yes, you can use glue to fix a screw hole in wood. Follow the same steps used for gluing a nail hole and make sure to use a screw instead of a nail when making the repair.
Can I paint over glued nail holes?
Yes, you can paint over glued nail holes once the glue has completely dried. However, use lightweight spackling or wood filler to fill in the hole, if needed, before painting.
How long should I wait before trimming the nail?
It is recommended to wait until the glue has completely dried before trimming the nail. This can take anywhere from 30 minutes to 24 hours, depending on the type of glue used.