When embarking on a plumbing project that involves PVC pipes, gluing the pipes together is a crucial step in ensuring that everything is sturdy and leak-free. However, if you’re not experienced in this area, the prospect of gluing PVC pipes can seem quite daunting. There are specific materials and tools that are required, as well as a process to follow. But fear not! With a bit of guidance, gluing PVC pipes can be a straightforward task that even a beginner can handle. In this guide, we’ll provide you with a complete breakdown of the steps involved in gluing PVC pipes, from the tools and materials you’ll need, to common mistakes to avoid, and safety considerations to keep in mind. So, let’s dive in and learn how to glue PVC pipes like a pro!
Tools and Materials

Working with PVC pipe requires a specific set of tools and materials to ensure that the job is done right. Each item is important in its own way, and the quality of the end result depends on choosing the right products. In this section, we’ll take a closer look at the materials and tools needed for this project. From the type of cement to be used to the cutting tools needed, we have got you covered. So let’s dive in and get started! And if you’re looking for tips on how to re-glue PVC pipe or gluing acrylic to PVC, be sure to check out our other guides.
Materials
When it comes to gluing PVC pipes together, there are a few key materials you will need. Here is a list of materials that you will need to complete this task:
- PVC pipes and fittings: Make sure you have the right PVC pipes and fittings that you want to glue together.
- PVC primer: This is a kind of solvent that is used to clean the surfaces of the PVC pipes and fittings and to help the glue bond better.
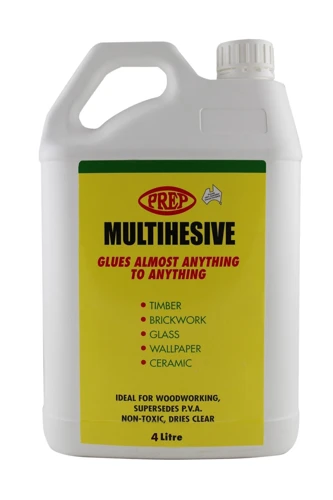
- PVC cement or glue: This is the actual adhesive that will bond the PVC pipes and fittings together. Make sure the cement you choose is appropriate for the type of PVC you have.
- Clean rags or towels: You will need these to clean off the pipes and fittings before applying the primer.
- Marker or pen: Use this to mark the PVC pipes where you want to cut them.
- Saw: You can use a hacksaw, handsaw, or PVC cutter to cut the PVC pipes.
- Sandpaper or emery cloth: Use this to sand the end of the pipes to make them smooth and ready for gluing.
- Measuring tape or ruler: To measure and mark the point where you want to cut.
It’s important to note that choosing the right materials is crucial when it comes to gluing PVC pipes together. Using the wrong cement or glue, for example, may not hold the pipes together properly and may even lead to leaks or breaks. If you are unsure which material to use, consult the manufacturer’s instructions or seek advice from a professional.
If you encounter any issues with re-gluing PVC pipes or need to glue PVC to other materials, such as acrylic or PP plastic, there are specific materials and techniques to keep in mind. For more information, check out our articles on re-gluing PVC pipe and gluing acrylic to PVC.
Tools
Tools:
- PVC Primer
- PVC Cement
- Clean Cloth
- PVC Pipe Cutter or Hacksaw
- Sandpaper or File
- Marker or Pen
- Gloves
PVC Primer: A primer prepares the surfaces of the PVC pipes and fittings, making them ready for the cement to bond. It softens the surfaces so that the cement can melt into the two pieces of PVC and create a chemical bond. It is an essential tool for successful PVC pipe gluing. Best glue can also help to keep car parts together.
PVC Cement: PVC Cement, also known as PVC glue or PVC adhesive, is a solvent that melts the surfaces of the PVC pipe and fittings. Once applied to two surfaces, the solvents evaporate, leaving behind the plasticized part of the PVC. It sets fast, so it is recommended that you have all the pieces ready before applying the cement.
Clean Cloth: Before gluing, it is important to have a clean surface. A clean cloth can be used to wipe away any dirt or debris that may interfere with the bond.
PVC Pipe Cutter or Hacksaw: Cutting the PVC pipe is an essential step in the process. A PVC pipe cutter or hacksaw can be used to make the cut. A pipe cutter will provide a cleaner and straighter cut, while a hacksaw can be used to make cuts in hard-to-reach areas.
Sandpaper or File: After cutting the PVC pipe, the edges may be rough or jagged. Sandpaper or file can be used to smooth out the edges, making them easier to fit together and creating a better bond.
Marker or Pen: A marker or pen can be used to mark the PVC pipe and fittings before cutting. This can help ensure that the pieces are cut to the correct length and fit together properly.
Gloves: PVC primer and cement are harsh chemicals, and contact with the skin should be avoided. Gloves provide protection and prevent any accidental exposure to the chemicals.
By having all the necessary tools and materials, and following the correct procedures, PVC pipe gluing can be done easily and efficiently. Understanding the pressure PVC glue can hold and gluing PP plastic requires, is also important. Ensuring a proper bond will prevent needing to redo the work and keep pipes connected securely.
Preparation
Before diving into the actual gluing process, it’s important to make sure you have properly prepared the PVC pipes and fittings. Preparation is key to ensuring a strong, leak-free bond between the pieces. Proper preparation includes creating a suitable work area, preparing the surfaces of the PVC pipe and fitting, and cutting the pipe to the correct size. Taking the time to properly prepare the materials will greatly increase the likelihood of success in the gluing process. It’s important to have the necessary tools and materials on hand before beginning. Let’s take a closer look at the materials and tools you will need for this project. If you need to learn more about how much glue to use for PVC pipes, check out our article on how much pipe glue.
Space
Before you start gluing the PVC pipe, you need to make sure that you have enough space to work. This will help prevent any accidents or spills that may occur during the process. Ideally, you should have a clean and open workspace that will allow you to move around freely without any obstacles. The table below summarizes the necessary space requirements you need to consider while preparing your workspace.
| Space Requirement | Description |
| Workspace | Your workspace should be well-lit, spacious, and free from clutter. This will allow you to move around freely during the gluing process. |
| Good ventilation | PVC cement has a strong odor and may cause respiratory problems. It is essential to have good ventilation in your workspace. |
| Absorbent surface | You need a flat, absorbent surface to place your PVC pipes and fittings on while applying primer and cement. |
| Protective gear | It is crucial to use personal protective equipment (PPE) when gluing PVC. This includes gloves, safety goggles, and a respirator mask to protect yourself from any fumes. |
| Water source | If you accidentally glue the wrong pieces together, you may need to re-position them. Keeping a water source nearby allows you to correct any mistakes promptly. |
Once you have enough space and all the necessary equipment, you can move on to preparing your PVC pipe for gluing. However, if you want to know how to glue PVC pipe when wet, check out our other detailed article on the topic.
Surface
When gluing together PVC pipes, it is important to pay close attention to the surface preparation. The surface must be clean, dry, and free of dust, dirt, grease, and other impurities that can affect the bond. To ensure a good bond, follow these steps:
| Step | Description |
|---|---|
| Step 1 | Clean the surface: Before you start gluing, use a cleaner specifically designed for PVC pipes like acetone. It will not only clean the surface but also help in softening the surfaces and making them more porous, which will enhance bonding. |
| Step 2 | De-grease the surface: Greasy surfaces can hamper the bonding process. Use denatured alcohol to remove any traces of grease and oil. Make sure to give enough time for the alcohol to dry before moving on to the next step. |
| Step 3 | Sand the surface: Once the surface is dry, smooth any rough spots, burrs, or edges with fine-grit sandpaper. This step will improve the adhesion of the glue to the pipe. After sanding, use a clean, dry cloth to remove any sanding dust or debris. |
Remember to take caution while working with PVC pipes, and avoid over-sanding or scratching them as it may weaken the pipe. Once the surface is adequately prepared, you are ready to start gluing the PVC pipe. If you want to know how to glue PVC pipe when wet, click here. For tips on how to glue PVC conduit, click here. If you want to know how to glue PETG, click here, and for information on what glue is used in plywood, click here.
Cutting the PVC Pipe
When cutting the PVC pipe, it’s important to have the right tools and technique to ensure a clean and precise cut. Here are the steps to follow:
| Step | Description |
|---|---|
| Step 1: | Measure the PVC pipe to the desired length using a measuring tape. |
| Step 2: | Mark the cutting point on the pipe using a pencil or marker. |
| Step 3: | Secure the pipe in place using a vice or clamp. |
| Step 4: | Use a handsaw, hacksaw or PVC pipe cutter to make the cut. |
| Step 5: | Make sure to cut straight and perpendicular to the pipe’s axis to avoid irregular shapes. |
| Step 6: | Remove any rough edges or burrs created by the cut using a deburring tool or sandpaper to ensure a snug fit. |
It’s important to note that using a proper PVC pipe cutter will provide the most precise cut. Avoid using a blade that is meant for wood or metal as this can lead to an uneven cut. Always wear safety goggles and gloves to protect yourself from flying debris and sharp edges. With the proper tools and technique, cutting PVC pipe can be done with ease and accuracy.
Gluing the PVC Pipe
Now that you have all the necessary materials and have prepared your PVC pipe accordingly, it’s time to move on to the next crucial step: gluing the PVC pipe together. This process ensures a tight and secure fit, which is essential for maintaining the pipe’s structural integrity and preventing any leaks. However, gluing PVC pipe can be tricky if you haven’t done it before, so it’s important to follow the steps precisely to ensure success. Let’s dive into the process step-by-step.
Apply Primer to the Pieces to be Glued
Before applying the cement, it’s important to prepare the PVC pipes by applying primer to the areas where the glue will be applied. The primer helps to clean and soften the PVC surface and allows for better adhesion of the cement.
Step 1: Begin by cleaning the PVC pipes with a clean rag to remove any dirt or debris from the surface.
Step 2: Next, take the PVC cleaner and apply it to the areas where the glue will be applied. Make sure to apply a thin and even coat of cleaner over the entire surface of the pipe to be glued.
Step 3: Allow the cleaner to evaporate for around 10-15 seconds. This should be enough time for the cleaner to do its job of softening and cleaning the surface of the PVC pipe.
Step 4: After the cleaner has evaporated, take the PVC primer and brush it onto the areas where the glue will be applied. Make sure to apply a thin and even coat of primer over the entire surface of the pipe to be glued.
Step 5: Allow the primer to dry for around 10-15 seconds. This should be enough time for the primer to penetrate the surface of the PVC pipe and prepare it for the glue.
Step 6: Once the primer has dried, you can then apply the PVC cement. Make sure to apply the glue immediately after the primer has dried, as it will lose its effectiveness if left for too long.
By following these steps and applying the primer to the PVC pipes before gluing, you’ll ensure a strong and lasting bond between the pipes, reducing the risk of leaks or pipe failure in the future.
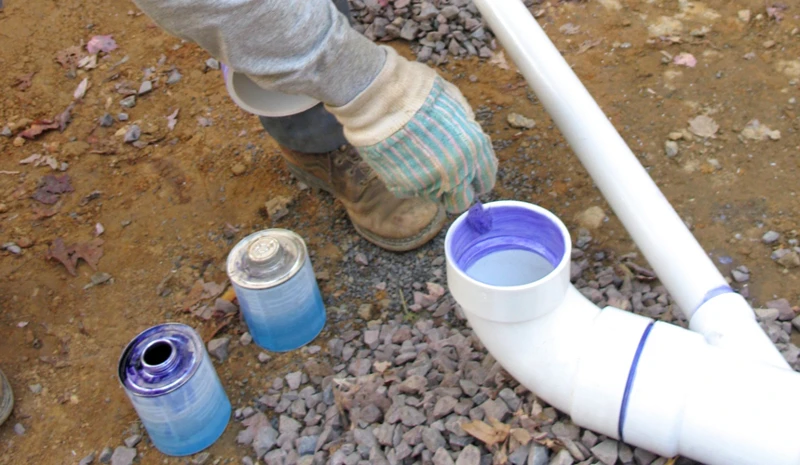
Apply PVC Cement
Now that you have applied the primer, you are ready to apply the PVC cement. Here’s how to do it:
- Open the PVC Cement Can
Before you start applying PVC cement, make sure the can is open and the brush is clean. Make sure to mix the cement well before use. - Apply PVC Cement to the First Piece
Dip the brush into the can and apply the cement onto the first piece. Make sure to apply a generous amount around the entire circumference of the pipe and within a few seconds of applying the primer. - Apply PVC Cement to the Second Piece
Apply PVC cement to the second piece in the same way as you did for the first piece. - Join the Pieces Together
After applying PVC cement to both pieces, join them together while twisting them slightly. This will ensure that the cement spreads evenly and makes a tight seal. - Hold the Pieces Together for a Few Seconds
After joining the two pieces together, hold them in place for a few seconds. This will help prevent the pieces from dislodging and maintain a tight seal.
Remember that PVC cement dries quickly, so you must work fast. Once the pieces are joined, you need to hold them in place for at least 30 seconds, but preferably a little longer. This will give the cement enough time to set and create a strong bond between the two pieces.
Join the Pieces
Once you have applied the primer and cement to the PVC pipe, it’s time to join the pieces together. This process requires precision as you want to make sure that the pieces are aligned correctly.
To help with this, it’s recommended to use an alignment guide or mark the pieces with a steady hand before joining. Make sure to firmly press the pieces together once joined to ensure a strong bond.
Here is a step-by-step guide on how to join PVC pipe pieces:
| Step | Action | Tip |
|---|---|---|
| Step 1 | Insert one end of the pipe into the fitting or coupling | Make sure the pipe is flush with the fitting |
| Step 2 | Rotate the pipe a quarter turn while pushing it into the fitting or coupling | This will ensure the cement is evenly distributed and will bond the pieces together effectively |
| Step 3 | Hold the pipe and fitting or coupling together for a few seconds to ensure they don’t move | Pressure can help form a stronger bond |
| Step 4 | Repeat the process for the other end of the pipe and fitting or coupling | Make sure both ends are aligned and flush with the fitting or coupling |
It’s important to note that once the pieces are joined, you should avoid moving them for at least 30 minutes. This allows the cement to dry and form a strong bond.
Remember: Precise alignment of the pieces before joining will ensure the strongest bond possible.
Hold the Pieces in Place
Once you have applied the PVC cement to the pieces you are joining, it is important to hold them in place until the cement dries. This is a crucial step in ensuring a proper bond between the PVC pieces. Here are some tips on how to hold the pieces in place:
- Use clamps: Clamps are a great option for holding the PVC pieces together. They provide a good grip and apply even pressure on the pieces. Make sure to use enough clamps to cover the entire length of the joint.
- Apply pressure: If you don’t have clamps, you can apply pressure on the pieces yourself. Use your hands to hold the pieces together and apply pressure for at least 30 seconds. Be careful not to move the pieces out of position while holding them.
- Use weights: Another option is to use weights to hold the PVC pieces together. Place a heavy object on top of the pieces and leave it there until the cement dries. This is a good option if you are gluing a vertical pipe or if you need to hold the pieces together for an extended period of time.
- Support the pieces: If you are gluing a long horizontal pipe, you may need to support the pieces as they dry. Use a block of wood or other sturdy object to support the joint, making sure that the pieces are not under any stress. This will prevent the joint from bending or breaking while it dries.
Whichever method you choose, make sure to hold the pieces in place until the PVC cement dries completely. The drying time may vary depending on the type of cement you use and the temperature and humidity of your workspace. Be patient and don’t rush the process, as a proper bond is crucial for the joint to be strong and leak-free.
Drying and Testing
After the pieces have been joined together, the next step is to wait for the glue to dry. This process is crucial, as it ensures that the bond between the PVC pipes is strong and long-lasting. It is important to follow the drying time instructions provided on the PVC cement container. In this section, we will discuss the drying time and testing for leaks to ensure that the PVC pipe joint is secure. Let’s dive in and discover how to properly dry and test your PVC pipe.
Drying Time
Once you have joined the PVC pipes, it’s important to allow them to dry completely before using them. The drying time can vary depending on factors such as temperature and humidity. Generally, it takes around 15 to 30 minutes before the joint sets, and 2 hours for the joint to cure completely.
It’s important not to put pressure on the joint before it has completely cured. Doing so can cause the joint to weaken or break, leading to leaks and potential damage. To help you keep track of the drying time, you can refer to the following table:
| Temperature | Humidity | Set Time | Cure Time |
|---|---|---|---|
| Below 60°F (15°C) | Below 60% | 30 minutes | 4 hours |
| 60-100°F (15-38°C) | Below 60% | 15 minutes | 2 hours |
| Above 100°F (38°C) | Below 60% | 5 minutes | 1 hour |
| Any temperature | Above 60% | 1 hour | 24 hours |
It’s important to note that these are general guidelines and the drying time may vary based on the specific brand of PVC cement you are using. Always read the manufacturer’s instructions and follow them carefully.
Remember to also consider the safety precautions during the drying period. Keep the area well ventilated and avoid smoking or open flames near the joint as PVC cement is highly flammable.
Once the joint is completely dry, you can test it for leaks. This will be covered in the next section of this article.
Testing for Leaks
After letting the PVC cement dry for the recommended time, it’s important to test for leaks before turning on any water supply. No matter how careful you were during the preparation and gluing process, leaks can still happen. Here are the steps to follow when testing for leaks:
| Step | Description |
|---|---|
| Step 1 | Visually inspect the glued joint. Make sure the cement has created a smooth and even connection without any gaps or bubbles. |
| Step 2 | Turn on the water supply and let it run for a few minutes. Check the joint for any signs of water leakage. If there is a visible leak, turn the water supply off immediately. |
| Step 3 | Dry the joint with a towel or cloth and wait for a few minutes. Check the joint again for any signs of water leakage. |
| Step 4 | Repeat steps 2 and 3 for at least three times to make sure there are no leaks. If there are still leaks, disassemble the joint, and repeat the gluing process. |
It’s important to note that testing for leaks should be done carefully and thoroughly to avoid water damage or any potential hazards. Always wear protective gear like gloves and safety glasses when testing for leaks and fixing any leaks that you may find. With patience and attention to detail, you can have a solid and leak-free PVC pipe joint that will last for years.
Common Mistakes

Even with the best of intentions, mistakes can happen when gluing PVC pipes. These mistakes can lead to leaks, weak joints, and ruined projects. In order to avoid these issues, it is important to be aware of the most common mistakes that people make when gluing PVC pipes.
Not Preparing the Surface Properly: One of the most common mistakes is not properly preparing the surface of the PVC pipes before gluing. The surface needs to be clean, dry, and free of debris or anything that could prevent the glue from adhering properly. Failing to do so can result in a weak bond and leaks.
Not Using Primer: Another common mistake is not using primer before applying the cement. Primer helps to soften and clean the PVC surface, providing a better surface for the cement to adhere to. Skipping this step can result in a poor bond and leaks.
Applying Too Much Cement: Applying too much cement can also cause problems. It can lead to the cement dripping or running and leaving unsightly marks on the pipe. It can also weaken the pipe, making it more prone to breaking or leaks.
Not Holding the Pieces Together Long Enough: In order for the PVC cement to bond properly, the pieces being glued together need to be held in place for a sufficient amount of time. Not doing so can result in a weak bond, which can lead to leaks.
Not Letting the Glue Dry Completely: It is important to let the glue dry completely before handling the PVC pipe. Moving or disturbing the joint before it is fully dry can cause the bond to fail and result in leaks.
By being aware of these common mistakes, you can take steps to avoid them and ensure a successful PVC pipe gluing project.
Safety Considerations
Safety should always be a top priority when working with PVC pipe and glue. Failing to follow the necessary safety precautions can lead to serious accidents and injuries. Here are some important safety considerations to keep in mind when gluing PVC pipe:
Wear Protective Gear: PVC cement and primer are strong chemicals that can irritate your skin and eyes. Always wear protective gloves and safety glasses while working with these chemicals. If you accidentally get any of the chemicals on your skin, wash the affected area immediately with soap and water.
Work in a Well-Ventilated Area: The fumes from PVC cement and primer can be harmful to your health. Always work in a well-ventilated area to prevent inhaling the fumes. If you’re working in a confined space, consider using a fan or opening a window to improve ventilation.
Keep Children and Pets Away: PVC cement and primer can be toxic if ingested. Keep children and pets away from your work area to prevent them from coming into contact with these chemicals.
Be Mindful of Fire Hazards: PVC cement is flammable and should be kept away from open flames or hot surfaces. Avoid smoking or using heat-producing tools near your work area.
Follow the Manufacturer’s Instructions: Always read the manufacturer’s instructions on the label of your PVC cement and primer. Follow their recommendations for safe usage, storage, and disposal.
By following these safety considerations, you can prevent accidents and injuries while gluing PVC pipe. Remember that safety should always be your top priority.
Conclusion
In conclusion, gluing PVC pipe together is a task that requires attention to detail and careful preparation. The materials and tools necessary for the job are readily available and affordable, which makes it an ideal DIY project for anyone who needs to join PVC pipes.
When working on this task, it is important to remember that safety is paramount. Be sure to wear the proper safety gear, including gloves and eye protection, and work in a well-ventilated area.
Preparation is key to success when gluing PVC pipe. Make sure the workspace is clean, dry, and free of any debris that could get into the pipe and cause clogs or leaks. Cutting the pipe precisely is also essential to ensure a tight and secure fit.
When applying primer and PVC cement, be sure to follow the manufacturer’s instructions carefully. Applying too little or too much can result in a weak joint that could fail over time. It is also important to hold the pieces in place for the recommended drying time to ensure a strong bond.
After the joint is dry, it is recommended to test for leaks to ensure that the connection is secure and the pipe is ready for use. This step can prevent potential problems down the road.
In conclusion, gluing PVC pipe together may seem daunting at first, but with the right tools, preparation, and attention to detail, it can be a straightforward and rewarding task. With practice and patience, you can create strong and reliable joints that will last for years to come.
Frequently Asked Questions
What is PVC Pipe?
PVC, or polyvinyl chloride, pipe is a type of plastic piping that is commonly used in plumbing, irrigation, and other applications due to its durability and affordability.
Can Any Type of PVC Cement be Used?
No, it is important to use the appropriate PVC cement and primer that is designed for the specific type and size of PVC pipe being used in your project.
How Long Does it Take for PVC Cement to Dry?
The drying time for PVC cement can vary depending on factors such as temperature and humidity, but it typically takes about 15-30 minutes for the cement to set and around 2 hours for it to fully cure and create a strong bond.
Can PVC Pipe be Used for Hot Water?
Yes, PVC pipe can be used for hot water, but it is important to use the appropriate PVC pipe and fittings that are rated for hot water applications.
Can PVC Pipe be Used for Drinking Water?
Yes, PVC pipe can be used for drinking water, but it is important to use PVC pipe and fittings that are rated for use with potable water.
Can PVC Pipe be Used for Gas?
No, PVC pipe should not be used for gas. Instead, use materials such as black iron or copper for gas piping.
Can PVC Cement be Used for CPVC Pipe?
No, PVC cement should not be used for CPVC pipe. It is important to use cement and primer that are specifically designed for CPVC pipe.
What is the Best Method for Cutting PVC Pipe?
The best method for cutting PVC pipe is to use a saw that is designed for cutting plastic, such as a hacksaw or PVC cutter. Make sure to cut the pipe evenly and at a 90-degree angle to ensure a proper fit.
What Should I Do if Glue Gets on my Skin?
If glue gets on your skin, wash the affected area with soap and water immediately. Do not try to peel the glue off, as this can cause further irritation.
Can PVC Pipe be Recycled?
Yes, PVC pipe can be recycled. Contact your local recycling center or check with your local waste management company for information on how to recycle PVC piping.