Are you looking for a quick and easy way to get fabulous nails without visiting a salon or risking your natural nails? Glue on nails may be the perfect solution for you! But what are glue on nails, exactly? In this complete guide, we’ll explore the types of glue on nails available, how to apply them, and how to care for them. By the end, you’ll have all the information you need to rock the perfect nails with confidence! So, let’s dive in and discover everything you need to know about glue on nails!
What are glue on nails?
Glue on nails are artificial nails that come in a variety of shapes, sizes, and colors made from materials like plastic, gel or acrylic which are designed to be attached to the natural nails. They are a popular choice for people wanting to have longer and more polished nails without the time and expense of getting a professional manicure. Glue on nails can be easily applied at home and offer a temporary solution to nail enhancements, also they are a great option for those who have brittle and weak nails that break easily.
Press-On Nails: Press-on nails are the most common and easiest to use type of glue on nails. They typically come in a set with pre-designed nails in various sizes with adhesive tabs or a nail glue included. The adhesive tabs allow for easy application without the mess of nail glue. Press-on nails are best for special occasions or a quick change of style.
Full Cover Nails: Full cover nails are designed to completely cover the natural nails, giving a smooth and polished look. They are available in a variety of colors, finishes, and shapes. Full cover nails typically require nail glue for application and offer a longer-lasting solution compared to press-on nails.
Tips: Tips are a type of glue on nails that can be applied to the natural nails to create an extended nail bed before applying a full cover nail or acrylic nails. Nail tips are made from various materials like plastic or acrylic and are attached to the natural nails with nail glue.
Half Cover Nails: Half cover nails have a design that only extends to the tips of natural nails. They are perfect for those who want to retain some of the natural and unpolished look of their nails. Half cover nails can be applied easily with nail glue and offer a more subtle look compared to full cover nails.
To make sure that glue on nails last longer, proper application of the nails is crucial. It is important to follow the instructions included in the glue on nail set or check out how to glue nail back on. In case the applied nails got damaged, it is necessary to know what is a good nail glue or how to fix them. It is important to maintain the glue on nails properly, to keep them looking neat and professionally applied, check out how to make glue on nails look real. Lastly, it is important to know when and how the nails should be removed, to avoid damaging the natural nails or glued nails, check out how to open KDS nail glue or how to dry nail glue fast.
Types of Glue On Nails
Glue on nails are a popular choice for those who want to achieve a beautiful manicure without having to go to the salon. These nails come in a variety of shapes, sizes, and designs, but they can be broadly classified into a few types.
Press-on nails are made of a lightweight plastic material, and they usually come with adhesive tabs. These tabs can be pressed onto the natural nails, without the need for any glue. These nails are perfect for those who want a temporary solution or who want to experiment with different nail shapes and designs, without committing to one style. Melted nail glue can also be used to secure press-on nails, giving them a longer-lasting hold.
Full cover nails, as the name suggests, are designed to cover the entire natural nail bed. These nails can be made of acrylic or gel material, and they come with a strong adhesive glue that is used to attach them to the natural nails. They are perfect for those who want a longer-lasting manicure that can withstand daily wear and tear. Gel-based full cover nails offer a more natural look and can last up to several weeks, depending on how well they are cared for. Check here how long fake nails last with glue.
Tips are another type of glue on nails that can be attached to the natural nails without covering the entire nail bed. These are perfect for those who want to achieve a natural look and prefer not to have long nails. They come with adhesive glue that is applied to the underside of the tip and then secured to the natural nail.
Half cover nails fall somewhere between full cover nails and tips. They are designed to cover only the top half of the nail bed and are perfect for those who want a manicure that looks more natural but provides more coverage than tips. Like full cover nails, these also come with strong adhesive glue that is used to attach them to the natural nails.
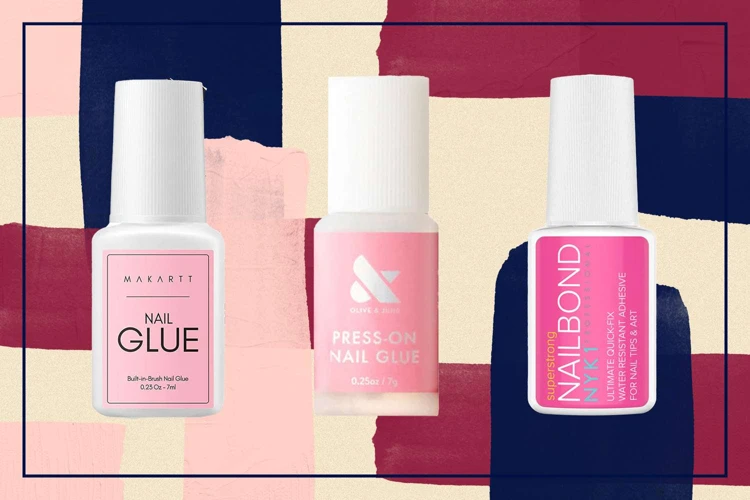
It is important to choose the type of glue on nails that suits your lifestyle and nail type. Some designs may require more maintenance or may not be suitable for those with brittle or thin nails. No matter which type you choose, it is important to take care of your nails and follow proper application and removal techniques. You can also use nail glue drying tips to help glue dry faster. Additionally, it is also important to use a high-quality glue like Ardell nail glue, which provides a strong and durable hold that can last for weeks.
How to Apply Glue On Nails
Preparing to apply glue on nails: Before applying glue on nails, it’s crucial to prepare them properly. Start by washing your hands and nails thoroughly with soap and water. Use a soft-bristled brush to remove any dirt or debris from under your nails. After that, dry your nails completely to ensure that they are clean, dry and oil-free. Any moisture or oil on your nails can interfere with the adhesive power of the glue.
Selecting the right-sized nail: Before applying glue on nails, it’s important to ensure that you choose the right size. Make sure the nails fit properly over your natural nails. If the glue-on nails are too wide or too narrow, it can lead to the nails coming off or causing damage to your natural nails.
Applying a base coat: Applying a base coat can help your glue-on nails last longer. Once your nails are clean and dry, apply a clear base coat on your nails to protect your natural nails. Let the base coat dry completely before moving on to the next step.
Applying glue: Apply a small amount of glue on your natural nails. Be careful to not apply too much glue, as this can lead to the glue seeping out from the sides of the glue-on nails. If you’re using a brush-on glue, make sure to brush the glue evenly over the nails, especially the edges.
Placing the glue-on nail: Once the glue has been applied, you can now place the glue-on nails over your natural nails. Make sure to press the nail firmly in place for at least 10 seconds to ensure that it is securely attached to your natural nail.
Smoothing out the edges: Use a nail file to gently file the edges of the glue-on nails to smooth out any rough edges. Make sure to file in one direction while holding the nail file at a slight angle.
Post-application tips: Once the glue-on nails have been applied, it’s important to take care of them to ensure that they stay in place for an extended time. Avoid getting your nails wet for at least an hour after applying the glue-on nails. Try to avoid any heavy lifting or activities that may put pressure on your nails. In case of any dings or chips, use a small amount of glue to fill and repair. If you need to remove the nails, use acetone nail polish remover and gently soak the nails for at least 10-15 minutes, then use a cuticle pusher to gently remove the softened nails.
How long does kiss nail glue last? Kiss nail glue is one of the popular types of glue used for applying glue-on nails. It lasts for around 7-10 days, depending on the proper application and taking care of the nails. In case the nails come off before the expected time, it could be due to improper application or removing the nails before they are ready. Use a nail glue remover for easier and proper removal of the glue.
How to Maintain Glue On Nails
Maintenance of glue on nails is crucial to ensure that they last long. Glue on nails may last up to two weeks or even longer depending on how you take care of them. Proper maintenance is essential to keep your nails looking polished and strong. Follow these tips to maintain your glue on nails:
Proper Care Tips
- Keep nails dry:
- Avoid using your nails as tools:
- Don’t bite your nails:
- Use cuticle oil:
- Be gentle while handling glue on nails:
Water can weaken the adhesive bond between the nail and the glue, so it’s essential to keep your nails dry. Avoid submerging your nails in water for an extended period. Suppose you need to wash dishes, it’s advisable to wear gloves to protect your nails.
Glue on nails can be delicate, and using them to open cans, bottles, or other tasks can easily damage them. You should avoid putting too much pressure on your nails or using them as tools.
Biting your nails can not only undo a fresh manicure but can also damage your natural nails. Damaged natural nails may not hold the glue on nails for long, and the adhesive may not stick to them properly.
Glue on nails can dry out your cuticles, leading to breakage or other nail issues. Use cuticle oil to moisturize your nails. It can also help to strengthen and nourish your natural nails and promote healthy growth.
Avoid rough handling of your nails. Be gentle while washing or applying lotion on your hands. This will help to prevent the glue on nails from falling off or breaking.
Fixing Damaged Nails
If your glue on nails get damaged, it’s necessary to fix them. However, you need to be careful while doing so. If a nail is partially broken or lifted, you can use a nail glue to fix it. But if a nail is completely broken or damaged, it’s recommended to remove it and apply a new one.
Removal Tips
You can remove glue on nails with acetone or a nail polish remover. Soak a cotton ball in acetone or nail polish remover and place it on your nail. Cover the nail with aluminum foil or cotton to maintain the moisture and wait for about 15 minutes. The nail should come off by itself.
Keeping up with the proper care of glue on nails can make a significant difference in how long they last. It is essential to handle them gently, moisturize your cuticles, and avoid exposing them to water for long periods. Besides, fixing damaged nails and removing them correctly play a key role in maintaining the health and appearance of your nails.
How long does Kiss Nail Glue Last?
Types of Glue On Nails
Glue on nails come in a variety of types to suit every taste and preference. Here are some of the most popular types of glue on nails:
Press-On Nails: These nails come in a wide range of colors and designs and are a favorite among people who do not want to spend hours at a nail salon. They offer a hassle-free and quick solution for those who want to have perfect-looking nails for a special occasion or event.
Full Cover Nails: These nails are perfect for individuals who want a complete coverage on their natural nails. They are pre-designed with different nail art and patterns and come in a range of sizes to fit different nail widths. They come in various shapes like round, square, and stiletto shapes.
Tips: These types of glue on nails offer a natural-looking nail enhancement by adding length to the nails. They are applied to the tip of the natural nails to enhance their length and shape. They come in a range of colors and designs from French to glittery tips.
Half Cover Nails: As the name suggests, these nails only cover half of the natural nails and are perfect for those who want to have a balance between natural nails and artificial nails. They are perfect for everyday wear as they provide the perfect manicured look without being too dramatic or showy.
The different types of glue on nails cater to different preferences and needs of individuals. From full cover nails to press-on nails, there is a type for every mood, occasion, and style. It is always recommended to try various types and styles to find the best-suited type to match individual preferences.
Press-On Nails
Press-On Nails: Press-On Nails are the most popular type of glue on nails. They are thin, pre-shaped nails that come with an adhesive backing. They can be easily applied to your natural nails without using glue or any other nail adhesive. They are convenient and easy to use, making them a great option for people who are always on the go or those who don’t have the time or money to go to a salon for a professional manicure.
One of the biggest advantages of Press-On Nails is their versatility. They come in a wide range of sizes, shapes, and colors, making them suitable for any occasion. They can be customized to match your outfit or your mood, and you can choose from a variety of designs, including French tips, glitter, and bold patterns.
Another advantage of Press-On Nails is that they are affordable. They are much cheaper than getting a professional manicure or going to a salon for nail extensions. Plus, with Press-On Nails, you don’t have to worry about damaging your natural nails with the acrylic or gel used in nail extensions.
Press-On Nails are also easy to apply. You simply need to clean your nails, select the appropriate size, and stick them on. They can be applied in just a few minutes, and you don’t need any special tools or skills to achieve a professional-looking result.
Finally, Press-On Nails are easy to remove. You can simply peel them off gently without damaging your natural nails. This makes them a great option for people who like to change their nail color or design frequently.
However, there are a few downsides to Press-On Nails. They may not stay on for as long as other types of glue on nails, and they may not look as natural or feel as comfortable. Additionally, they may not be suitable for people with very short nails or those with nail beds that are very flat or curved.
Press-On Nails are a great option for anyone looking for an easy, affordable, and versatile way to get beautiful, manicured nails at home.
Full Cover Nails
Full cover nails are a type of glue on nails that provide complete coverage for your natural nails. These nails come in a variety of sizes and shapes to fit every nail size and shape. They are often made of a durable plastic material that mimics the appearance of natural nails.
Benefits of Full Cover Nails
One of the biggest advantages of full cover nails is the convenience they provide. Since they are pre-designed and pre-shaped, you don’t need any special skills to apply them. You can use them to create a salon-quality manicure at home. Full cover nails can also be a time-saver since they can be applied quickly compared to other types of nails.
Another advantage of full cover nails is their durability. They are made of strong materials that can withstand everyday wear and tear, making them perfect for people with a busy lifestyle. They are also highly resistant to chipping, peeling, and cracking, so you don’t have to worry about your manicure getting ruined.
Choosing the Right Full Cover Nails
To get the best results from full cover nails, you need to choose the right size and shape for your natural nails. Nails that are too small will not provide adequate coverage, while nails that are too large can look unnatural and be uncomfortable to wear. It’s important to choose a size and shape that matches your natural nails to achieve the most natural look.
You should also consider the material used to make the full cover nails. Some nail brands use high-quality materials that are more durable than others. Additionally, some brands offer unique designs that can enhance the overall look of your manicure.
Applying Full Cover Nails
To apply full cover nails, you’ll need to prepare your natural nails first. Start by removing any old nail polish and cleaning your nails thoroughly. You can then use a cuticle pusher to push back your cuticles and trim your nails to the desired length.
Next, apply a small amount of nail glue to the back of the full cover nail and press it firmly onto your natural nail. Hold it in place for a few seconds to ensure a secure bond. Repeat the process for all nails, making sure to adjust the positioning as needed to achieve a natural and comfortable fit.
Maintaining Full Cover Nails
To make your full cover nails last as long as possible, it’s important to practice proper maintenance. Avoid exposing them to harsh chemicals, such as cleaning agents or acetone, which can weaken the bond between the nail and your natural nail. Also, avoid picking or biting your nails, as this can cause damage and lead to premature lifting of the full cover nail.
If a full cover nail does become damaged or starts to lift, you can use nail glue to reapply it. However, if multiple nails start to lift or become damaged, it may be time to remove the entire set and start over.
Conclusion
Full cover nails can be a game-changer for anyone looking for a quick and easy way to achieve a salon-quality manicure at home. By choosing the right size, shape, and material, you can create a natural and long-lasting look. With proper maintenance, you can enjoy beautiful nails for weeks or even months.
Tips
When it comes to glue on nails, there are some tips that can help you achieve the perfect look and make your manicure last longer.
Tip 1: Always clean and prepare your natural nails before applying glue on nails. You should file your nails, remove any old nail polish, and push back your cuticles. This will create a clean and smooth base for your glue on nails so that they can adhere properly.
Tip 2: Use the right size of glue on nails for your natural nails. The glue on nails should fit your natural nails perfectly, without any overlaps or gaps. Choosing the wrong size may cause the glue on nails to fall off or break easily.
Tip 3: Apply the glue properly. You should apply a tiny drop of glue on each natural nail before placing the glue on nail. Apply just the right amount of glue and spread it evenly on the nail bed to avoid creating bubbles or unevenness.
Tip 4: Be gentle with your hands. Glue on nails may not be as strong as acrylic nails, so it’s important to avoid harsh activities that could damage them. Avoid using your nails to open cans, scratch surfaces, or perform other activities that could cause them to bend or break.
Tip 5: Moisturize your nails and cuticles regularly. Glue on nails can dry out your natural nails and cuticles, so it’s important to keep them moisturized. Apply cuticle oil or hand cream regularly to keep your nails and cuticles healthy.
Tip 6: Avoid soaking your nails in water. Water can loosen the glue on nails and cause them to fall off. If possible, wear gloves when washing dishes or doing other activities that involve water.
Tip 7: Be cautious when removing the glue on nails. If you remove them improperly, you may damage your natural nails. Use a gentle nail polish remover or acetone to dissolve the glue, and avoid using force to remove the glue on nails.
By following these tips, you can ensure that your glue on nails look great and last longer.
Half Cover Nails
Half cover nails are a popular type of glue on nails that provide a natural look to your hands. As the name suggests, these nails only cover half of your natural nails. They can be placed either at the top or the bottom of your nails depending on the desired look.
Advantages of Half Cover Nails
One of the main benefits of using half cover nails is that they look more natural than other types of glue on nails. Since they only cover a portion of the natural nails, they blend in more seamlessly, making them perfect for everyday wear.
Another advantage is that they are easier to maintain and less prone to damage. Since they don’t cover the entire nail, there is less chance of them getting caught on something, resulting in them falling off or breaking.
Additionally, half cover nails are great for those who want to try out different nail designs but do not want to commit to a full set of glue on nails.
Choosing Half Cover Nails
When choosing half cover nails, it’s important to find the right size and shape that matches your natural nails. Make sure to measure your nails accurately before purchasing to ensure a perfect fit.
You should also consider the type of material used for the nails. Many half cover nails are made of acrylic or gel, but there are also options made of reinforced plastic or press-on material.
Applying Half Cover Nails
The process of applying half cover nails is similar to other types of glue on nails. Firstly, ensure that your natural nails are clean and free of any oil or debris. You can file your nails to your desired shape.
Next, apply a thin layer of nail glue to the back of the half cover nail. Carefully place the nail on your natural nail, starting at the base and pressing down firmly.
Ensure that the nail is properly aligned with your natural nails and hold it in place for a few seconds until the glue dries. You can then repeat the process for the rest of your nails.
Maintaining Half Cover Nails
To make your half cover nails last longer, it’s important to take proper care of them. Avoid using your nails as tools or exposing them to excessive water. You should also regularly moisturize your nails and avoid harsh chemicals that can cause the glue to weaken or damage the nails.
If one of your half cover nails does become loose or damaged, you can use a nail glue to fix it. However, if you need to remove the nails, soak them in warm soapy water for a few minutes before gently peeling them off to avoid damaging your natural nails.
Half cover nails are a great option for those who want a natural-looking and low-maintenance manicure. Just be sure to choose the right size and shape, apply them carefully, and take proper care to keep them looking their best.
How to Apply Glue On Nails
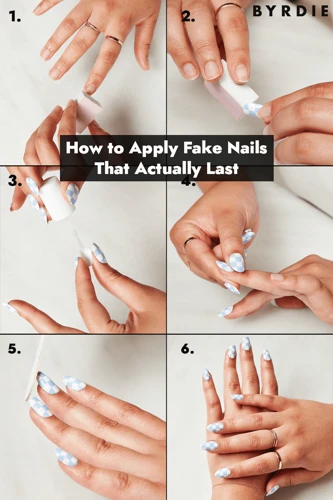
Applying glue on nails may seem intimidating, but with the proper technique and tools, it can be a simple and fun process. Below is a step-by-step guide on how to apply glue on nails.
Step-by-step guide:
1. Begin by prepping your natural nails. File and shape your nails to your desired length and shape. Make sure your nails are clean, dry, and oil-free. If your nails are too oily, the glue might not adhere well, and the nails might fall off quickly.
2. Apply a small amount of nail glue on your natural nails, and then apply a thin layer of glue on the back of the faux nail. Make sure to apply glue sparingly, as a thick layer can cause uneven application and difficulty in removing the nail later on.
3. Line up the faux nail with your natural nail, and press it down firmly. Hold the nail in place for at least 5-10 seconds.
4. Repeat the process on all of your nails until your desired look is achieved. Once all nails are glued on, wait at least 15-20 minutes for the glue to dry completely.
Pre-application tips:
• If you have oily nails, use a nail polish remover or rubbing alcohol to remove any excess oil and dry out your nails before applying glue.
• Cut the faux nails to your desired length before applying them. This will make it easier to manage and reduce the risk of the nails popping off.
• Apply a topcoat over the faux nails to help keep them in place and to give them a shiny finish.
Removal tips:
To remove the faux nails, gently lift up the edges and use a wooden cuticle stick to loosen the nail. Be careful not to force the nail off, or it may cause damage to your natural nail. If the glue is not coming off easily, soak your nails in warm soapy water for a few minutes, and then try removing the nails again.
Applying glue on nails is a relatively easy process that can be done in the comfort of your own home. With the right tools and technique, you can have a stunning set of nails that lasts for weeks. Just remember to be gentle when removing the nails, and take proper care of your natural nails to prevent damage.
Step-by-step guide
If you’re new to applying glue on nails, it might seem complicated at first. However, with these simple steps, you’ll be able to achieve a polished look in no time.
Step 1: Gather Your Supplies
Before you start, make sure you have all your supplies on hand. You’ll need artificial nails, nail glue, a nail file, a cuticle stick, and nail polish (optional).
Step 2: Prep Your Natural Nails
Start by washing and drying your hands thoroughly. Then, use the nail file to shape your natural nails to your desired length and shape. Be sure to file in one direction to avoid damaging your nails. Next, use the cuticle stick to push back your cuticles and remove any dirt or debris from under your nails.
Step 3: Apply Glue on Nails
Apply a small amount of glue to the back of the artificial nail. Be sure to use enough glue to cover the entire surface of your natural nail. Then, carefully apply the artificial nail to your natural nail, pressing down firmly for 10-15 seconds to ensure a secure bond.
Step 4: Trim and Buff Your Nails
Once the glue has dried, use nail clippers or scissors to trim the artificial nail to your desired length. Then, use a nail buffer to smooth out any rough edges or ridges.
Step 5: Add Nail Polish (Optional)
If you’d like, you can apply nail polish to your new nails to complete the look. Choose a color that complements your outfit or personality, and apply it evenly over the surface of your nails.
Step 6: Let Your Nails Dry
Allow your nails to dry completely before using your hands for any task. This will prevent the nails from chipping or breaking before the glue has fully hardened.
By following these simple steps, you’ll be able to apply glue on nails like a pro. Just remember to take your time, and be patient while waiting for the glue to dry fully.
Pre-application tips
Before applying glue on nails, there are several important pre-application steps you should take in order to ensure the best results possible. Here are some tips to keep in mind:
Clean and Prepare Your Natural Nails
Before applying glue on nails, you want to make sure that your natural nails are clean and free from any dirt, oil, or old nail polish. This will help the glue bond better with your nails and make your fake nails last longer. Start by removing any old polish with nail polish remover and use a nail brush to scrub under your nails and remove any dirt or debris. Then, trim and file your natural nails to your desired shape and length.
Push Back Your Cuticles
Gently push back your cuticles with a cuticle pusher or orangewood stick. This will help to create a smooth surface for the fake nails to adhere to and prevent the glue from getting on your skin.
Select the Right Size and Shape
Make sure that you have selected the right size and shape of fake nails for each of your nails. The pieces should not be too big or too small in order to ensure that the glue will adhere properly and your nails will look great. Test each nail against your own natural nail to ensure a perfect fit.
Clean and Dry Your Hands
Before you start applying the fake nails, you should clean and dry off your hands. Make sure that there is no moisture on your nails as this can affect the bonding process. You can use a nail dryer or a paper towel to dry your hands if necessary.
Apply a Base Coat
Applying a base coat can help to protect your natural nails from any damage caused by the glue or fake nails. It also helps to extend the life of the fake nails by preventing them from lifting or chipping. Choose a base coat that is appropriate for your natural nail type, and follow the instructions on the bottle for best results.
By following these pre-application tips, you can ensure that your glue on nails adhere properly, last longer, and look great. Remember to take your time and be patient, especially if you are applying glue on nails for the first time. With practice and a little bit of patience, you can achieve salon-quality results at home.
Removal tips
Removing glue on nails can be a challenging and tricky process, but it can be done easily with the right steps and tips. The first and foremost step is to avoid ripping or tearing the nails off, as this can cause damage to your natural nails. Instead, follow these simple and effective tips to remove your glue on nails safely and easily.
Tip 1: Soak your nails in acetone
The easiest and most effective way to remove glue on nails is to soak them in pure acetone. Acetone is a powerful solvent that can dissolve glue and nail polish, making it an ideal choice for removing glue on nails. Simply fill a bowl with acetone and soak your nails for 10-15 minutes. Gently scrape off the glue using a cuticle pusher or an orange wood stick. Be sure to wash your hands thoroughly after using acetone, as it can dry out your skin.
Tip 2: Use almond oil
If you don’t have acetone at home, you can use almond oil to remove the glue on nails. Simply apply a generous amount of almond oil on your nails and let it sit for 10-15 minutes. Use an orange wood stick to gently scrape off the glue. Almond oil is a natural and gentle method that will not harm your natural nails.
Tip 3: Use a nail polish remover
A nail polish remover solution that contains acetone can also be used to remove glue on nails. Soak your nails in the solution for 10-15 minutes and then carefully scrape off the glue using a cuticle pusher or an orange wood stick. It is important to be gentle and not apply too much pressure while removing the glue.
Tip 4: Do not force the removal
If the glue does not come off easily, do not force it. This can damage your natural nails and cause pain and discomfort. Instead, repeat the soaking process until the glue softens and can be easily removed. Patience and a gentle touch are key to safely removing glue on nails.
Tip 5: Moisturize your nails
After removing the glue on nails, be sure to moisturize your nails and hands with a good quality hand lotion or oil. This will help to replenish any moisture lost during the nail removal process and will keep your hands and nails hydrated and healthy.
Removing glue on nails may seem daunting, but with these tips and tricks, you can easily remove your glue on nails without causing harm to your natural nails. Remember to be gentle, patient, and always take your time when removing any type of artificial nails.
How to Maintain Glue On Nails
Maintaining your glue-on nails is just as important as applying them correctly. You want to make sure they look great and last for as long as possible. Here are some tips on how to keep your glue-on nails looking their best.
Proper Care Tips
One of the most important things you can do to maintain your glue-on nails is to take care of them. This means avoiding activities that could damage them, such as excessive hand washing, washing dishes without gloves, and using your nails as tools.
To clean your nails, use a soft-bristled brush and a gentle soap. Be sure to dry them thoroughly, especially between the nail and the natural nail to prevent mold or fungus growth.
Fixing Damaged Nails
If one of your glue-on nails becomes damaged, you don’t necessarily have to remove them all. Instead, try to fix the damaged nail. Depending on the severity of the damage, you may be able to repair it with more glue. If the nail is completely broken, consider using a replacement nail instead.
Removal Tips
When it’s time to remove your glue-on nails, resist the urge to peel them off. This can damage your natural nails and cause pain. Instead, soak your nails in warm water for around 10-15 minutes to loosen them. Then, gently pry them off with a cuticle pusher or orange stick. If you must use acetone to remove the nails, be sure to use it in a well-ventilated area and moisturize your hands afterward.
By following these tips for maintaining your glue-on nails, you can enjoy flawless nails that last for weeks.
Proper Care Tips
Taking care of your glue on nails is important if you want them to last for as long as possible. Here are some proper care tips you can follow:
1. Clean your nails regularly: It’s important to clean your nails regularly from top to bottom with a soft-bristled brush to prevent any dirt or bacteria from accumulating under the nails.
2. Keep your nails dry: Avoid getting your glue on nails wet for at least 2 hours after application to allow the glue to dry completely. Also, try to keep your nails dry as much as possible to prevent fungal infections.
3. Be gentle with your nails: Avoid using your nails as tools to open cans or files, or anything that can damage your glue on nails. Instead, use your fingers or a tool.
4. Apply cuticle oil: Applying cuticle oil regularly can help keep your nails healthy and strong, as well as prevent the glue on nails from getting brittle and breaking.
5. Avoid harsh chemicals: Household cleaners, acetone, and other harsh chemicals can weaken the glue on nails and cause them to lift or break. It’s best to wear gloves when using these products.
6. Don’t peel off your nails: If you need to remove your glue on nails, don’t peel them off. This can damage your natural nails and cause pain. Instead, soak your nails in warm water for a few minutes to loosen the glue and gently remove the nails.
By following these proper care tips, you can help keep your glue on nails looking beautiful for a longer period of time. Remember to treat your nails gently and with care in order to maintain healthy, strong nails.
Fixing Damaged Nails
It can be frustrating when one of your glue on nails becomes damaged, but don’t worry because there are ways to fix them! Here are some tips for fixing damaged nails:
1. Patch it up: If you have a tear or rip in your nail, you can try to patch it up with a small piece of tissue paper and glue. First, apply a thin layer of glue to the damaged area, then place the tissue paper on top and add another layer of glue. This will help reinforce the nail until it’s time to remove the glue on nails.
2. File it down: If your nail has a chip or crack, you can file it down with a nail file. Be careful not to file too much and damage your natural nail underneath. After filing, apply a layer of glue and a small piece of tissue paper to reinforce the nail.
3. Replace the nail: If the damage is too severe, you may need to replace the entire nail. Remove the damaged nail and apply a new one using the same method as before.
4. Take a break: If you’re experiencing frequent damage to your glue on nails, it may be a sign that your natural nails need a break. Take a few weeks to let your nails breathe and grow out before applying new glue on nails.
Remember to always handle your glue on nails with care to avoid damage. And if you do experience damage, don’t panic – there are easy solutions to fix it!
Removal Tips
Removing glue on nails may seem intimidating, but it doesn’t have to be a difficult process. The first step is to gather all the necessary supplies, including acetone, cotton balls, aluminum foil, and a cuticle stick.
Step 1: Prepare the foil and cotton balls
Tear off small pieces of aluminum foil and cut cotton balls into small squares that will fit over each nail. Soak the cotton balls in acetone, making sure they are fully saturated.
Step 2: Remove the top layer of the glue
Using the cuticle stick, gently pry off the top layer of the glue on each nail. Be careful not to damage the natural nail.
Step 3: Apply the cotton balls and foil
Place the soaked cotton ball on top of the glue on each nail, and wrap the foil around it to hold it in place. Make sure the cotton ball stays in contact with the glue on the nail.
Step 4: Wait for the acetone to dissolve the glue
Leave the wrapped nails for about 10-15 minutes, allowing the acetone to dissolve the glue.
Step 5: Remove the foil and cotton balls
Carefully remove the foil and cotton balls from each nail, wiping away any remaining glue with a fresh cotton ball soaked in acetone.
Step 6: Moisturize and recover
After removing the glue on nails, it’s important to moisturize the nails and surrounding skin. Apply cuticle oil or a moisturizing lotion to help keep the nails healthy and strong. Avoid applying glue on nails for a few days to give the nail bed a chance to recover.
While removing glue on nails is a relatively simple process, it’s important to be gentle and patient to prevent damage to the natural nail. By following these tips, you can safely and effectively remove glue on nails and keep your natural nails healthy and strong.
Conclusion
After reading this complete guide on glue on nails, it is safe to say that there is no one-size-fits-all answer to what exactly glue on nails are called. However, by going through this guide, you are now equipped with the knowledge to confidently discuss and apply glue on nails.
Whether you prefer full cover, half cover, press-on or tips glue on nails — knowing the differences and benefits of each will help you make the right choice for your desired look and lifestyle.
But beyond just selecting the right type of nail, properly applying and maintaining them is crucial to ensuring that they last for as long as possible. With the step-by-step guide and tips in this article, you should now be able to confidently apply and remove glue on nails, while also taking the necessary precautions to avoid damage to your natural nails and ensure maximum longevity.
Proper care and maintenance, such as regularly moisturizing your cuticles and avoiding the use of harsh chemicals, will help keep your glue on nails looking beautiful and natural. And if they do get damaged, don’t worry – there are still ways to fix and salvage them before needing to completely remove them.
In conclusion, whether you are using glue on nails for a special occasion or as a regular part of your beauty routine, following the tips and instructions outlined in this guide will help you achieve the best results. With the right knowledge and tools, you can confidently make glue on nails your go-to solution for beautiful, salon-worthy nails at home.
Frequently Asked Questions
What are the benefits of glue on nails?
Glue on nails offer an easy and affordable way to achieve salon-quality nails at home. They are also a great option for those who don’t have the time or patience for traditional nail polish.
How long do glue on nails last?
The duration of glue on nails varies depending on the type and brand of the product used. On average, they can last from a couple of days to up to two weeks.
Can glue on nails damage your natural nails?
If applied and removed properly, glue on nails should not damage your natural nails. However, improper application and removal techniques can cause damage such as nail thinning or breakage.
Can I apply glue on nails myself?
Yes, glue on nails can be applied at home. However, it is important to follow the instructions carefully to avoid any damage to your natural nails.
Can I reuse glue on nails?
It is not recommended to reuse glue on nails as they may lose their shape and adhesion after the first use.
How do I remove glue on nails?
To remove glue on nails, soak them in acetone for about 10-15 minutes, then gently peel them off. It is important not to force them off as this can cause damage to your natural nails.
What should I do if my glue on nails lift?
If your glue on nails start to lift, you can apply a small amount of nail glue to the area and press down to secure it. However, it is recommended to replace the nails as soon as possible to avoid any further lifting or damage.
Can I paint over glue on nails?
Yes, you can paint over glue on nails. However, it is important to wait until the nails are completely dry and secure before painting them.
Can I wear glue on nails while swimming?
It is not recommended to wear glue on nails while swimming as the water can weaken the adhesive and cause the nails to lift or come off completely.
Are glue on nails safe for pregnant women?
While there is no evidence to suggest that glue on nails are harmful to pregnant women, it is always best to consult with a healthcare professional before using any products during pregnancy.