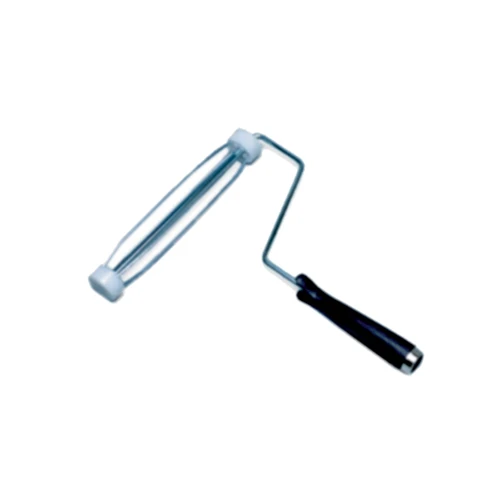
Painting a room can be a daunting task, but with the right tools, it can be much easier and more efficient. One tool that can make a big difference when painting is a roller frame. A roller frame allows you to cover large areas quickly and evenly, making the painting process much smoother. However, if you’re not using the right type of roller frame, you may find yourself frustrated with drips, splatters, and uneven coverage. In this article, we’ll walk you through everything you need to know about using a roller frame with different types of paint, so you can achieve a professional-quality finish with ease.
Benefits of Using a roller frame
Are you tired of spending hours painting your walls or ending up with uneven surfaces? A roller frame may just be the solution you need. Using a roller frame has many benefits that make painting easier, faster, and more efficient. Not only does it reduce time and effort, but also minimizes drips and splatter, and improves the overall quality of your painting. If you’re interested in learning more about the advantages of using a roller frame or how to choose the right one for your project, check out our article on the benefits of roller frames or our guide to choosing the right roller frame.
Reduce Time and Effort
Using a roller frame can significantly reduce the time and effort required for painting compared to using a paintbrush alone. With a roller frame, you can cover a larger surface area in less time than with a brush, making it an ideal choice for larger projects. The roller distributes the paint more evenly than a brush, meaning you can achieve the desired finish with fewer coats.
Using a roller frame also minimizes the amount of physical effort involved in painting. A quality roller frame will have a comfortable grip that’s easy to hold, allowing you to paint for longer periods without experiencing fatigue or strain. This makes it an excellent choice for both professionals and DIYers who want to achieve great results without significant physical exertion.
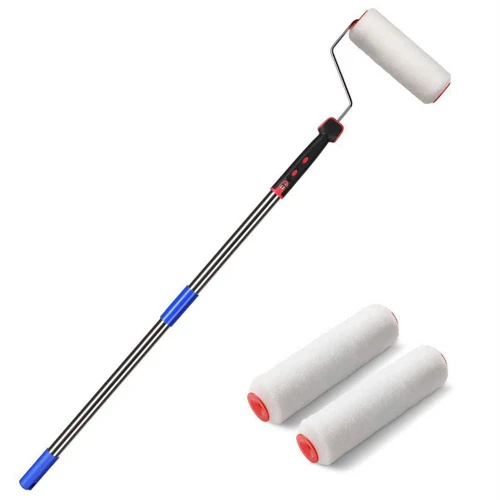
Lastly, roller frames are also great for ease of use, even in hard-to-reach areas. Nowadays, most roller frames come with extendable handles, allowing you to paint high walls and ceilings without using a ladder- which means less time and more safety.
So, if you want to save time, effort, and get a more professional-looking finish, using a roller frame is a must. However, it’s important to choose the right roller frame for your project, whether you’re painting walls, furniture, or a whole room. For more detailed guidance on choosing the right roller frame, check out our article on painting walls with a roller frame.
Minimize Drips and Splatter
Using a roller frame can significantly minimize drips and splatter while painting. Drips and splatter can cause a lot of mess and even ruin the entire project. But with a roller frame, you can avoid this problem and make your painting project much easier to complete.
One of the main reasons why a roller frame is so effective at minimizing drips and splatter is that the roller’s absorbent cover holds the paint and distributes it evenly. This means that the paint is less likely to drip or splatter as it flows uniformly from the roller onto the surface being painted. However, it is important to ensure that the roller cover is not overloaded with paint, as this can lead to drips and splatter.
Another way to minimize drips and splatter is to avoid pressing too hard on the roller when painting. Instead, use light pressure and let the roller do its job. Additionally, painting in a smooth and consistent motion can also reduce drips and splatter.
Finally, it is essential to use the right roller frame for your project. Different roller frames have different properties, such as size, shape, and material, which can affect the outcome of your painting project. Choosing the appropriate roller frame can minimize drips and splatter and help you achieve a high-quality finish. For more tips on selecting the right roller frame, check out our comprehensive guide on roller frame sizes, shapes, and uses.
Using a roller frame is an excellent way to minimize drips and splatter while painting. By selecting the right roller frame and using the appropriate technique, you can achieve a clean and polished finish for your project. To learn more about how to use your roller frame effectively, check out our detailed tips on roller frame tips and high-quality roller frame tips, or read about the common mistakes to avoid in our article about avoiding mistakes with a roller frame.
Improve Overall Quality of Your Painting
Using a roller frame can significantly improve the overall quality of your painting. By using a roller frame, you can achieve a smooth, even application of paint that is difficult to achieve with a brush alone. This is because a roller frame evenly distributes the paint, creating a consistent layer of paint regardless of the surface texture.
Additionally, when compared to a brush, a roller frame minimizes brush strokes, leaving a finish that is free of unsightly marks, streaks, and splotches. This can be particularly important if you’re working with a large surface or if you’re painting a room with multiple walls and surfaces.
Using a roller frame also allows you to apply paint more evenly and with less effort than a brush. Instead of having to paint in multiple directions, you can roll the paint on in one smooth motion, thus reducing the amount of time you spend painting, as well as minimizing the amount of effort you’ll have to exert.
Finally, by using a roller frame, you can minimize the amount of drips and splatter that can occur when using a brush. This is especially important when working with thicker paints like primer or textured paints.
To get the most out of your roller frame, it’s important to choose the right frame for the job and to use the right technique. Choosing the right roller frame involves considering the size and nap of the roller, as well as the material, shape, and style of the frame itself. For more information on choosing the right roller frame, see our section on “roller frame materials and their pros and cons“.
By using a roller frame for large-scale painting projects, you’ll not only be able to work more quickly, but you’ll also achieve a higher-quality finish. For more information on the benefits of using a roller frame for large projects, see our section on “the benefits of using a roller frame for large-scale projects“.
Choosing the Right Roller Frame
When it comes to painting, the roller frame that you choose is just as important as the paint itself. With so many different roller frames available on the market, it can be overwhelming to know which one to choose. Are you unsure about which roller frame is right for your painting project? Don’t worry, we’ll guide you step-by-step through the process of selecting the perfect roller frame for your specific needs. From the size and nap to the materials used, there are a few factors to consider before making your final decision. So, let’s dive into the details and explore what you need to know about choosing the right roller frame.
Size and Nap
Size and Nap are important factors to consider when choosing a roller frame as they affect the final outcome of your project. The size of the roller frame determines how much paint it can hold and how wide a surface can be covered in one pass. The nap, on the other hand, refers to the length of the fibers on the roller cover and affects how much paint is applied to the surface and how smooth the finish will be.
When it comes to size, roller frames are available in a range of sizes from as small as 2 inches to as large as 18 inches. The size you choose will depend on the size of the surface you are painting. For larger surfaces, such as walls, a larger roller frame will help you cover more area in a shorter amount of time. However, for smaller areas, a smaller roller frame may be more practical.
The nap of the roller frame is equally important. The length of the fibers on the roller cover determines how much paint it can hold and how much is applied to the surface. A shorter nap is ideal for smoother surfaces such as wood, metal or smooth drywall, while a longer nap is better suited for textured surfaces such as stucco or rough wood.
To make the choice easier, refer to this table:
| Size | Surface | Nap |
|---|---|---|
| 2-4 inches | Small areas, trim work | 1/8 inch-1/4 inch |
| 6-9 inches | Walls, ceilings | 3/8 inch-1/2 inch |
| 14-18 inches | Large surfaces, such as floors and decks | 3/4 inch or longer |
Choosing the right size and nap of your roller frame will ensure that you get the best results on your painting project.
Material
When it comes to choosing a roller frame, the material can make a big difference in the quality of your painting. There are several materials to choose from, and each has its own advantages and disadvantages. Here are some common materials used in roller frames:
- Plastic: Plastic roller frames are lightweight and affordable, making them a popular choice for DIY projects. However, they may not be as durable as other materials and may not hold up well to frequent use.
- Steel: Steel roller frames are strong and durable, making them a good choice for professional painters or those who use their roller frequently. They can be heavier than other materials, but they typically last longer.
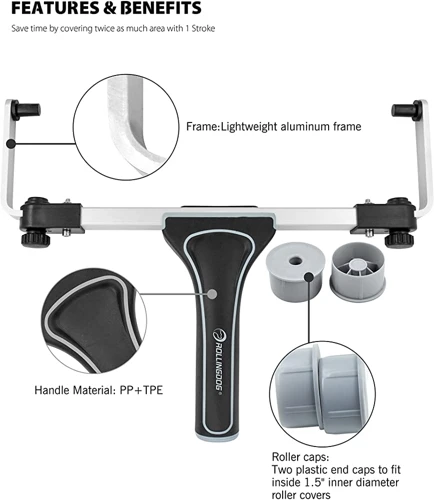
- Aluminum: Aluminum roller frames are lightweight and strong, making them a good middle ground between plastic and steel frames. They are also resistant to rust and corrosion, which can make them a good choice for outdoor projects.
- Foam: Foam roller frames are inexpensive and can be useful for applying certain types of paint, such as stains or clear finishes. However, they may not hold up well to rough surfaces or heavy use.
It’s important to consider the type of painting project you’ll be working on when choosing a roller frame material. For example, for a quick and easy DIY project, a plastic frame may be sufficient. However, for a larger project or one that requires more precision, a steel or aluminum frame may be a better choice. Ultimately, the material you choose will depend on your personal preferences and the specific needs of your painting project.
Shape and Style
When it comes to choosing the right roller frame, the shape and style are equally important as the size and nap. Here are some different shapes and styles of roller frames you may encounter and what they’re best suited for:
- Standard roller frames are the most common type and can be used for a wide range of projects.
- Cageless roller frames, as the name suggests, don’t have the traditional cage around them. They’re ideal for when you need to get into tight spaces and corners.
- Corner roller frames are specifically designed to help you paint tight corners without getting paint all over your trim or adjacent walls.
- Mini roller frames are used for smaller projects or touch-ups. They work well for painting furniture, doors, or trim.
- Jumbo roller frames are used for larger projects like painting walls or ceilings. They can hold more paint and cover a larger surface area with each pass.
It’s essential to choose the appropriate shape and style of the roller frame for the job you want to do. Not only will it make your painting job easier, but it will also help you achieve a cleaner, more professional-looking finish.
Latex Paint Roller Frames
When it comes to painting with latex, a good roller frame is essential for achieving a flawless finish. The right roller frame will help you to apply the paint evenly and smoothly, without leaving behind any drips or brush marks. But with so many options available, it can be difficult to know which roller frame is best suited for your project. In this section, we’ll explore the different types of roller frames that are suitable for use with latex paint, as well as how to use and care for them properly.
Best Roller Frames for Latex Paint
When it comes to painting with latex paint, you want to make sure you have the right roller frame to ensure a smooth and even finish. Here are some of the best roller frames for latex paint:
- Standard Roller Frame: This is the most basic and commonly used roller frame for latex paint. Its simple design allows for easy loading of paint and provides a smooth and even finish on most surfaces. Make sure to choose the size and nap that is appropriate for your project.
- Foam Roller Frame: Foam roller frames are great for smooth surfaces like cabinets and doors. They don’t leave behind any lint or fibers, ensuring a clean finish. However, they are not suitable for rough surfaces like stucco or textured walls.
- Microfiber Roller Frame: Microfiber roller frames are becoming increasingly popular due to their ability to hold more paint and deliver a smoother finish compared to traditional roller frames. They are especially great for larger surface areas like walls and ceilings.
- High-Density Foam Roller Frame: High-density foam roller frames are perfect for achieving a highly textured finish on surfaces like concrete or rough wood. They hold more paint than traditional foam roller frames and can easily reach into tight spaces.
No matter which roller frame you choose, it’s important to use the appropriate size and nap for your project to ensure the best results.
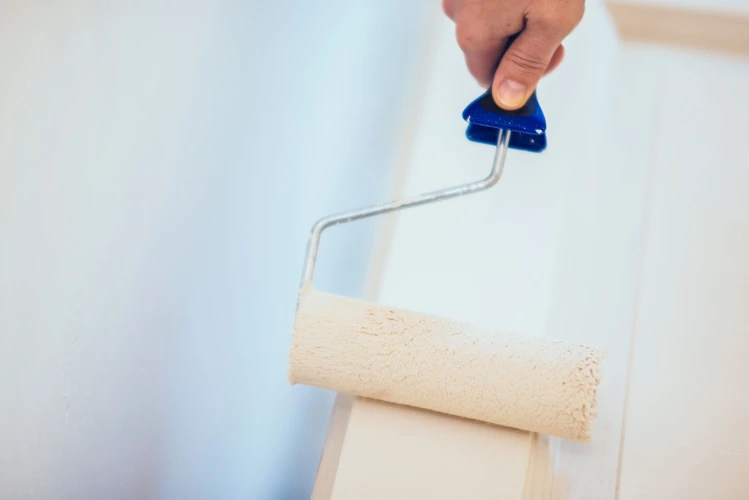
How to Use a Roller Frame with Latex Paint
When using a roller frame with latex paint, it’s important to keep a few things in mind to ensure a smooth and even application. Follow these steps for best results:
- Choose the right roller frame size and nap: For latex paint, a roller frame with a 3/8-inch nap is usually the best choice. This size will hold enough paint without becoming too thick and heavy, which can cause drips and mess. Make sure to choose a roller frame that fits your specific painting job, too – for example, if you’re covering a large area, a wider roller frame will be more efficient.
- Prepare your paint: Make sure your latex paint is well-mixed and at the right consistency. Most latex paints will need to be thinned with a small amount of water before use. Consult the paint can or manufacturer’s instructions for guidance on this step.
- Pour your paint into a roller tray: Use a roller tray with a ribbed surface to evenly distribute your paint. Pour a small amount into the tray, filling it about halfway. You can always add more later, but pouring too much at once can cause spills and waste.
- Dip your roller frame into the paint: Roll your roller frame through the paint in the tray, making sure to cover the nap evenly. Don’t saturate the roller – a light coating of paint on the nap is all you need to start.
- Roll the paint onto your surface: Start at the top of your surface and begin rolling the paint onto the wall, using even pressure and rolling in a “W” shape from top to bottom. Keep the roller frame moving to avoid drips and inconsistent coverage. Reload the roller as needed, dipping it in the tray and rolling off any excess paint onto the ribbed surface.
- Overlap your paint strokes: To ensure even coverage without lines or streaks, overlap your roller strokes as you paint. This will blend the paint together and create a smooth finish. Don’t press too hard or use a back-and-forth motion, as this can create texture and mess.
- Roll in the same direction: Once you’ve painted one section of your surface, continue rolling in the same direction until you’ve covered the entire area. Going back over paint you’ve already applied can cause messy streaks and breaks in the finish.
- Let the paint dry: Depending on the temperature and humidity in your space, your paint may take several hours to dry. Make sure to let it dry completely before applying a second coat or touching it up.
By following these steps and using a high-quality roller frame, you can achieve a professional-looking finish with your latex paint. Remember to clean your roller frame thoroughly after each use to ensure its longevity and to prevent cross-contamination between paint types.
Cleaning Your Roller Frame After Using Latex Paint
After using a roller frame with latex paint, it is crucial to properly clean the tool. Failure to clean the roller frame can lead to a buildup of dried latex paint, which can ultimately compromise the quality of your paint job.
Cleaning your roller frame after using latex paint is a simple process that requires a few essential tools. You will need:
| Materials: | Steps: |
| – Warm soapy water | 1. Fill a bucket with warm soapy water |
| – Garden hose or water source | 2. Place the roller frame under a garden hose or water source to remove excess paint |
| – Roller frame cleaner | 3. Spray the roller frame cleaner onto the roller frame |
| – Clean towel or rag | 4. Use a clean towel or rag to gently scrub the roller frame clean |
| – Paint thinner (optional) | 5. If there is still residual paint on the roller frame, use paint thinner on a clean towel or rag to further clean |
| – Rubber gloves (optional) | 6. Use rubber gloves to protect your hands during the cleaning process |
After cleaning your roller frame, make sure to thoroughly dry it to prevent rust from forming. Store the roller frame in a cool, dry place until the next use.
Oil-Based Paint Roller Frames
When it comes to oil-based paints, things can get a bit tricky with roller frames. The nature of the paint requires a roller frame that is sturdy and durable enough to withstand the paint’s thickness and consistency. In this section, we’ll explore what makes a roller frame suitable for oil-based paint, the best roller frames for the job, how to use them effectively, and essential cleaning tips to ensure your roller frame lasts longer. So, let’s dive in and discover the ins and outs of using a roller frame with oil-based paint.
Best Roller Frames for Oil-Based Paint
When it comes to choosing a roller frame to use with oil-based paints, there are several important factors to consider. The right roller frame can make a big difference in achieving a smooth, even finish without wasting time or effort. Here are some of the best roller frames to consider when working with oil-based paints:
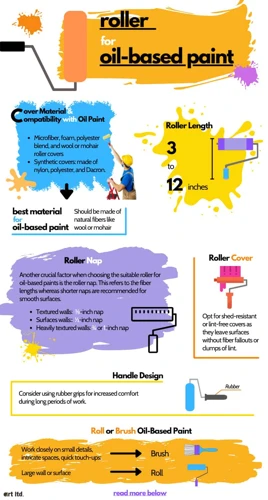
- Heavy-duty metal frame: Oil-based paints can be thick and sticky, and can even corrode certain materials. A heavy-duty metal frame, such as one made of aluminum or steel, can help withstand the chemicals and physical stress of using oil-based paints.
- High-capacity nap: Oil-based paints are typically thicker than latex paints, so choosing a roller frame with a high-capacity nap can help apply the paint evenly and more quickly.
- Solvent-resistant materials: Due to the chemical composition of oil-based paints, it’s important to choose a roller frame made of materials that won’t break down or weaken when exposed to solvents. Look for frames made of materials like polyester or nylon.
- Adjustable length: Depending on the surface or job at hand, it may be necessary to adjust the length of the roller frame. Look for frames with adjustable lengths that can be extended or shortened as needed.
When choosing a roller frame for oil-based paints, it’s important to consider all of these factors to ensure that you’re getting a quality product that will help you achieve the results you want. Using the right roller frame can make the difference between a smooth, even finish and a frustrating, time-consuming job.
How to Use a Roller Frame with Oil-Based Paint
Using a roller frame with oil-based paint requires a slightly different approach than with latex paint. Here are the steps to follow:
1. Prepping Your Surface: As with latex paint, it’s important to prep your surface by cleaning it and repairing any imperfections. However, with oil-based paint, you’ll need to wait a little longer for the surface to dry completely before applying the paint.
2. Choosing the Right Roller: When it comes to oil-based paint, it’s best to use a roller with a synthetic nap. Avoid using natural fibers like wool, as they may shed and leave fibers in your paint. A 3/8-inch nap is a good choice for most oil-based paints.
3. Loading Your Roller: Dip your roller into the oil-based paint, making sure to only cover about one-third of the nap. Then, roll it up and down the textured part of the paint tray to distribute the paint evenly on the roller.
4. Applying the Paint: Roll the paint onto the surface in a “W” pattern, making sure to apply even pressure. Don’t use too much pressure or the roller may leave streaks. A light touch will help ensure an even coat.
5. Overlap Your Strokes: After you’ve covered an area with the “W” pattern, make sure to slightly overlap your strokes to avoid leaving gaps in the paint.
6. Let the Paint Dry: Allow the first coat of paint to dry completely before applying a second coat. This usually takes around 24 hours, but check the paint can for specific drying times.
Cleaning Your Roller: It’s important to clean your roller thoroughly after using oil-based paint. Use a solvent like mineral spirits or paint thinner to remove the paint from the roller. Rinse the roller with warm soapy water, then rinse again with clean water until all the paint and solvent are removed. Allow the roller to dry completely before storing it away for future use.
Cleaning Your Roller Frame After Using Oil-Based Paint
After you’ve finished painting with oil-based paint, it’s important to clean your roller frame thoroughly to prolong its use. Here’s how to clean your roller frame:
Gather Materials: You’ll need paint thinner, a bucket or sink, a cleaning brush, and a clean cloth.
Step 1: Begin by scraping off any excess paint from the roller with the cleaning brush.
Step 2: Fill up a bucket or sink with paint thinner and soak the roller frame in it for about 10 minutes. This should help loosen any remaining paint.
Step 3: Take out the roller frame from the paint thinner and use the cleaning brush to remove any paint that’s still stuck on it. Be sure to pay special attention to the seams and crevices to ensure that all the paint is removed.
Step 4: Rinse the roller frame with warm water to remove any leftover paint and cleaner.
Step 5: Dry the roller frame with a clean cloth and allow it to air dry for a few hours.
By taking the time to clean your roller frame properly after using oil-based paint, you can ensure its longevity and reusability. Remember to dispose of any leftover paint thinner properly as well.
Specialty Paint Roller Frames
If you’re working on a unique painting project that requires special care and attention, using a regular roller frame may not be enough. That’s where specialty paint roller frames come in. These frames are designed to work with specific types of paint and surfaces, making it easier for you to get the perfect finish. But with so many options available, it can be perplexing to choose the right one. In this section, we’ll take a closer look at some of the best options for specialty paint roller frames and how to use them effectively.
Best Roller Frames for Specialty Paints
When it comes to specialty paints, it’s important to choose a roller frame that can handle the unique properties of the paint. Here are some of the best roller frames for different types of specialty paints:
| Specialty Paint | Best Roller Frame |
|---|---|
| Textured Paints | A heavy-duty roller frame with a thick nap is ideal for applying textured paints, such as popcorn ceilings or stucco textures. Look for a roller frame with a thick core and durable cover to withstand the rough surface of textured paints. |
| Epoxy Coatings | An epoxy coating requires a roller frame that can handle the thickness and stickiness of the paint. Look for a high-density foam roller cover with a frame that is resistant to corrosion from the chemicals found in epoxy coatings. |
| Metallic Paints | For metallic paints, a shorter nap roller frame works best to avoid muddying the metallic finish. Look for a smaller roller frame with a roller cover made from a soft material, such as lambswool, to prevent streaks or bubbles in the finish. |
| Gloss Paints | Gloss paint requires a smooth, even finish, so it’s important to choose a roller frame with a very short nap or even a foam roller cover. Look for a roller frame that is compatible with solvent-based gloss paints and has a sturdy handle for even pressure distribution. |
Remember to always refer to the manufacturer’s guidelines for the appropriate roller frame to use with your chosen specialty paint. Using the wrong roller frame can result in an uneven finish or damage to your roller frame.
How to Use a Roller Frame with Specialty Paints
When it comes to using a roller frame with specialty paints, there are a few things to keep in mind to get the best results. Follow these steps for a successful application:
- Read the label: Specialty paints, such as textured or metallic paints, may have specific application instructions on the label. Be sure to read and follow these instructions carefully.
- Choose the right roller frame: Depending on the texture or consistency of the specialty paint, you may need a specific roller frame with the appropriate nap and material. Look for roller frames designed for use with the specific type of specialty paint you will be using.
- Prepare the surface: Just like any other paint application, the surface should be clean and dry before beginning. If necessary, use a primer or base coat specified for use with your specialty paint to ensure proper adhesion.
- Apply the paint: Use the appropriate technique for the specific specialty paint you are using. For example, textured paint may require a stippling or dabbing motion for proper coverage. Metallic paints may require multiple thin coats to achieve the desired finish. Refer to the label or manufacturer instructions for the best technique to use.
- Clean the roller frame: After use, be sure to clean your roller frame thoroughly according to the manufacturer’s instructions. Specialty paints may have unique cleaning requirements, so it’s important to follow these instructions carefully to ensure the longevity of your roller frame.
Following these steps will help you achieve the best results when using a roller frame with specialty paints. Remember to always read the label, choose the appropriate roller frame, prepare the surface, apply the paint correctly, and clean your roller frame properly after use.
Cleaning Your Roller Frame After Using Specialty Paints
When it comes to cleaning your roller frame after using specialty paints, it’s important to take the necessary steps to ensure it’s properly cleaned and ready for future use. Here’s a step-by-step guide to properly clean your roller frame:
1. Scrape off excess paint: Before you begin cleaning, use a scraper or putty knife to remove any excess paint from the roller frame. This will make the cleaning process more efficient.
2. Use a solvent: Depending on the type of specialty paint used, you may need to use a specific solvent to clean the roller frame. Check the manufacturer’s instructions for recommended solvents.
3. Soak the roller frame: If the roller frame is heavily soiled, you may want to soak it in the solvent for a few minutes to loosen any stubborn paint that may be stuck on.
4. Clean the roller cover: Remove the roller cover from the frame and clean it separately to ensure that all paint is removed. You can use a separate cleaning solution for the cover, such as warm soapy water, depending on the type of paint used.
5. Rinse with water: Once the roller frame and cover have been cleaned, rinse them thoroughly with warm water to remove any remaining solvent or cleaning solution.
6. Dry completely: Allow the roller frame and cover to air-dry completely before storing or using again.
Cleaning your roller frame after using specialty paints can be a bit more involved than cleaning after using latex or oil-based paints, but it’s important to take the extra steps to ensure the longevity and effectiveness of your roller frame.
Tips for Using a Roller Frame
As you begin to use a roller frame, you’ll quickly learn that it takes more than just picking up a roller and painting away. There are techniques and best practices that can make your painting experience more seamless and efficient. In this section, we’ll provide you with some tips and tricks to help you make the most out of your roller frame. From prepping your surface to maintaining your roller frame for future use, we’ve got you covered. So, let’s take a look at what you need to know to use a roller frame like a pro.
Prepping Your Surface
Properly prepping your surface is a crucial step in achieving a high quality finish with your paint roller frame. Here are some key steps to follow:
| Clean the surface | Use a damp cloth or sponge to remove any dirt, dust, or debris from the surface. Let the surface dry completely before painting. |
| Repair any damage | Fill any cracks or holes with a suitable filler and let it dry completely. Sand the surface smooth with fine-grit sandpaper. |
| Protect surrounding areas | Cover any areas adjacent to the surface you are painting with masking tape or a drop cloth to prevent any accidental spills or splatters from damaging them. |
| Apply a primer (if necessary) | If you are painting a porous surface or a surface that has never been painted before, applying a primer can help improve the adhesion and appearance of your final coat. Consult with your paint supplier for the appropriate primer to use for your surface and paint type. |
By following these important steps, you can ensure that your surface is properly prepped and ready for your paint roller frame. This will not only help you achieve a better finish, but it will also help increase the longevity of your paint job.
Using the Right Technique
When using a roller frame, it is essential to use the correct technique. This can help to ensure that your painting project turns out as desired. Here are a few tips for using the right technique with your roller frame:
| Technique | Description |
| Load your roller properly | Before you start painting, you should ensure that your roller is loaded with the appropriate amount of paint. Dip the roller into the paint tray, and then gently roll it back and forth to remove any excess paint. This can help to prevent drips and splatters. |
| Roll in a “W” pattern | When you start painting with your roller frame, it is best to use a “W” pattern. This means making a series of overlapping strokes in the shape of the letter “W”. This can help to ensure that you cover the entire surface evenly. |
| Use light pressure | When you are rolling the paint onto your surface, be sure to use light pressure. This can help to prevent the paint from splattering or dripping, while also ensuring that the paint is distributed evenly. |
| Roll the full length of the surface | As you are painting, be sure to roll the full length of the surface. This can help to ensure that the paint is applied evenly, and that there are no areas that are missed or overlooked. |
| Overlap each stroke | As you roll your roller frame along the surface, be sure to overlap each stroke slightly. This can help to ensure that there are no gaps or inconsistencies in the finish. |
| Use the correct roller cover | Depending on the type of paint you are using, it is essential to use the appropriate roller cover. Using the incorrect cover can lead to poor paint coverage, uneven finish and potential mess or even damage to the surface. |
By using the right technique with your roller frame, you can achieve a smooth and even paint finish that will enhance the overall look of your space. So, consider following these tips when using your roller frame for your next painting project.
Maintaining Your Roller Frame
Taking care of your roller frame is essential to ensure its longevity and performance. Proper maintenance can also save you money in the long run. Here are some tips for maintaining your roller frame:
- Clean your roller frame after each use. This is important to prevent any leftover paint from drying onto the frame and affecting the quality of your next paint job. Use warm, soapy water and a brush to clean the roller frame thoroughly. Rinse it off with clean water and let it dry completely.
- Inspect your roller frame regularly. Check for any signs of wear and tear such as bent or broken parts. If you notice any issues, replace them immediately to avoid affecting the quality of your painting.
- Store your roller frame properly. After cleaning and drying, store your roller frame in a dry place. Do not leave it lying around or exposed to moisture.
- Use a roller cover to protect your roller frame. When not in use, use a roller cover to keep your roller frame clean and prevent any dust or debris from settling on it.
- Replace your roller frame when necessary. If you notice that your roller frame is not working as well as it used to or if it is worn out, consider replacing it to ensure the quality of your painting.
By following these simple maintenance tips, you can ensure that your roller frame is always in top condition and ready for your next painting project.
Conclusion
In conclusion, using a roller frame can greatly improve the efficiency and quality of your painting projects. By reducing the time and effort needed to complete a painting job, minimizing drips and splatter, and improving the overall quality of the finished product, a roller frame is an essential tool for any DIY enthusiast or professional painter.
When choosing a roller frame, it’s important to consider the size and nap of the roller as well as the material and shape of the frame to ensure optimal performance. For latex paints, a roller frame with synthetic fibers and a medium nap is generally preferred, while oil-based paints require a roller frame with natural fibers and a longer nap.
Specialty paints such as textured paints or epoxy coatings may require a roller frame with unique features such as an adjustable cage or a specific nap length. It’s important to select the appropriate roller frame for the type of paint you’re using to achieve the best results.
To ensure a successful painting project, it’s important to properly prep your surface, use the right painting technique, and maintain your roller frame by cleaning it thoroughly after each use.
Overall, using a roller frame is an effective way to achieve a professional-looking paint job with less effort and time. By choosing the right roller frame for the job and following the appropriate techniques and maintenance steps, you can enjoy a beautiful and long-lasting finish on your next painting project.
Frequently Asked Questions
Can I use the same roller frame for different types of paint?
While it is possible to use the same roller frame for different types of paint, it is recommended to have separate frames for latex, oil-based, and specialty paints to ensure the best results.
What size roller frame should I choose?
The size of the roller frame depends on the size of the surface you will be painting. A larger frame is best for bigger surfaces like walls and ceilings, while a smaller frame is appropriate for smaller surfaces and detail work.
What nap should I choose for my roller frame?
The nap of your roller frame varies depending on the surface you will be painting. A smoother surface calls for a shorter nap, while rougher surfaces require a longer nap.
What material should I choose for my roller frame?
Roller frames are typically made of metal, plastic, or wood. Metal frames are the most durable, while plastic and wood frames are more affordable but less sturdy.
Why should I clean my roller frame after using it?
Cleaning your roller frame after use helps to maintain its lifespan and prevent paint buildup, which can affect the quality of your future paint jobs.
Can I reuse a roller cover?
While it’s possible to reuse a roller cover, it’s not recommended as it may have leftover paint and debris that can affect the quality of your next paint job.
What is the best technique to use when painting with a roller frame?
Start by rolling the paint onto the surface in a “W” shape, and then fill in the areas in between. Use light pressure and overlap the previous strokes for an even finish.
How do I maintain my roller frame?
After cleaning, allow your roller frame to air dry completely before storing it in a dry place to prevent rusting. Avoid using harsh chemicals or abrasive materials that can damage the frame.
When should I replace my roller frame?
You should replace your roller frame if it becomes warped or damaged, if the roller cover is no longer fitting snugly, or if it becomes difficult to use due to paint buildup.
Can I use a foam roller with any type of paint?
Foam rollers are best used for smooth surfaces and with latex paint. However, some foam rollers can work with oil-based paint, but be sure to check the manufacturer’s recommendations before use.