Painting is an art form, whether it’s transforming a room or crafting a masterpiece on canvas. A crucial tool in achieving sharp, professional-looking edges is the use of masking tape. This seemingly simple tool can make or break the final outcome of your paint job. Understanding the significance of masking tape paint lines is the first step in elevating your painting projects to the next level.
Choosing the Best Painters Tape for Crisp Lines

Not all tapes are created equal, especially when it comes to painting. The best painters tape for crisp lines is designed to prevent bleeding and ensure a sharp border, making it a painter’s best friend.
Comparing Brands for the Best Tape for Clean Paint Lines
When looking for the best tape for clean paint lines, considering various brands is essential. Some brands are known for their reliability and ease of use, while others might offer a more budget-friendly option. Comparing user reviews, price points, and tape properties will guide you in finding the perfect match for your project.
Key Features of Clean Edge Masking Tape
- Adhesion level suitable for your surface
- Resistance to paint bleed-through
- Compatibility with paint type
- Easy removal without leaving residue
How to Apply Masking Tape Before Painting

Understanding how to apply masking tape before painting is as important as selecting the right tape. Proper application is crucial for achieving the desired results.
Preparing the Surface for Tape Application
The surface you’re taping must be clean, dry, and free of dust or grease. A thorough wipe-down with a damp cloth can ensure better tape adherence and cleaner paint lines.
Best Techniques for Applying Painters Tape
For applying painters tape, start from one end and gently pull the tape to the other, smoothing it down as you go. Make sure there are no air bubbles or wrinkles, as these can lead to paint seepage.
Achieving Clean Paint Lines with Tape
Executing a flawless paint job is directly linked to how well you manage to seal the edges of your tape. Clean paint lines with tape are not a matter of chance but of technique.
How to Get a Clean Line with Painters Tape
How to get a clean line with painters tape begins with being meticulous in your preparation and application. Burnishing the edge of the tape with a putty knife or a credit card can help in sealing it tightly against the surface, preventing paint from creeping underneath.
Tips on Pressing and Sealing Tape for Paint Perfection
- Press down the tape’s edge firmly with a smooth tool.
- Seal corners with extra attention to prevent tricky leaks.
- Overlap tape strips slightly at the seams for full coverage.
The Art of Painting: How to Get Crisp Lines with Painters Tape
The method you employ in painting can significantly impact the crispness of the lines. How to get crisp lines with painters tape involves not only the tape itself but also the painting techniques you use.
Paint Application Techniques for Sharp Edges
When painting close to the tape, use a brush to apply paint away from the tape edge rather than towards it. This can help in avoiding pushing paint under the tape. Also, consider using a roller with a light touch for an even coat.
Common Mistakes to Avoid for Clean Lines
One of the frequent errors is removing the tape too late or too early. It’s also a misstep to use tape on surfaces that are not fully dry or to stretch the tape too much during application.
Removing Painters Tape: When and How
The moment of truth in any paint job is the removal of the tape. Doing it correctly is paramount to maintain the integrity of your freshly painted lines.
How Long to Leave Painters Tape on After Painting
How long to leave painters tape on after painting depends on the tape brand and the type of paint used. Generally, waiting until the paint is dry to the touch but not completely hardened is advisable, as this can prevent chipping.
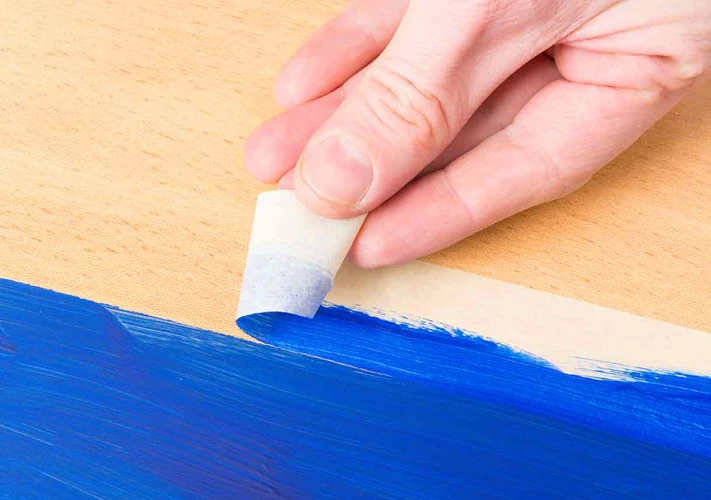
Methods for Safe Tape Removal without Damaging Paint
Peel the tape back on itself at a 45-degree angle, slowly and steadily. If the paint starts to lift, a utility knife can be used to gently score along the tape’s edge.
Final Touches and Troubleshooting
Even with the utmost care, sometimes touch-ups are necessary. It’s part of the painting process, and knowing how to handle these situations can save your project.
Fixing Bleeds and Imperfections
If paint has bled under the tape, wait for it to dry completely before scraping it off with a razor blade or touch up with a small brush.
If you’re looking to achieve crisp, clean lines in your painting projects, mastering the use of masking tape is essential. Our article on creative masking tape paint designs offers a wealth of ideas and techniques to help you create stunning visual effects with ease. For those interested in unique painting methods, be sure to check out our tips on faux painting techniques that can add texture and depth to your walls. And if you’re working with chalk paint, our guide on how to seal chalk paint provides invaluable tips and tricks to ensure a perfect finish. Whether you’re a DIY enthusiast or a professional painter, these resources will help you take your projects to the next level.
How to Get Clean Lines When Painting: Final Advice
To sum up, how to get clean lines when painting rests on the quality of tape used, the preparation of the surface, and the application and removal techniques. Paying attention to these details can elevate your painting project from amateur to professional-looking with sharp, clean lines.