Crafting can be a fun and rewarding hobby, but it can get messy and time-consuming if you don’t have the right tools. If you enjoy adding some sparkle and shine to your crafts, glitter glue pens can be an excellent addition to your crafting supplies. These pens are a convenient and mess-free way to add glitter to your projects. In this article, we will explore what glitter glue pens are, their advantages, and how you can use them for your crafty needs. So, grab your supplies and let’s get creative!
What Are Glitter Glue Pens
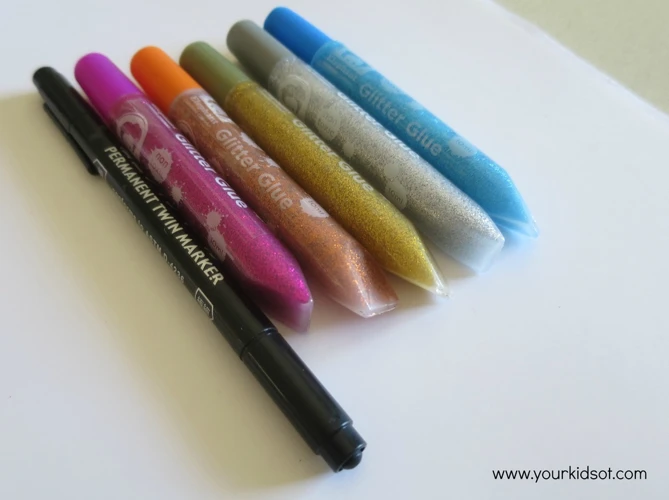
Glitter glue pens are a fun and easy way to add sparkle and shine to your craft projects. They are similar to regular glue pens, but with a glittery twist. These pens contain a special formula that includes glitter particles in the glue, creating a shimmering effect when applied to paper, cardboard, or other surfaces.
Glitter glue pens come in a variety of colors and sizes, making them perfect for all kinds of projects. Whether you want to make a birthday card, create a scrapbook page, or add some bling to a school project, glitter glue pens are a great option. They can be used on their own or alongside other crafting materials such as sequins, rhinestones, or stickers for added dimension and texture.
One of the great things about glitter glue pens is that they are versatile and allow for precision application, so you can create detailed and intricate designs with ease. Plus, they are affordable and can be found at most craft stores or online retailers.
If you’re new to using glitter glue pens, don’t worry! It’s easy to get started and add a little sparkle to your crafts. In the next sections, we will go over the advantages of using glitter glue pens, how to use them, and some tips and tricks to make the most of your crafting experience.
For those who want to learn how to make slime with glitter glue, check out our article on how to make slime with glitter glue without borax. If you prefer clear glue, you can also find information on how to make slime with clear glue and borax.
Advantages of Using Glitter Glue Pens
Using glitter glue pens have a number of advantages that make them a popular choice for many crafters. Let’s take a closer look at some of these advantages.
One of the biggest advantages of using glitter glue pens is that they are incredibly easy to use. Unlike traditional glitter that requires additional glue or adhesive to apply, glitter glue pens already have the adhesive built-in. Simply uncap the pen and you’re ready to start applying glitter.
Another advantage of using glitter glue pens is that you don’t need any additional tools. You don’t have to worry about brushes, sponges, or any other accessories. The pen itself is all you need to create a beautiful glitter effect.
Another great advantage of using glitter glue pens is that they provide a clean and mess-free application. You don’t have to worry about getting glitter all over your hands or work surface. Because the glue is contained in a pen, it’s easy to control the flow and apply the glitter exactly where you want it.
Glitter glue pens also have the advantage of drying quickly. Unlike traditional glitter, which can take a while to dry and may require a separate adhesive, glitter glue pens dry quickly and provide a permanent bond.
The advantages of using glitter glue pens for your crafty needs are clear. They are easy to use, require no extra tools, provide a clean and mess-free application, and dry quickly. With these advantages in mind, using glitter glue pens can be a great choice for all types of craft projects.
For more information on how to use glitter glue pens effectively, check out our article on how to glue glitter.
Easy to Use
Easy to Use: One of the biggest advantages of glitter glue pens is their ease of use. Traditional glitter can be messy and difficult to apply, often requiring additional tools like glue and brushes. With glitter glue pens, all of these extra steps are eliminated. Simply uncap the pen and start applying the glitter exactly where you want it. Plus, there is no need to worry about accidentally applying too much, as the pens make it easy to control the amount of glitter being applied.
Whether you’re a seasoned crafter or a beginner, glitter glue pens are a great option for adding a touch of sparkle to your projects. With their simple, straightforward application process, anyone can use them to elevate their crafts to the next level. From making glitter slime with glue and lotion to adding sparkle to sugar cubes, the possibilities are endless with glitter glue pens.
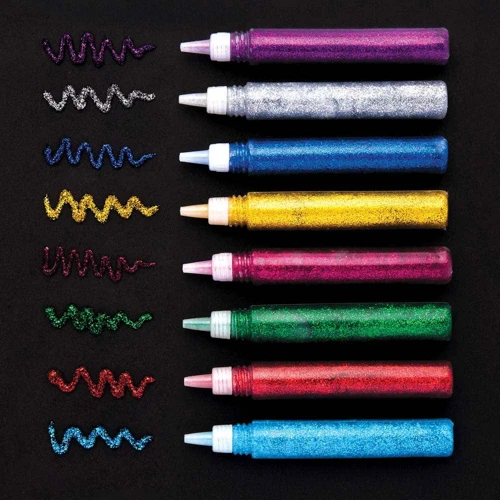
Not only are they easy to use, but they also come in a variety of colors to choose from. Whether you prefer classic metallic shades or bright, bold colors, glitter glue pens can truly bring any project to life. Plus, the fine tip of the pen makes it possible to create intricate designs or add small details to your crafts.
Another advantage of glitter glue pens is that they are portable and convenient. They can easily be taken with you on-the-go for crafting on the move. Whether you’re traveling or simply working on a project away from your main workspace, glitter glue pens can be a great option for adding a little bit of glam to any project.
If you’re a busy crafter who wants to add a touch of sparkle to your creations without the added mess and cleanup, glitter glue pens are the right choice for you. They are simple, easy to use, and produce fantastic results with minimal effort. So, whether you want to make slime with clear glue and no borax or create unique party favors with glitter glue, these pens are just the thing to take your crafting game to the next level.
No Extra Tools Required
One of the biggest advantages of using glitter glue pens is that no extra tools are required to use them. Unlike traditional glitter and glue, there is no need to have a separate tool for applying glue and then adding glitter onto it. The convenience of not having to use multiple tools makes crafting with glitter glue pens much easier and less messy.
Not having to use extra tools also means less cleanup time and hassle. With traditional glitter and glue, the glitter tends to go everywhere and cleaning it all up can be difficult. Glitter glue pens make the process much easier because the glitter and glue are combined in one pen, so there is no need to worry about cleaning up separate bottles of glitter and glue.
Additionally, the use of glitter glue pens eliminates the need for paintbrushes or glue spreaders. Traditional glitter and glue often require the use of these tools in order to achieve the desired effect. With glitter glue pens, the pen itself provides the perfect tool for applying glitter accurately and with precision.
The elimination of extra tools is a huge advantage when working with glitter glue pens. It makes the crafting process so much simpler, especially for children who may struggle with using multiple tools at once. With glitter glue pens, anyone can easily achieve a professional-looking result without the need for extra tools or advanced craft skills.
If you want to learn how to make slime with glue and body wash, we have a great guide for you to check out!
Clean and Mess-Free Application
Clean and Mess-Free Application
One of the biggest advantages of using glitter glue pens for your crafty needs is that they provide a clean and mess-free application. Unlike loose glitter, which can easily spread all over your workspace and clothing, glitter glue pens allow you to apply the glitter exactly where you want it, with no extra residue left behind. This is especially useful when working with children, as it helps to minimize the clean-up afterwards. Plus, the pens are designed with easy-to-use tips that prevent spills and contribute to overall precision.
The mess-free application of glitter glue pens also makes them a great option for creating slime. If you want to learn how to make slime with glitter glue pens, check out our article on how to make slime with glue and baking soda. Glitter glue pens are a convenient way to add sparkle and shine to your slime without the added mess of loose glitter.
Another advantage of using glitter glue pens is that they dry quickly. If you’re wondering how to dry glitter glue quickly, we also have an article on that: how to dry glitter glue quickly. This means you can move on to the next step of your craft project without having to wait for the glue to dry for an extended period of time.
The clean and mess-free application of glitter glue pens make them an ideal tool for adding sparkle and shine to any craft project. With their precise tips and quick drying times, the pens are perfect for creating unique and eye-catching designs. Give them a try and experiment with different colors and surfaces to take your craft projects to the next level.
Dries Quickly
One of the great advantages of using glitter glue pens is their ability to dry quickly. This means that you don’t have to wait for hours for your project to dry before moving on to the next step. The quick drying time is especially useful when working on projects with multiple layers or steps. You can add additional layers or even paint over the glitter glue without worrying about the first layer being smudged or smeared.
The fast drying time also makes glitter glue pens great for creating slime. If you’re wondering how to make slime with glue and don’t want to wait too long for it to dry, glitter glue pens are the perfect solution. Simply replace traditional glue with glitter glue pens to create a colorful and sparkly slime. Follow one of the popular slime recipes, such as how to make slime with glue and body wash, how to make slime with glue and lotion, how to make slime with borax and glue, or how to make slime with clear glue and no borax, and use glitter glue pens instead of regular glue. You’ll have a fun and vibrant slime in no time!
Another application where quick drying time is important would be in building structures with glue, such as how to glue sugar cubes. Using glitter glue pens on sugar cubes will reduce the overall drying time of the structure. It also creates an unexpected visual surprise, as the glitter adds a delicate shimmer to the finished product.
The quick drying time of glitter glue pens makes them a versatile tool for many different craft projects. So, the next time you’re working on a crafting project, consider using glitter glue pens instead of traditional glue for a clean, mess-free, and fast-drying application.
How to Use Glitter Glue Pens
Step 1: Gather Materials
Before you start using the glitter glue pen, make sure that you have all the necessary materials. You will need the glitter glue pen, the surface or material where you want to apply the glitter glue, and any embellishments that you want to add to it. Make sure that you have chosen the right surface to apply the glitter glue. You can use it on paper, cardboard, foam, and even some fabrics.
Step 2: Prepare Your Workspace
Prepare your workspace by laying down a newspaper or any other protective material. This will make sure that you don’t make a mess while applying the glitter glue. Choose an area with good ventilation as the glue can have a strong odor.
Step 3: Uncap the Glitter Glue Pen
Take the cap off the glitter glue pen and check the consistency of the glue. It should be smooth and not clumpy. If the glue looks clumpy, give it a good shake before using it.
Step 4: Start Applying the Glitter Glue
The beauty of using a glitter glue pen is that it’s easy to apply. Simply place the tip of the pen on the surface where you want to add the glitter glue and apply gentle pressure. You can control the thickness of the glue by adjusting the amount of pressure you apply. Make sure that you don’t squeeze the pen too hard, as this can cause the glue to come out too quickly and create a mess.
Step 5: Add Embellishments While the Glitter Glue is Wet (Optional)
If you want to add any extra embellishments to your glitter glue project, such as beads, sequins, or rhinestones, now is the time. While the glue is still wet, carefully place your embellishments onto the glue. Make sure that they are firmly attached to the glue.
Step 6: Wait for the Glitter Glue to Dry
Once you have finished applying the glitter glue and any embellishments, let it dry completely. This can take anywhere from 30 minutes to a few hours, depending on the thickness of the glue and the humidity in the air. Make sure that you don’t touch it while it’s drying.
Conclusion
Using glitter glue pens is a fun and easy way to add sparkle and shine to any project. By following these simple steps, you can create beautiful designs and crafts with ease. So, whether you’re making handmade cards, scrapbooking, or decorating a plain vase, glitter glue pens are the perfect tool to bring your project to life. And if you’re feeling bold, try using them in unconventional ways like showing in our article about how to glue sugar cubes.
Step 1: Gather Materials
Before using glitter glue pens, it’s important to gather all the necessary materials for your project. First and foremost, you will need the glitter glue pens of your choice. The great thing about glitter glue pens is that they come in a variety of colors, so you can pick the perfect shades to match your project.
Aside from glitter glue pens, you will also need the craft materials that you plan to apply the glitter glue on. This could be anything from cardboard to fabric to paper. Just make sure that the surface is clean and dry before you start applying the glitter glue.
It’s helpful to have some embellishments on hand, such as sequins or rhinestones, to add an extra touch of sparkle to your project. These are optional, but can make your project really pop.
Lastly, it’s always a good idea to have some paper towels or a cloth nearby in case of any spills or messes. Glitter glue pens are known for their mess-free application, but accidents can still happen.
Step 2: Prepare Your Workspace
Before starting your craft project with glitter glue pens, it is important to prepare your workspace to avoid any mess. First, find a clean and flat surface to work on. It could be a table, desk, or any other sturdy surface. Clear off the surface from any clutter or unnecessary materials to ensure enough working space.
Next, cover the surface with a protective layer such as a plastic tablecloth or newspaper. This will help protect your workspace from any accidental spillage or smudging and make the cleaning process easier after the project is complete.
Make sure you have good lighting, either natural or artificial, to see your working area properly. This will help you apply the glitter glue in the right amount and avoid any mistakes.
It is also recommended to keep a damp cloth or some wet wipes nearby to clean any excess glitter glue or deal with any accidents. This will prevent the glue from drying and ruining your workspace or the project itself.
Lastly, it is essential to have all the necessary materials for your project organized and within reach. This includes the glitter glue pens, paper or craft items that you plan to decorate with the pens, and any additional embellishments that you may want to add. Keeping everything organized and easily accessible will make the process smoother and more enjoyable.
By following these simple steps, you can prepare your workspace for using glitter glue pens and ensure a successful craft project without any mess or stress.
Step 3: Uncap the Glitter Glue Pen
Now that you have everything you need to get started, it is time to move on to the next step. Pick up your glitter glue pen and gently remove the cap. Make sure to hold the pen vertically with the tip facing downwards. This will help prevent any air bubbles from forming in the glue and keep the flow smooth and consistent.
If you are using a new pen for the first time, it might take a few seconds of squeezing the pen to get the glue flowing. In this case, it is important to be patient and not to shake the pen too vigorously, as this can create air bubbles. Instead, gently squeeze the pen and let gravity do the work of moving the glue down towards the tip.
It is also worth noting that different brands of glitter glue pens may have different methods for uncapping them, so make sure to read the instructions carefully. However, in most cases, simply unscrewing or pulling off the cap is all you need to do to get started.
Once the cap is off, inspect the tip of the pen to ensure that the glue is flowing properly. If the tip is clogged or if the glue is not flowing, gently tap the pen on a hard surface to dislodge any air bubbles. You can also try wiping the tip with a clean cloth or paper towel. If all else fails, you may need to unscrew the tip and clean it out with warm water.
Remember, glitter glue pens are a fun and easy way to add sparkle and shine to your craft projects. So take your time and enjoy the process of creating something beautiful!
Step 4: Start Applying the Glitter Glue
Once you have prepared your workspace and uncapped the glitter glue pen, it’s time to start applying the glitter glue to your chosen surface. Hold the pen at an angle of approximately 45 degrees and gently squeeze the tube to start releasing the glitter glue. Be sure to start with a light touch and gradually increase the pressure as needed to achieve the desired thickness of the lines or dots.
Remember that the size of the applicator tip will affect how much glitter glue is applied. The smaller the tip, the finer and more precise the application. On the other hand, a larger tip will result in a thicker, bolder line.
To create intricate designs, it can be helpful to apply the glitter glue in short, controlled bursts. Take your time and don’t be afraid to experiment with different techniques and styles. If you make a mistake, don’t worry! Glitter glue pens can be easily wiped away with a damp cloth before they dry.
When applying glitter glue, try to apply an even amount of pressure throughout the entire application. This will ensure consistent glitter coverage and a smooth finish. Be careful not to apply too much pressure or you may accidentally create a bubble in the glue.
As you apply the glitter glue, make sure to keep the pen moving. This will help prevent the glue from getting too thick and clumpy in one area. If you want to add some dimension to your designs, consider layering different colors or applying the glitter glue in different directions.
Once you have finished applying the glitter glue, set your craft aside in a safe place to dry. Depending on the type and thickness of the application, glitter glue usually dries within 30 minutes to an hour. Avoid touching the glitter glue while it’s drying to prevent fingerprints or smudging.
Applying glitter glue with a pen is a fun and easy way to add some sparkle to your crafts. With a little practice, you’ll soon be creating beautiful, shimmering designs on a variety of surfaces.
Step 5: Add Embellishments While the Glitter Glue is Wet (Optional)
Once you have applied the glitter glue, you can make your crafts even more unique by adding some embellishments while the glue is still wet. This step is completely optional, but it can take your design to the next level. You can use a variety of embellishments such as sequins, beads, buttons, or even small figurines.
To add embellishments, use tweezers to carefully place them on the surface of the glue. You can create a specific pattern or just scatter them randomly for a fun, whimsical look. If the glue has already started to dry, you can add some extra glue on top to ensure that the embellishments stick properly.
Keep in mind that different embellishments may require different drying times, so be patient and wait for the glue to dry completely before moving onto the next step. You don’t want to accidentally smudge your design!
Also, be mindful of the weight of the embellishments you choose. If they are too heavy, they may cause the glitter glue to sag or slide off the surface. If you are unsure, experiment with a small amount of glue and embellishments before committing to a larger design.
Adding embellishments is a great way to customize your craft and make it truly one-of-a-kind. So, feel free to experiment and have fun with different colors, textures, and shapes!
Step 6: Wait for the Glitter Glue to Dry
Once you have finished applying the glitter glue to your desired surface, it is important to give it enough time to dry completely. As tempting as it may be to touch or move the object before it’s dry, doing so can ruin the effect and create a mess.
Allowing the Glitter Glue to Dry Properly: Depending on the thickness of the layer and the humidity in your workspace, the drying process can take anywhere from 10 minutes to an hour. Be patient and give the glitter glue enough time to dry completely. A good indicator of dryness is to check if the surface is no longer tacky or if the glitter stays in place when touched gently.
Preventing Smudging: To avoid smudging or messing up your project, it is important to ensure that the surface remains undisturbed while the glitter glue is drying. Even the slightest touch or movement can cause the glitter to shift. You can cover your project with a breathable cloth or a piece of parchment paper to prevent any dust or debris from settling on the wet glitter glue.
Removing Any Excess: Once the glitter glue has fully dried, inspect the project for any excess glue or unwanted blobs. If you find any, you can easily remove them with a pair of tweezers or a toothpick. Take your time and be gentle to avoid damaging the rest of the project.
Final Touches: Once the excess glitter glue has been removed, your project is ready for final touches. You can add additional embellishments, if desired, or even apply a clear sealant to protect the glitter glue from wear and tear. Be sure to follow the instructions on the sealant carefully and let it dry fully before handling the object.
Remember, by waiting patiently for the glitter glue to dry and taking your time with the final touches, you’ll be able to create a beautiful and long-lasting craft project using glitter glue pens.
Tips and Tricks
When it comes to using glitter glue pens, there are some tips and tricks you can follow to make your projects even more dazzling. Here are some ideas to help you get started:
Use Different Pressure
Experiment with applying varying amounts of pressure when using your glitter glue pen. This can create different effects, from thin lines to thicker dots, and everything in between. Play around with different levels of pressure to see what works best for your project and the look you’re going for.
Experiment with Mixing Colors
Glitter glue pens come in a variety of colors, so don’t be afraid to mix and match them for a unique look. Try blending two or more colors together to create an original shade that speaks to your personal style.
Try Using it on Different Surfaces
While glitter glue pens are commonly used on paper and cardstock, it’s worth branching out and trying them on other surfaces as well. They can add a touch of sparkle to everything from fabric to ceramics, so don’t be afraid to experiment with different materials.
By following these tips and tricks, you can take your glitter glue pen projects to the next level. With a little bit of creativity and experimentation, the possibilities are endless!
Use Different Pressure
When using glitter glue pens, it’s important to experiment with different pressure levels to achieve different effects. If you apply more pressure, you can create thicker lines, while applying less pressure will produce thinner lines.
So, how can you use different pressure to create unique designs with glitter glue pens?
One option is to use varying pressure levels to add depth and dimension to your designs. For example, if you’re drawing a flower with a glitter glue pen, use light pressure to create thin lines for the petals, and heavier pressure for the center of the flower. This will make the center of the flower pop, creating a more realistic-looking design.
Another option is to use different pressure to create different types of textures. For instance, try using light pressure to create a subtle, delicate line for a fairy’s wings, and then use heavier pressure for the body of the fairy to give it a more solid and grounded effect.
Keep in mind that not all glitter glue pens are created equal. Different brands and types of glitter glue pens may have varying thicknesses, so be sure to test out your pen on a scrap piece of paper before starting your project. This will allow you to experiment with different pressure levels to achieve the desired effect.
By using different pressure with your glitter glue pens, you can add depth, dimension, and texture to your designs, taking your crafting to the next level. So, don’t be afraid to experiment and have fun with it!
Experiment with Mixing Colors
One of the exciting features of glitter glue pens is that they come in a wide variety of colors, allowing for ample opportunity to mix and match shades. Experimenting with color mixing is a great way to add depth, dimension, and interest to your crafts. Here are some tips for making the most out of your glitter glue pen collection:
Start with Primary Colors
If you’re new to color mixing, consider starting with just three primary colors: red, blue, and yellow. These colors are the building blocks for all other hues, and mixing them in varying ratios will create a full spectrum of shades. Remember that more of one color will result in a stronger shade of that color in the blend.
Blend on a Palette
To avoid blending colors directly on your craft project, use a separate mixing palette such as a paper plate or plastic lid. Dispense a small amount of each color onto the palette, and then use your glitter glue pen tip to swirl and combine the colors until you achieve the desired hue.
Try Gradual Blending
For a subtle color shift, blend two colors together gradually. Apply the first color to your craft project, and then, while it is still wet, add small dots of the second color over the first. Then, use your glitter glue pen tip to blend the two colors together by gently swirling them together.
Layer Different Shades
If you want to add more dimension and texture to your craft project, consider layering different shades of the same color. Start with a base layer of a lighter shade, and then add darker shades on top, using your glitter glue pen tip to blend the two together.
Don’t Be Afraid to Experiment
The most important tip when it comes to mixing colors with glitter glue pens is to not be afraid to experiment. There’s no wrong way to blend colors, and the beauty of glitter glue pens is that they are forgiving and easy to work with. So, go ahead and try new color combinations and see what stunning effects you can create.
Try Using it on Different Surfaces
One of the exciting things about glitter glue pens is that they can be used on a variety of surfaces. It’s not just limited to paper or cardstock! Using glitter glue pens on different surfaces can lead to stunning and unexpected results.
1. Fabric: If you’re feeling adventurous, why not try using glitter glue pens on fabric? This is a great option if you’re looking to add some sparkle to your clothing or create a unique design on a fabric surface. Before starting, make sure to test the glitter glue pen on a small, inconspicuous area to ensure it doesn’t bleed or spread too much. Once you’re confident, you can start applying the glitter glue directly onto the fabric. Use a light hand to prevent the glue from bleeding through the fabric. Once dry, your fabric will have a glittery, one-of-a-kind look.
2. Wood: Using glitter glue pens on wood is a great way to add some sparkle to your home decor project. Whether you’re working on a wooden frame, sign, or any other wooden surface, glitter glue pens can bring your project to the next level. Start by applying the glitter glue directly onto the wooden surface. You can use a brush or your finger to spread it around and create the desired effect. Once dry, you’ll have a glittery and eye-catching addition to your project.
3. Glass: Using glitter glue pens on glass can create a beautiful and unique effect. Whether you’re working on a vase, picture frame, or any other glass surface, glitter glue pens can add a touch of glamour and shine. Start by cleaning the surface with glass cleaner and letting it dry completely. Then, apply the glitter glue directly onto the surface in your desired pattern. Be careful not to apply too much pressure, as the glue can crack or peel off the glass surface. Once dry, your glass project will have a dazzling and sparkling finish.
Don’t be afraid to experiment with different surfaces when using glitter glue pens. The possibilities are endless, and the results can be absolutely stunning. So grab your glitter glue pens and get creative!
Conclusion
In conclusion, glitter glue pens are a versatile and fun tool that can add a pop of shimmer and glamour to any craft project. Whether you’re a professional crafter or just starting out, glitter glue pens are perfect for adding embellishments and accents to your creations.
So what have we learned? Glitter glue pens are easy to use and require no extra tools, making them a convenient choice for crafters of all levels. Plus, they dry quickly and have a clean and mess-free application, making them perfect for using on-the-go or in a small workspace.
If you’re new to using glitter glue pens, just follow our step-by-step guide for the best results. Remember to have fun and experiment with different colors, pressure, and surfaces.
Whether you’re using glitter glue pens to create intricate designs on paper or adding accents to a fabric project, the possibilities are endless.
So go ahead, add some sparkle and shine to your crafting toolbox with glitter glue pens!
Frequently Asked Questions
What is the best way to store glitter glue pens?
It is recommended to store glitter glue pens in a cool and dry place, away from direct sunlight and heat.
Can glitter glue pens be used on fabric?
Yes, glitter glue pens can be used on fabric, but it’s advisable to wash and iron the fabric before using the glitter glue pen for better results.
Are glitter glue pens safe for children?
Glitter glue pens are generally safe for children, but it’s recommended to use under adult supervision. The pens are not recommended for children under three years old.
Can glitter glue pens be used on paper?
Yes, glitter glue pens can be used on paper. In fact, it is one of the most popular surfaces to use glitter glue pens on.
Do glitter glue pens come in different colors?
Yes, glitter glue pens come in different colors. You can easily find them in craft stores or online.
Can glitter glue pens be used to write on surfaces?
No, glitter glue pens are not recommended for writing as they are designed to be used for decorative purposes only.
How long does it take for glitter glue pens to dry?
Glitter glue pens usually dry within 20 to 30 minutes, but it may vary depending on the thickness and amount of glue applied.
Can glitter glue pens be washed off?
It depends on the surface the glitter glue pen was used on. If used on a porous surface like paper, it’s not recommended to wash it off. However, if used on a non-porous surface like glass, it can be washed off with warm soapy water.
What is the best way to add dimension to a project using glitter glue pens?
The best way to add dimension is to apply the glitter glue in layers, allowing each layer to dry before applying the next one.
Can glitter glue pens be used to cover mistakes?
Yes, glitter glue pens can be used to cover mistakes, but it’s recommended to wait for the first layer to dry before adding another layer on top.