It’s time to give your nails a new life with gel glue! Whether you want to add length, fix a broken nail, or simply adorn your nails with beautiful designs, using gel glue can help you achieve all of that and more. But, if you’re new to the world of gel glue, it can be overwhelming to know where to start. That’s why we’ve put together this complete guide on how to use gel glue, from preparing your nails to removing the glue when the time comes. So, grab your materials, let’s get started!
Materials Needed
When it comes to using gel glue for your nails, having all the necessary materials on hand is crucial for a successful application. Here are the essential materials you will need to achieve a flawless gel glue manicure. We will discuss the uses and benefits of each material in detail to ensure you have a complete understanding of how to use them correctly. Keep in mind; using the right materials can make all the difference in achieving a long-lasting manicure. So let’s dive in and see what materials we need for this process.
If you are interested in learning more about how to remove eyelash glue with Vaseline, we have a separate guide you can follow.
Gel Glue
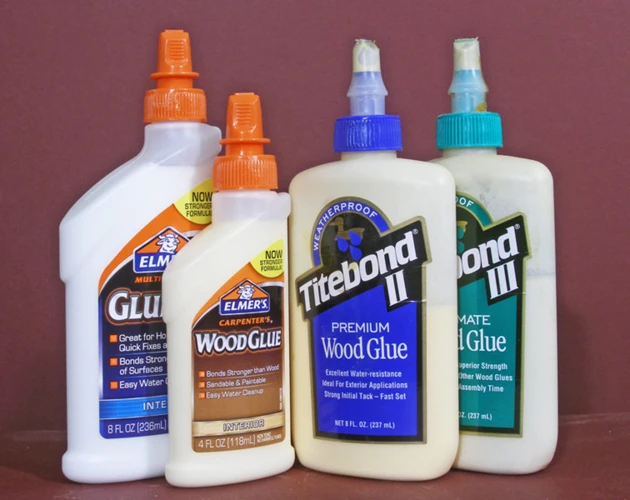
Gel glue is a specially formulated adhesive used for applying false nails and nail tips. This type of glue is stronger than regular nail glue, and it typically lasts longer. One of the best things about gel glue is that it dries clear, making it a great choice for those who want to create a seamless, natural-looking finish. Here are a few things you should know about gel glue before you start using it:
- Consistency: Gel glue has a thicker consistency than regular nail glue, which makes it easier to apply and control.
- Drying Time: Due to its thicker consistency, gel glue takes longer to dry than regular nail glue. You should expect a drying time of 2-3 minutes.
- Removal: Consistent with its durability, gel glue can be a bit tricky to remove. You’ll need to use acetone to soak and soften the glue so that it can be gently removed without causing any damage to your natural nails.
If you happen to get gel glue on your skin, it’s important to remove it as quickly as possible before it dries. To do this, use a cotton swab dipped in acetone to gently wipe away any excess glue. If you find that there is still glue left on your skin, do not attempt to peel or scrape it off as this can cause skin irritation. Instead, apply a bit more acetone and keep gently wiping until the glue is removed.
Gel glue is an excellent choice for those who want long-lasting, seamlessly applied fake nails or tips. Just remember to be patient during the application process and to take your time when removing the glue. If you’re finding success with gel glue, you may also be interested in learning about how to remove eyelashes glue with Vaseline, how to use duo lash glue, or how to tell if eyelash extension glue is bad.
Clean Cloth
When working with gel glue, keeping a clean cloth nearby is essential. Using a clean cloth helps keep the workspace tidy and your hands free from any gel glue mess. Plus, it will prevent any unwanted smudging or transferring of product from one surface to another.
Here are some tips on how to keep your cloth clean and ready for use:
- Choose a lint-free cloth to avoid any particles getting caught in the gel glue.
- Keep the cloth nearby and within reach, so you don’t have to pause or leave your workspace to find it.
- Use a small piece of cloth to avoid excess waste and make it easier to navigate around your nails.
- When the cloth becomes dirty or has excess gel glue on it, switch to a new clean piece of cloth to avoid transferring any old residue onto your nails.
It’s always a good idea to have multiple cloths ready in case you need them. Additionally, to avoid any irritation to your skin, ensure you use a fresh, clean cloth for each new step of the process.
Pro tip: Once you’re finished using your gel glue, use your clean cloth to wipe off the tip of the glue container before tightening the cap. This will prevent the glue from drying and causing the cap to become stuck.
Now that we’ve covered the importance of keeping a clean cloth handy let’s move onto the other materials you’ll need for this process.
Cotton Swabs
Cotton swabs are a crucial tool to have when using gel glue. They are great for cleaning up excess glue and making sure your nails look polished. One of the benefits of using cotton swabs is that they are disposable and easy to use. You can simply toss them away after use and avoid the mess associated with using other types of applicators. When purchasing cotton swabs, it’s best to go for ones with a pointed tip. This makes it easier to target specific areas on your nails without accidentally smudging the glue elsewhere.
When applying gel glue, it’s common to accidentally get some on the skin surrounding your nails. It’s important to clean any excess glue before it hardens. Using a cotton swab dipped in acetone is an effective way to do this. Acetone is a key ingredient in nail polish remover and helps break down and dissolve the glue. Simply dab the cotton swab onto the affected area and gently wipe away the unwanted glue.
Another great use for cotton swabs is cleaning the edges of your nails after you have applied the glue and nail tips. This helps ensure that the tips fit snugly and your nails look neat and tidy. Dip the cotton swab in some acetone and run it along the sides of your nails to remove excess glue. You can also use cotton swabs to help with precision when applying glue to the nail tips.
Using cotton swabs is an easy and efficient way to work with gel glue. They are affordable and readily available at drugstores and beauty supply stores. When you finish applying the glue, be sure to discard the used cotton swabs and start fresh for your next manicure.
If you’re interested in learning about how to remove eyelash glue, check out our article on how to use eyelash glue remover. Or, if you want to learn how to glue hair extensions, read our guide on how to glue extensions in.
Acetone
One of the most important materials needed when working with gel glue is acetone. This powerful solvent is essential in removing gel glue from your nails, should you need to take off your artificial nails for any reason. Without acetone, removing the glue can be a tedious and difficult task.
When choosing acetone, it is important to select one that is specifically designed for use on nails. High-quality acetone will work faster and be more effective in removing gel glue than lower quality options. Additionally, it is important to use acetone in a well-ventilated area and avoid prolonged inhalation or contact with skin.
To use acetone for removing gel glue, you will need to soak your nails in acetone for around 10-15 minutes. You can do this by filling a small bowl with acetone and immersing your fingers in it. To prevent evaporation, you can cover the bowl with a lid or a piece of plastic wrap.
After soaking your nails, you can gently remove the gel glue using a cotton swab or a soft nail file. Be careful not to scrape too hard or you can damage your natural nail bed. Once the glue is removed, it is important to moisturize your nails to restore hydration.
Acetone is a crucial component of the gel glue process, as it allows for easy and safe removal of artificial nails. However, always use caution when handling acetone and follow proper safety guidelines to avoid any accidents.
Optional: Tweezers and Nail File
Using tweezers and a nail file when applying gel glue to your nails is completely optional, but it can make the process much easier and more precise. If you have trouble handling small objects or have difficulty placing the nail tip correctly, using tweezers can provide better control.
Tweezers can be particularly useful when applying the nail tip, as they can easily grip and position the tip in place on your nail bed. If you’re having trouble getting the tip to lay flat against your nail, gently use the tweezers to adjust its position before pressing down.
Meanwhile, a nail file can smooth out any rough or uneven edges on your natural nail and the tip, creating a smoother surface for the glue to stick to. It’s important not to file too aggressively or you risk damaging your natural nail.
When using a nail file, gently file in one direction, rather than back and forth like a saw, to avoid splitting or weakening the nail. You can also use a nail buffer to achieve a smooth, glossy finish on your natural nails.
While tweezers and a nail file are not necessary to apply gel glue, they can definitely make the process easier and more efficient, especially for beginners. Just remember to use them gently and always prioritize the health of your natural nails.
No relevant links were found in this text.
Prepping Your Nails
Preparing your nails before using gel glue is an essential step to ensure the longevity and quality of your nail application. Clean and smooth nails will ensure that the gel glue adheres properly, and the final result looks professional and flawless. So, before getting started, make sure you have all the necessary materials on hand and follow the steps below. And if you’re interested in learning about other types of glues, check out our articles on how to glue glasses or what glue to use for eyebrow extensions.
Clean and Dry Your Nails
Before applying gel glue, it’s important to start with clean and dry nails. This will help the glue to adhere better, ensuring that your nails stay put for longer periods of time. To begin, gather all the necessary materials for this step, including a clean cloth and cotton swabs.
To clean your nails: start by removing any old nail polish using acetone and a cotton swab. This will help to get rid of any oils or debris that may be on your nails. Make sure to have good ventilation in your workspace when using acetone.
To dry your nails: use a clean cloth to gently wipe your nails dry. Ensure there is no moisture on your nails as this can prevent the gel glue from sticking properly.
It’s important to note that you should never use gel glue on broken skin or infected nails. Doing so can cause further damage and infection to your nails. Additionally, if you have any allergies, be sure to check the ingredients of the gel glue before use to avoid an adverse reaction.
Taking the time to properly clean and dry your nails before applying gel glue will help ensure that your manicure lasts longer and looks great. For more information on using other types of glue, check out our articles on how to use eye glue and how to melt lash glue. If you’re wondering how long your duo strip lash glue should last, check out our guide on how long does duo strip lash glue last.
Shape and Buff Your Nails
Having well-shaped nails before applying gel glue is important to ensure a smooth and seamless finish. Follow the steps below to shape and buff your nails:
| Step 1: | Choose the appropriate nail shape for you. If you’re not sure, consider the shape of your cuticles or the natural shape of your nails. Common nail shapes include square, round, almond, and stiletto. |
| Step 2: | Clip your nails to your desired length using nail clippers. It’s best to trim them evenly across your fingertips to avoid ingrown nails. |
| Step 3: | Use a coarse nail file to shape the edges of each nail to match your preferred style. Move the file gently in one direction to avoid damage, and avoid sawing back and forth, as this can weaken the nails. |
| Step 4: | Smooth out any rough edges by using a nail buffer. Buffing your nails can also help reduce ridges on the surface, resulting in a smoother finish. Use a fine-grit buffer or a four-way buffer to achieve the best results. |
Remember to take your time when shaping and buffing your nails. Rushing through this step may lead to unwanted shapes or damage to your nails. Properly shaping and buffing your nails will not only ensure a more pronounced finished result, but it will also set the foundation for your nail care and overall nail health.
Push Back Cuticles
Pushing back your cuticles is an important part of prepping your nails for a gel glue application. Cuticles are the thin layer of skin at the base of your nails and can cause problems if they are not properly pushed back. Follow these steps to push back your cuticles safely and effectively:
- Soften your cuticles: Before pushing back your cuticles, it’s important to soften them. Soak your fingers in warm water for 5-10 minutes or apply cuticle remover to your nails and wait a few minutes.
- Dry your nails: Once your cuticles are softened, use a clean cloth to dry your fingers. The surface of your nails should be completely dry before you start pushing back the cuticles.
- Use a cuticle pusher: A cuticle pusher is a tool specifically designed for pushing back cuticles. Gently push back the cuticles using the rounded end of the pusher. Do not use the pointed end, as this can cause injury.
- Be gentle: When pushing back your cuticles, it’s important to be gentle. Don’t push too forcefully or aggressively, as this can cause damage to your nails and cuticles.
- Remove excess cuticle: After pushing back your cuticles, you may notice some excess skin. Use a cuticle clipper or scissors to carefully trim any excess cuticle. Be careful not to cut too much or cause injury to yourself.
Pushing back your cuticles may seem like a small step, but it can make a big difference in the overall look and health of your nails. By following these steps, you can ensure that your cuticles are safely and effectively pushed back, leaving your nails ready for a flawless gel glue application.
Applying Gel Glue
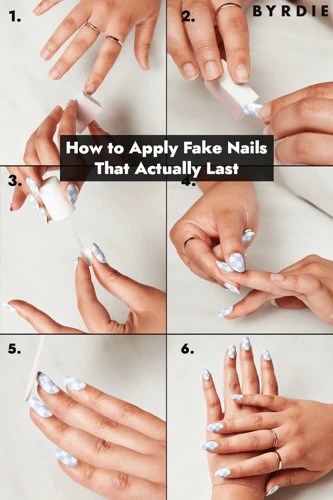
Now that you have prepped your nails, it’s time to apply the gel glue. This process requires a bit of precision, but with the right technique and tools, you can achieve a professional-looking manicure at home. It’s important to follow each step carefully to ensure that the nail tip adheres correctly and lasts for as long as possible. So, let’s dive in and learn how to apply gel glue to your nails like a pro!
Apply Gel Glue to Your Nail
Before applying gel glue to your nails, make sure the surface of your nails is clean and dry. Here are the steps to properly apply gel glue to your nail:
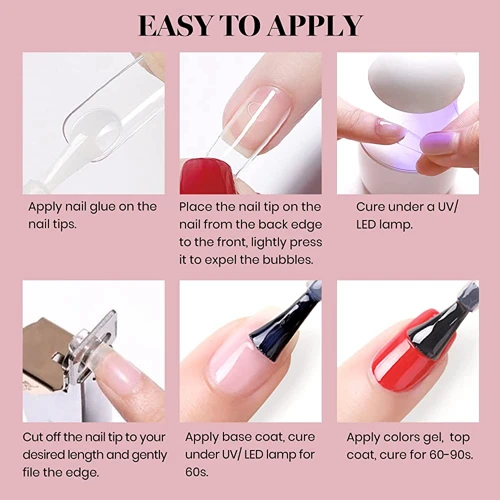
- Take your gel glue and gently shake the bottle to mix the contents.
- Open the bottle and apply a small amount of gel glue onto the center of your nail. Use the brush to spread the glue evenly over your nail, making sure to avoid getting any glue on your skin.
- If you are applying a fake nail tip, apply the gel glue to the underside of the nail tip as well.
- Carefully place the fake nail tip on your nail, lining it up with your natural nail and press down firmly. Hold the nail in place for a few seconds to allow the glue to adhere properly.
- Repeat the process for each nail, making sure to apply the glue and nail tip one nail at a time.
- Once all the nails are glued on, inspect each nail to make sure they are firmly attached. If any of the nails feel loose, gently press down on them and hold them for a few seconds to help the glue set properly.
- After all of the glue is applied to your nails, allow your nails to dry completely before moving on to the next step.
Remember, less is more when it comes to applying gel glue. Applying too much glue can cause the nail to lift, which will ruin your manicure. It’s better to add more glue later if needed, rather than applying too much at once. By following these steps, you’ll have perfectly applied gel nails in no time.
Place the Nail Tip on Your Nail
Once you have applied the gel glue to your nail, it’s time to place the nail tip on your nail. This step requires careful attention and precision to achieve the best results.
Step 1: Hold the nail tip with your tweezers or your fingers. Make sure the curved edge is facing away from your nail.
Step 2: Gently place the tip onto your nail and align it with the base of your nail bed. Ensure that the straight edge of the tip is parallel to your cuticle.
Step 3: Slowly press and hold down the tip onto your nail, starting from the center and then working towards the sides. Be gentle and avoid pressing too hard, which could cause the glue to spread unevenly.
Step 4: Use a clean cotton swab to wipe away any excess glue that may have oozed out from the sides of the nail tip or around the cuticles. This will help to ensure a clean and neat application.
Note: If the length of the nail tip is too long for your liking, you can trim it with a nail clipper. Be careful not to trim too close to the natural nail, as this could cause damage or discomfort.
Using a table can be a great way to visually display the steps and make it easier for readers to follow along. Here is an example of how it can be done:
| Step 1: | Hold the nail tip with tweezers or fingers, with curved edge facing away from nail. |
| Step 2: | Place tip onto nail and align it with the base of nail bed, ensuring straight edge is parallel to cuticle. |
| Step 3: | Press and hold down the tip onto the nail, starting from center and then working towards the sides, being careful not to press too hard. |
| Step 4: | Use a clean cotton swab to wipe away any excess glue that may have oozed out from the sides of the nail tip or around the cuticles. |
| Note: | Trim the length of the nail tip if necessary, but be careful not to trim too close to the natural nail. |
By following these steps carefully and using the table as a guide, you can achieve a flawless and long-lasting result with gel glue.
Press and Hold
Once you have placed the nail tip on your nail, it’s time to press and hold it in place. This step is crucial for ensuring that the gel glue bond is strong and long-lasting. Follow these steps to successfully press and hold your nail tip in place:
- Hold the nail tip firmly: Use your non-dominant hand to hold the nail tip firmly against your natural nail. Be careful not to move the nail tip out of place.
- Apply pressure: Using gentle pressure, press down on the nail tip with your dominant hand. The pressure should be firm enough to secure the nail tip, but not so hard as to cause discomfort.
- Hold for at least 30 seconds: To ensure that the bond is strong, hold the nail tip in place for at least 30 seconds. If you have a UV lamp, you can also cure the gel glue under the lamp for added security.
It’s important to make sure the nail tip is properly secured before moving on to the next nail. Rushing through this step can lead to lifting or peeling of the nail tips, which can ruin your manicure. Take your time and be patient to get the best results.
Removing Gel Glue
Taking off gel glue can be a tricky process, but with the right steps, it can be done easily and safely. Whether you’re looking to remove your gel glue for a new nail design or simply ready to take it off, it’s important to use the correct technique to protect the health and appearance of your nails. Read on to learn the proper steps for removing gel glue.
Soak Your Nails in Acetone
When it’s time to remove your gel glue manicure, soaking your nails in acetone is the most effective way to go about it. Here are the steps to take:
- Gather your materials: You’ll need a bowl, acetone, and some cotton balls.
- Pour acetone into the bowl: Fill it enough that your fingertips will be submerged.
- Place your fingertips in the bowl: Soak for 10-15 minutes.
- Check if the glue is softening: Use a cotton ball to gently rub the nail surface after 10-15 minutes. You should notice that the glue is starting to soften.
- Remove your nails from the bowl: Use a pair of tweezers or a cuticle pusher to gently remove the softened glue from each nail.
- Clean your nails: Gently remove any remaining glue from your nails with a cotton ball dipped in acetone.
Be careful: Acetone can be harsh on your skin and nails, so try to limit how often you use it. If you find that soaking your nails in acetone is too harsh, consider an acetone-free remover instead. Additionally, it’s important to moisturize your hands and nails after using acetone to prevent drying out.
Gently Remove Gel Glue
Once you have soaked your nails in acetone to remove the gel glue, it’s time to gently remove the remaining glue residue from your nails. You can use a clean cloth or cotton swab to help remove the glue. However, it’s important to be gentle and avoid forcefully pulling or scraping at the glue, as this can damage your nails.
To help you gently remove the gel glue, follow these steps:
| Step | Description |
|---|---|
| Step 1 | Apply a small amount of acetone to a cotton swab or clean cloth. |
| Step 2 | Gently rub the cotton swab or cloth over the remaining gel glue on your nails. |
| Step 3 | Continue to rub until the gel glue starts to lift off your nails. |
| Step 4 | Use a pair of tweezers to gently lift off any remaining glue residue. |
| Step 5 | Repeat steps 1-4 as necessary until all of the gel glue is removed from your nails. |
Remember: Be patient and gentle when removing the gel glue from your nails. It’s better to take your time and avoid causing damage to your nails. After removing the glue, make sure to moisturize your nails with lotion and cuticle oil to help keep them healthy and strong.
Moisturize Your Nails
Moisturizing your nails is an essential step in maintaining their health and appearance. You can use a moisturizer specifically designed for nails or opt for natural oils like coconut oil, olive oil, or argan oil. Here are some benefits of moisturizing your nails:
| Benefits of Moisturizing Your Nails |
|---|
| Prevents cracking and splitting |
| Increases flexibility and strength |
| Improves texture and appearance |
| Hydrates and nourishes cuticles |
| Prevents dryness and brittleness |
To moisturize your nails, apply a small amount of moisturizer or oil to each nail and massage gently. Pay special attention to your cuticles, as they tend to be the driest part of your nails. It’s best to moisturize your nails at night before going to bed, as this gives the moisturizer or oil ample time to absorb into your nails and cuticles.
In addition to moisturizing your nails, it’s also important to apply cuticle oil regularly. Cuticle oil helps to strengthen and nourish your nails while keeping your cuticles moisturized and healthy. You can also use a hand lotion with SPF during the day to protect your hands and nails from sun damage.
By taking care of your nails and moisturizing them regularly, you can prevent common nail problems like cracking, splitting, and brittleness, and help your nails look and feel their best.
Tips and Tricks
As you become more comfortable with using gel glue for your nails, there are a few tips and tricks that can elevate your technique and ensure a flawless application. These small adjustments can make a big difference in the longevity and appearance of your manicure. From using tweezers for precision to regular moisturizing, these tips will help you achieve a professional-looking result. So, let’s dive into some of the best ways to make the most out of your gel glue.
Use Tweezers for Precision
When applying gel glue to your nails, it’s essential to have precision to ensure that the nail tip is secured in the right place. To achieve accuracy, using tweezers can be helpful. Tweezers give you more control over the nail tip placement and prevent fake nails from sliding out of position before the glue sets.
Here are a few tips to keep in mind when using tweezers:
- Choose tweezers that are comfortable to hold and provide a good grip.
- Practice placing the nail tip on a flat surface before attempting to secure it to your nail using tweezers.
- Use one hand to hold the nail tip in place while using the tweezers to adjust the position if needed.
- Be gentle when using tweezers on your natural nails, as you don’t want to create any damage or discomfort.
- If you accidentally place the nail tip in the wrong position, gently lift it with the tweezers and reapply the glue before continuing.
Tweezers can be a handy tool when applying fake nails with gel glue to ensure precision and a flawless finish. Just remember to use them carefully and with patience to get the best results.
Clean Up Edges with a Cotton Swab
When applying gel glue to your nails, it’s common to have some excess glue around the edges. This can be easily cleaned up with a cotton swab. However, it’s important to be gentle when doing so to avoid lifting the nail tip. Here are some steps to follow when cleaning up any excess gel glue:
| Step | Instructions |
|---|---|
| Step 1: | Dip a cotton swab into acetone. |
| Step 2: | Gently rub the cotton swab along the edges of your nail, being careful not to touch the actual nail tip. |
| Step 3: | Repeat as necessary until all excess glue has been removed. |
| Step 4: | If you accidentally touch the tip of your nail, use a clean cotton swab to remove any glue residue on the nail tip. |
| Step 5: | Finish by moisturizing your nails with lotion and cuticle oil. |
Remember, cleaning up the edges of your nails with a cotton swab is a crucial step in getting a clean and polished look with gel glue. Just be gentle and take your time to avoid any mistakes.
Apply Lotion and Cuticle Oil Regularly
Taking care of your nails after applying gel glue is just as important as the application process. One of the essential things to keep in mind is to apply lotion and cuticle oil regularly. This will help keep your nails healthy and hydrated.
Lotion is necessary to moisturize both your hands and your fingernails. Dry skin can lead to brittle nails that easily break. It’s essential to keep your hands and nails moisturized. You can choose any hand and nail lotion that works for you. However, make sure to apply it regularly – at least once a day.
Cuticle oil is a nourishing oil that helps keep your cuticles soft and healthy. It can prevent hangnails and keep your nail bed hydrated. When applying cuticle oil, massage it gently into your cuticles, so they absorb it correctly. You can use any cuticle oil available in the market.
Here are some other tips that you can use to keep your nails healthy:
| Tip: | Description: |
| Wear Gloves: | When cleaning or performing any household chores with harsh chemicals, wear gloves to protect your nails. |
| Avoid Nail-Biting: | Nail biting can damage your nails and cause infections. Avoid this habit. |
| Take Nutritional Diet: | A balanced diet is essential for healthy nails. Include vitamins, minerals, and protein in your diet. |
| Don’t Use Nails as Tools: | Using your nails as tools for opening cans or packages can cause them to break or weaken. |
By following these tips, you can keep your nails healthy and enjoy the benefits of your gel glue application. So, make sure to add cuticle oil and lotion to your daily nail care routine.
Conclusion
After going through this complete guide on how to use gel glue on your nails, you should now have a good understanding of the process. Following these steps will help you achieve a long-lasting and professional-looking manicure or pedicure. Remember to always prep your nails properly, apply the gel glue carefully and with precision, and remove it gently to avoid damaging your nails.
One thing to keep in mind is that practice makes perfect. You may not achieve the perfect look the first time, but with patience and persistence, you will get better and better. Don’t be afraid to experiment with different techniques and products to find what works best for you and your nails.
Overall, using gel glue can be a great way to achieve a salon-quality manicure or pedicure at home. It’s a cost-effective and convenient option that can save you time and money in the long run. So, give it a try and see the amazing results for yourself. Happy nail styling!
Frequently Asked Questions
Q: Can I use gel glue on natural nails?
A: Yes, you can use gel glue on natural nails. It can help strengthen weak nails and prevent breakage.
Q: How long does gel glue last?
A: Gel glue can last up to three weeks with proper application and maintenance.
Q: Can I use acetone-free nail polish remover to remove gel glue?
A: No, acetone-free nail polish remover is not strong enough to remove gel glue. You will need to use pure acetone.
Q: Can I reuse nail tips with gel glue?
A: It is not recommended to reuse nail tips as they can harbor bacteria and compromise the integrity of the glue.
Q: Can I apply gel glue over nail polish?
A: No, gel glue should be applied directly to clean and dry nails without any nail polish or residue on them.
Q: Can I use gel glue to fix a broken nail?
A: Yes, you can use gel glue to fix a broken nail. Apply a small amount of glue to the crack and hold it together until it dries.
Q: Can I use gel glue on my toenails?
A: Yes, you can use gel glue on your toenails. It can help prevent ingrown toenails and strengthen weak nails.
Q: Can I paint over gel glue?
A: Yes, you can paint over gel glue once it has fully dried. However, be sure to use a non-acetone nail polish remover to avoid weakening the glue.
Q: Can I apply gel glue myself or should I visit a professional?
A: You can apply gel glue yourself, but it may be easier to get a professional to apply it for you if you are new to it.
Q: Can I remove gel glue without using acetone?
A: While it is possible to remove gel glue without acetone, it is not recommended as it can damage your nails. Use pure acetone for safe and effective removal.