Have you ever accidentally spilled leather glue on your favorite leather bag or furniture piece? If yes, then you know how frustrating and pesky it can be to remove leather glue stains. Don’t worry, though, as there are some practical steps you can take to get rid of those unwanted glue marks and restore your leather items to their former glory. In this comprehensive guide, we’ll walk you through the different types of leather glue, the tools and materials you’ll need, and a step-by-step process that will help you remove leather glue stains from your cherished possessions. So, let’s dive in and learn how to remove leather glue like a pro!
Types of Leather Glue
Removing glue from leather can be a tricky process, and choosing the right type of glue remover depends on the type of leather glue that has been used. There are two main types of leather glue – water-based and solvent-based. Each type requires a different approach to effectively remove the glue without damaging the leather. Understanding the type of glue is vital in order to choose the right tools and materials to get the job done. Let’s take a closer look at the two types of leather glue.
Water-Based Leather Glue
Water-based leather glue is a type of adhesive that is formulated with water as its main solvent. It is commonly used for bonding leather materials, such as wallets, bags, jackets, and shoes. This type of glue is popular because it is non-toxic and eco-friendly compared to solvent-based counterparts.
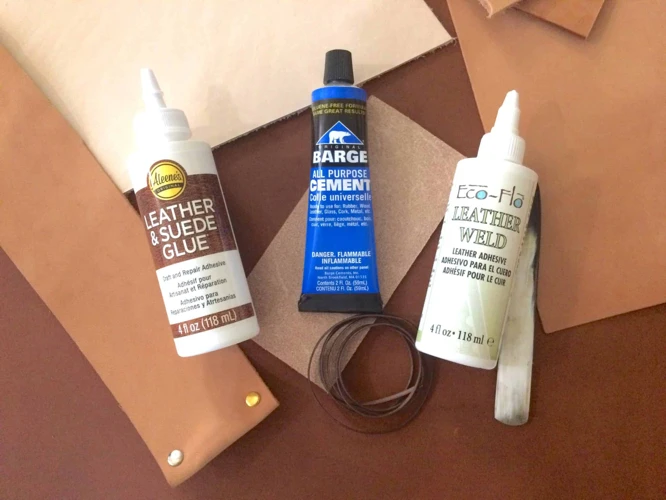
Some common examples of water-based leather glue include Aleene’s Original Tacky Glue, Elmer’s Carpenter’s Wood Glue Max, and Weldbond Universal Adhesive. These types of glue are relatively easy to find in craft stores or online shops.
However, removing water-based leather glue can be challenging, especially if it has already dried and hardened. Here are some tips and tricks to help you out:
| Materials | Directions |
|---|---|
| Clean, soft cloth | Use a clean, soft cloth to wipe off any excess glue before attempting to remove the residue. |
| Vinegar | Mix vinegar and water in equal parts and apply the solution to the glue stain. Let it sit for 10-15 minutes before wiping it clean with a damp cloth. |
| Baking soda | Mix baking soda and water in equal parts to create a paste. Apply the paste to the stain and let it sit for at least 15 minutes. Gently scrape off the paste with a plastic scraper or a credit card. |
| Rubbing alcohol or acetone | Apply rubbing alcohol or acetone on a cotton ball and gently dab it on the glue stain. Be careful not to rub too hard to avoid damaging the leather surface. |
| Leather conditioner | Apply a leather conditioner on the affected area after removing the glue residue to restore the leather’s natural oils and prevent cracks and damage. |
It is important to note that the effectiveness of these methods may vary depending on the severity and age of the glue stain. Some stains may require repeated attempts or a combination of methods to fully remove the residue.
If you accidentally get water-based leather glue on your skin, you can refer to our article “How to Unsuper Glue Fingers” for step-by-step instructions on how to safely remove the glue.
Solvent-Based Leather Glue
Solvent-based leather glue is a type of glue that uses organic solvents as the primary agent, such as toluene or acetone, to dissolve and disperse the adhesive. These types of glues are commonly used in industrial settings or for heavy-duty repairs, and are typically stronger than water-based adhesives. However, they can be quite difficult to remove from leather surfaces.
When working with solvent-based leather glue, it is important to take extra precautions to avoid skin contact or inhalation of the fumes. Make sure to work in a well-ventilated area and wear gloves and protective clothing.
To remove solvent-based leather glue from leather surfaces, follow these steps:
- Step 1: Gently scrape off any excess glue with a plastic scraper or spoon. Be careful not to damage the leather surface.
- Step 2: Apply a small amount of solvent, such as acetone or rubbing alcohol, onto a clean cloth.
- Step 3: Dab the cloth onto the glue stain, making sure not to saturate the leather. Let the solvent sit for a few minutes to soften the glue.
- Step 4: Gently rub the area with a soft-bristled brush or cloth until the glue starts to lift off. Be careful not to scrub too hard, as this can damage the leather.
- Step 5: Continue to apply the solvent and rub until all the glue is removed. If necessary, repeat the process until the glue is completely gone.
It is important to note that solvent-based adhesives can be difficult to remove and may require multiple attempts to fully eliminate the glue. If these steps do not work or the glue has penetrated deeply into the leather, it may be best to seek professional help or consult a leather expert.
If you accidentally get solvent-based leather glue on your skin, follow these steps to remove it safely: [insert anchor for /how-to-unsuper-glue-fingers/]
- Step 1: Immediately wash the affected area with soap and water.
- Step 2: Soak the area in warm, soapy water for several minutes.
- Step 3: Gently massage the glue with your fingers to try to loosen it.
- Step 4: If the glue does not come off, try using an acetone-based nail polish remover or rubbing alcohol to dissolve the adhesive.
- Step 5: Rinse the area with water and dry with a clean towel.
Remember, it is important to use caution when working with solvent-based adhesives and to take all necessary safety precautions to avoid damage to yourself or the leather surface. If you are unsure about how to remove glue stains from a leather item, it is always best to seek professional help or consult a reputable leather expert.
Tools and Materials Needed
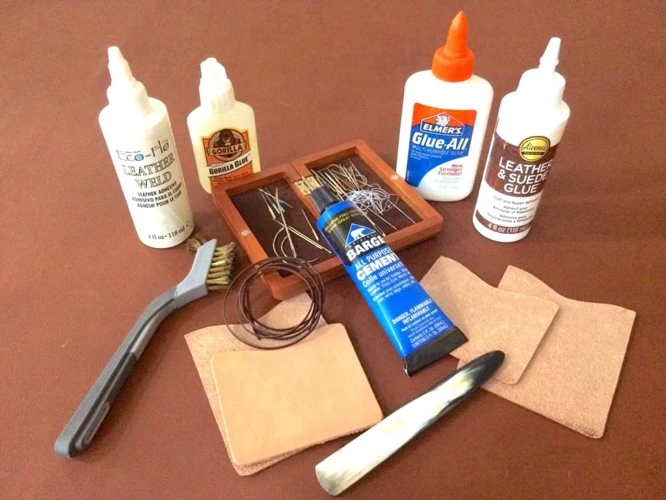
To effectively remove leather glue, you will need the right tools and materials to make the process easier and more efficient. Here are the things you will need:
1. Scraper: You will need a scraper to remove any excess leather glue residue from the surface of the leather. A plastic scraper or a putty knife works best to avoid damaging the leather.
2. Rubbing Alcohol or Acetone: You will need either rubbing alcohol or acetone to dissolve the leather glue. These solvents are effective in breaking down the chemical structure of the glue, making it easier to remove.
3. Leather Conditioner: After removing the glue, the surface of the leather may be dry and discolored. A leather conditioner helps moisturize the leather and restore its original color and texture.
4. Clean Cloth: You will need a clean cloth to wipe away the glue residue and to apply the rubbing alcohol or acetone on the affected area.
5. Hair Dryer or Heat Gun (optional): If the leather glue is difficult to remove, you can use a hair dryer or a heat gun to soften the glue. By applying heat to the glue, it will become more pliable, making it easier to scrape off.
6. Vinegar or Baking Soda (optional): Vinegar and baking soda can be effective alternatives to rubbing alcohol and acetone. You can mix vinegar and water in equal parts and apply it on the affected area. Alternatively, you can make a paste out of baking soda and water and apply it to the glue.
Remember that before using any of these tools and materials, you should test them on a small, inconspicuous area first to ensure that they will not damage the leather.
It’s also important to have a clean and organized work area to avoid any further damage to your leather item. Cover your work area with a plastic sheet or newspaper to prevent glue residue from getting on other surfaces. Using gloves and protective clothing is recommended to avoid any contact with the solvents or glue. And lastly, to prevent leather glue stains in the future, make sure to use a leather-specific glue and use it in a well-ventilated area.
For more tips on removing various types of glue, check out these articles:
How to Get Glue Off Tracks, How to Remove Glue From Any Surface, and How to Get Sticky Glue Off Wood.
Step-by-Step Guide to Removing Leather Glue
Removing leather glue can be a daunting task, but with the right tools and techniques, it is possible to do it effectively. In this section, we will provide you with a step-by-step guide on how to remove leather glue from your leather items. By following these steps, you will be able to eliminate any unsightly glue stains from your leather goods and enhance their appearance. So, let’s dive in! But before we jump in, remember that this article contains some tips that may be helpful for other glue stains. For example, if you want to know how to fix a lifting closure without glue or how to get glue off PVC, click on the relevant links.
Step 1: Scrape off any excess glue
One of the most critical steps in removing leather glue is to scrape off any excess glue before applying any cleaning solution. When leather glue dries, it forms a hard, rubbery substance that adheres firmly to the surface, making it difficult to remove. The first thing you need to do is to remove as much of the excess glue as possible.
To scrape off excess glue, you need a scraper or a putty knife. Be careful while scraping to avoid damaging the leather surface underneath. It’s best to scrape in a gentle and circular motion, focusing on the edges of the glue stain first. Once you’ve removed as much of the excess glue as possible using the scraper, you can gently rub the area with a clean, dry cloth to remove any residue.
It’s important to note that the process of scraping off the glue can be time-consuming and requires patience. Avoid using excessive force while scraping, as this could cause damage to your leather item. If you find that the glue is too difficult to scrape off, try applying some heat to the area using a hair dryer or heat gun. Alternatively, you can apply some rubbing alcohol or acetone to soften the glue. If you’re unsure about how to do this, refer to the relevant sections in this article for more information.
The key to effectively removing leather glue from any surface is to act quickly and follow each step carefully. By carefully scraping off any excess glue, you’ll be creating a surface that’s easier to clean and restoring your leather item back to its original state.
If you’re interested in finding out how to fix a lifting closure without glue, check out our article “How to Fix a Lifting Closure Without Glue.”
Step 2: Apply rubbing alcohol or acetone
Rubbing alcohol and acetone are effective solvents for removing leather glue. Here are the step-by-step instructions for using them:
- Prepare the work area: Make sure the area where you’ll be working is well-ventilated and free of any flammable objects.
- Test on an inconspicuous area: Before applying rubbing alcohol or acetone to the stained area directly, test a small amount on an inconspicuous area of the leather. This will help you determine if the solvent will damage the leather.
- Apply rubbing alcohol or acetone: Apply a small amount of rubbing alcohol or acetone to a clean cloth and gently rub it onto the leather glue stain. The solvent will dissolve the glue and make it easier to remove.
- Scrape off the glue: After applying the solvent, use a plastic or wooden scraper to remove any remaining glue from the leather surface. Be gentle so as not to damage the leather.
- Clean the leather: Once all the glue is removed, use a clean cloth soaked in clean water to wipe off any remaining solvent. Then, dry the leather with a clean towel.
Note: While rubbing alcohol and acetone are effective solvents for removing leather glue, they can be harsh on the leather and may cause discoloration or damage. So, be careful while using these solvents and test in an inconspicuous area first. If the leather gets damaged, you may need to seek professional help.
For more information on removing different types of glue, check out our other articles on how to get glue off pvc, how to get salon pro glue out of clothes, how to remove glue stain, how to remove glamnetic nail glue, and how to remove wax stick from glue gun.
Step 3: Use a leather conditioner
After removing the leather glue, it’s important to use a leather conditioner to restore the softness and flexibility of the leather. Here are the steps to use a leather conditioner:
- Clean the leather: Before applying any conditioner, make sure that the leather is clean and dry. Use a leather cleaner and a soft cloth to gently remove any dirt or debris from the surface of the leather. Allow the leather to dry completely before moving on to the next step.
- Apply the conditioner: Choose a high-quality leather conditioner that is specifically designed for your type of leather. Apply the conditioner to a soft cloth and rub it gently into the surface of the leather in a circular motion. Be sure to cover the entire surface of the leather, including any creases or folds.
- Let it absorb: Allow the leather conditioner to absorb into the leather for several minutes. This will help to restore the softness and flexibility of the leather fibers.
- Wipe away excess: After allowing the conditioner to absorb, use a clean dry cloth to wipe away any excess from the surface of the leather. Be sure to remove all excess conditioner to prevent any sticky residue from forming.
- Repeat as needed: Depending on the condition of your leather, you may need to apply the conditioner several times to achieve the desired level of softness and flexibility. Follow the instructions on your specific leather conditioner for best results.
Using a leather conditioner not only helps to restore the softness and flexibility of the leather, but it also helps to protect it from future damage. By keeping your leather well-conditioned, you can ensure that it will last for many years to come.
Additional Tips and Tricks
Now that you know the basic steps for removing leather glue, it’s time to take it up a notch with some additional tips and tricks. These methods may require a bit more effort and supplies, but they can be incredibly effective in tackling even the most stubborn glue stains. So, grab your gloves and let’s dive into these alternative solutions to removing leather glue.
Tip 1: Use a hair dryer or heat gun
When it comes to removing leather glue, one effective tip is to use a hair dryer or a heat gun. Here are the steps to follow when using this method:
- Step 1: Plug in the hair dryer or heat gun and turn it on to a low setting.
- Step 2: Hold the hair dryer or heat gun a few inches away from the affected area for a few minutes to heat up the glue.
- Step 3: Use a scraper or a plastic card to gently scrape off the glue. Be careful not to damage the leather surface.
- Step 4: If the glue does not come off easily, apply more heat and scrape again. Repeat until all the glue is removed.
- Step 5: Once the glue is removed, wipe the area with a soft cloth and allow it to cool. Finally, apply a leather conditioner to restore any lost moisture and protect the leather.
It is important to note that this method may not be suitable for all types of leather glue, especially if it is solvent-based. Be sure to wear gloves and protective clothing when using a heat gun or hair dryer to avoid burns or injury.
Using a hair dryer or heat gun is just one of many tips that can be used to remove leather glue. Try out this method if you have a water-based glue and need to remove it quickly and safely.
Tip 2: Try using vinegar or baking soda
When it comes to removing leather glue, vinegar and baking soda can be effective alternatives to traditional solvents. Vinegar, in particular, is a natural and non-toxic option that can break down and dissolve the glue. Here are the steps to using vinegar or baking soda for removing leather glue:
- Step 1: Mix equal parts white vinegar and water in a spray bottle or bowl. Alternatively, mix baking soda with just enough water to make a paste.
- Step 2: Spray or apply the solution/paste directly to the glue stain.
- Step 3: Allow the solution/paste to sit on the stain for about 10-15 minutes.
- Step 4: Use a soft-bristled brush or cloth to gently scrub the glue stain.
- Step 5: Wipe the area clean with a damp cloth and allow it to air dry.
It’s important to note that vinegar and baking soda may not be as effective on tougher or larger glue stains. In these cases, it’s recommended to use a solvent or seek professional help. Additionally, always test the vinegar or baking soda solution on a small, inconspicuous area of the leather first to prevent any discoloration or damage to the material.
Tip 3: Test on a small, inconspicuous area first
Before applying any cleaning agents or methods to remove leather glue, it is important to test on a small, inconspicuous area first. Doing so helps you determine whether or not the cleaning solution may cause further damage to the leather or affect its color. To ensure that your leather surface looks even and pristine after glue removal, it is important to follow this tip.
To test a small area, choose a spot that is not easily visible, like the underside of a couch cushion or the inside of a leather jacket. Apply a small amount of the cleaning solution or method to the area and leave it for a few minutes. Then, gently wipe it off with a damp cloth and assess the area for any discoloration or damage.
If there is no damage or discoloration, then go ahead with the cleaning process. However, if there is any indication of negative effects, refrain from using the cleaner or method and opt for a gentler approach. Taking the time to test an area first can prevent further damage to your leather item and save you a lot of money and heartache in the long run.
Here is a handy html table summarizing this tip:
| Tip | Description |
|---|---|
| Tip 3 | Test on a small, inconspicuous area first |
Preventing Leather Glue Stains
As they say, prevention is better than cure. So, if you want to avoid the hassle of removing leather glue stains, it’s best to take precautionary measures. Here are some tips and tricks that you can follow to prevent leather glue from staining your precious leather possessions.
Tip 1: Cover your work area
An important aspect to consider before starting any leather glue removal process is to cover your work area with a protective barrier. This will not only keep your work area clean but also protect your surroundings from any damage. Here are some materials you could use to cover your work area:
| Material | Advantages | Disadvantages |
|---|---|---|
| Plastic sheet | – Provides a barrier between the work area and the surroundings – Easy to clean up |
– May slip and slide around the work area – May not be very eco-friendly |
| Cardboard | – Provides a barrier between the work area and the surroundings – Easy to handle and dispose of after use |
– Not very durable or long-lasting – May absorb any spills or stains |
| Drop cloth | – Provides a barrier between the work area and the surroundings – Reusable and eco-friendly options available |
– May not be very easy to clean up – May be bulky and awkward to handle |
| Newspaper | – Provides a barrier between the work area and the surroundings – Easy to handle and dispose of after use – Eco-friendly option |
– May tear easily and not provide adequate coverage – May absorb any spills or stains |
Using any of these materials will help prevent any damage or stains to your work area. It’s important to choose the option that best suits your needs and budget. A little extra effort spent on covering the work area can save you a lot of time and money in the long run.
Tip 2: Wear gloves and protective clothing
Protecting yourself while removing leather glue is important to prevent skin irritation or injury. Here are some recommended protective wear to consider:
| Protective Wear | Description |
|---|---|
| Gloves | Avoid direct skin contact with the glue by wearing heavy-duty gloves, such as nitrile or latex gloves. |
| Protective Clothing | Wear long-sleeved shirts and pants that cover your entire body. Avoid wearing clothes made of synthetic materials that can melt upon exposure to heat. |
| Safety Glasses | When using a scraper or other sharp tools, wear safety glasses to protect your eyes from flying debris. |
| Respirator Mask | If you are using acetone or other strong chemicals, wear a respirator mask to avoid inhaling harmful vapors. |
Taking these precautionary measures can make the process of removing leather glue safer and more comfortable. Always prioritize your safety and seek medical attention if necessary in case of skin irritation or injury.
Tip 3: Use a leather-specific glue
It is important to use the right type of glue when working with leather to avoid any staining or damage. Using a leather-specific glue is the best way to ensure that your project turns out perfectly. Leather glues are specifically designed to bond leather and are available in a variety of forms including water-based, solvent-based, and contact adhesives.
Water-based leather glue: Water-based leather glue, also known as latex glue, is a popular choice because it is easy to clean up. It is also non-toxic, making it safe to use indoors. Water-based leather glue works well for small leather projects, such as repairing a tear or attaching a patch.
Solvent-based leather glue: Solvent-based leather glue is a strong adhesive that provides a permanent bond. It is often used for larger leather projects, such as reupholstering a chair. Solvent-based leather glue should be used in a well-ventilated area and with proper protective gear, as it contains volatile organic compounds (VOCs).
Contact adhesives: Contact adhesives are another option for bonding leather. These glues are applied to both surfaces and allowed to dry before they are joined together. They provide a strong, permanent bond and are ideal for projects where a clean, finished look is desired.
When using a leather-specific glue, it is important to follow the manufacturer’s instructions carefully. Always test the glue on a small, inconspicuous area of the leather first to ensure that it does not cause any discoloration or damage. Additionally, be sure to store the glue properly to prevent it from drying out or becoming contaminated.
By using a leather-specific glue, you can ensure that your leather project is strong, durable, and looks great. Whether you are repairing a tear or making a new leather item, the right glue can make all the difference in the finished product.
Conclusion
After following this complete guide, removing leather glue should be a breeze. Remember to use the right tools and materials, and to always test on a small, inconspicuous area first to avoid any damage to the leather.
When dealing with leather glue stains, prevention is key. Cover your work area, wear protective clothing, and use a leather-specific glue to prevent any future mishaps.
If you encounter any stubborn stains that won’t budge, try using the additional tips and tricks mentioned in this guide, such as using a hair dryer or vinegar.
By taking the time to carefully remove leather glue and prevent stains, you can extend the lifespan of your leather items and keep them looking good as new. Don’t let a little bit of glue ruin your leather’s appearance – with this complete guide, you’ll know exactly how to handle any sticky situation.
Frequently Asked Questions
Can I remove leather glue with just soap and water?
No, leather glue is not water-soluble and requires a specific solvent for removal.
What materials do I need to remove leather glue?
You will need rubbing alcohol or acetone, a scraper tool, a leather conditioner, and a clean cloth.
What is the difference between water-based and solvent-based leather glue?
Water-based leather glue is made with water as the main solvent, while solvent-based leather glue is made with chemical solvents.
Can rubbing alcohol damage my leather?
It is important to use rubbing alcohol with caution as it can dry out and damage certain types of leather. Use a leather conditioner after cleaning.
How do I apply the rubbing alcohol or acetone?
Apply a small amount of the solvent to a clean cloth and gently rub the affected area. Do not saturate the leather with too much solvent.
What is the purpose of using a leather conditioner?
A leather conditioner helps to keep the leather soft and supple after the cleaning process.
Can I use a heat gun to remove leather glue?
Yes, but be cautious as excessive heat can damage the leather. Use a low-heat setting and keep the heat gun moving to avoid burning the leather.
Can I use vinegar instead of rubbing alcohol or acetone?
Vinegar can be used as a natural solvent to remove leather glue, but it may take longer and require more elbow grease.
What should I do if I accidentally stain my leather with glue?
Act quickly and follow the steps in this guide to remove the glue as soon as possible. The longer the glue sets, the harder it will be to remove.
How can I prevent leather glue stains in the future?
Use a leather-specific glue, cover your work area, and wear protective clothing such as gloves to avoid accidental spills or stains.