Removing LCD glue can be a daunting task for those who are not familiar with the process. However, it is an essential skill to have if you want to replace your LCD screen without causing any damage to your device. In this article, we will guide you through the step-by-step process of removing LCD glue, as well as provide you with essential tips and techniques to make the process as easy and safe as possible. So, get ready to uncover the secrets of removing LCD glue with ease!
Why Removing LCD Glue is Important
Removing LCD glue may seem like a daunting task, but it is an essential part of replacing a damaged screen on your device. The glue that attaches the LCD screen to the frame of the device must be removed carefully to prevent any damage to the device. In this guide, we will discuss the importance of removing LCD glue and provide step-by-step instructions on how to do so. So, whether you’re replacing a broken screen or just need to clean up some glue residue, read on to learn how to do it like a pro. And if you’re also interested in learning about removing other types of glue, check out our guide on how to remove glue from cabinets.
Prevents Damage to the Device
When electronic devices such as smartphones or tablets experience damage to their LCD screens, it’s important to remove the LCD glue that adheres the screen to the device’s frame to effectively replace the damaged screen. If the glue is not removed properly, it can damage internal components and make the device unusable. Even attempting to remove the glue with force or incorrect techniques can result in scratches, cracks, or breakage to the device’s delicate glass or plastic components. By removing LCD glue correctly, you ensure that the device remains intact and can be safely repaired without causing further damage or compromising its functionality.
For example, using a heat gun to remove the glue is a popular technique, but if not used carefully, it can generate excess heat and melt or damage the internal components of the device. It’s crucial to handle such projects with precision and caution, using appropriate tools and techniques to avoid any damage to the device.
Learning how to properly remove LCD glue is not only crucial for repairing devices but also helps in maintaining their longevity and avoiding unnecessary damage. If you’re inexperienced with repairing devices on your own, it’s recommended to seek help from a professional, especially if you’re planning on attempting a more complex repair.
Taking the time to properly remove LCD glue can save you from significant losses in the long run. Not only does it prevent damage to the device, but it can also lead to a smoother, more efficient screen replacement process. If you need to know more about removing different types of glue, check out our article on how to remove RC tire glue.
Allows for Smooth Replacement of LCD Screen
When a device’s LCD screen needs to be replaced, it is important to ensure that the removal process is done correctly to prevent damage to the device. By properly removing the LCD glue, you can ensure a smooth replacement of the screen without causing further damage to the device. Here are a few things to keep in mind to facilitate the replacement process:
- Use the right tools: Make sure you have all the necessary tools such as a plastic scraper, isopropyl alcohol, cotton swabs, and a heat gun to make the removal process easier and more efficient.
- Apply heat: Use a heat gun to apply heat to the glue. This will soften the glue, making it easier to remove. Be careful not to apply heat for too long, as this could cause damage to the device.
- Be gentle: Use a plastic scraper to gently loosen the glue, taking care not to put too much pressure on the screen.
- Apply isopropyl alcohol: Apply isopropyl alcohol to the loosened glue with a cotton swab. This will weaken the glue, further facilitating its removal.
- Clean the surface: Once the glue has been removed, clean the surface of any remaining residue with alcohol and cotton swabs. This will ensure that the surface is clean and ready for the replacement screen.
By following these steps, you can replace the device’s LCD screen seamlessly and efficiently. It is important to remember that this process requires patience and attention to detail, as you do not want to damage the device in the process. If you are unsure about the DIY removal process, seeking professional help can be a good idea to ensure that the device is not damaged.
You can also check out our article on how to clean glue stains for more information on removing glue from various surfaces.
Tools and Materials Needed
When it comes to removing LCD glue, having the right tools and materials can make the process much smoother. The following tools and materials are recommended for safe and effective removal of LCD glue. Some of these may be familiar to you from other household projects, such as using isopropyl alcohol to get glue off jars or needing gloves and protective eyewear when melting hair bonding glue. Whether you’re a DIY enthusiast or a professional, having these tools and materials on hand will ensure that you can remove LCD glue without damaging the device. However, if you need to remove cement glue or tile glue from wood floor, you may need different tools and techniques, which we cover in other articles linked below:
- How to Remove Tile Glue from Wood Floor
- How to Get Glue off Jars
- How to Get Invisalign Glue off Your Teeth
- How to Melt Hair Bonding Glue
- How to Unbind Super Glue
- How to Unsuper Glue Fingers
- How to Remove Cement Glue
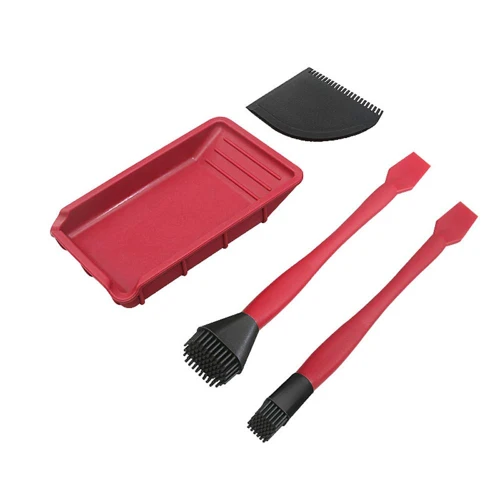
Plastic Scraper
One of the essential tools needed for removing LCD glue is a plastic scraper. This tool is necessary for loosening and dislodging the adhesive without causing damage to the device. It is often used during the initial stages of the removal process when heat is applied to melt the glue.
There are different types of plastic scrapers that can be used for this purpose. Some are flat and wide, while others are curved or angled to fit into tight spaces. The choice of scraper will depend on the size and shape of the device and the type of glue used.
When using a plastic scraper, it is important to be gentle and avoid exerting too much force, which can cause scratches or cracks on the LCD screen. The scraper should be held at a slight angle and moved in a back and forth motion to loosen and lift the glue.
To avoid any scratching on the device, it is recommended to wrap the plastic scraper with a soft material, such as a microfiber cloth, before use. This will act as a protective barrier between the scraper and the device.
Here are some key features of a plastic scraper:
| Features | Description |
|---|---|
| Material | Plastic scrapers are made from various materials such as nylon or polypropylene. |
| Size | The size of the scraper depends on the device size and the amount of glue that needs to be removed. |
| Shape | Plastic scrapers come in different shapes such as flat, curved or angled. |
| Flexibility | The scraper should be flexible enough to fit into tight spaces and bend around corners without breaking. |
| Durability | The scraper should be durable enough to withstand multiple uses and not break or snap easily. |
A plastic scraper is an essential tool for anyone looking to remove LCD glue. It is an effective and safe way to loosen and dislodge the adhesive without damaging the device. When used correctly, a plastic scraper can help make the removal process smooth and efficient.
Isopropyl Alcohol
When it comes to removing LCD glue, isopropyl alcohol is a crucial tool. It helps weaken the glue and prepare the surface for the replacement of the LCD screen. Here are some important points to keep in mind when using isopropyl alcohol:
- Choose the Correct Concentration: Isopropyl alcohol comes in different concentrations, so make sure to use one with a concentration of at least 70%. This ensures that it’s effective in removing the glue and leaves no residue on the surface.
- Apply the Alcohol Liberally: Apply the alcohol to the glue, using a cotton swab or a lint-free cloth. Be sure to apply it liberally to ensure that the glue is well-saturated, which helps in loosening it up.
- Keep it Away From the Circuit Board: Make sure to keep the alcohol away from the circuit board as it may damage it. Use a plastic scraper to remove the glue around the edges of the screen to prevent any contact with the circuit board.
- Wipe Clean with Cotton Swabs: Once you’ve applied the alcohol, use cotton swabs to wipe off any remaining glue. Be sure to use a new swab for each pass to avoid smearing the glue across the surface.
- Avoid Excessive Rubbing: When wiping with cotton swabs, avoid excessive rubbing. This can damage the screen surface or cause scratches. Instead, use a gentle wiping motion to gradually remove the glue.
- Allow Time to Dry Before Re-Assembling: After removing the glue, allow the surface to dry completely before reassembling the device. This ensures that no moisture is trapped between the screen and the adhesive, causing damage to the new screen.
Using isopropyl alcohol to remove LCD glue is an effective method that requires caution and precision. By following the above guidelines, you can ensure that the device is cleaned safely, and the LCD screen replacement process is smooth.
Cotton Swabs
When it comes to removing LCD glue, the right tools and materials can make all the difference. One essential material you’ll need is cotton swabs. These small, disposable sticks with cotton on either end are perfect for getting into tight spaces and cleaning delicate surfaces. But not all cotton swabs are made the same, so it’s important to choose the right ones for the job.
Here are some tips on choosing and using cotton swabs for removing LCD glue:
| Tip | Explanation |
|---|---|
| Choose high-quality cotton swabs | Low-quality cotton swabs may leave behind fibers or shed cotton, which can cause damage to delicate surfaces. Look for cotton swabs with tightly-wound, high-quality cotton that won’t come loose. |
| Use isopropyl alcohol | Moistening your cotton swabs with isopropyl alcohol can help you clean the surface more effectively. The alcohol will break down the glue and make it easier to wipe away. |
| Don’t use too much pressure | Applying too much pressure with your cotton swabs can damage the surface you’re cleaning, so always use a light touch. If the glue isn’t coming off easily, apply more heat or isopropyl alcohol instead of pressing harder. |
| Use the cotton swabs to target specific areas | Cotton swabs are perfect for cleaning small, hard-to-reach areas that other tools can’t reach. So use the cotton swabs on specific areas that still have glue after heating and scraping. |
| Dispose of used cotton swabs properly | After using cotton swabs to clean, be sure to dispose of them properly. Don’t just throw them in the trash, as they can still be flammable due to residual alcohol and cause accidents. Place them in a fire-proof container and wait until they’ve dried completely before disposing. |
Using cotton swabs is a crucial part of the LCD glue removal process. With these tips, you can be sure you’re using the right cotton swabs and using them effectively to remove the glue from your device without damaging it.
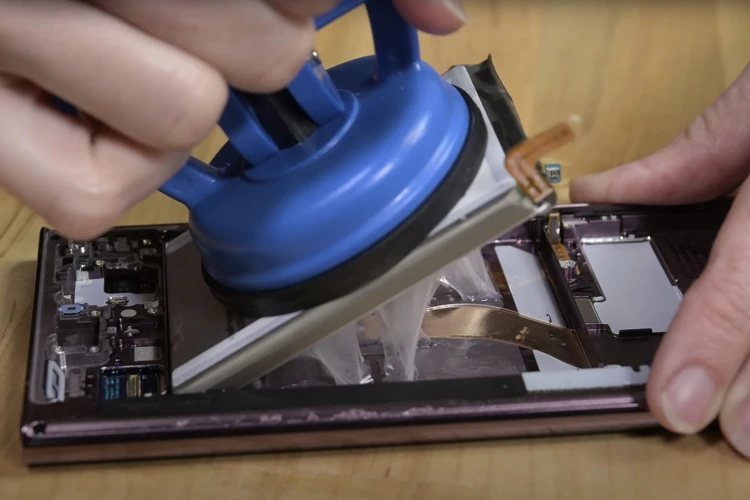
Heat Gun
One of the essential tools you’ll need when removing LCD glue is a heat gun. A heat gun is a handheld tool that blows hot air, which you can use to soften and loosen the glue. There are several types of heat guns available in the market, but for this task, you’ll need a low temperature, low airflow heat gun.
Why use a heat gun?
Using a heat gun is a crucial step in removing LCD glue because it helps soften the adhesive, making it easier to scrape off. Unlike other methods like using solvents or adhesives, using a heat gun is a safer and more effective way to remove glue without damaging the device.
How to use a heat gun?
To use a heat gun, first, switch it on and set it to a low temperature and a low airflow setting before pointing it at the glue. It would be best if you kept the heat gun at a reasonable distance from the surface, at least 6-8 inches away, and move it back and forth in a sweeping motion across the glue. Make sure you don’t concentrate the heat on one spot for too long, as it may damage the device.
Repeat this process several times until the glue has softened enough, then use a plastic scraper to loosen it further. You may need to reheat the area a few times to make sure all the glue has softened.
Precautions when using a heat gun
Remember to wear protective gear, such as gloves and protective eyewear, when using a heat gun. Make sure you work in a well-ventilated area, as the heat gun will produce fumes that you shouldn’t inhale.
| Pros | Cons |
|---|---|
| Effectively softens and loosens glue | Can be dangerous if used incorrectly |
| Does not damage the device | Requires cautiousness to avoid burns and injury |
| Efficient and quick | May not be effective for hard-to-remove glue |
A heat gun is an essential tool when removing LCD glue. It’s effective, efficient, and safe if used correctly, making it a popular choice for DIY enthusiasts. Remember to follow the proper precautions and use it in conjunction with other tools to get the best results when removing LCD glue.
Gloves and Protective Eyewear
When working with LCD glue, it’s important to remember safety first. As such, gloves and protective eyewear are essential for protecting your hands and eyes from any hazards. Here are some tips for choosing and using them properly:
- Choose the Right Gloves: When selecting gloves, consider the type of glue you’ll be removing. For example, if you’ll be working with strong adhesive, rubber gloves would be the best option. For less severe glue, latex or nitrile gloves should suffice. Look for gloves that are comfortable and fit your hands properly, so you don’t have to worry about them slipping off or getting torn.
- Wear Protective Eyewear: Glue removal can be a messy and potentially dangerous job, especially if you’re using a heat gun to loosen the glue. As such, wearing protective eyewear is crucial for avoiding any eye injuries or burns from stray glue fragments. Look for safety glasses that fit securely on your face and feature side shields for extra protection.
- Put Them On Correctly: Once you have your gloves and protective eyewear at hand, make sure to wear them correctly. Pull the gloves over your hands, ensuring that they fit snugly around your wrists to avoid any accidental exposure. For the eyewear, adjust the fit so it’s snug against your face and won’t slide off during the glue removal process.
- Remove with Care: Once you’ve completed the LCD glue removal process, make sure to remove your gloves and eyewear carefully. Discard the gloves promptly in the trash and thoroughly wash your hands with soap and water to remove any remaining glue or residue. Store your protective eyewear in a safe and dry place for future use.
Remember, safety should never be taken lightly, especially when it comes to working with chemicals like LCD glue. Investing in proper gloves and protective eyewear can go a long way in avoiding unnecessary accidents or injuries.
Step-by-Step Guide to Removing LCD Glue

Now that you understand the importance of removing LCD glue, it’s time to dive into the step-by-step process to ensure safe and successful removal. With the right tools and techniques, you can effectively and efficiently remove the glue without damaging the device. Follow these simple yet effective steps to remove LCD glue like a pro. Remember, it’s important to take your time and be gentle throughout the process to avoid any mishaps. So, let’s get started with the step-by-step guide to removing LCD glue.
Step 1: Apply Heat to the Glue
Step 1: Apply Heat to the Glue
The first step in removing LCD glue is applying heat to the adhesive. This helps to loosen it up and make it easier to remove. To do this, you will need a heat gun. Here is a table outlining the process:
| Tools/Materials Needed: | Heat gun |
| Instructions: |
|
Note: If you do not have a heat gun, you can also use a hairdryer on medium heat setting, but it may take a longer time to loosen the glue.
Using heat to remove the LCD glue is an effective technique. However, it is important to be careful not to overheat the device and to protect it from any potential damage. In the next step, we will use a plastic scraper to loosen the glue further.
Step 2: Use Plastic Scraper to Loosen the Glue
Using a plastic scraper is an effective way to loosen the LCD glue. It is important to use a plastic scraper to avoid causing any damage to the surface of the device. A metal scraper should never be used because it can scratch or damage the surface of the device.
Step 2: Gently insert the plastic scraper between the LCD screen and the frame of the device. Slowly move the scraper along the edge of the screen, applying slight pressure to loosen the glue. Be careful not to apply too much pressure as this can cause damage to the device.
| Do’s | Dont’s |
|---|---|
| Use a plastic scraper | Use a metal scraper |
| Be gentle and apply slight pressure | Apply too much pressure |
| Move the scraper along the edge of the screen | Insert the scraper too deeply or force it |
Moving the scraper along the edge of the screen will allow the glue to gradually loosen as you work your way around the device. Once you have loosened the glue around the edges of the screen, you can begin to lift the screen away from the device. Be sure to continue using the plastic scraper to keep the glue loose and prevent any damage to the device.
Step 3: Apply Isopropyl Alcohol to Weaken the Glue
Once the glue has been loosened, step 3 involves applying isopropyl alcohol to weaken the adhesive properties of the glue. Isopropyl alcohol is commonly used in the electronics industry for cleaning and removing adhesives. It is an effective solvent for LCD glue because it dissolves the glue’s bond without damaging the screen.
To apply the isopropyl alcohol, saturate a cotton swab with the solution and carefully rub it onto the area with the glue. It’s important to not use too much alcohol, as it can damage the LCD screen or other components of the device. Instead, use enough to make the glue pliable and easier to remove.
After applying the alcohol, let it sit for a few minutes to fully dissolve the glue. You may need to reapply the alcohol and repeat the process several times for stubborn glue.
Pro tip: If there is a lot of glue on the screen, you can also use a plastic scraper to gently scrape off the excess glue before using the alcohol. Just be gentle and use slow motions to avoid damaging the screen.
Once the glue is weakened, move on to step 4 and clean the surface with cotton swabs and isopropyl alcohol to ensure that all remnants of the glue are removed.
Step 4: Clean the Surface with Cotton Swabs
After completing the previous step, it’s time to clean the surface of the device with cotton swabs. Don’t use any other material except cotton swabs, as they are gentle and won’t scratch the device. Here are the detailed steps of cleaning with cotton swabs:
- Take a clean cotton swab and dip it into a small amount of isopropyl alcohol. Make sure the cotton swab is damp, but not soaking wet.
- Gently rub the cotton swab on the surface of the device where the glue was removed. This will help to remove any remaining glue residue or dirt. Be gentle with the device and don’t apply too much pressure, as this can cause damage to the device.
- Use a dry cotton swab to remove any excess isopropyl alcohol. This will prevent any potential damage caused by the alcohol. Make sure the surface is completely dry before continuing.
- Repeat steps 1 to 3 until the surface is completely clean. It’s important to take your time and be thorough with the cleaning process, as any leftover glue residue can cause issues with the replacement of the LCD screen.
- Inspect the surface of the device after cleaning. If there are any leftover residue or dirt, repeat the process until the surface is completely clean and free of any debris.
Remember to be patient and gentle when cleaning the surface of the device. Rushing through this step or being too rough can lead to permanent damage to the device, so take your time to ensure that the surface is completely clean and ready for the placement of a new LCD screen.
Tips and Techniques
As you prepare to remove the LCD glue, it is important to keep in mind certain tips and techniques that can make the process smoother and easier. By following these suggestions, you can ensure that you remove the glue with minimal damage to your device and without encountering unnecessary hurdles. Let’s take a closer look at some of the tips and techniques you should keep in mind while removing LCD glue.
Be Gentle with the Device While Removing Glue
When it comes to removing LCD glue from electronic devices, it’s essential to be extremely careful and delicate. Mishandling the device during the removal process can cause severe damage that sometimes renders the device unusable. Therefore, users must exercise caution and gentleness while removing the LCD glue from the surface.
Here are some tips to keep in mind when removing LCD glue:
| Tip 1: | Avoid using excessive force while scraping the glue. If the glue doesn’t come off easily, you might have to apply more heat or alcohol. However, avoid using too much force as it can scratch the surface of the device or damage the LCD screen. |
| Tip 2: | Avoid prying or pushing the screen too hard as it can cause it to crack or damage the internal components. |
| Tip 3: | Use a soft, lint-free cloth or cotton swabs to clean the device after removing the glue. The cloth should be gentle enough to avoid scratching the surface. |
| Tip 4: | Make sure to keep your hands and fingers away from any moving parts or internal components of the device while removing the LCD glue. |
| Tip 5: | If you’re unsure about the removal process or don’t have the necessary tools or skills required, it’s advisable to seek professional help. Trying to remove the glue yourself without adequate knowledge or expertise can cause more harm than good. |
By keeping these tips in mind, you can remove LCD glue from your device safely and effectively without causing any damage. Remember, a gentle touch is key when dealing with delicate electronic devices.
Work in a Clean and Well-Lit Area
When working on removing LCD glue, it’s important to do it in a clean and well-lit area to ensure accuracy and prevent further damage to the device. Here are some tips to keep in mind:
| Tip: | Description: |
| Clear the Workspace | Remove all clutter and debris from the workspace to avoid accidentally dropping or misplacing any tools or materials. |
| Well-Lit Area | Work in a well-lit area to improve your visibility and accuracy. Poor lighting can cause additional damage to the device or result in the failure to remove the glue properly. |
| Clean the Device Surface | Make sure the device surface is clean and free from any dirt or debris before you begin. This will give you a clear view of the area that needs to be worked on and help prevent any further damage. |
| Use Protective Gear | Wear gloves and protective eyewear to keep your hands and eyes safe from any chemicals or debris that may be released during the removal process. |
| Keep Children and Pets Away | Make sure to keep children and pets away from your workspace to prevent any accidents or injuries. |
Following these tips and techniques will ensure that the removal process is carried out smoothly and accurately, resulting in a clean and clear surface for the replacement of the LCD screen.
Wear Protective Gear to Avoid Injuries and Chemical Exposure
During the process of removing LCD glue, it is important to prioritize safety to avoid any possible injuries and chemical exposure. Most of the materials used during the process are hazardous if inhaled, ingested, or come in contact with skin. It is essential to wear protective gear to avoid any potential health hazards.
Here are the necessary protective gear to wear while removing LCD glue:
| Protective Gear | Reason for Use |
|---|---|
| Gloves | It is crucial to wear gloves as the glue contains harmful chemicals that can irritate or burn the skin. Using protective gloves will help prevent chemical contact with the skin, reducing the possibility of skin irritation or other harmful skin reactions. |
| Protective Eyewear | The removal process can be precarious. It involves using a heat gun, which can produce fog that irritates the eyes. Protective eyewear will provide a barrier between the eyes and any harmful chemicals or debris that might fly off during the removal process. |
| Mask | The use of heat gun and isopropyl alcohol during the removal process generates fumes containing harmful chemicals that can have adverse effects on health if inhaled. A mask will help prevent any inhalation of toxic fumes. |
| Apron/Clothing | Using aprons and clothing made of non-permeable materials will help to prevent skin contact with any harmful chemicals used during the LCD glue removal process. |
By following the above techniques and guidelines about wearing protective gear, you can avoid any possible injuries, skin irritation or other health hazards during the process of LCD glue removal. Remember, safety should always be a top priority in any DIY project.
Seek Professional Help if You’re Unsure about DIY Removal
Removing LCD glue can be a tricky and delicate process that requires some specific tools and techniques. If you’re not comfortable or familiar with DIY removal, it is recommended to seek professional help. Here are some reasons why you may want to consider professional assistance:
- Lack of Experience: If you have never removed LCD glue before, it may be difficult to know how to proceed. A professional who has experience working with LCD screens and adhesive removal can save you time and frustration.
- Potential Damage: If you remove the glue incorrectly, you risk damaging your device’s LCD screen or other components. A professional has the knowledge and expertise to minimize and avoid potential damage.
- Incorrect Tools or Chemicals: Using incorrect tools or chemicals can damage your device. A professional has access to the correct tools and chemicals for removing LCD glue without damaging your device.
- Time Constraints: If you have a busy schedule or limited time, you may not be able to devote enough time to removing the glue properly. A professional can complete the job in a timely manner and with greater efficiency.
While DIY removal can save you money, it may not always be the best option. If you’re unsure about how to proceed with LCD glue removal, reach out to a professional for assistance. They can provide you with peace of mind and ensure that your device is properly taken care of.
Conclusion
In conclusion, removing LCD glue is a delicate process that requires the right tools and techniques. It’s important to approach the task carefully to prevent damage to the device. By following the steps outlined in this guide, you can successfully remove the glue and prepare the screen for replacement.
Remember to use a heat gun to soften the glue, a plastic scraper to slowly loosen it from the surface, and isopropyl alcohol to weaken it. Additionally, always work in a clean and well-lit area and wear protective gear to avoid chemical exposure and injuries.
If you’re not confident in your ability to remove the glue yourself, consider seeking professional help. A skilled technician can remove the glue efficiently and safely.
Overall, removing LCD glue is a crucial part of screen replacement. It allows for a smooth process and ensures the device is not damaged. With the right tools, materials, and techniques, anyone can successfully remove LCD glue.
Frequently Asked Questions
What is LCD glue?
LCD glue is a type of adhesive used to bond the LCD screen to the device’s frame and other components.
Why do I need to remove LCD glue?
Removing LCD glue is necessary when replacing a damaged or cracked LCD screen. It also helps prevent damage to the device and allows for a smooth replacement process.
What tools do I need to remove LCD glue?
You will need a plastic scraper, isopropyl alcohol, cotton swabs, heat gun, gloves, and protective eyewear.
Can I use a metal scraper instead of a plastic one?
Avoid using metal scrapers as they can damage the device’s surface. Always use a soft plastic scraper to loosen the glue.
How much heat should I apply to the glue?
Use a heat gun at a low setting and keep it at a distance of at least 6 inches from the surface for optimal results.
Can I use an alternative to isopropyl alcohol?
Avoid using water or other solvents as they can damage the LCD screen. Only use isopropyl alcohol as it is safe for electronic components.
Can I skip cleaning the surface with cotton swabs?
No, it’s essential to clean the surface with cotton swabs after removing LCD glue to ensure smooth adhesion of the new screen.
Do I need to be careful while removing the glue?
Yes, be gentle throughout the process to avoid damage to the device. Ensure that the plastic scraper and other tools are not too forceful.
Can I remove LCD glue myself?
If you have experience working with electronic devices, you can remove LCD glue yourself. Otherwise, seeking professional help is advisable.
What should I do if I accidentally damage the device while removing glue?
If you accidentally damage the device, seek professional help. They can assess the damage and offer a repair or replacement solution.