Introduction
Crafting is a great way to unleash your artistic side and add a personal touch to everyday items. One fun and creative way to do this is by gluing glass beads to a wine bottle. Not only is this a great DIY project, but it also makes for a beautiful decor piece in your home or a thoughtful gift for a loved one. In this article, we’ll walk you through the steps of how to glue glass beads to a wine bottle, from start to finish. So grab your supplies and let’s get started!
Why Glue Glass Beads to a Wine Bottle
Gluing glass beads to a wine bottle is a fun and easy way to create a unique piece of decor that can be used to spruce up any space. Whether it is a DIY project or a gift for someone special, it is a great way to show off your creativity. Glass beads come in different shapes, sizes, and colors, so it is easy to pick out the perfect ones that will suit your preferences and style. Additionally, gluing beads to a wine bottle is an affordable way to add a touch of elegance to your home decor. You can use various types of glue for this project, but it is important to choose a glue that is strong and dries clear to achieve the best results. This article will guide you through the steps to glue glass beads to a wine bottle and provide some tips for success along the way.
Here are some reasons why you might want to glue glass beads to a wine bottle:
- You can create a beautiful centerpiece for your dining table.
- You can make a unique gift for someone special.
- You can recycle old wine bottles and turn them into works of art.
- You can show off your artistic skills and creativity.
- You can add a touch of elegance to your home decor.
No matter what your reason is for gluing glass beads to a wine bottle, it is a great way to have some fun and make something beautiful. In the next sections of this article, we will discuss the supplies you’ll need, how to prepare the wine bottle, how to glue the beads to the bottle, and how to add some finishing touches to complete the project.
Supplies You’ll Need
To glue glass beads onto a wine bottle, you’ll need a few supplies to get started. Firstly, you’ll need a clean, empty wine bottle , which can be either clear, green, or any other color you prefer. You can use an old bottle you have lying around your home, or purchase one from a crafts store. Make sure to remove any labels or stickers from the bottle beforehand.
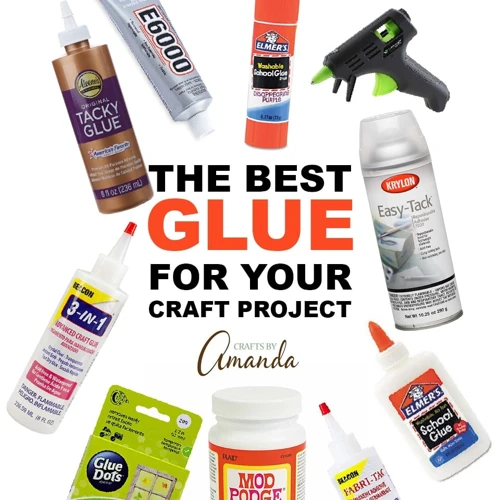
Next, you’ll need to choose the right glue for the project. There are several types of glue that work well for glass beads, including E6000, Aleene’s Original Tacky Glue, and Gem-Tac. E6000 is a popular choice as it dries clear and remains strong over time. Be sure to follow the manufacturer’s instructions and safety precautions for whichever glue you choose.
You’ll also need a set of glass beads to use as your decoration. These can be found at most craft stores and come in a variety of sizes, shapes, and colors. You can choose to use all one color or mix and match for a unique look.
In addition to the beads, you’ll need a pair of tweezers to help place them on the bottle. This will make it much easier to handle the small beads and place them in the desired location.
Lastly, you may decide to add a ribbon or bow to your finished product for an extra decorative touch. This is optional but can add a nice finishing touch to your bottle.
Before beginning, make sure you have all of these supplies readily available to ensure the process goes smoothly. If you need any additional guidance on choosing the right glue for glass bottles, check out our article, “What Glue to Use on Glass Bottles.”
Preparing the Wine Bottle
Once you’ve gathered all the necessary supplies, it’s time to prepare the wine bottle for decorating. This step is crucial for ensuring that the glass beads adhere properly and your finished product looks professional. You want to make sure that the bottle is clean and free of any residue that could prevent the beads from sticking. Additionally, selecting the right type of beads is essential to achieving your desired look. Let’s go over the steps needed to prepare your wine bottle and create a beautiful decoration you’ll be proud to display. But first, let’s take a quick look at the type of glue you should use. If you’re not sure which type of glue to use, be sure to read our article on “What Kind of Glue Should You Use?“.
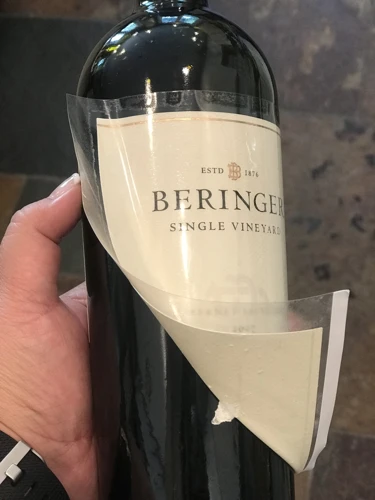
Cleaning the Bottle
Properly cleaning the wine bottle is an essential step in ensuring that the beads adhere to the surface without any dirt or residue interfering. Firstly, remove any labels or stickers from the wine bottle. To remove the labels, soak the bottle in warm water mixed with dish soap for around 15 – 30 minutes. Once the label has loosened, use a scrubber to scrape it off. Any remaining adhesive can be removed by rubbing it with acetone or nail polish remover.
WARNING: Always use acetone or nail polish remover in a well-ventilated area.
After removing the label and adhesive residue, rinse the bottle with warm water and dish soap. Then, rinse again with clean water to remove any soap residue. Finally, dry the bottle thoroughly using a clean towel or air-drying. It’s important to ensure that the bottle is completely dry before moving on to the next step to ensure proper adhesion of the beads.
Choosing the Right Beads
When it comes to choosing the right beads for your wine bottle, there are a few things you should keep in mind. First and foremost, you want to select beads that complement the bottle’s color and style. For example, if the bottle has a green tint, you may want to opt for clear glass beads or green beads that match the bottle. If the bottle is a darker hue, like a burgundy, deep blue, or black, you may want to choose beads with a metallic finish, like gold or silver, to add a touch of glamour.
Another thing to consider is the size of the beads. If you’re gluing the beads onto the entire surface of the bottle, larger beads may be a better choice. Alternatively, if you’re creating a pattern or specific design, smaller beads may work best.
The material of the beads is also essential. Make sure to use glass beads instead of plastic ones, as plastic beads melt when exposed to heat or sunlight. Glass beads are also more durable and reflective, making them ideal for wine bottle decorations.
Here’s a quick summary of what to keep in mind when selecting your glass beads:
| Considerations | Recommendations |
|---|---|
| Bottle color | Complimentary or matching beads |
| Bead size | Larger beads for covering entire surface, smaller for patterns |
| Bead material | Glass beads instead of plastic |
Remember, the beads you choose will ultimately determine the finished look of your wine bottle decoration. Take your time and carefully select the beads that best suit your needs and preferences.
If you’re interested in more creative projects that involve glue, check out our article on how to make a paper car without glue.
Gluing the Glass Beads to the Wine Bottle
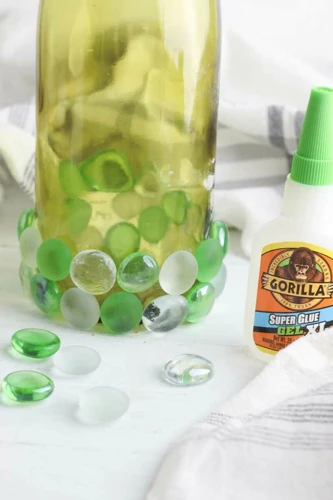
Once you have cleaned and prepared your wine bottle and chosen the perfect glass beads, it’s time to begin the process of attaching the beads to the bottle. This step requires patience and precision, as you want to make sure your design is symmetrical and tasteful. With the right materials and methods, you can ensure that your glass beads will securely adhere to the surface of your wine bottle. In the following sections, we’ll go through the process step-by-step, including applying the glue, placing the beads, and adding finishing touches to give your project a professional look. But before we begin, be mindful that the glue used in this project can be messy and difficult to remove from skin or surfaces. To avoid this issue, make sure you have a clean workspace and wear disposable gloves. If you’re ready to get started, let’s move onto how to apply the glue.
As a side note, if you’re interested in other unique uses for glue, check out our article on how to reseal an envelope without glue.
Applying the Glue
It’s important to choose the right glue for gluing glass beads to a wine bottle because not all glues will work. One option is E6000, which is a strong adhesive that dries clear. Before applying the glue, make sure the bottle is completely dry and free of any fingerprints or residue.
To apply the glue, you can use a small brush or toothpick to apply a thin layer onto the bottle. It’s better to use small amounts of glue and work in sections, rather than applying it all at once. This will help keep the glue from drying out before you have a chance to add the beads.
Pro tip: If you accidentally apply too much glue, you can use a cotton swab or tissue to remove the excess.
To avoid the hassle of miscalculating the amount of glue you need, calculate the surface area you need to glue and, then, have a look at a specialized table for roughly estimated amount of glue needed, like the one presented below:
| Surface area to glue (cm²) | Amount of glue needed (ml) |
|---|---|
| 10 | 0.5 |
| 50 | 2 |
| 100 | 4 |
Once you’ve applied the glue to the area where you want to place the beads, it’s time to carefully place them on the glue. Remember to work in small sections and hold the bottle so that the area you are working on is facing up. This will help keep the beads from sliding off while the glue dries.
Note: Before applying glue, verify that it works with the beads you’ve chosen. Other type of glue may be required if regular E6000 doesn’t work.
After you have placed all the beads, let the glue dry for 24 hours before moving the bottle or adding any finishing touches. Be patient and let the glue cure completely before handling it.
To make sure your work area stays clean and free of excess glue, consider placing a sheet of wax paper or a disposable tablecloth underneath the bottle while you work.
Internal link: If you want to learn more about resealing an envelope without glue, check out our article on how to reseal an envelope without glue.
Placing the Beads
After applying glue to a small area of the wine bottle, it’s time to start placing the glass beads. Start by holding a bead with a pair of tweezers or using your fingers if you prefer. It’s important to handle the beads with care to avoid any scratches or chips on their surface. You can also try using an adhesive tape to facilitate the process and keep the beads in place. Make sure you have a steady hand, and start placing the beads on the glue one by one.
One helpful tip is to begin gluing the beads at the bottom of the bottle and then work your way up in rows or patterns. By doing this, you can avoid any accidental bumps or misalignments when placing the beads. Remember to leave a small gap between each bead to allow room for the glue to dry and prevent any beads from falling off.
As you place the beads, check frequently to make sure they’re aligned and straight. You can use a ruler or any straight object to help guide the placement of the beads. Continue gluing one section at a time until you’ve covered the entire wine bottle.
For a more creative look, you can experiment with different patterns or shapes using the glass beads. This is a great opportunity to express your artistic side and add a unique touch to your wine bottle decoration.
Once you’ve completed placing all the beads, let the glue dry completely before moving the wine bottle. The curing time will depend on the type of glue you used, so make sure to follow the instructions on the glue packaging. It’s important to allow enough time for the glue to dry to avoid any accidental movement of the beads.
Now that you’ve placed all the glass beads on the wine bottle and the glue has dried, you’re almost done with your beautiful creation. The last step is to add a ribbon or a bow that complements the design. This will give your wine bottle a polished finish and make it ready to be displayed anywhere in your home.
I hope these tips help you successfully glue glass beads to your wine bottle and create a beautiful decoration. For more helpful tips and tricks, visit our website and check out our other articles on DIY projects and crafts.
Internal Link: How to glue a headliner roof to fix sagging fabric
Finishing Touches
When it comes to creating a unique and personalized wine bottle decoration, gluing glass beads is a fun and creative way to do it. However, simply gluing the beads onto the bottle may leave it looking a little incomplete. That’s where the finishing touches come in. In this section, we’ll explore some ideas to take your wine bottle from okay to outstanding. Whether it’s a ribbon, bow, or other decorative elements, these finishing touches add an extra level of customization and flair to your project that will make it stand out. And also, keep in mind that gluing glass beads to a wine bottle can make a great gift idea or centerpiece for your home.
Adding a Ribbon or Bow
Adding a ribbon or bow is a simple but elegant way to finish off your wine bottle decoration. Not only will it add a nice finishing touch, but it can also make your decoration more festive. You can use any type of ribbon or bow that you like, but a colorful or glittery one will make your bottle stand out even more.
To get started, you’ll need to measure out the length of ribbon that you’ll need to wrap around the neck of the bottle. It’s a good idea to add a few extra inches to the length so that you can tie a bow or knot at the end. Once you have the right length of ribbon, you can wrap it around the neck of the bottle and tie it in a knot or bow.
If you want to get even more creative, you can try adding some embellishments to your ribbon or bow. For example, you could glue some small beads or rhinestones onto the ribbon to give it a bit of sparkle. Alternatively, you could add a small charm or pendant to the bow to make it even more eye-catching.
Remember to take your time when adding the ribbon or bow, as you want it to look neat and tidy. It’s also important to make sure that the decorations are securely attached to the bottle, so that they don’t fall off when you move it around.
Once you’ve added the ribbon or bow, you’ll need to give the glue some time to dry and set properly. This will usually take several hours, but you can speed up the process by using a hot glue gun or a fast-drying adhesive.
Adding a ribbon or bow is a great way to add some extra flair to your wine bottle decoration. It’s a simple and inexpensive way to make your creation look more festive and attractive. So why not give it a try? Your guests will be impressed with your creativity and attention to detail.
Pro tip: If you’re feeling especially crafty, you could even try making your own ribbon or bow from scratch! There are plenty of tutorials online that will show you how to do this, using materials like fabric, paper, or even recycled materials.
Curing Time
Once you have glued all the glass beads onto the wine bottle, it’s important to let the glue cure properly to ensure that the beads won’t fall off easily. The curing time for the glue will vary depending on the type of glue you’re using. Some types of glue may require as little as an hour to cure, while others may require several hours or even overnight.
To determine the curing time of your glue, refer to the manufacturer’s instructions. It’s essential to follow the instructions closely to ensure that the glue will dry and cure as intended. This is especially important if you’re using a strong adhesive, such as epoxy or super glue, which can be difficult to remove if not applied correctly.
To make sure that the glue cures evenly, it’s important to place the wine bottle in a location where it can dry undisturbed. A flat surface, such as a table or countertop, is ideal for this purpose. It’s also important to avoid touching the beads or the bottle while the glue is curing, as this can cause the beads to shift or fall off.
Once the glue has cured completely, you can add the finishing touches to your wine bottle. This includes adding a ribbon or bow to the neck of the bottle, which can help to enhance its decorative appeal. Make sure to choose a ribbon that complements the color of the glass beads, or opt for a contrasting color to create a more striking effect.
The curing time of the glue is an important consideration when gluing glass beads to a wine bottle. By following the manufacturer’s instructions and allowing sufficient time for the glue to cure, you can ensure that the beads will remain securely attached to the bottle. Additionally, adding a decorative bow or ribbon to the bottle can help to enhance its appearance and make it a beautiful addition to any home or event.
Conclusion
As we reach the end of this guide, we hope that you have found all of the information provided helpful in your quest to learn how to glue glass beads to a wine bottle. It’s always rewarding to see a project come together, and with this one, the possibilities are endless. From using different colored beads to choosing unique wine bottles, the final product will be a beautiful addition to your home decor. Remember to follow the tips and tricks we’ve provided to ensure success with your project. And, if you’re looking for more information on different types of glue and their uses, be sure to check out who sells PVA glue.
Tips for Success
When gluing glass beads to a wine bottle, there are several tips that can help ensure success. Check out our table below for some helpful hints to keep in mind during the gluing process:
| Tip | Description |
| Use the right type of glue | Choose a glue that is specifically designed for glass and dries clear for the best results. We recommend E6000 or Aleene’s Clear Gel Tacky Glue. |
| Clean the bottle thoroughly | Make sure the bottle is completely clean and dry before gluing the beads on. Any dirt, dust, or fingerprints can interfere with the glue’s ability to adhere properly. |
| Experiment with bead placement | Try out different bead placement combinations on a separate surface before gluing them onto the bottle. Play around with different patterns and designs to ensure that you achieve the desired look. |
| Apply the glue in small sections | Work in small sections and apply the glue only where you plan to place the beads. This will prevent the glue from drying out before you are ready to place the beads. |
| Press the beads firmly | After placing each bead, press it firmly into the glue to ensure it adheres properly. This will help prevent the beads from falling off later. |
| Allow ample curing time | Be sure to allow the glue to dry completely before handling the bottle. Follow the instructions on the glue packaging for recommended drying times. |
By following these tips, you can ensure that your wine bottle with glass beads will turn out beautifully and last for years to come. If you’re interested in learning more about different types of glue and their uses, check out our article on what glue to use on blinds.
Frequently Asked Questions
What type of glue is best for gluing glass beads to a wine bottle?
A clear-drying adhesive such as E6000 or Aleene’s Tacky Glue works best for attaching glass beads to a wine bottle.
Can I glue beads onto a wine bottle that still has wine in it?
No, the wine bottle must be completely empty and dry before gluing on the beads.
How can I get rid of any labels or residue on the wine bottle before I start the project?
Soak the bottle in warm soapy water for a few hours. Any remaining residue can be removed with rubbing alcohol.
What type of glass beads work best for this project?
Small, rounded glass beads with a flat back work best. Seed beads or pony beads can also work well.
How do I ensure that the glass beads are placed evenly around the bottle?
Measure the circumference of the bottle and divide it by the number of beads you plan to use. This will give you the spacing needed for the beads to be evenly placed.
Can I use a hot glue gun instead of a clear-drying adhesive?
A hot glue gun can be used, but it may not provide as secure of a hold and the glue may show through the beads.
What is the best way to place the beads on the bottle?
Start at the bottom of the bottle and work your way up, placing the beads in a straight line to ensure they are level.
How long does it take for the glue to dry?
Drying time can vary depending on the brand of glue used, but it typically takes 24 to 48 hours for the glue to fully dry and adhere to the glass bottle.
Can I add other decorations to the bottle along with the glass beads?
Yes, you can add other decorations such as ribbons, bows, or additional embellishments to make it more personalized.
Is this a beginner-friendly project?
Yes, this is a beginner-friendly project that requires minimal supplies and can be a fun and easy way to upcycle an old wine bottle.