Embarking on a DIY cotton ball project can transform everyday materials into whimsical creations. Whether for holiday decorations, educational activities, or just for fun, gluing cotton balls to fabric opens up a world of imaginative possibilities. This comprehensive guide provides all the steps and tips necessary to ensure your cotton ball art projects are not only creative but also durable and visually appealing.
Essential Supplies for Your DIY Cotton Ball Project
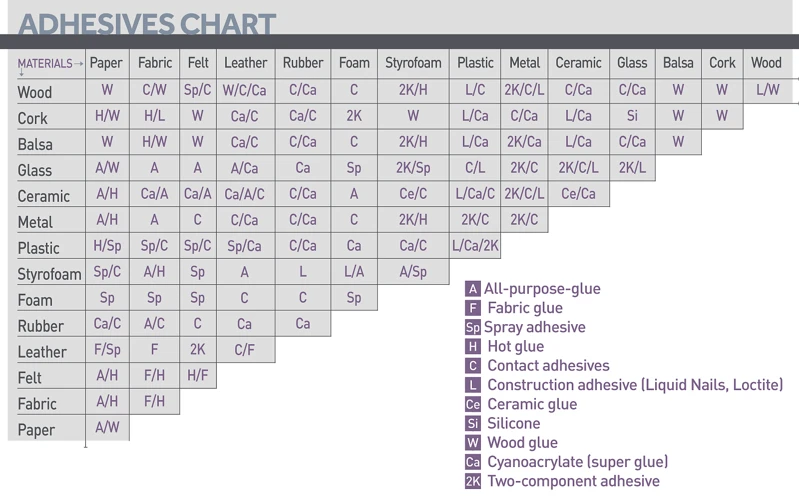
Choosing the Best Glue for Cotton Balls
Success in your project relies heavily on selecting the best glue for cotton balls. Factors like fabric type and the intended use of the finished product will guide your choice. A flexible fabric glue that dries clear is typically preferred to maintain the fluffy appearance of the cotton and the integrity of the fabric.
Additional Tools and Materials
Aside from the adhesive, you’ll need a few more items on hand. Gather scissors for trimming excess fabric, a workspace cover to protect surfaces, and any decorations to enhance your project. A pair of tweezers might also prove helpful for placing small cotton balls with precision.
Preparing Your Fabric and Cotton Balls
Cleaning and Prepping the Fabric
For the strongest bond, your fabric should be clean and free of oils or residues. A light wash or a wipe with a damp cloth can ensure the surface is ready for the cotton balls to adhere properly.
Fluffing and Separating Cotton Balls
Before you begin, fluff each cotton ball by gently pulling the fibers apart. This step increases the surface area for the glue to adhere to and results in a fuller, more textured look in your final design.
Fabric Adhesive Techniques
Applying Craft Glue for Fabric
Application of craft glue for fabric must be done with care to avoid saturation, which can lead to stiff and unsightly spots. Apply a thin layer to the fabric or dab a small amount directly onto the cotton ball for the best results.
Adhesive for Cotton to Fabric: Dos and Don’ts
- Do test your adhesive on a scrap piece of fabric first.
- Don’t use too much glue, as it may seep through and create a hard spot.
- Do allow proper drying time for the glue.
- Don’t iron or heat-set the glue unless it’s recommended by the manufacturer.
Step-by-Step Guide: How to Attach Cotton Balls
Planning Your Design Layout
Before diving in, sketch your design on paper or lightly on the fabric to serve as a guide. This planning phase is crucial for a cohesive and balanced final product.
Gluing Cotton Balls to Fabric
Begin by applying glue to the base of each cotton ball or directly onto the fabric where you plan to place it. Press the cotton ball firmly onto the fabric, holding it in place for a few moments to create a strong initial bond.
Ensuring a Strong Bond
Once the cotton ball is in place, avoid adjusting it, as this can weaken the bond. If you need to reposition a cotton ball, it’s better to remove it completely and reapply fresh glue.
Drying Time and Tips
Allow the glued cotton balls ample time to dry, ideally overnight. Resist the urge to touch or move the project during this time to prevent any misalignment or weakening of the glue’s hold.
Cotton Ball Craft Ideas and Art Projects
Creating Cotton Ball Decorations
Cotton balls are perfect for creating textured snow scenes, cloud motifs, or even fluffy animals. Their versatility is a boon for decorators and educators alike.
Incorporating Cotton Balls into Wearable Art
With careful application, you can also create unique wearable art, such as costume accessories or textile jewelry. Always ensure that the adhesive is safe for skin contact if the fabric will be worn.
Cotton Ball Decoration Tips
Adding Color and Texture
Coloring your cotton balls with fabric dye or paint can add an extra dimension to your work. Experiment with layering and clustering cotton balls to achieve different textural effects.
Final Touches for a Professional Look
To give your creation a finished look, trim any stray fibers and clean up excess glue with a damp cloth. Adorn your piece with additional embellishments like glitter or beads for that professional touch.
Alternative Attachment Methods
Sewing Cotton Balls: When to Use This Method
In some instances, sewing may be a viable alternative to gluing, offering a removable option that’s perfect for temporary decorations or garments that need to be laundered.
Non-Adhesive Options for Temporary Projects
For a short-term display or an easily changeable project, consider using hook-and-loop fasteners or double-sided tape to attach cotton balls without permanent commitment.
Troubleshooting Common Issues
Dealing with Adhesive Failures
If you find that cotton balls are not sticking properly, check if the glue has expired or if the fabric’s surface is too smooth or oily. A different adhesive or a fabric primer might resolve the issue.
Adjustments for Different Fabric Types
Heavier fabrics might require a stronger glue or additional drying time. Conversely, delicate fabrics require a gentle adhesive that won’t cause damage or bleeding through the material.
Maintenance and Care for Cotton Ball Creations
Cleaning and Storage
Keep your creations dust-free by storing them in a cool, dry place. For cleaning, a gentle hand dusting or a blast of compressed air can remove surface dust without disturbing the cotton balls.
Repairing Loose Cotton Balls
If a cotton ball comes loose, reattach it with a small dab of glue, taking care not to disturb the surrounding pieces. Allow plenty of time for the repair to dry before handling again.
Conclusion: Showcasing Your Finished Cotton Ball Art
After all the gluing, designing, and drying, your cotton ball masterpiece is ready to be displayed. Share your work with friends, family, or through social media, and bask in the joy of your handcrafted creation.
When it comes to crafting, gluing various materials together is a common task that can open up a world of creativity. If you’re working with fabric and looking to adhere different items, we have some helpful guides for you. For instance, if you’re curious about attaching cotton balls to fabric, the principles are similar to those in our detailed tutorials. Check out our step-by-step guides on how to glue fabric to rubber, how to glue fabric to cardboard, and for those interested in adding a bit of sparkle to their projects, our guide on how to glue beads to fabric will certainly be of help. These resources will provide you with the techniques and tips you need to successfully complete your crafting projects.
FAQs About Gluing Cotton Balls to Fabric
Have further questions about your project? This section aims to clear up any lingering queries you may have about the process, materials, or troubleshooting. Remember that with a little patience and creativity, your fabric adhesive techniques will lead to stunning results.