Getting braces can be an exciting and nerve-wracking experience. After all the planning and anticipation, it’s finally time to take that first step towards straighter teeth. However, one question that many people have before getting braces is how long does braces glue take to dry? The process of attaching braces to your teeth involves the use of adhesive glue, which can take time to set and dry completely. In this article, we’ll delve into the application process of braces glue, how long it takes to dry, factors affecting the drying time, and tips to speed up the process. We’ll also cover what to expect after the glue has dried and how to care for your braces. Let’s take a closer look!
The Process of Applying Braces Glue
When getting braces, the process of applying braces glue is crucial to ensure that the brackets remain in place throughout the treatment. This adhesive, also known as composite resin or orthodontic glue, is a tooth-colored material that bonds brackets to the teeth. In this section of the article, we will discuss the step-by-step process of how this glue is applied. It is essential to note that not all adhesives are created equal, and some may have varying drying times and application techniques. It is crucial to consult with your orthodontist about the type of adhesive they will be using for your braces. Let’s dive into the process of applying braces glue.
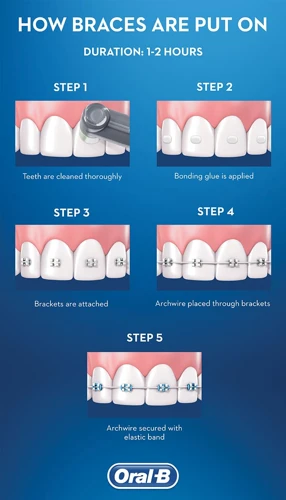
Step 1: Cleaning the Teeth
Cleaning teeth is a crucial step in the process of applying braces glue, as the adhesive needs a clean and dry surface to bond properly with the teeth. Before the procedure begins, the orthodontist will clean and dry the teeth thoroughly. This is done to ensure that there is no plaque or food debris on the teeth, which can affect the adhesive’s ability to bond correctly.
During the cleaning process, the orthodontist or dental assistant will use a mix of water and pumice to clean the teeth. Pumice is a natural product that is known for its abrasive properties, making it an ideal product for tooth polishing. The mix of water and pumice is used to remove any stubborn stains or plaque, leaving the teeth smooth and clean.
After the teeth have been cleaned, the next step is drying them thoroughly. This is usually done using compressed air or a dental handheld dryer. The teeth have to be completely dry before the braces glue can be applied, and the drying process can take up to a minute. It’s a critical step because the adhesive is moisture-sensitive, and the presence of any residual moisture can affect the bonding process.
Orthodontists are careful not to over-dry the teeth during this step, as the desiccation can cause teeth sensitivity and irritation. Thus, it’s best to trust the orthodontist doing this job. Now that the teeth are clean and dry, the orthodontist can proceed to the next step – applying the braces glue.
Cleaning teeth before the application of braces glue is a routine dental procedure. However, it’s interesting how different types of glue also require unique instructions. Some people might not know the difference between different types of glue, for example, LOCA glue, nail glue, school glue, and Henkel glue, just to mention a few. Each of these glues has a specific purpose and requires different techniques and precautions when using them. The drying time also varies depending on the type of glue being used. Knowing how long it takes for each type of glue to dry can be useful when using them for various projects.
Step 2: Applying the Adhesive
One of the most important steps in the process of getting braces is applying the adhesive. The adhesive, also known as bonding glue, is what holds the brackets to your teeth and ultimately keeps your braces in place while you undergo orthodontic treatment. It is crucial that the adhesive is applied correctly to ensure that your braces stay in place for the duration of your treatment. Here is a step-by-step guide on how the adhesive is applied:
- Cleaning the teeth: Before the adhesive can be applied, your teeth will need to be thoroughly cleaned and dried. Your orthodontist will use a dental tool to remove any debris or plaque from your teeth and will dry them thoroughly with a special air tool.
- Applying the adhesive: Your orthodontist will now apply the adhesive to your teeth using a specialized dental instrument. The adhesive is applied to the center of each tooth where the bracket will be placed. It is important to note that the adhesive used for orthodontic bonding is different from other types of glue, such as tacky glue, silicone glue, or super glue. Orthodontic adhesive has a unique chemical composition that allows it to bond to teeth and brackets in a safe and effective way.
- Placing the brackets: Once the adhesive has been applied, your orthodontist will carefully place each bracket onto your teeth. They will ensure that each bracket is properly aligned before the adhesive begins to dry.
Applying the adhesive correctly is vital for ensuring the success of your orthodontic treatment. Orthodontists undergo extensive training in the application of adhesive and are skilled in providing a precise and accurate application. The drying time for the adhesive can vary depending on the type of adhesive used and the environmental conditions in the office. It is essential that you follow your orthodontist’s instructions for aftercare and attend all follow-up appointments to ensure that your braces remain in place and your treatment progresses as planned.
Step 3: Placing the Brackets
Step 3: Placing the Brackets
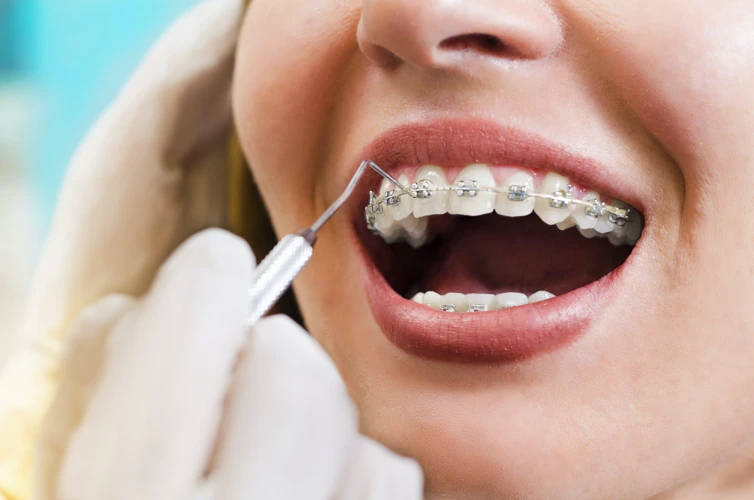
Once the teeth are cleaned and the adhesive is applied, it’s time to place the brackets. Brackets are small metal or ceramic pieces that are glued to each tooth using the adhesive.
Before placing the brackets, the orthodontist or dental assistant will select the appropriate size and shape to fit the patient’s teeth. This is important to ensure that the brackets fit snugly and provide the necessary support for the wires.
To place the brackets, a small amount of adhesive is placed on the back of each bracket. The orthodontist or dental assistant will then carefully position each bracket on the center of each tooth. They may also use a dental curing light to help the adhesive set and bond the bracket to the tooth.
Once all the brackets are in place, the orthodontist or dental assistant will gently place the archwires into the brackets and secure them with small elastic bands. These archwires apply pressure to the teeth, gradually moving them into the desired position over time.
It’s important to remember that the brackets must be properly aligned and secured to ensure successful treatment. If the brackets are not properly aligned or if they become loose, they can cause discomfort and delay the treatment process.
To avoid this, it’s important to follow the orthodontist’s instructions for proper care and maintenance of the braces. This includes avoiding hard or sticky foods that can damage the brackets, and practicing good oral hygiene to prevent tooth decay and gum disease.
To learn more about the drying time of different types of adhesives, check out our article on how long tacky glue takes to dry, how long silicone glue takes to dry, and how to know if glue is expired. It’s important to use fresh adhesives to ensure successful bonding of the brackets.
How Long Does it Take for Braces Glue to Dry?
The duration of braces glue drying time is a concern for many, notably those who are conscious of their time and dental health. The length of time braces glue takes to dry can impact how long a patient will need to wear braces and how well the braces will adhere to the teeth. It’s essential to understand everything involved in the braces application process and factors that can affect the drying time of adhesive. In the following sections, we’ll detail how long it takes for braces glue to dry, factors affecting drying time, what happens if the glue isn’t dry, and how to expedite the process.
Drying Time for Initial Bonding
When you first get braces, the orthodontist will apply the braces glue to your teeth to bond the brackets in place. This process is called initial bonding. The drying time for initial bonding can vary depending on several factors. Typically, it can take anywhere from 10 to 20 minutes for the braces glue to fully dry. During this time, it’s important to avoid touching your teeth or brackets, as the adhesive is still wet and could shift or come off.
The factors that can affect the drying time for initial bonding include:
- The type of adhesive used: Different types of adhesives have varying dry times.
- The amount of adhesive used: A larger amount of adhesive may take longer to dry
- The moisture in your mouth: If your mouth is particularly moist, it may take longer for the adhesive to dry.
- The temperature and humidity in the room: A warm, dry room will help the adhesive dry faster, while a cold, humid room may slow down the drying process.
It’s important to note that the initial bonding process is crucial for the success of your orthodontic treatment. If the braces glue isn’t given enough time to fully dry, the brackets may not adhere properly to your teeth. This could lead to discomfort, shifting of the brackets, or even the bracket falling off completely. It’s essential to follow your orthodontist’s instructions carefully and allow enough time for the adhesive to dry completely.
If you’re concerned about the drying time, you can ask your orthodontist how long they typically expect the braces glue to take to dry. They may also be able to provide you with tips on how to speed up the drying process or how to care for your newly-bonded braces.
Conclusion: The initial bonding process is when the braces glue is first applied to your teeth to bond the brackets in place. The drying time for initial bonding can vary, but typically takes around 10-20 minutes. It’s important to avoid touching your teeth or brackets while the adhesive is still wet. Factors that affect the drying time include the type and amount of adhesive used, the moisture in your mouth, and the temperature and humidity in the room. It’s crucial to follow your orthodontist’s instructions and allow enough time for the adhesive to dry completely.
Drying Time for Re-Bonding
When it comes to re-bonding braces, the drying time for the adhesive is longer than the initial bonding process. This is because the teeth and brackets need to be cleaned thoroughly and any remaining old adhesive must be removed before the new adhesive is applied.
The re-bonding process involves the same three steps as initial bonding: cleaning the teeth, applying the adhesive, and placing the brackets. However, the drying time is affected by the amount of surface area that needs to be bonded and the amount of adhesive used.
According to orthodontic experts, the average drying time for re-bonding braces is between 10-15 minutes. This means that patients need to be sitting in the dental chair with their mouths open for a longer period of time than the initial bonding process.
It is important for patients to keep their mouths dry and avoid swallowing or moving their tongues during this process. The orthodontist may use a dental dam to isolate the teeth and keep them dry during the drying process.
Factors that can affect the drying time for re-bonding braces include:
| Factor | Effect on Drying Time |
|---|---|
| The amount of adhesive used | More adhesive requires a longer drying time |
| The surface area being bonded | More surface area requires a longer drying time |
| The humidity in the air | Higher humidity prolongs the drying time |
| The temperature in the room | Lower temperatures prolong the drying time |
If the orthodontist finds that the adhesive is not drying properly, they may use a curing light to help speed up the process. However, this is usually not necessary for re-bonding braces.
It is essential that the adhesive is fully dry before the wires are attached to the brackets. If the adhesive is not fully dry, the brackets may slip or become misaligned, which can lead to discomfort and treatment delays.
To learn more about how to care for your braces and how long they will last, check out our articles on how long super glue will last and how much super glue will kill you.
Factors Affecting Drying Time
There are several factors that can affect the drying time of braces glue. These factors include:
- Humidity: High humidity levels can slow down the drying process, as moisture in the air can interfere with the bonding agents in the glue.
- Temperature: The ideal temperature for drying braces glue is between 60-80 degrees Fahrenheit. Higher or lower temperatures can affect the adhesive’s effectiveness and can cause it to take longer to dry.
- Type of Adhesive: Different types of adhesive have different drying times. Some adhesives have a longer curing time, while others dry quickly.
- Amount of Adhesive: The amount of adhesive used can also impact drying time. If too much adhesive is applied, it can take longer to dry. On the other hand, if too little adhesive is used, the bond may not be as strong as it should be.
- Quality of Adhesive: The quality of the adhesive can also have an impact on drying time. Higher quality adhesives are often designed to dry more quickly and provide a stronger bond.
- Technique of Application: The technique used to apply the adhesive can also have an impact on drying time. A skilled orthodontist with experience in applying braces can often apply the adhesive more efficiently, leading to a faster drying time.
It’s important to note that each patient’s mouth is unique, and as such, each individual may experience different drying times based on these factors. It’s critical to follow the orthodontist’s instructions closely and avoid any activities that could interfere with the drying process. Patience is key when it comes to the bonding procedure; rushing or becoming restless can negatively impact the outcome of the orthodontic treatment.
What Happens If the Braces Glue is Not Fully Dry?
If the braces glue is not fully dry before the brackets are placed, it can cause several problems and may negatively impact the overall effectiveness of treatment. Below are some of the possible consequences of not allowing the adhesive to dry completely:
| Consequence | Description |
|---|---|
| Bracket Movement | Placing brackets on wet glue can cause them to slide out of position. This can lead to improper tooth alignment and increased treatment time. |
| Infection | If the glue is not dry before the brackets are attached, it can create pockets of moisture that are ideal environments for bacteria to grow and thrive. This can lead to infection and other dental issues. |
| Discomfort and Pain | If the brackets are not securely attached to the teeth, they can move around and cause discomfort and pain. |
| Extended Treatment Time | If brackets move out of place due to wet glue, it can add more time to the overall treatment as teeth need to be repositioned. |
It is crucial to allow the braces glue to dry completely before attaching the brackets. The orthodontist or dental assistant may use various methods to ensure that the adhesive has dried properly, and patients must follow proper care instructions to ensure successful treatment.
How to Speed Up the Drying Process
Now that you know how long it takes for the braces glue to dry, you might be wondering if there are any ways to speed up the process. Fortunately, there are some things you can do to make sure the adhesive dries as quickly and effectively as possible. By following these tips, you may be able to reduce the amount of time you have to spend in the orthodontist’s chair and begin enjoying your new braces sooner. So, let’s explore some of the best techniques for speeding up the drying process.
Use a High-Volume Evacuator
One effective way to speed up the drying process of braces glue is by using a high-volume evacuator. This tool is commonly used in dental procedures to remove saliva and other fluids from the mouth. By using the high-volume evacuator during the bonding process, excess moisture on the teeth and brackets can be removed more quickly, allowing the glue to dry faster.
The high-volume evacuator works by using suction to eliminate liquid from the mouth. It is typically attached to a long, thin tube that can reach deep into the mouth, making it easy to remove all excess moisture. The evacuator is also typically operated by a dental assistant, allowing the orthodontist to focus more on the bonding process.
One of the advantages of using a high-volume evacuator during the bonding process is that it can help to prevent contamination of the glue. When excess moisture is left on the teeth and brackets, it can dilute the glue, making it less effective. This can also lead to a weaker bond between the bracket and the tooth, which can cause problems later on. By using the evacuator to remove excess moisture, the glue can adhere more strongly to the teeth, providing a more secure bond.
In addition to promoting faster drying times and stronger bonding, using a high-volume evacuator during the bonding process can also help to make the overall procedure more comfortable for the patient. By reducing the amount of fluid in the mouth, patients are less likely to experience discomfort or gagging during the application of the braces.
Using a high-volume evacuator can be an effective way to speed up the drying process of braces glue. By quickly removing excess moisture from the mouth during the bonding process, patients can enjoy faster and more effective orthodontic treatment.
| Pros | Cons |
|---|---|
| Faster drying time | May cause discomfort for some patients |
| Stronger bond between brackets and teeth | May require an additional assistant during the procedure |
| Prevents contamination of braces glue | May have additional cost for the patient |
Use an LED Light
One effective way to speed up the drying process of braces glue is by using an LED light. LED lights provide a focused, intense beam of light that can help the adhesive dry faster. This technique is especially useful when time is of the essence, such as when a patient needs to get back to work or school.
When using an LED light to dry braces glue, it’s important to follow these steps:
| Step | Description |
|---|---|
| Step 1 | Prepare the area around the patient’s mouth by placing a protective sheet over their face and clothes to shield them from the bright light. |
| Step 2 | Use a high-volume evacuator to remove any excess moisture from the teeth and brackets. This will ensure that the adhesive is evenly distributed and will dry properly. |
| Step 3 | Hold the LED light about 6 inches away from the brackets and shine the light directly on them. |
| Step 4 | Move the light around to ensure that all of the brackets are exposed to the light. The light should be held in place for about 10 to 15 seconds per bracket. |
| Step 5 | Repeat the process on the other arch of teeth. |
It’s important to note that LED lights should only be used by licensed dental professionals who have been trained in their proper use. Improper use of LED lights can cause damage to the patient’s teeth or gums.
In addition to LED lights, there are other techniques that can be used to speed up the drying process of braces glue. Using a warm air source, such as a hair dryer, can help evaporate the moisture in the adhesive. The dry field technique, which involves using cotton rolls or a dental dam to keep the teeth dry, can also be effective. Finally, using a high-volume evacuator can help remove moisture from the teeth and brackets to ensure that the adhesive dries evenly.
Use a Warm Air Source
Using a warm air source is another effective way to speed up the drying process of braces glue. By using warm air, the moisture in the adhesive can evaporate more quickly, allowing the glue to dry faster.
What types of warm air sources can be used?
There are different types of warm air sources that can be used to dry braces glue. Some of the most common ones include:
| Type | Description |
|---|---|
| Hair Dryer | A hair dryer can be used on a low heat setting to blow warm air onto the braces. It is important to keep the hair dryer at a safe distance from the braces to avoid overheating the glue. |
| Air Syringe | An air syringe is a tool commonly used in dental procedures to deliver a precise stream of air. When used to deliver warm air, it can help dry the braces glue quickly. |
| Warm Air Gun | A warm air gun is a tool used in DIY projects to heat up and dry surfaces quickly. It can also be used to dry braces glue, but caution must be taken not to overheat the glue or the surrounding teeth. |
Safety Precautions
When using a warm air source to dry braces glue, it is important to take the necessary safety precautions to avoid damaging the braces or harming the patient. Some of these precautions include:
- Using a low heat setting to avoid overheating the glue or the teeth.
- Keeping the warm air source at a safe distance from the braces and the patient’s face.
- Avoiding direct contact with the glue or the teeth with the warm air source.
- Using protective eyewear and a face mask to avoid inhaling any fumes or particles.
By following these safety precautions, a warm air source can be a helpful tool in speeding up the drying process of braces glue.
Use a Dry Field Technique
One effective technique to help speed up the drying process of braces glue is the use of a dry field technique. This involves creating a dry environment in the mouth to prevent moisture from interfering with the bonding process. Here are the steps to follow when using a dry field technique:
- Use a rubber dam: A rubber dam is a small sheet of latex that is placed over the teeth being worked on. It is stretched and anchored around the teeth, creating a barrier between the teeth and the rest of the mouth. This helps to keep saliva and other liquids away from the area, allowing the adhesive to dry more quickly.
- Cotton rolls: Cotton rolls can be used in addition to a rubber dam to wick away any excess moisture. These rolls can be placed on either side of the teeth being worked on to absorb any excess saliva or moisture in the mouth.
- High-volume evacuation: A high-volume evacuation (HVE) is a device that sucks saliva and other liquids out of the mouth. This is a highly effective method for keeping the area dry during bonding. The HVE is placed near the tooth being worked on, and the patient is asked to close their lips around it. This creates suction and helps to remove moisture from the area.
- Air flow: Another way to dry the teeth and surrounding area is by using a flow of air. This can be achieved with a simple air syringe or a dental air compressor. A gentle stream of air can be directed at the teeth to help dry the area more quickly.
Using a dry field technique can help to speed up the drying process of the braces glue, which is an important step in the bonding process. By creating a dry environment using a rubber dam, cotton rolls, HVE, and air flow, the adhesive can fully dry and cure properly, resulting in a strong and lasting bond between the brackets and the teeth.
After the Braces Glue is Dry
Now that the braces glue has fully dried and your braces are attached, it’s important to know what to do next to ensure a successful orthodontic treatment. From adjusting your diet to properly cleaning your teeth and braces, there are several important steps you should take to keep your teeth and braces in good condition. Additionally, your first follow-up appointment is crucial for monitoring your progress and making any necessary adjustments. Read on to learn more about what to expect after the braces glue has dried.
What to Eat After Braces are Attached
When you first get your braces attached, you may experience some discomfort. Eating soft foods can help ease the pain and protect your braces from damage. Here are some soft and easy-to-chew foods that you can eat after getting braces:
- Soups: Any soft soups without large chunks of vegetables or meat are good options. Miso soup, tomato soup, and cream of mushroom soup are some favorites.
- Pasta: Pasta with soft sauces such as Alfredo sauce, tomato sauce, or butter and garlic sauce are good soft food options as well. Just avoid hard noodles like spaghetti.
- Yogurt: Greek yogurt, regular yogurt, and yogurt drinks are all great soft food options that are high in protein and calcium for healthy teeth and bones.
- Cottage Cheese: Another soft and nutritious option, cottage cheese is a great source of protein and calcium. Pair it with soft fruits like bananas or berries for added taste and nutrients.
- Oatmeal: Warm oatmeal with soft fruits mixed in is a great breakfast option that is gentle on your teeth and braces.
It’s important to avoid hard, crunchy, and sticky foods during the first few days after getting braces to avoid damaging the brackets and wires. This includes foods like popcorn, hard candies, and chewing gum. As your teeth adjust to the braces, you will be able to gradually reintroduce harder foods back into your diet.
Additionally, make sure to drink plenty of water and avoid sugary or acidic drinks, as they can cause damage to your teeth and braces. Stick to water or milk, and if you do choose to indulge in a sugary drink, make sure to brush your teeth afterwards to prevent any damage to your teeth or braces.
How to Clean Teeth and Braces
Keeping your teeth clean while wearing braces is crucial for good oral health. Traditional braces feature lots of tiny crevices that can trap food particles and bacteria, leading to cavities and other issues. Here are some tips and tricks to ensure that you’re cleaning your teeth and braces as thoroughly as possible:
| Tip | Description |
|---|---|
| Brush Regularly | Brushing your teeth twice a day is critical while wearing braces. Be sure to brush around the brackets and wires to remove any food particles that may have gotten stuck there. Use a soft-bristled toothbrush and fluoride toothpaste. |
| Floss Daily | Flossing with braces can be tricky, but it’s essential for keeping your teeth clean. Use a floss threader or orthodontic floss to work the floss under the wire and between your teeth. Be sure to floss every day. |
| Use an Interdental Brush | An interdental brush is a tiny brush that can fit between the wires and is great for removing any food particles left behind from brushing or flossing. |
| Avoid Certain Foods | Sticky, chewy, and hard foods can all damage your braces and make them harder to clean. Avoid things like gum, caramel, and popcorn while wearing braces. |
| Attend Regular Appointments | Regular visits to your orthodontist will ensure that your braces are well-maintained and that your teeth are staying clean and healthy. Your orthodontist may also recommend additional cleaning products or procedures based on your individual needs. |
Remember, taking good care of your braces and teeth will make the process go smoother and ensure that your teeth are as healthy as possible when the braces come off.
What to Expect At Your First Follow-Up Appointment
At your first follow-up appointment after getting braces, you might be wondering what to expect. This is a crucial appointment as it allows your orthodontist to check on the progress of your teeth alignment and make any necessary adjustments. Here is what you can expect at your first follow-up appointment:
| Expectation | Description |
|---|---|
| Examination of Braces and Teeth | During the appointment, your orthodontist will examine your braces and teeth to determine if any adjustments need to be made to your treatment plan. Your orthodontist may also take X-rays or impressions of your teeth to check for any issues that may affect your treatment. |
| Adjustments to Braces | If your orthodontist determines that adjustments are needed, he or she may tighten the wires and adjust the brackets to continue the process of aligning your teeth. In some cases, your orthodontist may need to add additional components to your braces, such as rubber bands or springs. |
| Instructions for At-Home Care | Your orthodontist will provide you with instructions on how to properly care for your braces and teeth at home. This may include information on how to brush and floss around your braces, what foods to avoid, and how often to use any prescribed orthodontic appliances, such as rubber bands. |
| Discussion of Progress | Your orthodontist will discuss your progress and any concerns you may have. This is a good opportunity to ask questions or voice any concerns you have about your braces treatment. |
It is important to attend all follow-up appointments as scheduled by your orthodontist. These appointments allow your orthodontist to monitor the progress of your treatment and make any necessary adjustments to ensure the best outcome for your teeth alignment.
Conclusion
In conclusion, getting braces may seem like a daunting process, but with proper care and attention, it can lead to a beautiful, healthy smile. Understanding the process of applying braces glue and the time it takes to dry is essential to ensuring a successful bonding. Factors such as humidity and the type of adhesive used can affect drying time, so it is important to follow your orthodontist’s instructions and be patient.
Remember, after the braces glue is dry, it is important to maintain good oral hygiene to prevent decay and staining. Utilize tools such as a high-volume evacuator, LED light, or warm air source to speed up the drying process if needed. Be mindful of what you eat and avoid hard, sticky, or sugary foods that can damage the braces or attract bacteria.
Lastly, don’t forget to attend follow-up appointments with your orthodontist to ensure that everything is progressing as planned and address any concerns or issues that may arise. With dedication and proper care, you will soon be on your way to a beautiful and healthy smile.
Frequently Asked Questions
1. Can braces glue cause any allergic reactions?
While rare, it is possible for some individuals to have an allergic reaction to the adhesive used in braces. If you experience any unusual symptoms like swelling or hives, contact your orthodontist immediately.
2. Is it normal for the braces glue to come off?
No, if the braces glue comes off, it means that the brackets are not well bonded to your teeth, and you should contact your orthodontist immediately to fix the problem.
3. Will the braces glue damage my tooth enamel?
No, modern orthodontic adhesives are designed to be safe for tooth enamel. However, you should still take good care of your teeth and braces to prevent the formation of white spots or cavities.
4. Can I eat normally after getting braces glued on?
It is best to avoid eating hard, sticky, or crunchy foods that can damage your braces or delay the drying process of the adhesive. However, you can still eat most foods and adjust to your braces gradually.
5. How long does it take to remove braces glue?
The removal process of braces glue is brief and painless. Your orthodontist will use special tools to remove the brackets and adhesive, and it usually takes a few minutes per tooth.
6. Can I brush my teeth immediately after getting braces glued on?
No, you should wait at least an hour before brushing your teeth to allow the braces glue to dry and set. After that, you can brush as usual, but make sure to use a soft-bristled brush and clean all surfaces carefully.
7. How long will my braces stay bonded to my teeth?
Your braces should remain bonded to your teeth throughout your entire treatment period, which can range from a few months to several years. However, if a bracket comes loose or falls off, you should schedule an appointment with your orthodontist to have it repaired.
8. Can I play sports or musical instruments with braces on?
Yes, you can still play sports and musical instruments while wearing braces. However, it is best to use a mouthguard during contact sports and be careful not to damage your braces while playing.
9. Is it normal to feel discomfort after getting braces glued on?
Yes, it is normal to experience some discomfort after getting braces glued on, especially during the first few days. You can take over-the-counter pain relievers and eat soft foods to manage the discomfort and allow your mouth to adjust to the braces.
10. Can I have the braces glue removed early?
No, it is not recommended to have the braces glue removed early before your treatment is complete. Removing the adhesive before your teeth are fully aligned can result in unstable or incomplete results and require additional treatment.