Eraser putty, often recognized for its malleable properties and fun factor, has become a staple in classrooms, offices, and creative spaces. Unlike traditional erasers, this putty can be sculpted and shaped, enhancing the experience of correcting mistakes. Plus, its ability to adhere to small debris makes it an excellent cleaning tool for electronic devices and intricate objects.
How to Make Eraser Putty with Glue
Preparing Your Materials
Commencing this DIY project requires gathering a few essential items. You’ll need white school glue, liquid starch, and a mixing bowl. Ensure you have a clean workspace and if you’re working with children, cover the area to prevent messes. Additionally, keep paper towels on hand for any unforeseen spills.
Combining the Ingredients
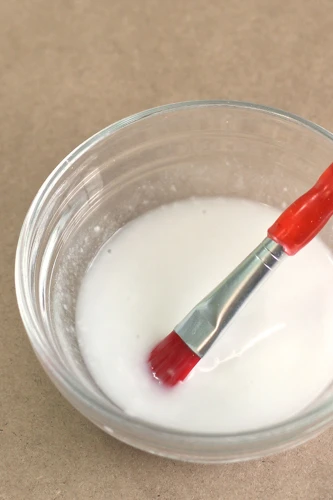
Begin by pouring an equal ratio of glue to liquid starch into your bowl. The precise measurements don’t have to be exact, but starting with a smaller quantity is advisable as you learn the consistency of your eraser putty. Stir these components steadily until they start to form a cohesive substance. Patience is key during this step to ensure the mixture achieves the desired texture.
Kneading Your Eraser Putty
Once the mixture begins to thicken and pull away from the sides of the bowl, it’s time to get your hands involved. Dust a flat surface with a bit of starch to prevent sticking and begin kneading the dough-like material. Continue this process until the putty is smooth and no longer sticky, which may take several minutes.
How to Make Eraser Putty Easy
Simple Steps for Quick Eraser Putty
The process of creating eraser putty doesn’t need to be complex. For a straightforward approach, combine the glue and starch in a ziplock bag, seal it, and squish the contents together. This method keeps your hands clean and mixes the ingredients effectively. Once combined, remove the putty from the bag and finalize the kneading process.
Troubleshooting Common Issues
If you encounter problems such as stickiness or brittleness, a few adjustments can help. For stickiness, add more liquid starch incrementally. Conversely, if the putty is too rigid, work in additional glue. The key is to alter the consistency slowly until you reach the perfect balance.
Creating Scented Eraser Putty
Choosing Your Scent
Selecting a fragrance that appeals to you is the first step in making scented eraser putty. Essential oils offer a variety of scents and therapeutic benefits, making them an ideal choice. Consider calming lavender, invigorating citrus, or refreshing mint as potential options.
Infusing the Scent into Your Putty
Infusing your eraser putty with your chosen scent is a breeze. Simply add a few drops of the essential oil to the glue before mixing it with the starch. As you knead the mixture, the scent will distribute evenly, resulting in a pleasantly fragranced eraser putty.
Customizing Your Eraser Putty
Adding Colors and Textures
Personalizing your eraser putty is part of the fun. Food coloring can transform the putty into any hue you desire. For texture, consider mixing in glitter, small beads, or even sand. Remember to add these elements during the mixing stage for uniform distribution.
Shaping and Storing Your Putty
Once your putty is ready, unleash your creativity by sculpting it into various shapes. To preserve its pliability, store the putty in an airtight container, keeping it fresh and ready for your next use.
Tips for Perfect Eraser Putty
- Adjust the ratio of glue to starch for desired consistency.
- Use a ziplock bag for a no-mess mixing alternative.
- Add scent and color during the initial mixing phase for even distribution.
- Always store eraser putty in an airtight container to maintain its properties.
For those who love DIY projects and are curious about creating their own craft materials, we have some great tutorials for you! If you’re specifically interested in making your own eraser putty, our guide on how to make eraser clay with glue can be a perfect starting point. And for those who want to explore different textures, check out our article on how to make putty with glue. Additionally, if you’re into nail art, you might find our instructions on how to make DIY nail glue incredibly useful for your next creative endeavor. Dive into these projects and unleash your creativity with simple ingredients like glue!
Conclusion: Endless Possibilities with Eraser Putty
In conclusion, learning how to make eraser putty opens up a world of customization and creativity. Whether you opt for a scented variety or a kaleidoscope of colors, the versatility of this DIY project is boundless. Not only does eraser putty serve as a functional tool, but it also provides a tactile and sensory experience that can enhance focus and relaxation. So, gather your materials, and embark on the journey of making your unique eraser putty today!