Assembling a snow globe can be a fun and fulfilling activity, whether as a DIY project or a gift for a loved one. However, choosing the right adhesive for your snow globe is crucial to making a long-lasting and beautiful piece. With so many types of glue available in the market, it can be overwhelming to know which one to use. The wrong choice of adhesive can lead to a cloudy snow globe, a leaking container, or components that detach over time. In this guide, we will cover in detail the different types of glue suitable for snow globes, the application process, and offer tips and tricks for a successful outcome.
Why Choosing the Right Glue Matters

Using the right glue is crucial when making snow globes. Not all adhesives are made the same way, and some may not be able to withstand the test of time. It is important to choose an adhesive that has strong waterproof properties, quick-drying capabilities, and clarity.
1. Waterproof Properties
A snow globe’s components are submerged in water, which makes it essential to use waterproof glue. If regular glue is used, it will break down and cause the water to become cloudy and the snowflakes to clump together. This is why it’s important to use a glue that is specially designed to withstand water without losing its adhesive properties.
2. Quick-Drying
When working on a project like a snow globe, it’s important to use a glue that dries quickly. This is because the glue will be used to hold together small components like figurines, and it’s important that they don’t move out of place before the glue dries. Using a glue that takes too long to dry can cause frustration and unwanted movement of the components.
3. Clarity
Using an adhesive that dries clear is essential in snow globe making. This is because the adhesive will be visible through the glass, and using a glue that dries in an opaque color like white or yellow can ruin the entire look of the snow globe. A clear adhesive ensures that the components inside the snow globe remain visible.
When choosing the right glue for snow globes, look for adhesives with strong waterproof properties, quick-drying capabilities, and clarity. Using glue that has one or more of these properties can cause issues with the snow globe’s components over time. For more information on choosing the right glue for other types of projects, check out our article on what glue to use for models.
1. Waterproof Properties
Finding glue with waterproof properties is essential for creating long-lasting snow globe projects. While regular glue may seem like a quick fix, it can quickly deteriorate when exposed to water, leading to unsightly and unsafe leaks. A waterproof adhesive like epoxy glue, silicone adhesive, or polyurethane adhesive is necessary to ensure that the snow globe remains intact and leak-free over time. Not only does the glue need to be waterproof, but it should also dry clear for a finished look. For more information on what glue dries clear on glass, check out our article.
2. Quick-Drying
Choosing a quick-drying glue is essential in snow globe making. Quick-drying glue ensures that the components don’t shift or move while setting and that the glue doesn’t seep into the water, making the snow globe cloudy. There are several quick-drying glues for snow globes available in the market, and it can be overwhelming to choose one.
To help you out, here are some of the best and quickest-drying glues for snow globes:
- Epoxy glue: Epoxy glue is a two-part adhesive that dries quickly and forms a strong bond. It is ideal for gluing non-porous materials like plastic and metals and hence perfect for the plastic base of the snow globe.
- Silicone adhesive: Silicone adhesives are quick-drying and waterproof. They aren’t as strong as epoxy, but they are perfect for sealing small gaps or cracks between components.
- Polyurethane adhesive: Polyurethane adhesive is thicker and slower to dry than other adhesives, but its strong bonding properties and water resistance make it ideal for gluing the glass globe onto the base of the snow globe.
Quick-drying glue ensures a clean and easy process when making snow globes. However, it’s crucial to use the right amount of glue. Applying too much glue can cause the components to be displaced while setting, and using too little can result in the snow globe falling apart. In case you are wondering whether there is a glue that dries clear on glass, this article has detailed information on it.
Remember, the amount of time it takes for glue to dry will depend on the type of adhesive being used, among other factors. It’s essential to follow the instructions on the label and not rush the process. Rushing the process could result in shoddy work or damage to the snow globe.
3. Clarity
When it comes to making a snow globe, the clarity of the glue is an important factor to consider. Snow globes rely on a clear and transparent medium to showcase their miniature worlds, and using the wrong type of glue can result in cloudiness and a lack of visual appeal. Epoxy glue, polyurethane adhesive, and silicone adhesive are the three types of glue that provide the necessary clarity for a beautiful and visually appealing snow globe.
In terms of clarity, epoxy glue is the clearest and most transparent option. It dries crystal clear and is a popular choice for making snow globes due to its water-resistant properties. However, it’s important to note that epoxy glue can yellow over time if exposed to sunlight.
Polyurethane adhesive is another strong option for snow globe making. It has excellent waterproof properties and dries clear without yellowing over time. One downside to polyurethane adhesive is that it can take longer to dry than other types of glue, so be sure to give your snow globe enough time to set before shaking it.
In terms of ease of use and clarity, silicone adhesive is a great option for beginners. It dries clear and flexible and has good waterproof properties. However, it’s important to use a high-quality silicone adhesive to avoid cloudiness and be sure to let it dry completely before adding water to your snow globe.
When choosing the right glue for a snow globe, it’s important to prioritize waterproof properties, quick-drying time, and clarity. Below is a summarized table of the three types of glue mentioned, highlighting their pros and cons.
| Glue Type | Clarity | Waterproof | Drying Time | Yellowing Over Time |
|---|---|---|---|---|
| Epoxy Glue | Crystal Clear | Excellent | Quick | Possible |
| Polyurethane Adhesive | Clear | Excellent | Longer | No |
| Silicone Adhesive | Clear | Good | Quick | No |
If you’re interested in learning more about different types of glue and their uses for other DIY projects, check out our article on what is a glue stick.
Types of Glue for Snow Globes
Selecting the right type of glue is crucial in making a snow globe that will last. You want a glue that’s strong, waterproof, and clear. There are several types of glue suitable for making snow globes, including Epoxy Glue, Silicone Adhesive, and Polyurethane Adhesive.
Epoxy Glue is a popular choice for making snow globes. It’s a two-part adhesive that consists of a resin and a hardener. Once mixed together, epoxy glue forms a strong, durable and waterproof bond, which makes it perfect for sealing the snow globe components. It also dries clear, which is ideal for not obstructing the viewer’s vision. This type of glue takes approximately 24 hours to set properly, so make sure your snowglobe is kept upright during the drying process.
Silicone Adhesive is another suitable option for making snow globes. It’s a flexible glue that adheres to a range of materials such as plastics and glass. One of the benefits of using silicone adhesive is that it is more resistant to extreme temperatures and movements compared to other glues. Like epoxy adhesive, it’s also waterproof and dries clear. However, Silicone adhesive is not as strong as epoxy glue, so make sure your snow globe is not dropped or exposed to extreme conditions.
Polyurethane Adhesive is a strong and durable adhesive that is suitable for making snow globes. It’s a single-component glue that cures by reacting with moisture. Like epoxy and silicone adhesives, it’s waterproof and dries clear. It also has some flexibility which allows the glue can to expand and contract based on temperature changes. It takes around 24 hours to cure fully, and during that time, you need to make sure that your snow globe components are kept still and not moved around.
Each of these adhesives are good, but epoxy glue is often the most popular choice, mainly because of its strength, clarity, and waterproof properties. However, depending on the materials you are working with and your personal preference, the other types may suit you better.
Make sure to store your glue according to the manufacturer’s instructions, as some types of glue can crystallize, separate, or break down if not stored correctly or if exposed to extreme temperatures.
1. Epoxy Glue
Epoxy glue is one of the most popular types of adhesive used in snow globe making. This type of glue is a two-part adhesive that consists of a resin and a hardener that must be mixed together right before application. Epoxy glue is known for its excellent bonding strength and waterproof properties, making it ideal for use in snow globes. Additionally, it dries clear and is resistant to yellowing over time. However, it is important to note that epoxy glue can be tricky to work with, and it is essential to follow the manufacturer’s instructions carefully to achieve the best results. For those looking to make slime without glue or activator, check out our guide on how to make butter slime without glue or activator.
2. Silicone Adhesive
Silicone adhesive is a popular choice for snow globe makers as it provides a strong hold and is resistant to water. It is a flexible adhesive that can withstand extreme temperatures, making it ideal for snow globes that may be subjected to varying environmental conditions. Silicone adhesive can bond different materials with ease.
| Advantages | Disadvantages |
|---|---|
| • Provides a strong hold | • Not as fast-drying as other adhesives |
| • Resistant to water | • Can be messy to work with |
| • Flexible and can withstand extreme temperatures | • Can take up to 24 hours to set |
| • Bonds different materials with ease |
To use silicone adhesive in your snow globe project, make sure to clean and dry the components before applying the glue. Squeeze a small amount of silicone adhesive onto one of the surfaces to be bonded, then press the parts together with gentle pressure. You may want to secure the components with clamps or tape to ensure they remain in place while the glue sets.
One thing to note is that silicone adhesive may take up to 24 hours to set completely. It is important to be patient and avoid disturbing the components during this time to ensure a strong and durable bond.
If you want to learn more about other types of glue, check out our article on ‘What Kind of Glue to Mount Air Plants?‘ Additionally, if you’re looking for tips on how to keep a glue bottle from drying out, read our article on ‘How to Keep Wood Glue from Drying Out‘.
3. Polyurethane Adhesive
Polyurethane adhesive is another effective option for snow globe makers. This type of adhesive is known for its strong and durable bond, making it a great choice for securing items inside the snow globe.
One of the benefits of using polyurethane adhesive is that it is waterproof, making it an ideal choice for snow globes. It is also resistant to heat and cold, which is important for items that will be submerged in water and exposed to different temperatures, such as glitter or small figurines.
When using polyurethane adhesive, it’s important to note that it dries quickly, so you need to work efficiently to ensure that you apply the adhesive precisely where you want it. It’s best to do a dry run to practice the application process before diving in.
Another thing to keep in mind is that polyurethane adhesive may not be as clear as other types of glue, such as epoxy. However, it is still an excellent choice for certain snow globe projects that do not require complete clarity.
It’s important to read the manufacturer’s instructions carefully when using polyurethane adhesive. Some types may require a specific application process or cure time. Make sure you follow these instructions closely for the best results.
Polyurethane adhesive is another reliable option for securing items inside a snow globe. However, it may not be the best choice for projects that require complete transparency or a longer curing time.
How to Apply Glue to Snow Globe Components
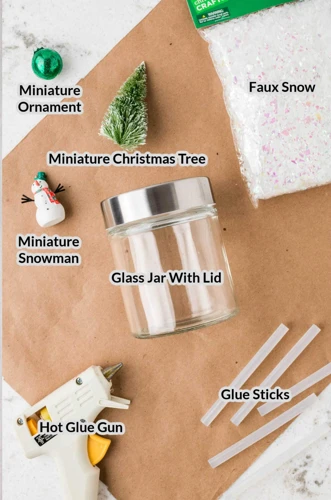
When it comes to applying glue to snow globe components, precision is key. Any mistakes in glue application could lead to cloudy water or non-functional snow globes. Here are some essential steps to follow:
1. Clean and Dry the Components: Before applying glue, make sure the components are clean and dry. Any dust, dirt, or moisture could prevent the glue from adhering properly. Use a lint-free cloth to gently clean each component.
2. Apply the Glue with Precision: When applying glue, it’s important to use just the right amount. Too much glue can cause cloudiness or unevenness in the water. Conversely, too little glue may not adhere the components together properly. Read the manufacturer’s instructions carefully to determine exactly how much glue to apply. You may need to apply the glue to one component and then press it firmly against the other.
3. Let the Glue Dry Completely: It can be tempting to test the strength of the glue right away, but patience is essential. Let the glue dry completely according to the manufacturer’s instructions. This is typically between 24-48 hours. Moving the components before the glue has fully dried could cause them to shift out of place, ruining your snow globe.
By following these essential steps, you can ensure that your snow globe components are securely fastened together and ready for use.
It’s important to note that different types of glue may have varying application processes. For example, some types of glue require a special activator to work properly, while others may be made at home with common household ingredients. If you’re unsure about how to apply a certain type of glue, always read the manufacturer’s instructions carefully or consult with a professional.
Link: /what-is-ca-glue-activator/
1. Clean and Dry the Components
Before you begin assembling your snow globe, it’s important to make sure that all the components are clean and dry. Any dirt, dust, or debris that is left on the components can interfere with the glue’s ability to form a strong bond. Start by wiping the components down with a clean, dry cloth, and then use a soft-bristled brush or compressed air to remove any particles that may be stuck in crevices or corners. Once they are completely clean, set them aside to air dry before beginning the gluing process. Remember, the cleanliness of your components will ultimately affect the longevity and success of your snow globe.
2. Apply the Glue with Precision
Applying glue with precision is crucial to ensuring that all the components of your snow globe stay in place and don’t shift or leak. Use a small brush or toothpick to apply the glue to the edges of the base and figurine, making sure to cover all parts that will come into contact with the water and glitter.
To ensure that the glue is spread evenly, take your time and work carefully. If you rush this step, you risk not applying enough glue, which can cause components to detach and the snow globe to malfunction.
Table:
| Tools for Applying Glue | Description |
|---|---|
| Small brush | Useful for easily spreading glue on flat surfaces like the base of the snow globe |
| Toothpick | Great for reaching tight spaces and applying glue to small figurines |
| Syringe | Helpful for precise application of the glue |
| Tweezers | Useful for holding delicate components in place as you apply glue |
Remember to be gentle and precise in applying glue to the snow globe components. And, if you make any mistakes, don’t worry. You can use a cotton swab or tissue to wipe off excess glue before it dries.
Pro tip: If you want to avoid using store-bought glue in your snow globe, you can even make your own glue using simple household ingredients. Check out our guide on how to make glue without glue for more information.
By applying glue with precision, you can ensure the components of your snow globe stay in place for a long time. However, proper glue application is just one piece of the puzzle. Next, we’ll discuss some tips for making successful snow globes, so that you can create the most beautiful and long-lasting designs possible.
3. Let the Glue Dry Completely
Once you have applied the glue to the snow globe components, it is essential to let it dry completely before proceeding with the next steps. Not allowing the glue to dry can result in a weak bond and a dysfunctional snow globe. The drying time will depend on the type of glue used and the amount applied, but generally, it will take at least 24 hours for the glue to cure fully.
During the drying process, avoid disturbing or moving the snow globe components, as this can cause the glue to shift and create an uneven bond. It is also important to ensure that the components are placed on a flat surface while they dry, to prevent any dripping or sliding.
To make sure the glue has fully dried, you can do a simple test by gently touching the components. If the glue is still tacky or sticky, give it more time to dry. If the glue is dry to the touch, leave the components to dry for a few more hours to ensure that it has cured properly.
Remember that rushing the drying process can result in a poorly made snow globe, so be patient and allow enough time for the glue to dry completely before moving on to the next steps.
If you want to learn more about gluing techniques for other crafts, check out our article on how to install a lace closure without glue.
Tips for Making Successful Snow Globes
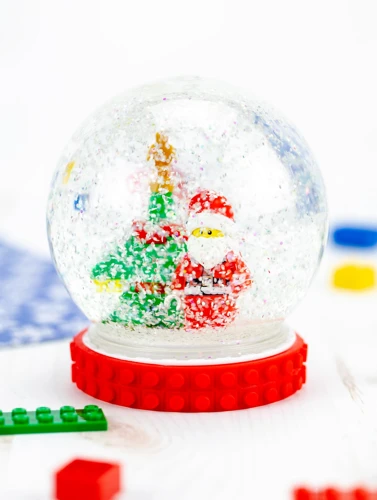
When making a snow globe, there are a few tips that can help ensure success and produce a beautiful, long-lasting product. Here are some tips to keep in mind:
1. Use Distilled Water
Using regular tap water may seem like a convenient option, but it can lead to cloudiness in the snow globe over time. Distilled water is free of impurities and minerals that can cause cloudiness, making it the best option for creating a clear snow globe.
2. Add Glycerin
Adding a small amount of glycerin to the water in your snow globe can help the snowflakes or glitter fall more slowly and create a more magical effect. Glycerin is a clear, odorless liquid that can be found at most craft stores.
3. Use a High-Quality Glass Globe
The quality of the glass globe can have a big impact on the overall look and longevity of your snow globe. Look for a globe made of thick, durable glass that won’t easily break or scratch. Additionally, be sure to test the seal of the globe before using it to ensure that no water or air leaks out.
By following these tips, you can create a truly stunning snow globe that will last for years to come. Remember to choose your materials carefully and take your time assembling and gluing the components. With patience and attention to detail, you’ll have a beautiful snow globe that will bring joy and wonder to all who see it.
1. Use Distilled Water
When it comes to making a snow globe, the water used to create the magical display inside is just as important as the glue used to hold it all together. Many people make the mistake of using tap water, which can contain impurities that can ruin the display inside the globe. That’s why it’s crucial to use distilled water in your snow globe project. Distilled water is free from impurities, which means you’ll have a crystal clear display that will last for years to come. In this section of our comprehensive guide on snow globe glue, we’ll take a closer look at why using distilled water is so important and how to ensure you’re using it correctly.
2. Add Glycerin
Adding glycerin to a snow globe can help enhance its snowfall effect. This substance is a clear and odorless liquid that can be found in most craft stores. It acts as a thickening agent that makes the water inside the snow globe thicker, allowing the glitter or snow to fall more slowly and gracefully. Here are some tips to successfully add glycerin to your snow globe:
- Measure Properly: Use 1 part glycerin for every 3 parts of water in the snow globe. Using too much glycerin can result in a mushy snowfall effect, while using too little glycerin can cause the glitter to fall too quickly.
- Mix Gently: When adding glycerin to the water, it’s essential to mix it gently. Vigorous mixing can cause bubbles to form and take away the clarity of the snow globe.
- Use High-Quality Glycerin: Make sure you choose high-quality glycerin. Cheaper options may contain impurities, resulting in a cloudy snow globe effect that can take away from its beauty.
Adding glycerin can result in a stunning snowfall effect inside your snow globe that can make it truly stand out. Don’t forget to combine this with high-quality glue and other snow globe-making tips to ensure that your snow globe is a success.
3. Use a High-Quality Glass Globe
When making snow globes, it’s essential to choose a high-quality glass globe to ensure the longevity of your creation. Here are some reasons why:
- Avoid shattering: Using a cheap glass globe may lead to glass shattering, ruining your snow globe and creating a safety hazard as well.
- No distortion: High-quality glass globes are made with precision, which ensures that they are crystal clear and do not distort the view of the object inside.
- Prevent leakage: Better quality globes are less likely to have leaks due to their superior sealant.
- Long-lasting: A high-quality glass globe is more durable and resists scratches and cracks, ensuring that your snow globe can be cherished for years to come.
Choosing the right glass globe is crucial to the success of your snow globe. While it may cost a bit more upfront, the superior quality and durability are well worth the investment. Be sure to check reviews before purchasing and opt for a reputable supplier.
Common Gluing Mistakes to Avoid
When it comes to making snow globes, using the wrong type of glue or failing to use the glue properly can result in a ruined project. Here are some common gluing mistakes to avoid:
1. Overapplying Glue: Overapplying glue can cause it to seep out and create unsightly clumps around the edges of the components, which can ruin the aesthetic of the snow globe. Additionally, overapplying glue can cause the components to shift, which can prevent the snow globe from functioning properly.
2. Using the Wrong Type of Glue: Using the wrong type of glue can result in the components not adhering together properly or the glue becoming cloudy over time, which can obstruct the view of the snow globe inside. It is important to use a glue that is specifically designed for glass-to-glass or plastic-to-plastic adhesion, depending on the materials being used in the snow globe.
3. Not Letting the Glue Dry Enough: Failing to let the glue dry enough before assembling the components can result in the components shifting or not adhering together properly, leading to a malfunctioning snow globe. To prevent this, make sure to follow the manufacturer’s instructions for drying time and allow for adequate drying time before assembling the snow globe components.
By avoiding these common gluing mistakes in your snow globe-making process, you can help ensure that your project turns out beautifully and functions as intended.
1. Overapplying Glue
One of the most common mistakes when gluing snow globes is overapplying glue. This can happen when individuals apply a thicker layer of glue than necessary, believing it will offer better adhesion or create a stronger bond. However, this can actually have the opposite effect, and lead to a sloppy looking snow globe or one that leaks over time. It’s important to understand how much glue to use and how to apply it properly to achieve the best results. Let’s dive into some tips on how to avoid overapplying glue when making your own snow globes.
2. Using the Wrong Type of Glue
Using the wrong type of glue can lead to a snow globe disaster. While there are a variety of glues available to use, not all of them are appropriate for snow globes. Choosing the wrong type of glue can result in cloudiness, discoloration, or even leakage. Check out the list below of common glue types that should not be used in snow globes:
- White Glue (PVA): PVA or white glue is water-soluble, making it an unsuitable adhesive for snow globes, which are constantly exposed to water. Using this type of glue can result in the figurine or decorative items floating off the base, causing a mess inside the globe.
- Super Glue (Cyanoacrylate): Though super glue works well for bonding materials together in other craft projects, it is not suitable for use in snow globes. It can become brittle and break down over time, causing leaks in the globe and allowing water inside.
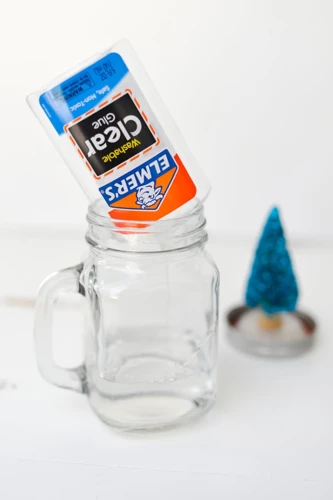
- Hot Glue: Hot glue may be a popular adhesive for other projects, but it is not appropriate for snow globes. It can melt and breakdown over time, causing cloudiness or leakage, leaving your snow globe ruined.
Remember, using the wrong type of glue can ruin your snow globe project. Always select the appropriate glue based on its waterproof properties, clarity and quick-drying characteristics. Avoiding these mistakes can make your snow globes more successful and enjoyable.
3. Not Letting the Glue Dry Enough
It’s important to give the glue enough time to dry before handling the snow globe. Rushing the drying process could result in the glue not fully setting and the components shifting or coming apart.
Common reasons for not letting the glue dry enough:
| Reasons | Consequences |
|---|---|
| Impatience to finish project quickly | The glue may not set properly, causing components to shift or come apart |
| Poorly ventilated area | The glue may take longer to dry and not set properly |
| High humidity | The glue may take longer to dry and not set properly |
How to avoid this common mistake:
To ensure that the glue dries properly and your snow globe stays in one piece, it’s important to follow these tips:
- Read the label on the glue and follow the recommended drying time
- Allow extra time for drying if you’re working in a humid environment or poorly ventilated area
- Avoid handling the snow globe until the glue is completely dry and set. It’s recommended to wait at least 24 hours before handling the snow globe.
By allowing enough time for the glue to dry thoroughly, you can ensure your snow globe is a successful project that will be cherished for years to come.
Conclusion
In conclusion, choosing the right glue for your snow globe project is crucial for its success. It is important to consider factors such as waterproof properties, quick-drying time, and clarity when choosing the glue to use. Among the types of glue suitable for snow globes are epoxy glue, silicone adhesive and polyurethane adhesive. It is important to follow the correct steps when applying glue to snow globe components, which include cleaning and drying the components, applying the glue with precision and letting it dry completely.
When crafting snow globes, there are also a few tips that can help to ensure success. Using distilled water, adding glycerin and using a high-quality glass globe are just a few ways to make your snow globes look professional and long-lasting.
It is equally important to avoid common mistakes when gluing snow globes. Overapplying glue, using the wrong type of glue, and not letting the glue dry long enough are easily avoidable mistakes that can ruin your snow globe project.
In summary, with the right glue choice, proper application techniques, and attention to detail, snow globe crafting becomes an enjoyable and rewarding activity. Start creating beautiful and long-lasting snow globes today by following this comprehensive guide.
Frequently Asked Questions
What is the best glue for making snow globes?
The best glue for making snow globes depends on your specific needs, but some popular options include epoxy glue, silicone adhesive, and polyurethane adhesive.
Can you make a snow globe without glue?
No, glue is necessary for making a snow globe as it seals the components together and prevents water leakage.
What kind of water should I use for my snow globe?
Distilled water is recommended for snow globes because it is free of impurities that can affect the clarity of the water. Avoid using tap water.
How much glycerin should I add to my snow globe?
The recommended ratio for glycerin to water in a snow globe is 1:1. However, you can adjust the amount based on your desired effect.
Can I use hot glue for making a snow globe?
No, hot glue is not recommended for making snow globes as it can melt the plastic components and cause water leakage.
Do I need to use a specific type of glitter for my snow globe?
No, you can use any type of glitter for your snow globe. However, fine glitter is recommended as it moves more easily in the water.
How long does it take for the glue to dry in a snow globe?
The drying time for glue in snow globes varies depending on the type of glue used. However, it is recommended to let the glue dry for at least 24 hours to ensure a strong bond.
Why is clarity important in snow globe water?
Clarity is important in snow globe water because it enhances the visual effect and allows the glitter and snowflakes to be seen more clearly.
Can I use a plastic globe for my snow globe?
Yes, plastic globes can be used for snow globes. However, glass globes are recommended for their higher quality and clarity.
Can I add other objects besides glitter to my snow globe?
Yes, you can add other small objects like figurines, beads, or shells to your snow globe. However, make sure they are waterproof and will not dissolve in the water.