Have you ever walked into a room and felt like something was missing? Maybe it’s time to add a little personality with stencil patterns. Stencil designs are a great way to add visual interest and a touch of creativity to your home decor. From walls to furniture, floors and even your children’s rooms, there are endless possibilities. But with so many different stencil patterns available, where do you start? In this article, we’ll explore the different types of stencil patterns for various areas of your home and provide some tips for using them effectively. So, let’s dive in and explore the world of stencil patterns!
Wall Stencil Patterns
Decorating your walls can transform your home and give it a new look. If you’re looking for an easy and affordable way to decorate your walls, consider using wall stencil patterns. Not only are they simple to use, but they allow you to create unique designs and patterns that will enhance the visual appeal of your home interiors. From traditional designs to modern geometric shapes, nature-inspired patterns, and more, the options are virtually limitless. In this article, we’ll share some of the best stencil patterns for your walls and offer some tips on how to use them effectively. Whether you’re an experienced DIY-er or just starting, the following information will help you get started with wall stencils.
Traditional
Traditional stencil patterns are timeless and classic. They incorporate motifs such as fleur-de-lis, damask, and Victorian ornate designs. These patterns are perfect for creating an elegant and sophisticated atmosphere in any room. If you want to add a touch of old-world charm to your home decor, you can choose from a variety of traditional stencil patterns.
Here are some popular traditional stencil patterns for your walls:
- French lace stencil: This pattern replicates the look of fine French lace and can add an exquisite touch to your walls. You can use it to create a delicate border or an intricate all-over pattern.
- Vine stencil: An elegant vine stencil with leaves and tendrils can make your walls look like a stylish garden. This type of pattern can look great in a dining room or a feminine bedroom.
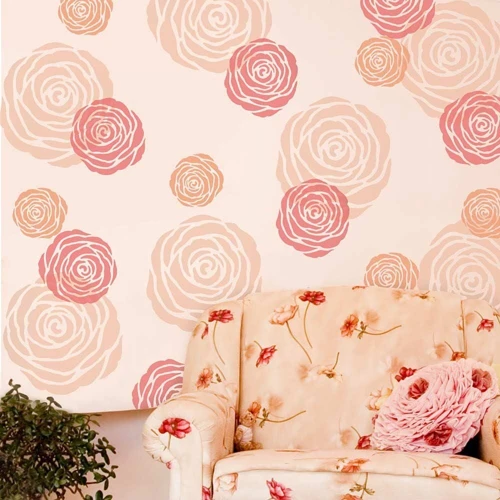
- Floral stencil: If you are fond of classic and feminine motifs, you can select a floral stencil pattern. This can be a simple daisy or an ornate rose, depending on the look you want to achieve.
If you are stenciling furniture, here are some traditional patterns you can use:
- Chinoiserie stencil: It is a classic pattern that draws inspiration from Chinese art and designs. This can make your furniture look like a work of art.
- Victorian scroll stencil: This pattern incorporates intricate scrolls and flourishes and can add a dash of opulence to your furniture.
- Fleur-de-lis stencil: This is a classic symbol of the French aristocracy and can give a regal touch to any furniture piece.
When using traditional stencil patterns, keep in mind that they work best in rooms with classic decor and architecture. You can also use them to add a decorative touch to doors, stairs or cabinets. To achieve the best results, select the pattern that complements your overall theme and color scheme. Also, make sure you use a steady hand while stenciling, and do not apply too much pressure while painting.
If you are new to stenciling, you can check out 5 Easy Steps to Wall Stencils or Stencil Furniture Makeovers Guide for more information on how to stencil like a pro. By choosing the right stencil pattern, you can create an elegant and timeless look for your home decor.
Geometric
Geometric stencil patterns are perfect for those who adore clean lines and modern designs. They offer infinite possibilities and can transform your plain walls into a work of art with minimal effort. These patterns feature shapes and angles that can be repeated in different arrangements to create a stunning visual effect.
Here are some popular geometric stencil patterns:
| Stencil Pattern | Description |
|---|---|
| Chevron | A timeless pattern that is ideal for modern interiors. Its inverted ‘V’ pattern adds a bold look to your décor. It works best when used sparingly, as it can be overwhelming in large doses. |
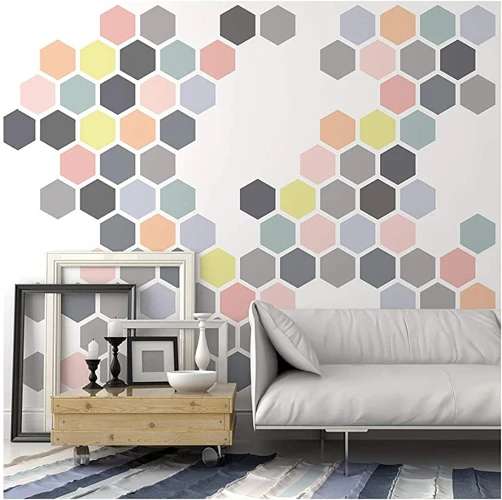
| Honeycomb | It is a pattern that is bound to make a statement. This stencil design creates a hexagonal pattern that is perfect for enhancing the look of a plain wall. The pattern gives a modern and fresh look to any space. |
| Triangulate | Using this pattern works perfectly for creating a unique feature wall. This stencil design can produce a 3D-effect that adds depth to your décor. Pair it with a monochromatic color scheme to enhance the modern look. |
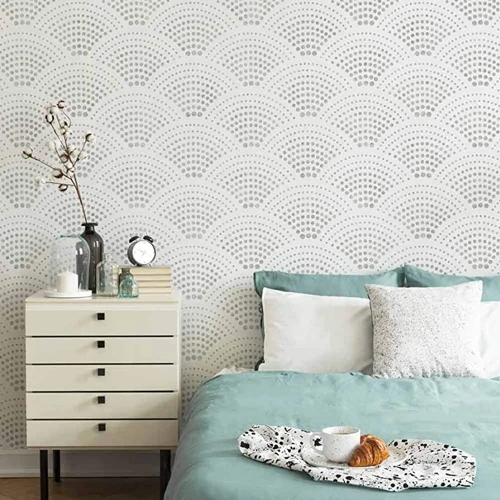
| Dot Matrix | It is a pattern ideal for contemporary homes. This pattern is formed by the arrangement of tiny dots that create a perfect grid. It provides a sleek, modern look. |
With geometric stencil patterns, your options are endless. These patterns can be used on any surface, including walls, furniture pieces, and floors. If you are hesitant to dive into full-wall stenciling, consider using geometrics for accents, such as borders or patterns around light fixtures.
Remember that the key to getting the best results from stencil patterns is to prepare adequately. One way to prepare yourself is by understanding what goes into successfully stenciling your home. Consider reading up on perfectly painted stenciled walls tips to aid you in the process. Additionally, make sure to choose the right pattern to complement your room décor by checking out our guide on how to choose the right stencil for your room.
Nature-Inspired
Nature-inspired stencil patterns are perfect for creating a serene and calming atmosphere in your home. There are a plethora of different nature-inspired designs to choose from, each bringing its own unique touch to your decor. Here are a few popular options to consider:
- Leaf Patterns: Leaf patterns are a classic choice for nature-inspired stencils. They can come in a variety of designs, from simple and elegant to more intricate and detailed.
- Floral Patterns: Floral stencil designs are perfect for adding a touch of femininity and elegance to any room. They can range from delicate and dainty to bold and dramatic, depending on your personal taste.
- Tree Patterns: Tree stencil designs can add a rustic and earthy feel to your home. They are perfect for creating a cozy and welcoming atmosphere in living rooms or bedrooms.
- Animal Patterns: From birds to butterflies to even forest animals, animal stencil patterns can add an element of whimsy and fun to any space. These patterns work especially well in kids’ rooms or nurseries.
When choosing a nature-inspired stencil pattern, it’s important to consider the colors you’ll be using as well. Stick to natural, earthy tones to enhance the natural feel of the stencil design. With the right stencil and paint combination, you can easily bring a touch of the outdoors into your home.
Modern
If you’re looking for something bold and visually striking, then modern stencil patterns may be just the thing for your home decor. These stencil patterns feature sharp lines and geometric shapes that create a dynamic and contemporary look. Some popular modern stencil patterns include:
- Triangles: A classic modern stencil pattern, triangles have a minimalist feel and work well in any room. Play with different sizes and colors to create a unique look.
- Circles: Another simple yet effective modern stencil pattern is the circle design. Use a variety of circle sizes and colors to create a fun and playful atmosphere.
- Hexagons: Hexagons have become increasingly popular in recent years as a modern and chic design element. They can be used to create a uniform pattern or a more organic look.
- Abstract Lines: If you want something more abstract, consider using stencil patterns with bold lines and shapes. These can be used to create a unique piece of art on your walls or furniture.
- Asymmetrical Shapes: Finally, don’t be afraid to experiment with asymmetrical shapes and designs. These modern stencil patterns can add a touch of whimsy and playfulness to your home decor.
No matter which modern stencil pattern you choose, be sure to use contrasting colors and experiment with different layouts to create a truly unique look.
Furniture Stencil Patterns
If you want to add a unique touch to your furniture, then stenciling can be a great way to achieve this. By using stencils, you can create intricate designs and patterns that will give your furniture a personalized touch. There are many different stencil patterns that you can use to enhance your furniture’s appearance, ranging from floral prints to abstract art. In this section, we will explore some of the most popular furniture stencil patterns and how you can incorporate them into your home decor.
Floral Prints
One of the most popular stencil patterns for furniture is floral prints. These patterns can be painted onto dressers, headboards, and even cabinets. To achieve a unique and stylish look, consider using different types of stencils for each piece of furniture.
Rose Stencils – These stencils create a classic, romantic look. They are popular for accent pieces, such as a jewelry box or photo frame, and can be painted in a variety of colors to match any decor.
Sunflower Stencils – If you want to add a touch of country charm to your furniture, sunflower stencils are a great choice. They work well on larger pieces of furniture, like a rustic coffee table or kitchen island.
Peony Stencils – The bold, vibrant colors of peonies make them a popular choice for stenciling. Use a peony stencil to add a pop of color to a neutral-toned piece of furniture, like a beige armchair or white dresser.
Daisy Stencils – These cheerful flowers are a versatile choice for any piece of furniture. They work well as a border or as a repeating pattern, and can be stenciled in a variety of colors to match any decor style.
When using floral stencils, it’s important to choose the right paint colors to complement your furniture. Consider the existing colors in the room, as well as the color of the furniture and any accent pieces. Experiment with different color combinations on a sample board before stenciling the final piece.
Abstract Art
One of the more daring stencil patterns for furniture is abstract art. It can be challenging to execute, but the end result can be quite striking. Abstract art consists of a mixture of shapes, colors, and lines that create an intricate and unpredictable pattern.
Using an abstract art stencil can make it easy to add this unique flair to your furniture. Bold colors can make a statement, while softer hues give a more subtle effect. The shape of your furniture can also add to the look of the pattern – angular pieces may complement a more geometric abstract pattern, while curvier pieces may look best with something more fluid.
When choosing an abstract stencil, consider what design elements you want to incorporate. Some patterns may have more open spaces and fewer intricate details, while others may consist of many small shapes arranged in a complex manner. A more detailed stencil may require a steadier hand, while a simpler one may be easier to tackle.
It’s important to keep in mind that abstract patterns can appear busy, so it’s best to use them in moderation. Consider using them on a single piece of furniture, or choosing a complementary design to pair with a more subtle solid color.
Tips:
To ensure the best outcome when using an abstract art stencil, keep these tips in mind:
| Tip: | Description: |
| Prepare the surface | Make sure the surface is clean and smooth before beginning to stencil. |
| Practice on sample boards | Test the stencil on sample boards before applying it to the furniture to ensure you’re happy with the design. |
| Use a quality stencil brush | A high-quality stencil brush will help you achieve clean, crisp lines. |
| Apply with light pressure | Apply the paint with light pressure in thin layers to avoid bleeding under the stencil. |
| Choose the right paint | Consider using a paint meant for stenciling, which may be formulated to avoid dripping or bleeding. |
With these tips in mind, you’ll be ready to create a unique and eye-catching piece of furniture with an abstract art stencil pattern.
Monograms
Monogram stencil patterns are a classic way to personalize furniture and home decor. Whether it is a single initial or a three-letter combination, monograms add a touch of sophistication and elegance to any piece of furniture. Here are a few ideas on how to incorporate monogram stencil patterns into your home decor:
- Monogrammed Pillows: Create custom monogrammed pillows by stenciling the initials onto the pillowcase. This adds a personal touch to your living room or bedroom.
- Monogrammed Table Runner: A monogrammed table runner is a great way to add a touch of elegance to your dining room. Stencil the monogram onto a plain table runner for a custom look.
- Monogrammed Wood Sign: Use a monogram stencil to create a custom wood sign for your home. This can be hung in your entryway or living room for a personalized touch.
- Monogrammed Towels: Stencil monograms onto towels to add a touch of luxury to your bathroom. This is a great way to dress up plain towels.
When using monogram stencil patterns, it is important to choose the right font style and size. The font should reflect your personal style and complement the piece of furniture or home decor item you are stenciling. Additionally, be sure to properly prepare the surface before stenciling and use a quality stencil brush to ensure clean lines. With these tips, you can easily add a touch of sophistication to your home with monogram stencil patterns.
Chalk Painted
Another popular type of furniture stencil pattern is chalk painted. This approach to stenciling involves using a special type of paint that creates a chalk-like finish on the furniture. It is perfect for achieving a vintage or shabby-chic look.
| Stencil Design | Suitable Furniture Types | Color Scheme |
| Floral prints | Headboards, dressers, nightstands, accent tables | Pastel shades, white, black |
| French Script | Desks, accent chairs | Black, white, grey |
| Geometric shapes | Coffee tables, end tables, bookcases | Bright and bold colors |
| Quotes and sayings | Antique frames, mirror frames, benches | Black, white, gold |
Before starting the project, make sure that the furniture is clean, dry, and sanded if necessary. Apply the chalk paint using a stencil brush with light pressure, gradually building up the color in layers. Remove the stencil carefully while the paint is still wet. Finally, distress the edges of the furniture using sandpaper or a damp cloth to achieve a more authentic vintage look.
Remember that the chalk paint may require a protective topcoat to prevent chipping and ensure longevity. With the right technique and color scheme, chalk painted stencil patterns can add a unique and charming touch to any piece of furniture in your home.
Floor Stencil Patterns

Floor stencils may not be the first design element that comes to mind when sprucing up a home, but they add a unique touch to any space. The possibilities are endless with floor stencil patterns, which can seamlessly blend in with existing decor or make a bold statement. From classic checkerboard to intricate floral medallions, floor stencils provide a cost-effective and stylish way to upgrade floors without the hassle of ripping out existing ones. In this section, we’ll explore some of the stunning stencil patterns you can use to add character to your floors.
Checkerboard
A Checkerboard pattern stencil is a classic option for floor décor, bringing a timeless touch to any room. This pattern can create a chic look with bold contrasts, where black and white are the most commonly used colors. It is also possible to use warmer tones, such as yellow and white, to brighten up the space.
To create the Checkerboard floor pattern, you will need to use a high-quality stencil and painter’s tape to secure it in place. Start by ensuring that your floor is clean and dry before you begin the stenciling process.
Next, position the stencil on the floor and secure it with painter’s tape on each corner to prevent movement. Begin painting by carefully dabbing the paint over the stencil, making sure to cover all areas evenly. Use a stencil brush with stiff bristles and apply light pressure to achieve a clean, uniform finish.
Once the paint is dry, carefully remove the stencil and repeat the process for the next section until the Checkerboard pattern is complete.
Tip: To achieve a professional finish, use contrasting colors, clean your stencil between uses, and vary the direction of the squares in each section.
Using the Checkerboard pattern stencil is a great way to add a touch of elegance to any room, particularly kitchens and living rooms. It is a classic design that is sure to stand the test of time while adding sophistication to your home decor.
Floral Medallion
Floral Medallion stencil pattern is a perfect way to add a touch of femininity and elegance to your home decor. This pattern features a medallion design with intricate floral details. It can be used on both wooden and concrete floors.
Design: The Floral Medallion stencil pattern features a central medallion design with floral motifs around it. The medallion is surrounded by a circular border with more floral patterns. This creates a beautiful and delicate design suitable for bedrooms, living rooms and dining areas.
Color: You can choose any color scheme that suits your taste and matches your existing decor. Soft pastels like pink, peach or baby blue create a romantic look, while bold colors like red, green or purple can add drama and vibrancy to the room.
Material: To ensure the durability of the stencil pattern, use high-quality paints and stencils. Low-quality materials can result in a blurred and smudged design. Choose a durable stencil material that can be rinsed and reused for future projects.
Application: Prepare the surface by cleaning and sanding it to ensure a smooth and even finish. Secure the stencil in place and apply the paint using a stencil brush with light pressure. Start from the center of the medallion and work your way outwards to prevent smudging. Allow the paint to dry before removing the stencil.
Usage: This stencil pattern can be used on wooden or concrete floors, but it’s also a great choice for accent walls and furniture pieces. You can experiment with different color combinations to achieve unique and personalized results.
Consider using the Floral Medallion stencil pattern to create a romantic and feminine ambiance in your home decor.
Polka Dots
Polka dots are a playful and whimsical pattern that can add a touch of fun to any space. There are a variety of stencil patterns available for creating polka dot designs on floors.
Size: When selecting a polka dot stencil pattern, consider the size of the dots you want to create. Some patterns feature larger dots that can create a bold statement, while others have smaller dots that can create a more delicate look.
Color: Another important consideration is color. Polka dots can be created using a single color or multiple colors. Consider the overall color scheme of the room and select colors that complement or contrast with the existing decor.
Layout: Polka dots can be laid out in a variety of ways, from a random pattern to a more structured grid. Consider the look you are going for and select a stencil pattern that fits your vision.
Stencil Brush: A quality stencil brush is essential when creating a polka dot design. The brush should be small and firm, allowing for precise application of the paint.
Paint: When selecting paint for a polka dot design, choose a quality paint that is designed for the surface you are working on. Use a paint color that is bold and vibrant for a playful look, or a more muted color for a subtle touch.
Polka dots are not just for kids’ rooms. They can be used in any space to add a lighthearted touch. Use a polka dot stencil pattern on a floor in a kitchen or bathroom for a fun and unexpected twist.
Stripes
One of the most popular stencil patterns for floors is the classic stripe. Stripes can add a bold statement to any room, and they’re especially ideal for narrow spaces like hallways. Vertical stripes create the illusion of height and elongate the space, while horizontal stripes can make a room appear wider.
When it comes to choosing colors for your stripes, you can either go for bold contrast or more subtle shades. For example, black and white stripes can make a bold statement, while blue and tan stripes can create a calming and coastal atmosphere.
To ensure the lines are perfectly straight, use a level and painter’s tape to mark off your stripes before painting. A stencil with pre-made stripes can also make the job much easier and faster.
Once you’ve painted your stripes, finish with a protective layer of polyurethane sealant, especially if the floor is high traffic. This will help protect the paint from wear and tear.
Whether you opt for bold and graphic or subtle and calming, stripes can add a unique touch to your home’s decor. So, consider this pattern when it comes to floor stenciling.
Stencil Patterns for Kids’ Rooms
Decorating a child’s room is all about creating a fun and playful atmosphere that will inspire imagination and creativity. One of the most effective and affordable ways to achieve this is by using stencil patterns to add visual interest and personality to their living space. With a variety of themes and designs available, parents can easily find stencil patterns that match their child’s unique style and interests. In this section, we will explore some of the best stencil patterns for kids’ rooms and provide tips for choosing and applying them effectively. So, let’s dive in and discover how to create a magical and enchanting world for your little ones!
Animal Prints
Animal prints are a popular choice for kids’ rooms, adding a playful and whimsical touch to the decor. Here are some different types of animal prints that can be used as stencil patterns:
- Leopard Print: One of the most popular animal prints that adds a sense of adventure and wildness to the child’s room. It can be stenciled in neutral or bold colors, depending on the overall color scheme of the room.
- Zebra Stripes: A classic black and white pattern that adds a fun graphic touch to the room. It can be used as a border around the walls or incorporated into furniture stenciling.
- Giraffe Print: A unique and playful pattern that adds a sense of height to the room. It can be stenciled in a variety of colors, from neutral browns to bright yellows and blues.
- Tiger Stripes: A bold and fierce pattern that can be stenciled in black, orange or a combination of both, creating a striking visual impact in the room.
When stenciling animal prints, it is important to choose the right paint and a quality stencil brush for precise and even application. It is also recommended to practice on sample boards or a spare piece of paper before stenciling onto the walls or furniture. With a bit of patience and creativity, animal prints can make a wonderful addition to your child’s room decor.
Fantasy Themes
Fantasy themes are always a hit with kids, and stenciling a fantasy-themed pattern on their bedroom walls can transport them to a magical world of adventure and wonder. Here are some popular fantasy-themed stencil patterns to consider:
- Fairy tales: Create a enchanted forest scene with fairies, unicorns, and castles.
- Space: Bring the mysteries of the galaxy to life with stars, planets, and rockets.
- Ocean: Dive into the depths of the sea with mermaids, dolphins, and whales.
- Halloween: Create a spooky but not too scary atmosphere with pumpkins, ghosts, and witches.
- Superheroes: Let your kids be their favorite superhero by stenciling images of Batman, Spiderman, or other hero.
- Cartoon: Bring their favorite cartoon characters to life with stenciled images of Mickey Mouse, Minions, or Adventure Time heroes.
Fantasy-themed stencils can be combined with other patterns such as stripes or polka dots to make them more visually appealing. Keep in mind that some children may outgrow their love of fairy tales, superheroes, and other fantasy themes as they get older, so be prepared to update their decor in a few years.
Chevron Stripes
Chevron stripes are a popular choice for kids’ rooms because of their fun and playful design. To create this pattern, you will need a chevron stencil, painter’s tape, and your choice of paint colors. Here are the step-by-step instructions:
- Choose your color palette. Chevron stripes look great with bold and bright colors, so don’t be afraid to experiment. You can use two contrasting colors or mix it up with multiple shades.
- Prepare the surface by cleaning and priming the wall.
- Position the stencil in the desired location and secure it to the wall with painter’s tape.
- Dip the stencil brush lightly into the paint and then tap off the excess on a paper towel.
- Use a light dabbing motion to apply the paint to the stencil. Start from the outside and work your way in to prevent bleeding.
- Peel off the stencil and reposition it to create a continuous pattern. Use a level to ensure the stripes are straight and even.
- Allow the paint to dry completely before applying a second coat, if necessary.
Tips:
- Be sure to use a high-quality stencil brush to avoid smudging and bleeding.
- Use a light pressure when applying the paint for a cleaner finish.
- Practice on a sample board before starting on the wall to get the hang of the technique.
- Clean the stencil after each use to prevent build-up and ensure a crisp pattern.
With these instructions and tips, you can create a fun and vibrant chevron stripe pattern in your child’s room. Let your creativity run wild and have fun with the process!
Alphabet Letters
One of the most popular stencil patterns for a child’s room is the use of alphabet letters. These stencils provide a fun and educational element to the room decor. With the use of bold and vibrant colors, alphabet letters can create an eye-catching and stimulating environment for a child.
Here are some tips for using alphabet letter stencils in a child’s room:
- Choose the Right Size: Consider the size of the room and the size of the stencil. You don’t want the letters to be too small or too large for the space.
- Select the Font: There are various font styles to choose from when it comes to alphabet letters. Pick a font that is easy to read and fits the aesthetic of the room.
- Pick the Colors: Use bright and bold colors to make the letters stand out on the walls. Consider using different colors for each letter to make the room more visually stimulating.
- Arrange Creatively: Experiment with different layouts for the letters, such as arranging them in a curved or diagonal pattern. This can add an extra element of style and creativity to the room.
Another option for alphabet letter stencils is to use them to spell out the child’s name on the wall. This personalizes the room and gives it a unique touch. Additionally, you can pair the alphabet letters with other stencils, such as images of animals or nature, to create a fun and educational theme for the room.
Remember to follow the general tips for using stencils, such as using the right paint and applying with light pressure. With these tips in mind, stencil patterns like alphabet letters can enhance the decor of a child’s room and provide a fun and engaging element to the space.
Tips for Using Stencil Patterns
When you’re planning to use stencil patterns for your home decor, it’s important to keep a few things in mind. To ensure that your project turns out beautifully, it’s essential to choose the right paint, properly prepare the surface, and use a quality stencil brush for a smooth finish. Additionally, applying the stencil with light pressure and practicing on sample boards can help you perfect your technique before tackling your final project. Follow these tips to make the most of your stencil patterns and create a stunning look in your home.
Choose the Right Paint
When it comes to selecting the right paint for stenciling, there are a few factors to consider. Firstly, choose a paint that is specifically designed for stenciling, as this will ensure better precision and cleaner edges. These paints are usually thicker and have a higher pigment concentration than regular wall paint. Secondly, consider the type of surface you’ll be stenciling on. Some paints work better on certain surfaces than others. For example, acrylic paints work well on most surfaces, including wood and fabric, while oil-based paints are better suited for hard surfaces like metal and glass. Thirdly, consider the color and finish of the paint. Matte finishes are popular for stenciling because they don’t reflect light and can provide a subtle texture, but gloss and metallic finishes can also add a unique touch to your design.
Here’s a breakdown of some of the most common types of paint for stencil projects:
| Type of Paint | Description | Best Surfaces |
|---|---|---|
| Acrylic Paint | A water-based paint that dries quickly and can be easily cleaned up with soap and water. | Works well on most surfaces including wood, fabric, and walls. |
| Oil-based Paint | A paint made with oil that dries slower, provides a smoother finish, and is generally more durable than acrylic paint. | Best for hard surfaces like metal, glass, and ceramics. |
| Puffy Paint | A type of fabric paint that creates a raised, textured effect. | Best for fabric surfaces like t-shirts, tote bags, and canvas. |
| Spray Paint | A fast-drying paint that is applied in a mist spray. | Best for large stenciling projects and hard surfaces like furniture and walls. |
Remember, the key to a successful stenciling project is selecting the right paint for the job. Take into consideration the type of surface you’ll be stenciling on, the color and finish of the paint, and whether or not it is specifically designed for stenciling. By doing so, you’ll ensure that your stencil pattern looks clean, crisp, and professional.
Prepare the Surface
Preparing the surface is an essential step to ensure that the stencil pattern adheres properly and looks flawless. Here are the steps you need to follow for surface preparation:
| Clean the Surface |
| The surface must be clean and free of any dust, dirt, or grease. Clean the surface using a damp cloth or sponge and let it dry completely before proceeding further. |
| Sand the Surface |
| If the surface has a glossy finish, it is recommended to sand it lightly to create a rough surface that the paint can adhere to. Use a fine-grit sandpaper to sand the surface and wipe off the sanding dust with a clean cloth. |
| Mask Off Edges |
| If you want a crisp and clean edge, use painter’s tape to mask off the edges. Apply the tape carefully, ensuring that it is straight and properly adheres to the surface. |
| Apply a Primer |
| If the surface is porous or has been painted before, applying a primer is recommended. This will ensure that the stencil pattern adheres well and the paint looks vibrant. Choose a primer that is suitable for the surface and apply it evenly using a brush or roller. Let the primer dry completely. |
Following these steps will ensure that the surface is properly prepared and the stencil pattern looks flawless.
Use a Quality Stencil Brush
When it comes to applying stencil patterns, having the right tools is essential. One such tool is the stencil brush. Here are some tips for using a quality stencil brush:
- Choose the right size: Stencil brushes come in different sizes, from small to large. Choose a size that matches the size of your stencil and the project you’re working on.
- Look for natural bristles: Synthetic bristles may not hold the paint as well as natural bristles do. Look for brushes made of hog, goat or camel hair.
- Keep the brush dry: Dip only the tips of the brush bristles into the paint and then wipe off the excess onto a paper towel or rag. This will prevent the paint from bleeding under the stencil.
- Use a circular motion: To apply the paint, use a circular motion with the brush. Start in the middle of the stencil and work your way out to the edges.
- Apply multiple coats: For a more opaque finish, apply two or more coats of paint, allowing each coat to dry completely before applying the next.
- Clean the brush: After using the brush, clean it with soap and water. Rinse thoroughly and allow the brush to air-dry before storing it away.
Using a quality stencil brush will help ensure that your stencil pattern looks crisp and clean. Remember to choose the right size, look for natural bristles, keep the brush dry, use a circular motion, apply multiple coats and clean the brush properly.
Apply with Light Pressure
When using stencil patterns for your home decor, it’s important to apply the paint with light pressure to achieve the best results. Using too much pressure can cause the paint to bleed under the stencil, resulting in a messy and uneven design.
To apply the paint with light pressure, use a stencil brush and begin by dabbing off any excess paint onto a paper towel or palette. Then, gently stipple the brush onto the stencil, using a light tapping motion. It’s best to start in the center of the stencil and work your way outward, taking care not to drag the brush across the stencil.
When switching to a new color, it’s important to clean the stencil brush thoroughly to prevent color bleeding or mixing. You can do this by using a paper towel or cloth to remove any excess paint, and then washing the brush with soap and water.
If you do accidentally apply too much pressure and the paint bleeds under the stencil, don’t worry! Simply take a clean, damp cloth and gently wipe away the excess paint before it dries.
Remember to take your time and be patient when using stencil patterns. Practice on sample boards before starting your project to get a feel for the process and find the right amount of pressure to use. With a little practice and patience, you’ll be able to create beautiful, professional-looking designs on your walls, furniture, floors, and more!
| Tip | Description |
|---|---|
| Use Light Pressure | Apply the paint with gentle tapping motion and do not drag the brush across stencil. |
| Use Stencil Brush | Stencil brush helps to achieve the desired effect when painting over stencil patterns. |
| Clean the Brush between Colors | It is important to clean the stencil brush thoroughly when switching to a new color to prevent colors from bleeding or mixing. |
| Remove Excess Paint Immediately | If too much paint is applied, gently wipe away the excess paint with a damp cloth before it dries. |
| Practice on Sample Boards | Take your time and practice on sample boards before starting your project to get a feel for the process and find the right amount of pressure to use. |
Practice on Sample Boards
One important tip for using stencil patterns in your home decor is to practice on sample boards before starting on your actual project. This will help you get a feel for how the stencil brush works and how much pressure to apply. Here are some steps to follow when practicing on sample boards:
- Gather materials: Gather some scrap pieces of wood or cardboard as well as your stencil, paint, and stencil brush.
- Secure the stencil: Tape the stencil securely onto the sample board so that it doesn’t shift or move during painting.
- Load the brush: Dip the stencil brush into the paint and then load it onto a paper plate or palette. Make sure to blot the brush gently on a paper towel to remove excess paint.
- Apply paint: Using light pressure, apply the paint to the stencil in a dabbing motion. Make sure not to overload the brush to avoid bleeding or smudging.
- Remove the stencil: Gently remove the stencil from the sample board to reveal your pattern. If you notice any mistakes or imperfections, you can easily adjust your technique before starting your actual project.
Practicing on sample boards can save you a lot of time and frustration in the long run. It’s always better to make mistakes on a small, inconspicuous surface rather than on the wall or furniture that you have invested time and money into. Take your time and experiment with different colors and techniques until you feel confident enough to tackle your larger project.
Conclusion
After exploring the different types of stencil patterns for your home decor, we hope you are feeling inspired and ready to create your own unique designs. Stenciling is a cost-effective way to transform any room in your home, adding style and personality without breaking the bank. Remember to choose a pattern that complements your existing decor and reflects your personal taste. Don’t be afraid to get creative and experiment with different colors and textures to achieve the desired effect.
To ensure success, make sure to follow the tips for using stencil patterns that we have provided. Choosing the right paint, preparing the surface, using a quality stencil brush, applying with light pressure, and practicing on sample boards are all important steps to achieve professional-looking results.
Whether you choose to stencil your walls, furniture, floors, or kids’ rooms, there are endless possibilities for creating beautiful designs that you and your family will enjoy for years to come. So grab your stencils, your paint, and your brushes, and let your imagination run wild! With a little practice and patience, you can achieve stunning results that will make your home the envy of all your friends and neighbors. Happy stenciling!
Frequently Asked Questions
What is a stencil pattern?
A stencil pattern is a design that is cut out of a material, such as plastic or paper, and used as a template to create a repeated image or pattern on a surface.
Can stencil patterns be used on any surface?
Stencil patterns can be used on a variety of surfaces, including walls, furniture, floors, and even fabric.
What types of paint work best with stencil patterns?
Acrylic paint and latex paint work well with stencil patterns. It is important to use a paint that is not too thick or it may bleed under the stencil.
How do I make sure my stencil pattern is aligned correctly?
Using a level, measure and mark the starting point for your stencil. Then place the stencil carefully and use masking tape to secure it in place.
Can I reuse my stencil pattern?
Yes, stencil patterns can typically be reused several times. Just make sure to clean them thoroughly after each use.
Can I create my own stencil pattern?
Yes, you can create your own stencil pattern using a cutting machine or by hand using a craft knife and stencil paper.
What should I do if paint bleeds under the stencil?
If paint bleeds under the stencil, use a small brush to touch up the area with the base coat color.
How do I clean my stencil pattern?
Clean your stencil pattern with warm, soapy water and a soft brush. Rinse thoroughly and let it dry completely before storing it.
Can I combine different stencil patterns in one project?
Yes, you can combine different stencil patterns in one project to create a unique design.
Do I need to seal my project after stenciling?
It is recommended to seal your project with a clear coat to protect it from wear and tear.