Decorating your walls can completely transform the look and feel of your room. One popular and stylish way to decorate your walls is by using stencils. However, if you’ve never painted stenciled walls before, it can be a bit intimidating. Where do you start? What supplies do you need? Have no fear! In this comprehensive guide, we’ll walk you through the entire process and provide expert tips to help you achieve perfectly painted stenciled walls. From choosing the right stencil to aftercare, we’ve got you covered. Are you ready to embark on a new decorating adventure? Let’s get started!
Choosing the Right Stencil
When it comes to stenciling your walls, choosing the right stencil for the project can be a challenging task. There are so many options to choose from, and selecting the wrong design could lead to a less than perfect result. So how do you make sure you choose the right stencil? You’ll want to consider factors such as room and wall size, as well as the appropriate design for the space. With these tips, you’ll be one step closer to creating a stunning stenciled accent wall or mural in your home. For more information on the stenciling process, check out our guide on 5 Easy Steps for Wall Stencils.
Consider Room and Wall size
Consider Room and Wall size
Before choosing a stencil design, it’s important to consider the size of the room and walls you’ll be painting. You don’t want to pick an intricate pattern for a small room as it may end up making the space feel cluttered. Similarly, a large pattern may not work well on a small wall. To help you choose the right stencil size for your room and walls, take note of the measurements and refer to the table below:
| Room Size | Wall Size | Ideal Stencil Size |
|---|---|---|
| Small (up to 100 sq ft) | Standard (approx. 8 ft x 10 ft) | Small to Medium |
| Medium (100-200 sq ft) | Standard to Large (10 ft x 10 ft or more) | Medium to Large |
| Large (200+ sq ft) | Large or Oversized (12 ft x 12 ft or more) | Large to Oversized |
Keep in mind that the table is a general guideline and that you should ultimately choose a stencil size that you feel looks proportional to your space. For more information on choosing the right stencil design for your room, check out our article on stencil patterns for home decor.
Choose an Appropriate Design
When it comes to stenciling, it’s important to choose an appropriate design that complements your room’s decor. A stencil that looks great in one room may not necessarily work well in another. Choosing the right design is key to achieving a polished finished look for your walls.
First, consider the overall style of the room. Is it traditional, modern, or eclectic? This will help you narrow down your options. If you have a specific theme in mind, such as nautical or floral, you can also search for stencils that fit that theme.
Next, think about the size of the room and the wall you want to stencil. A smaller room may benefit from a smaller stencil pattern, while a larger room can handle bolder and more intricate designs. Similarly, a smaller wall may work better with a smaller stencil, while a larger wall can accommodate larger designs.
Stenciling options are endless: from geometric shapes to floral patterns, there is something to fit every room and style. Alternatively, you can create your own stencil from a favorite image or graphic. Just be sure to choose a high-quality image that will translate well to a stencil.
Don’t be afraid to take a chance and try a bold design that will add interest and character to your space. With the right design and execution, stenciling can be a great way to add visual interest and personality to any room in your home.
If you need inspiration for finding the right stencil design, check out our guide to stencil patterns for home decor or learn about how to use stenciling to transform furniture with our stencil furniture makeovers guide.
Gathering Supplies
Before diving into the exciting process of stenciling your walls, you need to gather all the necessary supplies. This step is important to ensure that you have everything you need to achieve a beautiful and professional-looking result. With so many different tools and products required for stenciling, it can be overwhelming to figure out what you need. But don’t worry, we’ve got you covered! In this section, we’ll walk you through the essential supplies you need and provide tips for choosing the right paint to achieve the perfect stenciled walls. So, let’s get started on gathering everything you need to get creative with your walls!
Essential Supplies Needed
To successfully stencil your walls, you will need to gather some essential supplies before you begin. These supplies include:
| Stencil | A high-quality stencil that is appropriate for your chosen design. |
| Painter’s tape | Use painter’s tape to secure the stencil to the wall to prevent it from moving during the painting process. |
| Paint rollers or brushes | Choose high-quality paint rollers or brushes that fit the size of your stencil design. Foam rollers can be great for smaller designs, while larger designs may require larger brushes or rollers. |
| Paint tray | A paint tray is essential for rolling or brushing the paint onto the stencil. |
| Drop cloth or protective plastic | Protect your floors and furniture from paint spills by laying down a drop cloth or plastic sheeting before you begin. |
| Clean cloth or sponge | Keep a clean cloth or sponge on hand to quickly wipe away any mistakes or excess paint. |
| Paint | Choose a high-quality paint that is appropriate for your wall surface and your preferred color. |
Having these essential supplies on hand will make the stenciling process much easier and ensure that your finished product looks professional and polished.
Tips for Choosing the Right Paint
Choosing the right paint is essential when it comes to achieving a perfectly painted stenciled wall. Here are some tips to keep in mind when choosing your paint:
| Tip | Description |
| 1 | Choose a paint specifically designed for stenciling. Stencil paint is usually thicker and dries faster, minimizing bleeding and smudging. |
| 2 | Opt for a paint that contrasts well with your wall color. This will allow your stencil design to stand out without being overpowering. |
| 3 | Select a paint finish that suits the room’s purpose. For high-traffic areas, use a durable satin or semi-gloss finish, while for less busy areas, a matte finish will suffice. |
| 4 | Buy high-quality paint to ensure even coverage and long-lasting durability. Cheaper paints may require multiple coats, resulting in an uneven finish. |
| 5 | Consider the type of stencil you are using. For intricate designs, choose a paint that has a longer drying time to prevent smearing. |
| 6 | For a more subtle effect, consider using metallic or pearlized paints. These types of paints add texture and dimension to your stencil design. |
| 7 | Test your paint colors on a small, inconspicuous area before painting the entire wall. This will give you an idea of how the paint will look in natural light. |
By following these tips, you can select the perfect paint for your stenciled wall project and achieve a beautiful and long-lasting result.
Preparing the walls
Getting your walls ready for stenciling is one of the most crucial steps in ensuring the longevity and polished look of your finished product. You’ll want to prepare the surface of the walls carefully to ensure paint adhesion, longevity, and overall stenciling satisfaction. In this section, we’ll go over some essential tips for getting your walls ready for stencil application. Let’s dive into preparations that are necessary before starting the painting process!
Clean and Repair Walls
Before starting the stencil painting process, it is essential to ensure that the wall is clean and free of any blemishes. Here are some steps to follow to ensure that your wall is ready for painting:
| Clean the Wall | Use a damp cloth or sponge to gently wipe the wall and remove any dirt or debris. If the wall is especially dirty, you may need to use a cleaning solution specifically designed for walls. Be sure to allow the wall to dry completely before proceeding. |
| Repair Any Damage | Inspect the wall for any cracks, holes or other damages that may need repair. Use a spackling compound to fill in any visible cracks or holes, and smooth it out with a scraper or putty knife. Allow the compound to dry completely before sanding it smooth with fine-grit sandpaper. |
| Sand the Wall | Use fine-grit sandpaper to lightly sand the entire wall. This step will help to ensure that the paint adheres smoothly to the wall. After sanding, use a tack cloth to remove any dust or debris from the wall. |
By following these steps, you can ensure that your stencil painting project goes smoothly and the end result is perfect.
Prime Walls if Necessary
Before stenciling any walls, it’s important to prime them properly. This step ensures that the paint adheres well and also helps achieve a more even finish.
Why prime walls?
Priming walls before stenciling is especially important if the walls have never been painted before, or if they have been painted with a different color. Priming seals the porous surface of drywall, plaster, or other wall materials, and provides a smooth and consistent base for the stencil paint.
When to prime walls?
It’s necessary to prime the walls if:
- The wall color is dark and you are stenciling with a light color.
- The wall is porous or has been patched up.
- The walls are weathered and have cracks or stains.
How to prime walls?
Here are some tips to consider when preparing to prime the walls:
- Clean the walls with a damp cloth to remove any dirt or dust.
- Repair any cracks or damage to the wall.
- Choose a primer that is compatible with both the wall material and the paint you will use for stenciling.
- Apply the primer evenly using a brush or roller. Be sure to follow the manufacturer’s instructions on drying time and number of coats to apply.
- Allow the primer to dry completely before stenciling the walls.
By taking the time to prime the walls before stenciling, you’ll ensure a more professional and polished result. It may add a bit of extra time and effort to your project, but the end result will be worth it.
The Painting Process
Once you have prepared the walls and chosen the right stencil for your space, it’s time to focus on the painting process. This phase requires attention to detail and patience, but the end result will be worth it. So grab your essential painting supplies, and let’s dive into the next steps for achieving perfectly painted stenciled walls.
Use a Quality Brush or Roller
When it comes to stenciling walls, choosing the right tools is just as important as choosing the right stencil and paint. To ensure a smooth, professional-looking finish, it’s essential to use quality brushes or rollers specifically designed for the task.
The type of brush or roller you choose will depend on the size of your stencil and the area you’re painting. For smaller stencils and tight spaces, a small-sized brush is ideal. On the other hand, a medium or large-sized brush or roller will work better for larger stencils or broader areas.
One of the most important things to look for when choosing brushes and rollers is the quality of the bristles. High-quality bristles are made from natural materials such as horsehair or hog bristle, which absorb paint well and distribute it evenly. Synthetic bristles can also work well, but it’s important to choose brushes and rollers specifically designed for stenciling to avoid seepage under the stencil.
When it comes to rollers, foam rollers are the most commonly used for stenciling. They are inexpensive and easy to use and can provide a smooth and even finish. However, if you’re working with a larger stencil, a larger-sized roller may work better to cover larger areas more quickly.
Regardless of the brush or roller you choose, it’s important to test it out on a small area before using it to stencil the entire wall. This will help you determine how much pressure to apply and how much paint to load on the brush or roller.
In addition to using quality brushes and rollers, it’s also important to clean them properly after each use to extend their lifespan. Rinse them thoroughly with warm water and mild soap and store them in a dry, cool place until the next use.
By investing in quality brushes and rollers and taking proper care of them, you can achieve a professional-looking finish that will last for years to come.
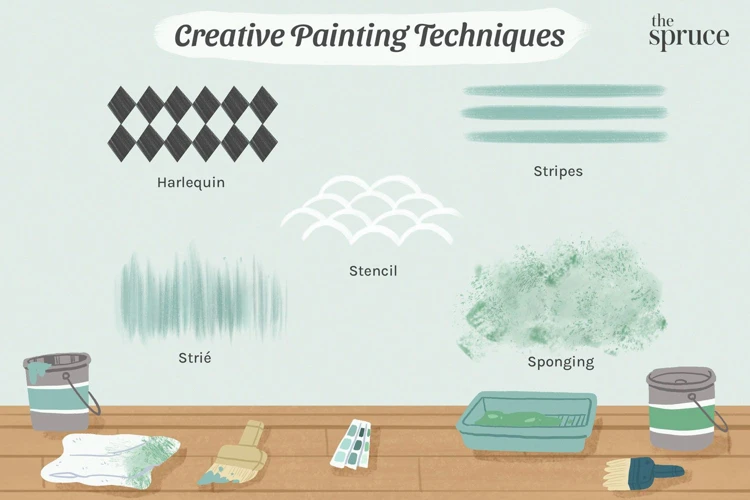
Stenciling Techniques
When it comes to stenciling your walls, using the right technique is crucial for achieving perfect results. Here are some essential stenciling techniques to keep in mind:
| Technique | Description |
|---|---|
| Dabbing | One of the most common techniques for stenciling, dabbing involves applying the paint onto the stencil using a stencil brush or small sponge in a pouncing motion. Make sure you use just enough paint to fill in the stencil shape without causing any bleeding. |
| Rolling | Rolling is an effective technique for larger stencils or when working on walls with a rough texture. Use a stencil roller to apply the paint in an up-and-down motion, making sure to remove any excess paint from the roller before applying it to the stencil. |
| Taping | In some cases, it may be helpful to use painter’s tape to hold the stencil in place while you work. This can be especially useful for complex designs that require a steady hand. Make sure to use a low-tack tape that won’t damage the stencil or the wall. |
| Blending | If you want a more subtle, blended effect, try using a stencil brush to gently blend the edges of the stencil design into the wall. This can create a beautiful, watercolor-like effect. Just make sure to use a light touch and blend gently to avoid any smudging. |
No matter which technique you choose, remember to work slowly and carefully, being mindful of the amount of paint you’re using, the pressure you’re applying, and the overall effect you’re trying to achieve. With a bit of patience and practice, you’ll be able to master the art of stenciling and create beautiful, custom designs on your walls.
Fill in Any Blemishes
Once you’ve stenciled your walls, you may still notice some small blemishes or imperfections that need to be addressed. These may include smudges, drips, or areas where paint has bled under the stencil. Fortunately, these issues can be easily fixed with a few simple steps.
First, use a small brush to carefully fill in any missed or uneven spots in the stenciled pattern. For larger blemishes or mistakes, you may need to touch up the entire section with a small roller or brush.
Next, take a closer look at the edges of your stencil. If you notice any bleeding or smudging, use a small craft knife or razor blade to carefully scrape away any excess paint. Be sure to take your time with this step to avoid accidentally damaging the surrounding painted area.
If you have a particularly stubborn blemish, you may need to sand it down gently and reapply paint as needed. For larger patches of missing or damaged paint, you may need to repaint the entire wall.
Taking the time to fill in any blemishes will help ensure a professional-looking finished product that you’ll be proud to show off to friends and family. Remember to take your time during this step, and don’t hesitate to consult with a painting expert if you need additional guidance.
| Steps to fill in blemishes: |
|---|
| Step 1: Use a small brush to carefully fill in any missed or uneven spots in the stenciled pattern. |
| Step 2: For larger blemishes or mistakes, touch up the entire section with a small roller or brush. |
| Step 3: If there is bleeding or smudging, use a small craft knife or razor blade to carefully scrape away any excess paint. |
| Step 4: If there’s a particularly stubborn blemish, sand it down gently and reapply paint as needed. |
| Step 5: If a larger patch of paint is missing, repaint the entire wall. |
Aftercare
Now that the hard work of stenciling is over, it’s time to focus on the finishing touches to ensure your wall stands the test of time. Proper aftercare is essential to keep your newly stenciled wall looking fresh and vibrant for years to come. There are a few steps you need to follow to ensure your wall looks great and your supplies are ready for your next project. Let’s explore these steps in detail.
Removing the Stencil
When the paint has dried completely, it’s time to remove the stencil, which requires care and precision to avoid smudging or damaging the design. Follow these steps to remove the stencil safely and cleanly:
| Step 1: | Gently peel off the stencil from one corner to avoid tearing or pulling on the surface of the wall. |
| Step 2: | Use a razor blade or craft knife to carefully cut any paint that has seeped under the stencil or connected pieces of the stencil. |
| Step 3: | Check for any areas that need touch-ups or corrections, and use a small brush or sponge to fix any mistakes. |
| Step 4: | Dispose of the stencil or clean it thoroughly with warm water and soap for future use. |
Be sure to take care when removing the stencil to ensure that the painted design remains intact and the wall looks as beautiful as you imagined.
Clean the Tools and Brushes
Once you have finished painting your stenciled walls, it is essential to clean your tools and brushes properly. This will help maintain the quality of your brushes and ensure they are ready for future use. Here are some tips to ensure you clean your tools and brushes correctly:
- Wash your tools and brushes immediately: It is essential to wash your tools and brushes as soon as the painting process is complete. This will prevent the paint from drying and hardening on the bristles. Use warm water and soap to remove any excess paint.
- Use the right cleaning method: Different brushes require different cleaning methods. For example, synthetic brushes require a different cleaning method compared to natural brushes. Consult the manufacturer’s instructions for the recommended cleaning method.
- Do not soak the brushes in water: Avoid soaking the brushes in water as this can damage the bristles. Instead, rinse the brushes under running water and use your fingers to remove any remaining paint.
- Dry the brushes: Once you have finished cleaning your brushes, it is essential to dry them correctly. Use a clean cloth to remove any excess water and reshape the bristles back into their original shape. Allow the brushes to dry completely before storing them away in a cool and dry place.
By following these tips, you can ensure that your painting tools and brushes last for many painting projects to come. Proper care and maintenance of your brushes will help prevent them from becoming damaged or worn, which can negatively impact the quality of your painting in the future.
Conclusion
In conclusion, stenciling is a fantastic option for those who want to add a unique and personalized touch to their walls. By following the expert tips and step-by-step guide provided, you can achieve perfectly painted stenciled walls that will impress and delight anyone who enters your home.
Choosing the right stencil is a critical factor in achieving a successful stenciling project. Take into consideration the size of your room and the design of your stencil. It’s best to choose a design that complements your room’s theme and style.
Gathering the supplies will ensure that you have everything you need before starting the project. Ensure that you have all the essential supplies and choose the right paint for your walls.
Preparing the walls is crucial when it comes to stenciling. Ensure that your walls are clean and free from any blemishes. Also, prime your walls if necessary to achieve an even surface.
During the painting process, use a quality brush or roller to achieve a smooth and even coat. Apply the stencil using the appropriate technique, and fill in any mistakes or blemishes.
Aftercare is equally important to ensure that your stenciled walls maintain their perfect finish. Remove the stencil carefully, and ensure that you clean all the tools and brushes used during the project.
By following these expert tips and guidelines, you can achieve perfectly painted stenciled walls that will last for years to come. Take your time and enjoy the process, and don’t forget to share your final results with friends and family!
Frequently Asked Questions
What is stenciling?
Stenciling is a decorative painting technique in which a design is created by applying paint through a cut-out template, or stencil.
Can any wall be stenciled?
Most walls can be stenciled as long as they are clean, dry, and free of any major imperfections.
How do I choose the right stencil?
Consider the size of the room and walls, as well as the design you want to achieve. Make sure to choose a stencil that fits your vision and skill level.
What supplies do I need for stenciling?
You will need a stencil, painter’s tape, a pencil, a level, a paintbrush or roller, and paint in your chosen colors.
What type of paint should I use for stenciling?
It’s best to use a high-quality, low-VOC paint in a matte or eggshell finish. Avoid using high-gloss paint, as it may create a glare and highlight imperfections in the wall.
Do I need to prime my walls before stenciling?
If your walls have any imperfections, it’s recommended to use a primer before stenciling to create a smoother surface for the paint to adhere to.
What is the best technique for stenciling?
Start by securing the stencil to the wall with painter’s tape, then use a light amount of paint and a tapping or swirling motion with your brush or roller to fill in the design.
How do I fix any mistakes while stenciling?
If you make a mistake or the paint bleeds under the stencil, use a small artist’s paintbrush to touch up the affected area and clean up any edges with a damp paper towel.
How do I clean my stencils and tools after use?
After use, clean your stencils and tools with warm water and soap or a gentle paint thinner, then let them dry completely before storing them away.
Can I reuse my stencils?
Yes, stencils can be reused multiple times if they are properly cleaned and stored in a dry, cool place.