Have you ever faced the challenge of trying to remove urethane glue from wood? It can be a perplexing and frustrating experience, especially if you don’t know where to start. Urethane glue is a strong adhesive that bonds quickly and securely to wood, making it a popular choice for woodworking projects. However, removing it from wood can be tricky, as it is resistant to solvents and heat. In this complete guide, we will explore four effective methods for removing urethane glue from wood step-by-step. So let’s dive right in and discover how to tackle this common woodworking problem.
What is Urethane Glue?
When it comes to woodworking, choosing the right adhesive is essential to ensuring a strong bond. One type of adhesive that is commonly used in woodworking is urethane glue, also known as polyurethane glue. This type of glue is well-known for its strong bonding properties and its ability to fill gaps, which makes it a popular choice for woodworkers. However, while the glue is great for bonding, removing it from wood surfaces can be a challenge. In the following sections, we will provide a complete guide on how to successfully remove urethane glue from wood using different methods. But first, let’s take a closer look at what makes urethane glue unique. If you have ever struggled with removing glue from different surfaces, you may find our guide helpful, such as how to get glue off shoes, how to get hair glue off skin, how to get super glue off acrylic, and more.
The Problem with Urethane Glue on Wood
Urethane glue is a type of adhesive that forms a strong bond between two surfaces. While it is an effective adhesive, it can also be a problem for woodworkers. When this glue is applied to wood, it can be difficult to remove without damaging the surface. Moreover, urethane glue is resistant to solvents and can become hard and brittle over time, which makes it even more difficult to remove.
Unlike other adhesives, urethane glue is not water-soluble and can’t be removed with water. It can only be removed through mechanical means or with the help of chemicals that are specifically formulated to dissolve it. However, the use of chemicals can damage the wood surface if not used properly. This is why it is important to choose the right method and follow the steps precisely to avoid causing more harm than good.
The longer the urethane glue stays on the surface of the wood, the harder it can become and the more challenging it can be to remove it. This is why it’s important to act quickly and remove the glue as soon as possible before it fully sets. There are different methods and tools that can be used to remove urethane glue from wood, but not all of them may be suitable for your specific situation.
Method 1: Scraping and Sanding
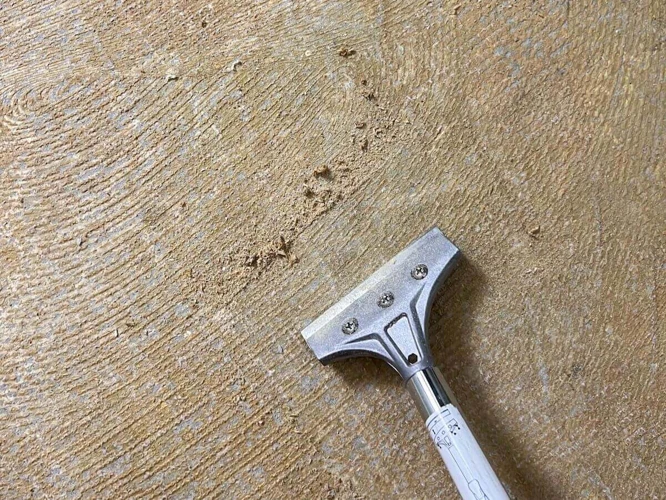
Scraping and sanding is one of the most basic yet effective ways to remove urethane glue from wood. This method involves physically scraping off excess glue and sanding the area until it’s smooth and even. While it may take some time and effort, it’s a great option for those who don’t want to use harsh chemicals or solvents. Just be sure to follow the steps carefully to avoid damaging the wood. If you need help removing other types of glue, check out our guides on removing super glue from miniatures, getting glue off lenses, or removing glue from stairs.
Step 1: Scrape off Excess Glue
Scraping off excess glue is the first step in removing urethane glue from wood. It is important to get as much of the glue off the surface as possible to make the other removal methods easier and more effective. Here are the steps involved in scraping off excess urethane glue from wood:
| Step 1 | Use a plastic scraper or putty knife to gently scrape off any excess glue. Be careful not to gouge the wood surface. |
| Step 2 | If the glue is still wet, use a damp cloth to wipe away the excess. This will prevent it from drying and hardening. |
| Step 3 | Continue to scrape off the glue until you can no longer remove any more. |
| Step 4 | Dispose of the excess glue properly, as it can be harmful to the environment. |
It is important to note that using a metal scraper or putty knife can damage the surface of the wood. Using a plastic scraper or putty knife is the best option. If the glue has already dried and hardened, it may be difficult to scrape off. In this case, other removal methods such as sanding or solvents may be necessary.
Tip: If the urethane glue has accidentally gotten on your skin, check out our article on how to remove super glue from skin.
Step 2: Sand the Area
After scraping off the excess urethane glue, the next step is to sand the area. Sanding the area is an essential step in removing urethane glue stains and residue from wood. The primary goal of sanding is to remove the remaining glue and make the surface smooth and even. Here are the steps to follow when sanding urethane glue from wood:
- Select the Right Sandpaper: Choosing the right sandpaper can make the process easier and more effective. Typically, sandpapers with grits of 80-120 are excellent for sanding the wood surface.
- Start Sanding: Begin sanding slowly with gentle pressure. Always sand in the direction of the grain. Sanding with the grain ensures that the wood remains smooth and prevents it from getting scratched or damaged.
- Increase Pressure: Gradually increase the pressure as you sand. This will help remove stubborn residue and ensure that all the glue has been sanded off.
- Switch to Fine Grit Sandpaper: Once you’ve sanded the area with a coarse-grit sandpaper, switch to a fine-grit sandpaper. Sand the area again, but this time use a light touch while still moving in the direction of the grain. This helps to remove any remaining residue and to make the surface smooth.
- Finish Sanding: After completing the sanding, wipe the area with a lint-free cloth to remove any sanding dust and debris.
It is important to note that sanding can only be effective if the glue has not penetrated too deep into the wood. If the urethane glue has penetrated deep into the wood, it might be necessary to use other removal methods like heat and solvent or abrasive blasting.
As a final tip, it is advisable to test the sanding method in a small, inconspicuous area first, to prevent accidental damage to the wood.
Step 3: Clean the Surface
Once you have successfully removed the urethane glue from the wood using your chosen method, it’s time to clean the surface to ensure that there is no residue left behind. Use a clean cloth soaked in warm soapy water to wipe away any remaining glue residue. Rinse the cloth in clean water and continue cleaning until no glue is left.
Important note: Make sure to use gentle, non-abrasive cleaning materials to avoid damaging the wood. Avoid using harsh chemicals, soapy water will usually be enough.
Pat dry the surface with a dry clean cloth. Examine the area and check whether the surface is smooth or has any bumps or lumps. If so, use abrasive paper to even the surface gently until you get a uniform smooth surface.
If you have followed the Tip 3: test the method on a small area first before proceeding to remove the urethane glue from a larger area of your wooden surface, then the possibility of damaging the wood surface is minimal. However, before continuing with the cleaning process, inspect the area and ensure that you haven’t affected the finish of the wood.
In case you have damaged the finish of the wood, you may need to refinish the surface to restore it to its initial state. This step may be tedious and time-consuming but will leave your wooden surface looking as good as new.
Cleaning the surface after removing the urethane glue from the wood is vital to ensure that no residue is left behind and that the surface is left looking neat and presentable. Taking this step will leave your wood surface looking as good as new, having successfully removed all the urethane glue without leaving any damage behind.
Method 2: Heat and Solvents
When it comes to removing urethane glue from wood, there are various methods to consider. One effective way is through the use of heat and solvents. This technique involves heating the glue and applying a chemical solvent to dissolve it. It’s important to note that this method can be hazardous, so it’s crucial to follow safety precautions and use protective gear to avoid any injury or damage. In this guide, we’ll walk you through the detailed steps to remove urethane glue from wood using heat and solvents.
Step 1: Heat the Glue
To start the process of removing urethane glue from wood using heat and solvents, the first step is to heat the glue with a heat gun or a hairdryer. This step is crucial because heat softens the glue and makes it easier to remove.
To begin, put on protective gear such as gloves and goggles, and turn on the heat gun or hairdryer to a medium or high setting. Hold the hot air about one inch away from the urethane glue and move it around slowly and evenly to avoid scorching or burning the wood.
Continue heating the glue until it becomes soft and pliable enough to scrape off. This may take up to a few minutes depending on the thickness of the glue and the intensity of the heat. Be patient and do not try to scrape off the glue before it is adequately heated because this can damage the wood surface.
If using a heat gun, be sure to keep it moving to avoid overheating any one spot. Do not allow the heat gun to get too close to the wood surface or plastic components nearby as this can cause melting, warping, or ignition. If using a hairdryer, use a low-heat setting to avoid burning the wood.
Once the urethane glue has softened, proceed to the next step of applying a solvent. If you want to know more about how to remove Kiss Individual Lash Glue, how to get super glue off desk, or how to remove tub surround glue, click on the following links: how to remove Kiss Individual Lash Glue, how to get super glue off desk, or how to remove tub surround glue.
Step 2: Apply the Solvent
To apply the solvent to the urethane glue on the wood surface, follow these steps:
- Choose the right solvent: There are several solvents available in the market that can help dissolve the urethane glue. Acetone, mineral spirits, and isopropyl alcohol are some of the common solvents used. Choose a solvent that is safe to use on wood and has a higher chance of dissolving the glue. Read the product label carefully before using it.
- Prepare the work area: You need to prepare the work area before applying the solvent. Wear protective gloves and goggles to prevent the solvent from coming in contact with your skin or eyes. Ensure that there is enough ventilation in the area as the fumes from the solvent can be harmful. Place a piece of cardboard or plastic sheet under the work area to collect any solvent or glue residue.
- Apply the solvent: Wear gloves and dip a cotton ball or a rag in the solvent. Gently rub the soaked cotton or rag over the urethane glue and let it sit for a few minutes. The solvent will start dissolving the glue, and it will become soft and gooey. Repeat the process until all the glue is dissolved.
- Clean the surface: Once the glue has dissolved, use a scraper or a putty knife to remove the softened glue from the wood surface. Be gentle, so as not to damage the wood. Use a clean cotton or rag dipped in the solvent to wipe off any remaining glue residue. Use a dry cloth to wipe the surface and remove any excess solvent.
Remember, the solvents are highly flammable and volatile, so handle them with care. Keep them away from heat sources and open flames. Dispose of the used solvents and cotton balls according to local regulations.
Step 3: Wipe Clean
After applying the solvent in Step 2, you will need to give it some time to work its magic. Once the solvent has had enough time to break down the urethane glue, take a clean cloth and wipe away the glue. Be sure to use a firm and consistent pressure to ensure the glue is adequately removed.
Using a clean cloth is crucial as it ensures that you do not end up with any debris or solvent on the wood. If you leave any excess solvent on the surface, it can potentially damage the finish or the color of the wood. Make sure that you do not rub too hard on the wood as it can cause the wood’s surface to become damaged or scratched.
If there are any remaining traces of urethane glue on the wood, you may need to repeat Step 2 and Step 3 until all traces of glue are gone. Once you have fully removed the glue, you should rinse the surface with warm water and gently blot with a dry cloth to remove excess liquid.
It is essential that you thoroughly dry the surface before any further treatment, such as staining or varnishing. Leaving the surface moist can cause discoloration or uneven staining, which can be difficult to rectify. Take your time and ensure that all traces of moisture are gone before applying any treatments, and you can be assured of a beautiful and long-lasting result.
Method 3: Abrasive Blasting
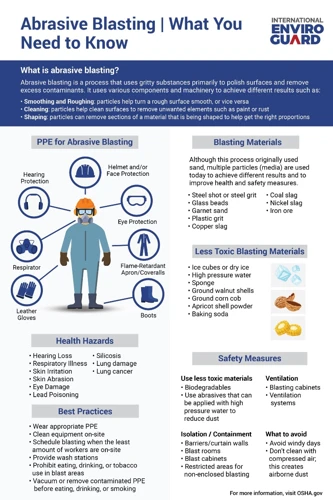
Removing urethane glue from wood can be a frustrating and time-consuming task, but with the right tools and techniques, it is possible to achieve excellent results. Abrasive blasting is a method that involves the use of compressed air or water to propel abrasive materials at high speeds onto the surface of the wood. This process can effectively remove even the most stubborn and thick layers of urethane glue from wood surfaces, leaving them clean and ready for refinishing. In this section, we will discuss in detail how to use abrasive blasting to remove urethane glue from wood.
Step 1: Prepare the Work Area
Before starting the process of abrasive blasting to remove urethane glue from wood, it is crucial to prepare the work area adequately. Here are the steps to follow:
- Cover nearby objects: Cover any nearby fixtures or objects, such as furniture or electronics, with a protective sheet. Abrasive blasting can produce a lot of dust and debris that may damage sensitive surfaces.
- Clear the work area: Clear the work area of any debris, such as sawdust or wood chips, that could mix with the abrasive media and impede its effectiveness. Sweep or vacuum the area thoroughly to ensure that the surface is free from dirt and debris.
- Wear protective gear: Abrasive blasting can cause serious eye, skin, and breathing hazards, so make sure to wear protective gear such as goggles, gloves, and dust masks.
By taking these steps to prepare the work area, you’ll ensure that the abrasive blasting process goes smoothly and effectively, reducing the risk of damage to nearby fixtures and protecting your health and safety in the process.
Step 2: Apply Abrasive Blasting
Step 2: Applying Abrasive Blasting
Once the work area has been prepared, the next step is to apply abrasive blasting to remove the urethane glue from the wood surface. Abrasive blasting is a powerful method that uses high-pressure air to propel abrasive material to the surface. This method quickly removes the glue and any other unwanted materials from the surface of the wood.
To apply abrasive blasting, follow these steps:
| Materials Needed: | Protective eyewear and respiratory mask | Abrasive blasting equipment | Abrasive blasting media (such as sand or baking soda) |
|---|---|---|---|
| Step-by-Step Instructions: | 1. Put on protective eyewear and respiratory mask to avoid inhaling any harmful particles. | 2. Set up the abrasive blasting equipment and fill the tank with the abrasive blasting media of your choice. | 3. Start the equipment and adjust the air pressure and flow rate based on the type of wood you are working with and the size of the urethane glue area you are removing. |
| 4. Hold the tip of the abrasive blaster about 6-10 inches away from the wood surface and move it back and forth, keeping the nozzle perpendicular to the surface. | 5. Work in small sections, blasting the glue and wood until the glue is removed, being careful not to damage the wood underneath. | 6. Repeat the process, adjusting the air pressure and flow rate as needed, until the entire urethane glue area is removed. |
Note: This method should only be used on a durable type of wood. It can be too harsh for softwood and may damage the surface. Before using abrasive blasting, be sure to test it out on a small area to make sure it doesn’t cause any damage.
Step 3: Clean the Surface
After scraping off excess glue and sanding the area, the surface needs to be cleaned thoroughly. Here are a few steps to ensure a clean surface:
- Step 1: Use a brush to remove any debris and dust from the surface of the wood. Make sure to remove all of the dust and debris as they can interfere with the proper application of the solvent or chemical stripper.
- Step 2: Use a clean and dry cloth to wipe down the surface of the wood. Make sure there is no remaining dust or debris on the surface before proceeding to the next step.
- Step 3: Prepare a cleaning solution by mixing warm water and mild dish soap in a bucket. Dip a clean sponge or cloth in the solution and wring out the excess liquid. Gently scrub the surface with the sponge or cloth, making sure to remove all traces of the urethane glue. Rinse the surface with clean water and dry it with a clean and dry cloth.
It is important to make sure the surface is completely clean and dry before using any finishing products on it. Any residue left on the surface can interfere with the finishing process and affect the final result.
Method 4: Chemical Stripping
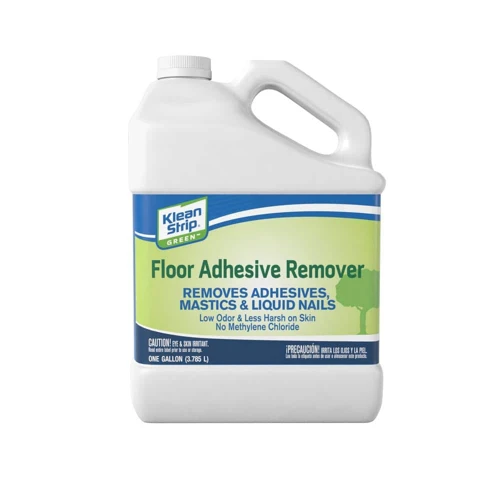
Removing urethane glue from wood can be a challenging task. However, there are several effective methods that can help you to achieve a clean and smooth surface. One of the most popular methods to remove urethane glue from wood is through chemical stripping. This method involves the use of a chemical solution that dissolves the glue, making it easy to wipe away. But before diving in, it’s essential to understand the steps involved to avoid damaging the wood. Let’s explore the chemical stripping method step-by-step.
Step 1: Apply Chemical Stripper
Step 1: Apply Chemical Stripper
- Start by choosing a chemical stripper that is safe to use on wood. Read the manufacturer’s instructions and warning labels carefully before opening the container.
- Use a paintbrush to apply the chemical stripper generously over the area where the urethane glue is located. Be careful not to apply too much or the stripper may run or drip.
- Make sure to cover the entire surface of the glued area with the stripper.
- Leave the stripper to work on the glue for the amount of time specified in the instructions. Typically, this will be around 30 minutes depending on the brand of chemical stripper that you are using.
Note: Chemical strippers can be harmful, so make sure to wear gloves, protective goggles and a respirator mask when applying these products. Work in a well-ventilated area to avoid inhaling fumes.
After the amount of time specified in the instructions has passed, move on to Step 2: Wait for the Stripper to Work.
Step 2: Wait for the Stripper to Work
Once the chemical stripper has been applied to the affected area, it is important to allow it to work its magic. This can typically take anywhere from 30 minutes to an hour, depending on the product and the thickness of the glue.
Tip: Check the manufacturer’s instructions for specific guidance on how long to wait.
During this waiting period, it is important to avoid touching the area or disturbing the stripper in any way. The stripper must be allowed to penetrate the glue and break down its chemical composition completely.
While waiting, consider covering the area with a plastic sheet to keep the stripper from evaporating too quickly. Alternatively, some products come with a thickening agent that can be applied to the area to keep the stripper in place and prevent it from drying out.
Warning: Do not attempt to scrape or sand the area while waiting for the stripper to work. This can cause the glue to spread and may damage the wood surface.
Once the waiting period is over, use a scraper or a plastic brush to gently remove the glue. Avoid using metal tools as they can scratch the wood surface. If the glue does not come off easily, repeat the process by applying more stripper and waiting for the suggested time again.
Tip: Use a clean, dry cloth to wipe away any residue left behind by the stripper.
After the glue has been removed, wash the surface with water and let it dry before proceeding with any further sanding or finishing.
Step 3: Remove the Glue
After applying the chemical stripper and waiting for it to work its magic, it’s time to remove the urethane glue from the wood. This step can be messy, so be sure to wear protective gear such as gloves and eye protection.
One option for removing the glue is to use a putty knife or scraper. Gently scrape away the glue, being careful not to damage or gouge the wood. It may take some effort to remove all of the glue, especially if it has dried and hardened on the surface.
Another option is to use a piece of fine-grit sandpaper or a sanding block. Sand the surface of the wood in a circular motion, working slowly and carefully. Be sure to remove all of the glue and any rough areas left behind by scraping.
Once the glue has been removed, use a damp cloth to wipe down the surface of the wood and remove any leftover residue. It may be necessary to repeat the stripping and removal process in order to achieve the desired result.
Important: When using any of these methods, be sure to work carefully and patiently to avoid damaging the wood. It may take some trial and error to find the best method for removing the urethane glue, so don’t be afraid to experiment on a small, inconspicuous area first.
| Materials Needed | Tools Needed |
|---|---|
| Chemical stripper | Putty knife or scraper |
| Protective gear (gloves, eye protection) | Sanding block or sandpaper |
| Damp cloth |
Removing urethane glue from wood can be a time-consuming and tedious process, but with the right tools and techniques, it can be done effectively. By following these steps and using the tips and tricks mentioned in this guide, you can restore the natural beauty of your wood surface and enjoy it for years to come.
Tips and Tricks to Remove Urethane Glue from Wood
Removing urethane glue from wood can be a challenging process, especially if you’re not sure what tools and techniques to use. However, with the right tips and tricks, you can make the process easier and more efficient. In this section, we’ll explore some of the best practices you should keep in mind when removing urethane glue from wood. From wearing protective gear to testing methods on a small area first, these tips will help you achieve a successful removal while protecting yourself and your wood surfaces. So, let’s dive in and discover the valuable tips and tricks to remove urethane glue from wood.
Tip 1: Wear Protective Gear
When removing urethane glue from wood, it’s important to keep safety in mind. This is why it’s highly recommended that you wear protective gear, including but not limited to gloves, goggles, and a respirator.
Gloves will protect your hands from chemicals and sharp tools. Metal scrapers, sandpaper, and chemical strippers can all cause cuts and abrasions. Make sure to wear sturdy gloves that cover both your hands and wrists.
Goggles will protect your eyes from flying debris and dust. Abrasive blasting can create a lot of dust, which can irritate your eyes and cause damage. Wearing goggles or a face shield is important when working around these materials.
A respirator will protect your lungs from inhaling harmful fumes or dust. Heat and solvents can both release toxic vapors, which can cause respiratory problems. If you’re working with these materials, make sure to wear a respirator that is rated for the type of chemicals you’re using.
| Protective Gear | Why You Need It |
|---|---|
| Gloves | Protects your hands from chemicals and sharp tools |
| Goggles | Protects your eyes from flying debris and dust |
| Respirator | Protects your lungs from inhaling harmful fumes or dust |
Wearing protective gear is a crucial step in ensuring your safety while removing urethane glue from wood. Don’t skip it!
Tip 2: Use the Right Tools
When it comes to removing urethane glue from wood, having the right tools can make a big difference in your success. Here are some tools that you should consider having on hand:
| Tool | Purpose |
|---|---|
| Scraper | To get rid of excess glue |
| Sanding Block or Electric Sander | To sand down the area |
| Heat Gun | To heat up the glue and make it easier to remove |
| Solvent | To dissolve the glue |
| Protective Gear | Such as gloves and goggles, to protect your skin and eyes from chemicals and debris |
Using the proper tools not only helps to make the job easier, but also ensures your safety throughout the process. For example, without proper protective gear, you risk exposing yourself to dangerous chemicals or getting debris in your eyes while using abrasive blasting techniques. When using a heat gun, it’s important to not overheat the wood or leave the heat gun in one place for too long. Additionally, using the wrong type of solvent or abrasive material can damage the wood. Taking the time to evaluate the materials you have on hand and making a list of any additional tools or equipment you need to purchase before beginning the project will be worth your effort.
Tip 3: Test the Method on a Small Area First
Before using any of the methods mentioned above, it’s essential to test it on a small area first. Testing the method will give you an idea of whether it works best for your particular project or not.
Here are some tips to keep in mind while testing the method on a small area first:
- Choose an inconspicuous spot on the wood surface to test the method.
- Apply the method to a small area first and wait for the results.
- Observe the area once the method is complete. If you notice any damage or discoloration, refrain from using the method on the entire surface.
- If the results are positive, only then proceed to apply the method to the entire surface.
Testing the method on a small area will not only save you time and effort, but it will also prevent any unwanted damage to your wood surface. It’s always best to use the method on a small area first to ensure that you achieve the desired results without risking any damage.
Conclusion
After trying out different methods to remove urethane glue from wood, it’s important to understand that each method has its own advantages and disadvantages. The scraping and sanding method may be the most common and affordable but it requires a lot of effort and time. Meanwhile, the heat and solvent method offers a quicker process but requires caution and proper ventilation. Abrasive blasting and chemical stripping are effective, but they can be expensive and risky if not done correctly.
Whatever method you choose, there are always tips and tricks to enhance the process and minimize the risks. Wearing protective gear, using the right tools, and testing the method on a small area first are essential to ensure your safety and the preservation of your wood.
In the end, removing urethane glue from wood requires a combination of patience, caution, and the willingness to try out different methods until you find the one that suits you best. With proper technique and safety measures, you can remove urethane glue and restore the beauty of your wood.
Frequently Asked Questions
1. Can I use a metal scraper to remove urethane glue from wood?
Yes, a metal scraper can be used to remove the excess glue. However, be careful not to damage the wood surface.
2. What is the best solvent to use for removing urethane glue from wood?
The best solvent to use is a non-acetone based cleaner or solvent. Examples include rubbing alcohol, mineral spirits or denatured alcohol.
3. How do I know if the urethane glue has been completely removed?
You will know that the glue has been completely removed if there are no more visible traces of glue on the wood surface.
4. Can I use a hair dryer to heat the urethane glue?
Yes, a hair dryer can be used to heat the glue. However, it is important to be careful not to overheat the wood as this can cause damage.
5. Can I use a chemical stripper to remove urethane glue from wood furniture?
Yes, a chemical stripper can be used to remove urethane glue from wood furniture. However, it is important to select a product that is safe for use on furniture.
6. Is it safe to use abrasive blasting to remove urethane glue from wood?
Abrasive blasting can be safe if done correctly. However, it is important to wear protective gear and follow safety precautions.
7. Can I use a heat gun to remove urethane glue from wood flooring?
Yes, a heat gun can be used to remove urethane glue from wood flooring. However, it is important to be careful not to scorch or damage the wood.
8. Can I use a plastic scraper to remove urethane glue from wood?
Yes, a plastic scraper can be used to remove urethane glue from wood. It is a gentler option that is less likely to damage the wood.
9. How long does it take for the chemical stripper to work?
The time it takes for the chemical stripper to work can vary depending on the product and the thickness of the glue. It typically takes between 15 minutes to an hour.
10. Can I use a pressure washer to remove urethane glue from wood?
It is not recommended to use a pressure washer to remove urethane glue from wood as it can damage the surface of the wood. It is better to use a more gentle method such as sanding or chemical stripping.