As we strive for clear and glowing skin, blackheads often tend to be a pesky problem. Blackheads are stubborn, and their removal can be a difficult task. If you’ve tried several methods to remove blackheads on your nose or face with no success, then you might want to try something new. Have you ever heard of using glue to get rid of blackheads? It may seem unusual, but it is a method that has been trending in the skincare world lately. In this article, we will be delving into the step-by-step guide on how to remove blackheads with glue and everything else you need to know about the process. Read on to find out more!
What are Blackheads?
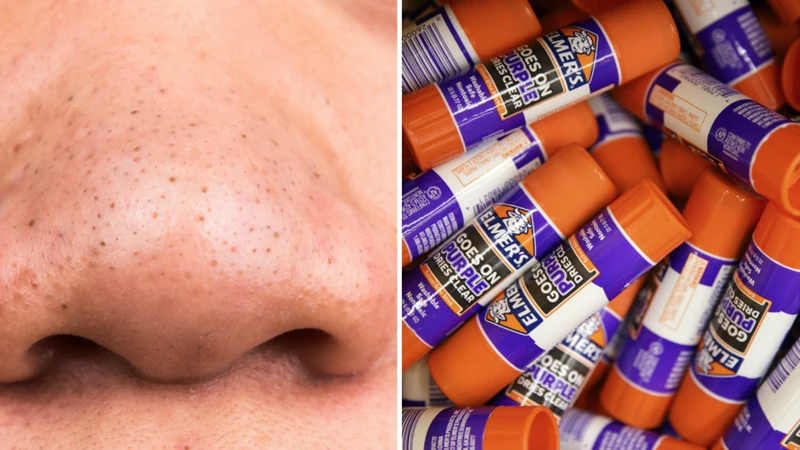
Blackheads are a common skin problem that affects people of all ages and skin types. They are small, dark bumps that appear on the skin’s surface, usually on the face, neck, chest, and back. Blackheads are a type of acne, but unlike whiteheads, they are open at the top of the pore, allowing air to enter and create the black appearance. They are caused by the accumulation of excess oil and dead skin cells in the pores. If left untreated, blackheads can lead to more severe forms of acne. As we explore the causes and types of blackheads in more detail, keep in mind that a thorough understanding of this condition is integral to effectively combatting it.
Causes of Blackheads
Blackheads are a type of acne that occurs when hair follicles become clogged with oil and dead skin cells. Here are some of the most common causes of blackheads:
- Excess oil production: Our skin naturally produces oil to keep it moisturized. However, excessive production of oil can lead to clogged pores and ultimately blackheads.
- Dirt and pollution: When we go out, our skin comes in contact with dirt and pollution, leading to clogged pores and blackheads.
- Makeup: Certain makeup products can clog pores, leading to blackheads.
- Poor skincare routine: Not removing makeup, not washing face regularly or using harsh skincare products can also contribute to the formation of blackheads.
- Hormonal changes: Hormonal fluctuations during puberty, menstruation, pregnancy, and menopause can result in increased oil production and blackheads.
- Tight clothing: Wearing tight clothing or using tight headbands or hats can result in blackheads by trapping oil and sweat against the skin.
It is important to note that blackheads can be caused by a combination of factors and vary from person to person. Regular cleansing and proper skincare can help prevent the occurrence of blackheads. However, if you suffer from severe acne or have persistent blackheads, it is recommended to consult a dermatologist for appropriate treatment.
Types of Blackheads
Types of Blackheads:
Blackheads are not all the same; they can come in different types depending on their size, shape, and level of infection. Here are the three main types of blackheads:
| Type | Appearance | Description |
|---|---|---|
| Open Comedones |  |
These blackheads appear as small pores on the skin’s surface with dark centers. They get their color from sebum and dead skin cells that have become oxidized, resulting in a black or dark appearance. |
| Closed Comedones |  |
These blackheads are also known as whiteheads. They appear as small, white or flesh-colored bumps on the skin’s surface and happen when a pore becomes clogged with sebum and dead skin cells, causing the follicle’s opening to close. They usually do not have an oxidized plug. |
| Inflammatory Acne |  |
These blackheads can be identified by their red and inflamed appearance. It happens when the hair follicle becomes clogged, infected and inflamed due to an overproduction of sebum. If left untreated, inflammatory acne can lead to scarring. |
It’s important to note that squeezing or picking at blackheads, especially inflammatory acne, can lead to further irritation and even infection. In some cases, it’s best to seek the help of a professional dermatologist to prevent further complications.
Why Use Glue to Remove Blackheads?

Using glue to remove blackheads may seem like an unusual approach, but it can be a highly effective way to get rid of these stubborn blemishes. The glue helps to adhere to the blackhead and pull it out of the pores when it is removed. This method is particularly useful for those who are prone to blackheads on their nose, chin, or forehead.
One of the benefits of using glue to remove blackheads is its affordability and accessibility. You don’t need to spend a lot of money on expensive skincare products or treatments to remove blackheads, as you most likely already have glue in your home. This makes it a convenient option for those who want to save money on their skincare routine.
Another advantage of this method is that it can be done in the comfort of your own home, without the need for professional help. This means that there is no need to schedule appointments or spend time traveling to a salon or clinic. You can simply set aside some time to remove your blackheads with glue, and do it whenever it is convenient for you.
Additionally, using glue to remove blackheads is generally safe and non-invasive, making it a preferable option for those who are apprehensive about more aggressive treatments. Just be sure to use the proper glue, as not all types of glue are suitable for this purpose. You should also follow the proper precautions when applying and removing the glue to avoid any potential skin irritation.
Using glue to remove blackheads is a simple, affordable, and effective solution for those looking to get rid of these pesky blemishes. However, it’s important to ensure that you’re using the right type of glue and to follow the instructions carefully to avoid any potential risks. And, of course, there are other methods that may work better depending on your skin type and preferences.
What Kind of Glue Should You Use?

Looking to remove blackheads with glue but not sure what kind of glue to use? You’re in the right place! Using the right kind of glue is crucial to ensure that the process is effective and safe. You don’t want to use just any glue that you have lying around in your house. In this section, we will discuss the best types of glue to use for this process and what to avoid. So, let’s dive into it! But before we begin, if you have accidentally spilled glue on velvet or other delicate fabrics, check out our guide on how to get glue off velvet for tips on how to remove it without damaging the fabric.
Types of Glue to Avoid
When it comes to using glue to remove blackheads, it’s important to know which types of glue to avoid. Using the wrong kind of glue may cause skin irritation and damage, which can ultimately make blackheads worse. Here are some types of glue that you should steer clear of:
| Glue Type | Why to Avoid |
|---|---|
| Super Glue | This type of glue is extremely strong and can damage your skin when trying to remove it. It can also cause chemical burns in some cases. |
| Adhesive Tape Glue | Adhesive tape glue is not meant to be used on skin and can cause irritation if applied. Additionally, it can leave a sticky residue that is difficult to remove. |
| Wood Glue | Wood glue contains chemicals that are not designed for skin use and can cause irritation or allergic reactions. |
Using any of these types of glue would not only be ineffective for removing blackheads, but could also cause harm to your skin. It’s best to stick with a safe and gentle glue specifically designed for skin use. If you accidentally get one of these types of glue on your skin, refer to this guide on what takes off glue to safely remove it without causing damage to your skin.
Step-by-Step Guide: How to Remove Blackheads with Glue
Now that we know what blackheads are, let’s talk about how to remove them with an unusual yet effective method – glue! This may sound strange, but using glue as a blackhead remover is a popular technique, and in this step-by-step guide, we’ll walk you through the process. You’ll need just a few items, and the steps are simple to follow. Plus, if you’re wondering why glue is effective, we’ll explain that too. So, get ready to say goodbye to those pesky blackheads! And if you’re interested in learning more about removing glue from other surfaces, check out our article on how to get glue off your hands.
Things you’ll need
To properly remove blackheads with glue, you’ll need a few items. Make sure you have these on hand before you begin:
| Item | Purpose | Link to Learn More |
|---|---|---|
| Non-toxic glue: | To pull the blackheads out of your pores. | How to Get Glue off Water Bottle |
| Clean towel: | To wipe your face once the process is complete. | N/A |
| Bowl of hot water: | To allow the steam to open up your pores. | N/A |
| Facial cleanser: | To wash your face before and after the process. | N/A |
| Spoon or applicator: | To apply the glue to your face without using your fingers. | N/A |
It’s important to note that you should use non-toxic glue, such as Elmer’s glue, for this process. Do not use any glue that contains harmful chemicals, as this can damage your skin. Additionally, make sure the bowl of hot water is not too hot, as this can burn your skin. Take caution when applying the glue and use a spoon or applicator rather than your fingers to avoid spreading bacteria.
Step-by-Step Instructions
To remove blackheads with glue, you’ll need the following items:
| Item | Description |
| Craft glue (water-soluble) | Make sure it is non-toxic and non-irritating to the skin. |
| Cotton swabs (Q-tips) | Used to apply the glue on your skin and remove the blackheads. |
| Clean towel | Used to dry your face before applying the glue. |
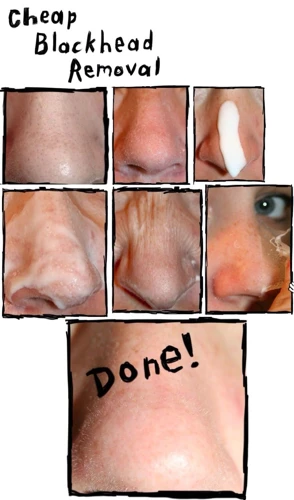
Once you gather the items, follow these step-by-step instructions to remove blackheads with glue:
- Wash your face with a gentle cleanser and warm water. This step helps to loosen up the dirt and oil clogging your pores, making it easier to remove blackheads.
- Gently pat your face dry with a clean towel. Avoid rubbing your face, as it may irritate your skin and cause further breakouts.
- Using a cotton swab, apply a thin layer of craft glue over your nose or T-zone area, where most blackheads appear. Ensure that you don’t apply glue around sensitive areas like your eyes.
- Wait for the glue to completely dry on your skin. It should take about 10-15 minutes. You can test whether the glue is dry by touching it gently with your finger. If it’s not sticky, the glue is ready to be peeled off.
- Take an edge of the dried glue and gently peel it off in an upward motion. You will notice that the blackheads stick to the glue and come out easily.
- Continue peeling off the glue until you have removed all the blackheads. You can use a new cotton swab to apply glue on other parts of your face, but avoid reusing the ones used in the first application.
- Once you’re done, wash your face with lukewarm water to remove any remaining glue. Gently pat dry with a clean towel.
- Apply a toner or mild astringent to close your pores. This step keeps your pores clean and minimizes the chances of further blackheads developing.
Be sure to follow each step carefully, as any deviation may cause skin irritation or inflammation. If you experience any discomfort or redness, stop the treatment and consult with a dermatologist.
Remember that glue is not the only solution to remove blackheads. You can try other methods like salicylic acid, blackhead extractor tool, or baking soda. Check out our article on “other uses of glue” for more unconventional glue hacks.
Precautions to Keep in Mind
Precautions to Keep in Mind
While using glue to remove blackheads is a safe and effective method, there are a few precautions that you need to keep in mind to avoid any mishaps.
Do not use white school glue or super glue: Although white school glue is also known as PVA glue and is non-toxic, it is not suitable for skin. Super glue can cause chemical burns on your skin. So, always choose a non-toxic glue that is formulated for use on skin.
Do not use the glue on sensitive skin: If you have sensitive skin, using any kind of glue on it can cause irritation and redness. Always do a patch test on a small area of your skin before applying the glue to your face.
Do not leave the glue on for too long: Leaving the glue on for too long can cause it to dry and stick to your skin more firmly. It can also make the removal process painful and cause skin irritation. The recommended time for leaving the glue on is 10-15 minutes.
Do not use the glue too frequently: Using the glue to remove blackheads too often can cause the skin to dry out and become flaky. Limit it to once or twice a week.
Do not use the glue near your eyes or mouth: Glue that is accidentally applied near your eyes or mouth can cause serious damage. In case of accidental contact with eyes or mouth, rinse immediately with cold water and seek medical help.
Clean the skin before and after using the glue: To prevent any kind of infection, it is essential to clean your skin before and after removing blackheads with glue. You can use a gentle cleanser or warm water to clean the area. After removing the blackheads, apply a mild moisturizer to hydrate your skin.
By following these precautions, you can safely remove blackheads with glue without any mishaps. However, if you accidentally get glue on unintended surfaces like your shoes, check out how to get glue off shoes or how to remove sticker glue from TV screen to resolve the issue.
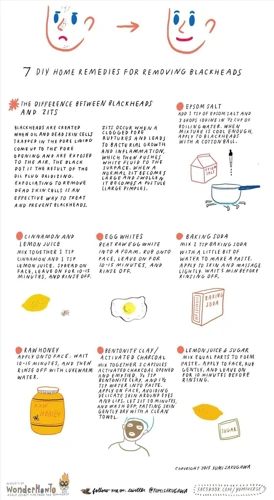
Other Methods to Remove Blackheads
When it comes to removing blackheads, there are various methods you can try. While we have already discussed removing blackheads with glue, there are other ways to tackle these pesky spots. Whether you prefer using chemical exfoliants or tools specially designed for blackhead removal, there is a method that will work for you. In this section, we will explore alternative methods to remove blackheads including using salicylic acid, a blackhead extractor tool, and baking soda. Additionally, we will share tips on how to prevent blackheads from forming again. But first, let’s discuss when it’s necessary to seek professional help.
Using Salicylic Acid
Salicylic acid is another popular method for removing blackheads. It works by exfoliating the skin and getting rid of dead skin cells that can clog pores. This acid is often used in acne-fighting products due to its effectiveness in clearing out the pores. Here are the steps for using salicylic acid to remove blackheads:
Step 1: Choose a salicylic acid cleanser or toner that has a concentration of 2% or less. Higher concentration can lead to dryness or irritation.
Step 2: Wash your face with a mild cleanser and warm water, and pat dry.
Step 3: Apply the salicylic acid product to a cotton pad or ball.
Step 4: Gently rub the cotton pad over the affected area, focusing on the blackheads.
Step 5: Leave the product on for a few minutes, as instructed on the packaging.
Step 6: Rinse your face with cool water and pat dry.
Step 7: Apply a moisturizer to your face to prevent dryness.
Keep in mind that salicylic acid is a milder option for blackhead removal and it may take longer to see results compared to glue or a blackhead extractor tool. It is also important to note that salicylic acid may not work for everyone and it may cause irritation or dryness in some individuals.
If you do choose to use salicylic acid to remove blackheads, be sure to follow the precautions mentioned in the product’s packaging and to gradually build up your usage in order to avoid any potential irritation.
Note: If you accidentally get salicylic acid on a surface and need to remove it, check out our article on what takes super glue off metal.
Using A Blackhead Extractor Tool
When it comes to removing blackheads, using a blackhead extractor tool is a popular and effective method. Here are the steps to follow:
- Cleanse your face: Before using the blackhead extractor tool, it’s important to cleanse your face with a gentle cleanser. This will help to remove any dirt and oil that may be clogging your pores.
- Steam your face: Next, steam your face for a few minutes to open up your pores. You can do this by using a facial steamer or by placing a warm towel over your face.
- Disinfect the tool: It’s important to disinfect the blackhead extractor tool before using it to avoid any infections. You can do this by wiping it down with rubbing alcohol.
- Position the loop: Place the loop end of the tool over the blackhead you want to remove and apply gentle pressure.
- Apply pressure: Gently push down on the tool and move it back and forth until the blackhead is extracted.
- Cleanse again: Once you’re finished, cleanse your face again to remove any remaining dirt and oil.
- Apply toner: To close your pores after extracting blackheads, apply a toner with a cotton pad. Toner helps to prevent any bacteria from entering your open pores and causing infections.
It’s important to note that using a blackhead extractor tool improperly can cause skin irritation and damage. Hence, make sure you are gentle and take care while using the tool. If you are not confident in using the tool, it’s best to seek professional help from a dermatologist or esthetician.
You may also want to read our other articles about removing other types of glue, such as how to get shoe glue off hands or how to remove wheel weight glue.
Using Baking Soda
Another effective method for removing blackheads is using baking soda. This common household item not only works as a natural exfoliator, but it also has antibacterial properties that can help prevent further breakouts.
Here are the steps to use baking soda to remove blackheads:
- Mix together equal parts baking soda and water to make a paste.
- Apply the paste to your face, focusing on areas where blackheads are present.
- Gently massage the paste into your skin in circular motions for about two minutes.
- Rinse your face with warm water.
- Pat your skin dry and apply a moisturizer.
Precautions: Do not overuse baking soda on your skin, as it can be abrasive and cause irritation. Limit usage to once or twice a week, and always follow up with a moisturizer to prevent dryness.
Additional tips: For added benefits, you can also mix in a few drops of tea tree oil with the baking soda and water mixture. Tea tree oil has anti-inflammatory and antimicrobial properties that can help reduce inflammation and prevent infection. Regular use of baking soda can also help to balance pH levels on the skin, reducing the likelihood of blackheads and other blemishes.
While baking soda is an effective home remedy for blackhead removal, it is not a permanent solution. To keep blackheads at bay, it is important to maintain a regular skincare routine that includes cleansing, exfoliation, and moisturizing.
Tips for Preventing Blackheads
Preventing blackheads is a key part of any skincare routine. Here are some tips to help you keep blackheads at bay:
Cleanse your face regularly: Regular cleansing is important to remove sweat, dirt, and excess oil from your skin. Use a gentle cleanser twice a day, especially after sweating.
Exfoliate: Exfoliation can help remove dead skin cells and dirt that can block pores. However, be gentle as over-exfoliating can damage your skin and make blackheads worse.
Avoid touching your face: Touching your face with dirty hands can transfer oil and bacteria to your skin, leading to blackheads and acne.
Keep your hair off your face: Hair products, including conditioner, can clog pores on your forehead and cheeks. Tie your hair back or use a headband to keep it away from your face.
Avoid wearing heavy makeup: Heavy makeup can block pores and contribute to blackheads. Choose lightweight, oil-free products labeled “non-comedogenic.”
Use products with salicylic acid: Salicylic acid can help unclog pores and prevent blackheads. Look for products labeled “oil-free” or “non-comedogenic.”
Use sunscreen: Sun damage can cause your skin to produce more oil, leading to blackheads. Use a lightweight, non-comedogenic sunscreen daily to protect your skin.
Eat a healthy diet: Eating a balanced diet with vegetables, fruits, lean protein, and whole grains can help keep your skin healthy and reduce the risk of blackheads.
By following these tips, you can help prevent blackheads and keep your skin looking smooth and clear.
When to See a Professional
It’s important to know that while at-home remedies can be effective in removing blackheads, there may come a point where it’s best to seek the help of a professional. If you have severe or persistent blackheads, it’s always better to consult a dermatologist who may suggest stronger treatments.
Stubborn Blackheads: If you’re unable to remove blackheads or notice that they’re not improving with at-home treatments, it’s best to see a dermatologist. A dermatologist may suggest a stronger topical medication containing ingredients such as salicylic acid or retinoids to clear stubborn blackheads.
Deep Blackheads: If you’re experiencing deep blackheads that are not improving even with regular cleansing or at-home treatments, a dermatologist may be able to remove them using a specialized tool. A procedure called microdermabrasion may also be used to help unclog pores and remove blackheads.
Large or Painful Blackheads: If you have a large or painful blackhead, it’s important not to try removing it yourself as this can lead to scarring or further irritation. A dermatologist can safely remove these types of blackheads using specialized tools or prescribe a stronger medication.
If you are unable to remove blackheads or are experiencing severe or persistent blackheads, it’s best to seek the help of a professional. A dermatologist can help you find the best treatment options to safely remove blackheads and prevent future ones from forming.
Conclusion
In conclusion, removing blackheads with glue can be an effective and affordable solution for those looking to improve the appearance of their skin. However, it is important to be cautious and follow the proper steps to prevent irritation or damage.
Remember to:
- Use the right kind of glue, such as non-toxic white school glue.
- Be gentle when removing the glue and avoid pulling too hard on the skin.
- Cleanse and moisturize the skin afterwards to maintain its health.
While there are other methods available to remove blackheads, such as salicylic acid or blackhead extractor tools, using glue may be more accessible and convenient for some people. It is important to evaluate what method works best for your skin and to follow proper skincare practices to prevent the formation of blackheads in the future.
Remember that blackheads are a common skin concern and can be managed with consistent skincare practices and, if needed, the help of a professional. If you are struggling with persistent blackheads or have concerns about your skin, it is always advisable to seek out the guidance of a dermatologist or esthetician. With the right knowledge and treatment plan, you can achieve the clear and healthy skin you deserve.
Frequently Asked Questions
1. Can glue really help remove blackheads?
Yes, glue can effectively remove blackheads. When the glue dries, it sticks to the skin and pulls out the blackheads as it’s peeled off.
2. What type of glue should I use?
PVA glue or Elmer’s glue are safe to use on the skin. Make sure to read the label and avoid using any toxic or strong adhesives.
3. Can I use glue to remove blackheads on sensitive skin?
It’s not recommended to use glue on sensitive skin. If you have sensitive skin, it’s best to consult with a dermatologist before using this method.
4. How often can I use this method to remove blackheads?
You can use this method once a week, but it’s important to avoid overdoing it as it can damage the skin’s natural barrier.
5. Is the glue method painful?
When removing the glue, it can feel slightly uncomfortable, but it shouldn’t be painful. If you experience pain, stop immediately and consult with a dermatologist.
6. Can I mix glue with other ingredients for better results?
No, it’s not recommended to mix glue with other ingredients as it may cause skin irritation, allergic reactions, or other complications.
7. Can I use this method to remove blackheads from my nose?
Yes, this method is effective in removing blackheads from any area of the face, including the nose.
8. Is it safe to perform this method on acne-prone skin?
No, it’s not recommended to use this method on acne-prone skin as it can worsen the acne by spreading bacteria and causing more inflammation.
9. Can I use other adhesive products instead of glue?
No, it’s not recommended to use other adhesive products as they may contain harmful chemicals that can damage the skin.
10. Are there any side effects of using this method?
In rare cases, this method may cause redness, skin irritation, or allergic reactions. If you experience any of these side effects, stop immediately and consult with a dermatologist.