Have you ever found yourself in a situation where you needed strong glue, but couldn’t find any? Perhaps it’s time to consider making your own homemade adhesive. Making strong glue may seem like a daunting task, but with a few key ingredients and some basic knowledge of chemistry, you can create a powerful bonding agent that will withstand even the toughest of jobs. In this comprehensive guide, we’ll take a deep dive into the chemistry behind strong glues, the materials you’ll need, and a step-by-step recipe for making your own. So, roll up your sleeves, put on your safety gear, and let’s get started on creating the perfect adhesive solution.
The Chemistry of Strong Glue

Understanding the chemistry behind strong glue is crucial for achieving reliable results. Each type of adhesive is made up of a unique combination of elements and compounds that determine its properties and performance. By comprehending the key components that contribute to glue strength, you can customize your own adhesive solution for a specific project. For example, if you need to glue rubber to wood, you will need to choose an adhesive that can bond these two materials. Later in this article, we will discuss the science of polymers, cross-linking, and solvents in creating a durable glue.
Understanding Polymers
Polymers are one of the key components in creating strong glue. Polymers are molecules made up of repeating subunits, called monomers. When these monomers bind together, they form long chains, creating a material with unique properties.
In glue, polymers are responsible for forming the adhesive bond. The most common type of polymer used in glue is polyvinyl acetate (PVA), which is known for its strong adhesive properties and water resistance.
Other types of polymers used in glue include epoxies and cyanoacrylates. Epoxy polymers are known for their exceptional strength and ability to bond to a wide range of materials, including metals and plastics. Cyanoacrylates, or superglues, form an almost instant bond and are ideal for small and precise projects.
To better understand the role of polymers in glue, it’s important to consider their molecular structure. The structure of a polymer can greatly affect its properties, including adhesive strength, flexibility, and durability.
Polymers play a crucial role in creating strong glue by forming the adhesive bond. The type of polymer used can greatly affect the properties of the glue, including its strength and durability.
If you’re interested in learning more about specific types of glue for different projects, check out our article on how to glue rubber to wood or how to glue copper to wood.
The Role of Cross-Linking
Cross-linking is an essential process in creating strong glue, as it increases the strength and durability of the adhesive. During cross-linking, strong chemical bonds are formed between polymer chains, creating a three-dimensional network. The result is a material that is much more stable and resistant to external stress.
There are different ways to induce cross-linking, depending on the type of polymer used:
- Thermal cross-linking: Heat is used to initiate the chemical reaction. This method is commonly used for thermosetting polymers, such as epoxies and phenolics.
- Radiation cross-linking: Ionizing radiation, such as gamma rays, can be used to break chemical bonds and create free radicals, which in turn can initiate cross-linking.
- Chemical cross-linking: A cross-linking agent is added to the polymer, which reacts with the functional groups on the polymer chains to form covalent bonds. This method is typically used for thermoplastic polymers, such as polyethylene.
One of the benefits of cross-linking is that it reduces the solubility of the polymer, making the glue more resistant to solvents and water. Additionally, cross-linked polymers are more resistant to heat and can withstand higher temperatures without breaking down.
An example of cross-linked polymer is epoxy: it consists of two components, a resin and a hardener, which react together to form a cross-linked network. Epoxy is known for its excellent adhesion to various materials, including metal, plastics, and ceramics. It is commonly used for bonding applications that require high strength and durability, such as bonding car side view mirrors (source) or attaching foam insulation (source).
However, not all cross-linked polymers are suitable for all applications. For example, electrically conductive glue (source) requires a specific type of cross-linked polymer that can conduct electricity. Similarly, glue for ABS plastic (source) requires a cross-linked polymer that can bond with the specific properties of ABS plastic. Knowing which type of cross-linked polymer is required for the specific application is therefore crucial for achieving the desired results.
The Importance of Solvents
A solvent is a substance that dissolves another substance, called the solute, to form a homogeneous mixture known as a solution. In this case of making strong glue, the importance of solvents cannot be overstated. Solvents play a crucial role in determining the properties of the glue and its adhesion strength.
Here are some reasons why solvents are important in making strong glue:
- Regulating Viscosity: The right amount and type of solvent can help regulate the viscosity of the glue. A highly viscous glue may not be easy to apply and may not soak in well, leading to weaker bonding. On the other hand, a low viscosity glue may not effectively fill gaps and create strong bonds. The right solvent helps maintain the correct viscosity of the glue.
- Controlling Drying Time: The solvent also controls the drying time of the glue. Some solvents evaporate quickly, causing the glue to dry faster. Others evaporate slowly, giving the glue more time to seep into the material and create a stronger bond.
- Enhancing Bond Strength: Different solvents have different affinities for different substrates, like wood, metal or plastic. When a solvent interacts with a surface, it can dissolve some of that material, creating a microscopic texture on the surface. This texture can serve to increase the adhesive strength of the glue, by creating more surface area for the glue to bond with.
- Improving Durability: Solvents can play an important role in improving the durability of glue. They can help the adhesive to withstand harsh environments, changes in temperature or add flexibility to the bond.
Choosing the right solvent for glue depends on the specific application. Some common solvents used in glue making include acetone, isopropyl alcohol, toluene, and mineral spirits. Understanding how different solvents interact with different materials is critical to ensuring that the glue has the required properties for your task.
To learn more about specific glue types for different materials, check out our article on which Loctite glue is the strongest or what glue to use on ceramic mug.
Materials You’ll Need
Before diving into the recipe for creating your own strong glue from scratch, it’s important to gather all the necessary materials. Having everything ready will make the process much smoother and efficient. Gather your ingredients including PVA glue, water, borax, and vinegar. Additionally, make sure you have all the tools and safety equipment required such as a mixing bowl, measuring spoons, protective gloves, and goggles. Once you have everything organized, you’ll be ready to tackle the next steps in creating your homemade adhesive. Need to repair a chair leg? Check out our guide on how to glue chair legs. Looking to make some unique jewelry? Our article on how to glue cabochons may come in handy.
Gather Your Ingredients
To make strong glue, you will need a few key ingredients. Here’s a list of what you’ll need to gather:
- Polyvinyl Acetate: Also known as PVA, this polymer is the base of many commercial adhesives and is a popular choice for homemade glue.
- Borax: This mineral salt acts as a cross-linking agent, helping to form strong bonds between the PVA molecules.
- Water: This solvent is essential for dissolving and mixing the other ingredients.
- Measuring Cups and Spoons: Accurately measuring the ingredients is important for achieving the desired consistency and strength.
- A Mixing Bowl: You’ll need a clean and dry mixing bowl to combine the ingredients.
- A Stirring Tool: A spoon or spatula will work for stirring the ingredients together.
- A Stove or Microwave: You’ll need a heat source to help dissolve the borax and fully mix the ingredients together.
Keep in mind that the quality of your ingredients can affect the quality of your glue. Make sure to use high-quality PVA and borax, and use clean and purified water. With these ingredients gathered and ready to go, you’re one step closer to making your own strong glue.
Tools and Safety Equipment
Before starting to make your own strong glue, it’s important to gather all the necessary tools and safety equipment to ensure the process goes smoothly and safely. Here is a list of items you should have:
| Item | Purpose |
|---|---|
| Gloves | Protects your skin from the chemicals |
| Safety goggles | Protects your eyes from any accidental splashes or spills |
| Measuring cups/spoons | Helps to accurately measure out the ingredients |
| Mixing bowl | Used to mix the ingredients together |
| Stirrer (wooden stick or spoon) | Used for stirring the mixture |
| Cooking pot | Used to heat up the mixture |
| Thermometer | Used to monitor the temperature of the mixture |
| Heat source (stove, hot plate, etc.) | Used to heat up the mixture |
It’s important to note that many of the ingredients used in making strong glue can be harmful if they come into contact with your skin or eyes. Therefore wearing gloves and safety goggles will ensure you are protected. Make sure to work in a well-ventilated area to avoid inhaling any fumes.
By having all the necessary tools and safety equipment, you can safely and accurately create your own strong glue at home.
Recipe for Strong Glue
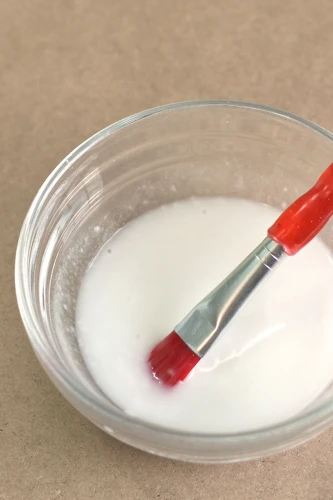
Now that we understand the chemistry behind strong glue, it’s time to put that knowledge into action and make our own! With a few simple ingredients and tools, you’ll be able to create a strong adhesive that will hold up to even the toughest of tasks. Get ready to roll up your sleeves and dive into the world of DIY glue-making. Here’s the step-by-step recipe for creating a robust adhesive that will leave store-bought glue in the dust. Let’s get started!
Step-by-Step Instructions
Creating strong glue at home is a surprisingly easy process that requires only a few simple steps and basic materials. Follow these step-by-step instructions to make your own adhesive:
| Step | Instructions |
|---|---|
| Step 1 | Mix together 3/4 cup of water and 2 tablespoons of corn syrup in a small saucepan. |
| Step 2 | Bring the mixture to a boil over medium heat. As the water heats up, it will become clear and the corn syrup will dissolve completely. |
| Step 3 | Reduce the heat to low and add 1/4 cup of white vinegar. Stir well to combine. |
| Step 4 | Add 2 tablespoons of baking soda to the mixture. As you add the baking soda, it will begin to foam and expand. This is normal. |
| Step 5 | Stir the mixture well and allow it to simmer gently for 5-10 minutes. The mixture will thicken as it cooks. |
| Step 6 | Remove the saucepan from the heat and set it aside to cool completely. The glue will continue to thicken as it cools. |
| Step 7 | Your homemade glue is now ready to use! |
Important note: Be sure to store your glue in an airtight container to prevent it from drying out. This recipe will yield approximately 1 cup of glue, so feel free to adjust the quantities if you need more or less for your specific project.
By following these simple steps and using the right ingredients, you can create high-quality glue that will work for a variety of projects. Experiment with different quantities and ratios to find the perfect recipe for your needs.
Tips for Achieving the Best Results
To get the best results when making strong glue at home, it’s important to follow a few key tips. Here are some suggestions to help you achieve the most effective outcome:
- Be precise with measurements: Accurately measuring your ingredients is crucial when creating a strong glue. Use a kitchen scale to weigh out exact quantities of each component, and follow the recipe closely.
- Use high-quality ingredients: Investing in high-quality materials will help ensure that your glue is strong and reliable. Look for top-notch resins, solvents, and other components from reputable suppliers.
- Prepare your workspace: Before you begin making your glue, clear a clean and well-ventilated area to work in. Cover your work surface with newspaper or a drop cloth to protect it from spills and drips.
- Protect your skin and eyes: When working with chemicals, it’s important to wear appropriate safety gear. Be sure to wear gloves, goggles, and a face mask to avoid skin and eye irritation, as well as respiratory problems.
- Follow the recipe carefully: Stick to the recipe when making strong glue, and be mindful of the order in which to add each ingredient. Mixing the components in the wrong order could affect the final glue’s effectiveness.
- Mix thoroughly: When you’ve added all the ingredients, mix them together thoroughly. Use a stir stick or a whisk to blend everything together, making sure there are no clumps or lumps of material.
- Allow plenty of time to dry: For the best results, let your glue dry completely before putting your materials to use. Depending on the recipe, this could take anywhere from a few hours to a few days. Be patient and don’t rush the drying process.
By following these tips, you’ll be on your way to making a strong glue that’s suitable for a wide range of applications. Remember to always exercise caution when working with chemicals, and don’t hesitate to seek medical attention if you experience any adverse reactions.
Testing Your Homemade Glue
Now that you’ve made your own strong glue, you may be wondering how to determine its adhesive strength and whether it’s suitable for your project. Testing your homemade glue is essential before using it to ensure it can support the weight or hold the materials together as intended. In this section, we’ll explore several methods for testing glue strength, as well as factors that can affect the performance of your adhesive. Let’s dive in and see how your homemade glue holds up!
How to Test Adhesive Strength
Testing the adhesive strength of your homemade glue is crucial to ensure that it will work effectively on the materials you plan to use it on. Here are some effective ways to test the strength of your homemade glue:
- Shear Test: Cut two same-sized pieces of the same material that you plan to glue together. Apply the glue to one of the pieces and press the other piece against it. Once the glue dries, hold one piece stationary and apply force to the other piece in a sideways, or shear, motion. If the pieces break apart easily, then your glue may not be strong enough for the required task.
- Tensile Test: Cut two same-sized strips of a material, such as paper or fabric, and glue them together. Once the glue dries, hold one strip stationary and apply force to the other strip in an opposite direction, or tension. If the glue can withstand this force without breaking, then it is likely to be strong enough for most tasks.
- Peel Test: Cut two same-sized pieces of material and glue them together. Once the glue dries, slowly pull the pieces apart in a perpendicular motion. If the glue does not come unstuck easily, then it is likely to have good peel strength and be effective for materials that may experience tension forces.
It is important to note that various factors can affect the strength of your homemade glue, such as the type and amount of ingredients used, the environment, and the materials it is being used on. Always take the time to test your glue before using it on important projects.
Factors That Affect Glue Performance
The performance of your homemade glue can be affected by various factors that you need to keep in mind.
| Factor | Description |
|---|---|
| Variation in Ingredients | The quality and composition of the materials you are using can greatly impact the strength and durability of your glue. Make sure to measure and mix the ingredients carefully and follow the recipe closely. |
| Humidity and Temperature | The environment in which you use the glue also plays a role. High humidity can cause the glue to take longer to dry, while cold temperatures can make it harder for the glue to bond properly. |
| Surface Type | The type and condition of the surface you are applying the glue to can also affect its performance. Porous surfaces may require more glue to create a strong bond, while smooth surfaces may need less. |
| Pressure and Time of Application | It’s important to apply pressure to the glued surfaces and give the glue enough time to dry and cure properly. Failure to do so can result in a weak bond that can easily break apart. |
| Age | The age of the glue can also play a role in its ability to bond. Over time, the glue may dry out and become less effective, so it’s important to use it within a reasonable timeframe. |
By keeping these factors in mind and taking the necessary precautions, you can ensure that your homemade glue performs as expected and creates a strong and lasting bond.
Conclusion
After following this comprehensive guide, you should now have a better understanding of how to make strong glue. By learning about the chemistry of strong glue, including polymers, cross-linking, and solvents, you can appreciate how different ingredients work together to create a durable adhesive.
Gathering all the necessary materials, including ingredients, tools, and safety equipment, is key to making strong glue. Following the step-by-step recipe and tips for achieving the best results can help you create a glue that performs on par, if not better, than store-bought options.
To ensure your homemade glue is up to the task, it’s important to test its adhesive strength. Remember that factors such as the substrate, humidity, and temperature can affect the performance of your glue.
Not only can making your own glue be more cost-effective, but it also empowers you to customize the adhesive to your specific needs. Whether you’re a DIY enthusiast, a crafter, or an artist, making strong glue can be a useful skill to have in your arsenal.
So go ahead and put your newfound knowledge to the test – you might be pleasantly surprised at the strength of your homemade adhesive.
Frequently Asked Questions
What makes homemade glue stronger than store-bought glue?
Homemade glue is often stronger than store-bought glue because you can customize the recipe to suit your needs. Additionally, homemade glue is often free of additives and fillers that can weaken the bond.
Can I use any type of polymer to make strong glue?
No, not all polymers are suitable for making strong glue. You’ll want to use a polymer that can form strong cross-links and has a low viscosity to allow for good penetration into the surfaces you’re bonding.
Do I need to use solvents in my homemade glue recipe?
Solvents can help to dissolve the polymer and allow it to penetrate into the surfaces you’re bonding, which can lead to a stronger bond. However, not all types of glue require solvents. It depends on the specific recipe you’re using.
What are some safety concerns when making homemade glue?
When working with chemicals, it’s important to wear appropriate safety gear, such as gloves and eye protection. Additionally, you should work in a well-ventilated area to avoid breathing in fumes. Be sure to follow the recipe carefully and handle all chemicals with care.
Can I store my homemade glue for later use?
Yes, you can store homemade glue for later use. However, you’ll want to keep it in an airtight container and store it in a cool, dry place to avoid spoiling. Some homemade glue recipes may have a shorter shelf life than store-bought glue, so be sure to check the recipe for specific instructions.
Can I use homemade glue on all surfaces?
No, not all surfaces are suitable for homemade glue. You’ll want to test the glue on a small, inconspicuous area before applying it to the entire surface to ensure that it doesn’t damage or discolor the material.
Do I need special tools to make homemade glue?
You may need some specialized tools, such as a thermometer for measuring the temperature of the mixture, but many homemade glue recipes can be made using basic kitchen equipment.
What is the curing time for homemade glue?
The curing time for homemade glue can vary depending on the recipe and the conditions in which it is applied. Some homemade glues may dry within minutes, while others may take hours or even days to fully cure.
How can I remove homemade glue if I make a mistake?
If you make a mistake and need to remove homemade glue, you can use a solvent such as acetone or rubbing alcohol to dissolve the glue. Be sure to test the solvent on a small area first to avoid damaging the surface you’re working on.
Can I use food items to make homemade glue?
Yes, some food items can be used to make homemade glue, such as flour or milk. However, these types of glues may not be as strong or long-lasting as glues made from other materials. Additionally, food-based glues may attract pests or bacteria over time.