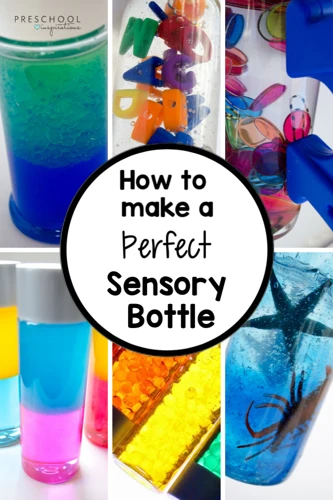
Engaging the senses through playful and calming activities is a cornerstone of developmental learning, and sensory bottles stand out as a remarkable tool for such engagement. These captivating vessels are more than just visually appealing; they’re part of a tactile and visual exploration that can soothe and educate simultaneously. Let’s delve into the world of sensory bottles and discover why they’ve become so popular among parents, educators, and therapists alike.
Benefits of Sensory Bottles
Sensory bottles offer a plethora of advantages for individuals of all ages. For children, they serve as a method to regulate emotions, providing a calming effect during times of overstimulation. They are also instrumental in refining motor skills as little hands grip and flip the bottles, observing the mesmerizing movement within. Furthermore, these bottles can act as educational aids, introducing basic scientific concepts like viscosity and gravity in an entertaining manner.
Understanding Sensory Bottle Ingredients
Creating the perfect sensory experience is all about the right combination of sensory bottle ingredients. The components you choose will determine the motion, speed, and overall effect of your sensory bottle. With the inclusion of various textures, colors, and densities, each bottle can be a unique sensory adventure, perfect for individual needs and preferences.
Choosing Your Bottle
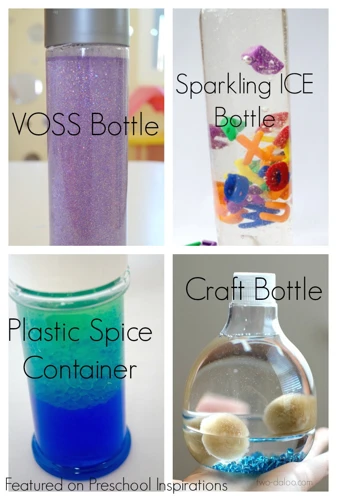
Selecting an appropriate container is the first step in crafting your sensory bottle. You’ll need a transparent, durable bottle – often a plastic Voss water bottle is the choice of many due to its clarity and shape. It’s important to choose one that is sealable and leak-proof to ensure the longevity of your creation.
Essential Sensory Bottle Ingredients
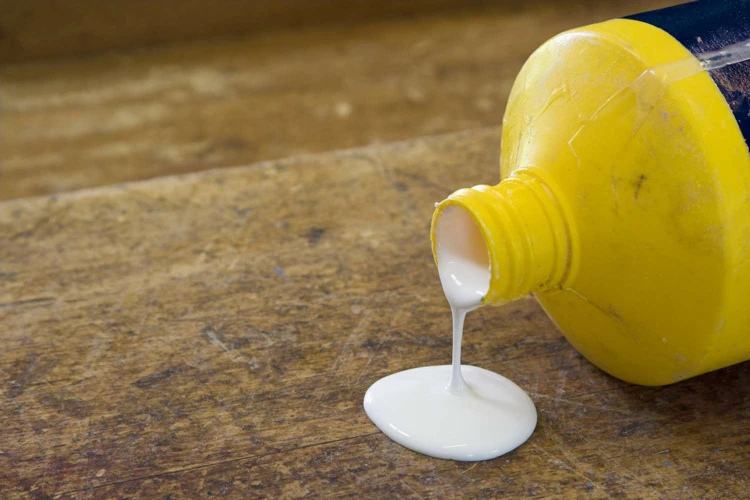
At the heart of these calming tools are the sensory bottle ingredients. A good quality clear glue is vital as it acts as a thickening agent, slowing down the movement of glitter and other embellishments. This creates the mesmerizing “lava lamp” effect that is so soothing to watch.
Sensory Bottle With Clear Glue
A sensory bottle with clear glue is a classic choice. The clear glue provides a viscous medium for your glitter and confetti to float through, making the descent a calming and slow spectacle. Moreover, the transparent nature of the glue ensures that the colors and sparkles remain vivid and engaging.
Alternative Ingredients: Glitter Glue & More
For those seeking a different approach, sensory bottles with glitter glue are an excellent alternative. Glitter glue comes in various colors and contains glitter, providing both color and sparkle in one ingredient. This can be particularly useful for creating themed sensory bottles or for simplifying the creation process.
Step-by-Step Guide to Making Your Sensory Bottle
Now that you’re familiar with the components, let’s create your very own sensory bottle. The process is simple, enjoyable, and allows for a great deal of personalization. Whether for yourself or as a craft with children, the steps below will guide you through making a sensory bottle with glue.
Preparing Your Materials
- Select a clean and dry bottle.
- Gather your sensory bottle ingredients: clear glue or glitter glue, warm water, glitter, food coloring (optional), and any additional embellishments you desire.
- Have a funnel, measuring cup, and stirring stick or spoon ready.
Mixing Water and Clear Glue
Begin by filling your bottle halfway with warm water. The warmth helps to dissolve the glue more effectively. Next, pour in the clear glue until the bottle is nearly full, leaving a small air gap at the top to allow for mixing. The ratio of water to glue can vary depending on how slowly you want the contents to move; experiment to find your preferred viscosity.
Adding Glitter and Embellishments
Using the funnel, add your chosen glitter and any additional items like beads or sequins into the bottle. You can mix colors and sizes for varied visual interest. Once added, secure the lid tightly and shake the bottle to mix everything thoroughly. Observe the glittery swirls and make adjustments to the contents as you see fit.
Variations of Sensory Bottles With Glue
There is no one-size-fits-all when it comes to creating sensory bottles; variations abound, allowing for a custom-tailored experience.
Sensory Bottles With Clear Glue
For a serene and clear look, sensory bottles with clear glue are ideal. You can add liquid watercolor or food coloring to the glue mixture for a tinted effect, or leave it transparent to showcase the shimmering glitter. The clear glue creates a slow-moving spectacle that is both beautiful and relaxing.
Sensory Bottles With Glitter Glue
If you prefer a more vivid display, sensory bottles with glitter glue might be your preference. The pre-mixed colored glue saves time and offers a thicker base for the glitter to move through. Experiment with different colors to create a rainbow effect or stick to a monochromatic scheme for simplicity and elegance.
Tips for a Successful Sensory Bottle Creation
While the creation process is quite straightforward, there are a few tips to ensure your sensory bottle is a success and lasts a long time.
Ensuring a Secure Seal
A secure seal is critical to prevent leaks and spills. Once you are satisfied with your bottle’s contents, apply a strong adhesive like super glue or hot glue to the threads of the lid, then screw it on tightly. Allow the adhesive to dry completely before using the bottle.
Maintenance and Care for Sensory Bottles
To maintain the pristine condition of your sensory bottles with glue, keep them out of direct sunlight to prevent the colors from fading. Should the contents become cloudy over time, you can open the bottle, pour out the contents, and create a new mixture. Always ensure the outside of the bottle is clean and dry to provide the best visual experience.
Creating sensory bottles is a fun and engaging way to stimulate the senses, and glue plays a pivotal role in the process. For those interested in the different ways glue can be used in DIY projects, we have a selection of articles that might pique your interest. Learn how to create various types of adhesives with our guides on how to make spray glue, how to make glue balls, and how to make liquid glue. These resources will provide you with the know-how to enhance your sensory bottle creations or embark on other adhesive-related crafts!
Conclusion: Enjoying Your Sensory Bottle
Whether you’ve created a sensory bottle with clear glue or opted for the dazzling effect of glitter glue, your sensory bottle is now ready to be a source of calm and fascination. Enjoy the tranquility it brings to any environment and take pride in having crafted a personalized sensory experience. Remember, the beauty of sensory bottles lies in their versatility and the ease with which they can be customized to fit any mood or theme.