Have you ever found yourself perplexed when it comes to joining PVC pipes using glue? Joining PVC pipes may seem like a daunting task, but with the right tools and knowledge, anyone can do it! In this step-by-step guide, we will explore the different types of glue used to join PVC pipes and provide you with tips on how to strengthen your joints. We’ll also cover what to do if your pipes are wrongly joined and when to call in a professional. So grab your PVC pipes and let’s dive into the ultimate guide on how to glue PVC!
What Are PVC Pipes and Their Use?
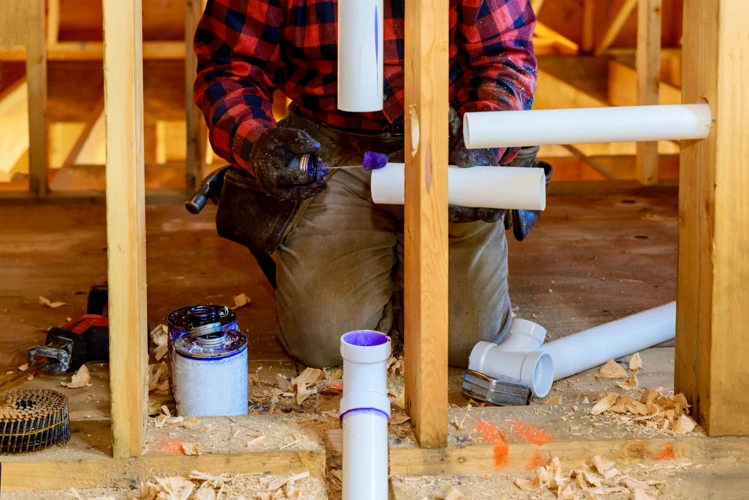
Polyvinyl chloride (PVC) pipes are plastic pipes that have gained immense popularity in the plumbing industry. These pipes are used for various purposes such as carrying drinking water, drainage systems, vent systems, and many more. PVC pipes are highly durable, corrosion-resistant, and cost-effective. Hence, they are being used in domestic and commercial plumbing projects.
PVC pipes are available in different sizes and shapes, and each type of PVC pipe is used for a specific purpose. For example, the Schedule 40 PVC pipe is used in water supply systems and drainage systems while the Schedule 80 PVC pipe is used in industrial applications that require high-pressure resistance. Additionally, the PVC pipes are color-coded for easy identification of their intended purpose.
One of the advantages of PVC pipes is that they can be easily joined together using various methods. PVC pipes can be joined using threaded joints, push-fit joints, and glued joints. However, glued joints are the most popular method used for joining PVC pipes.
Glued joints are made by applying PVC glue or solvent cement on the surface of the PVC pipes, which then melts the surface of the PVC, creating a strong bond that seals the joint. There are different types of glue used for joining PVC pipes, including solvent cement, two-part epoxy, and multi-purpose glue/adhesive.
Understanding the materials and methods for joining PVC pipes is critical to achieve a successful project. To know more about the types of glue used for joining PVC pipes, continue reading our article on Types of Glue Used to Join PVC Pipes.
Types of Glue Used to Join PVC Pipes
Understanding the different types of glue used to join PVC pipes is crucial to achieve a strong and long-lasting joint. When it comes to gluing PVC pipes, there are three main types of adhesive commonly used: solvent cement, two-part epoxy, and multi-purpose glue/adhesive. Each of these adhesives has its unique properties, pros, and cons. It’s essential to choose the right glue for your project. In the following section, we’ll explore each of these glue types in detail to better understand their functionality and use.
Solvent Cement
Using solvent cement to glue PVC pipes is the most common and recommended method. It is a specially formulated glue that chemically bonds PVC pipes. Solvent cement works by softening and melting the plastic of the pipes, allowing it to fuse together. There are various types of solvent cement available on the market, including those with different drying times, viscosity, and strength.
| Type of Solvent Cement | Characteristics |
|---|---|
| Regular-Bodied PVC Cement | Recommended for pipes 4 inches or less in diameter. It has medium viscosity and can be used for both flex and rigid PVC. It typically dries in 15 minutes and takes 2 hours to cure. |
| Heavy-Bodied PVC Cement | Recommended for pipes larger than 4 inches in diameter. It has a thicker consistency than regular-bodied cement, making it suitable for vertical applications. It usually dries in 30 minutes and takes up to 4 hours to cure. |
| Low-VOC PVC Cement | Recommended for indoor use or in poorly ventilated areas. It has low volatile organic compounds (VOCs) and is less harmful to the environment. It typically has a drying time of 30 minutes and takes up to 2 hours to cure. |
| Quick-Drying PVC Cement | Recommended for quick repairs or small projects. It has a drying time of 5-10 minutes and can be handled in 10-15 minutes. However, it takes up to 4 hours to cure. |
Applying solvent cement can be tricky and requires precision to avoid mistakes. Be sure to follow the manufacturer’s instructions and wear protective gloves and clothing when using solvent cement. Remember to apply primer before the glue for maximum bond strength. If you need to glue ABS to PVC, check out our article on how to glue PVC to ABS.
If you’re wondering how long PVC glue takes to dry, read our article on how long PVC glue dries for more information. If you need to glue something other than PVC pipes, like refrigerator plastic, check out our article on the best glue for refrigerator plastic. Remember to use the correct amount of glue for the job. Check out our article on how much pipe glue to use for more information.
Note that solvent cement is not suitable for gluing ABS pipes to PVC pipes. For more information on how to glue ABS to PVC, see our article on how to glue ABS to PVC. Solvent cement is also commonly used in plywood production, where it is used to bond layers of veneers together. Check out our article on what glue is used in plywood for more information.
If you accidentally glue the wrong pipes together, don’t worry. Our article on how to break PVC glue can help you fix the mistake. If you need to glue a PVC repair coupling, see our article on how to glue a PVC repair coupling.
While it is possible to glue TPU (thermoplastic polyurethane) to PVC pipes, it requires a specialized adhesive. Check out our article on how to glue TPU for more information.
If you’re new to working with solvent cement or have a complex project, it may be better to call a professional. Our article on when to hire a professional can help you decide if you need an expert.
Two-part Epoxy
Two-part Epoxy: This type of glue is a two-component adhesive that requires mixing before use. It is a high-strength adhesive that can be used to join PVC pipes, along with other materials. Two-part epoxy has a longer curing time compared to solvent cement. It is also resistant to heat, chemicals, and water, making it ideal for outdoor use and in environments where the pipes are exposed to extreme conditions.
Advantages:
– Strong bond: Two-part epoxy creates a strong bond that can handle high-pressure applications.
– Versatile: It can be used to join different types of materials, including PVC, metal, and wood.
– Durable: It is resistant to water, chemicals, and extreme temperatures, making it ideal for outdoor use.
– Can be used to fill gaps: Two-part epoxy can also be used to fill gaps between the pipes before joining.
Disadvantages:
– Longer curing time: Two-part epoxy can take up to 24 hours to cure completely, which means you will have to wait longer before using the joined pipes.
– Mixing: It requires mixing of two components before use, which can sometimes be messy.
– Price: Two-part epoxy is generally more expensive than solvent cement.
When to use: Two-part epoxy is ideal for applications where a strong, durable bond is required. If you are joining PVC pipes that will be exposed to harsh conditions, this is the glue for you. It is also suitable for joining PVC pipes of different diameters and can fill gaps between the pipes before joining.
It is essential to follow the manufacturer’s instructions when using two-part epoxy. Improper mixing can result in a weaker bond and may lead to the joint failing over time. Ensure that you work in a well-ventilated area and wear appropriate protective gear before using this adhesive.
In case you need to open PVC pipe glue, check our detailed guide on how to open PVC pipe glue.
Multi-purpose Glue/Adhesive
One of the commonly used types of glue for joining PVC pipes is “multi-purpose glue/adhesive”. This type of glue is a non-solvent, two-part adhesive that creates a strong bond between PVC pipes and fittings. It is also popularly known as PVC pipe adhesive.
Here’s a table comparing the features of multi-purpose glue/adhesive with other types of PVC pipe glues:
| Feature | Multi-purpose Glue/Adhesive | Solvent Cement | Two-part Epoxy |
|---|---|---|---|
| Drying Time | Ranges from 1-24 hours | Ranges from 10-15 minutes | Ranges from 24-48 hours |
| Application Area | Interior and Exterior | Interior | Interior and Exterior |
| UV Resistance | Poor | Poor | Excellent |
| Temperature Resistance | Good up to 200°F (93°C) | Good up to 140°F (60°C) | Excellent up to 250°F (121°C) |
| Flexibility | Good | Poor | Poor |
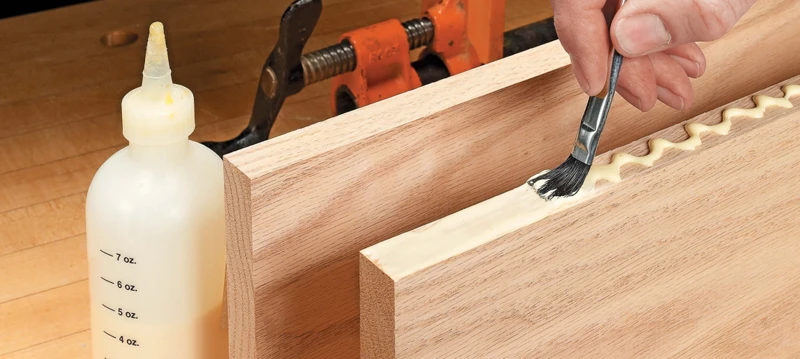
| Application Method | Brush or Roller | Brush | Brush |
| Water Resistance | Excellent | Poor | Poor |
| Price | Reasonable | Cheap | Expensive |
Multi-purpose glue/adhesive has a long drying time as compared to solvent cement and two-part epoxy, ranging from 1-24 hours depending on the manufacturer’s instructions. Although it takes longer to dry, it is a good option for those who are new to joining PVC pipes. It also has a good level of flexibility, making it ideal for pipes that may experience some movement.
One of the key advantages of multi-purpose glue/adhesive is its versatility. It can be used for both interior and exterior applications, making it perfect for a wide range of projects. Additionally, it offers excellent water resistance, making it perfect for plumbing projects where there is the potential for water exposure.
However, multi-purpose glue/adhesive is not ideal for all situations. It has poor UV resistance, making it unsuitable for outdoor applications where the pipes will be exposed to sunlight. It also has a lower temperature resistance as compared to two-part epoxy, which can be a limiting factor in certain applications.
In terms of application, multi-purpose glue/adhesive is easy to apply using a brush or roller. It is also reasonably priced, making it an economical option for those on a budget.
Multi-purpose glue/adhesive is a great option for general plumbing projects. It offers versatility, good flexibility, and excellent water resistance. However, for specific applications such as outdoor plumbing or high-temperature environments, it may be necessary to consider other types of PVC pipe glues.
How to Glue PVC Pipes- A Step by Step Guide
So, you have your PVC pipes and you’re ready to start gluing them together. But where do you start? Don’t worry, we’ve got you covered. In this comprehensive guide, we’ll take you through the step-by-step process of gluing PVC pipes together and make this seemingly intimidating task much easier. From cutting the pipes to holding them in place, we’ll walk you through all the necessary steps you need to know so you can confidently join your PVC pipes together and create a strong, leak-free bond. So, grab your PVC pipes and let’s get started!
Step 1: Cut the PVC pipe
Step 1: Cutting the PVC pipe is the first and most important step when it comes to joining them together. To cut the PVC pipe, you will need a cutter or saw that is specifically designed for cutting PVC pipes. There are different types of cutters available in the market, but the most commonly used one is the ratcheting plastic pipe cutter.
Before cutting the PVC pipe, ensure that you measure it properly and mark the exact spot where you want to make the cut. This will help you to make a clean and precise cut.
| Tools Required: | PVC Cutter or Saw |
| Materials: | PVC Pipe |
| Instructions: | 1. Measure and mark the PVC pipe at the exact spot where you want to make the cut. |
Once you have marked the spot, place the pipe in the cutter and align the blade of the cutter with the mark. Squeeze the handles of the cutter or saw to make the cut. Be careful not to apply too much pressure as it can deform or damage the pipe.
After making the cut, ensure that the edges of the pipe are smooth and even. Any rough or jagged edges can compromise the joint and lead to leakage.
Pro tip: To make the cutting process easier, you can use a miter box. It is a device that provides a precise guide for cutting angles and is especially useful when making angled cuts.
Step 2: Deburr the Edges
Before joining the PVC pipes, it’s essential to deburr the edges to ensure a smooth surface. Deburring refers to the process of removing raised or rough edges on the cut pipe. If these edges are not removed, they can interfere with the glue’s ability to bond the PVC pipes properly.
To deburr the edges of the PVC pipe, you will need a chamfering tool or sandpaper. Here’s a step-by-step guide on how to deburr the edges of the PVC pipes:
| Step 1 | Inspect the edges of the cut pipe by running your fingers over them to ensure there are no rough edges. If you feel any rough patches or raised edges, they need to be deburred. |
| Step 2 | Place the chamfering tool over the end of the pipe. Alternatively, wrap a small piece of sandpaper around the end of the pipe. |
| Step 3 | Apply firm, downward pressure while rotating the pipe or tool around the edges. This will grind down any raised or rough edges until the pipe’s end is smooth. |
| Step 4 | If using sandpaper, make sure to change the position of the pipe several times while eliminating rough edges. Also, change the sandpaper or fabric to ensure there are no more rough edges. |
| Step 5 | Wipe off any debris or shavings with a clean cloth to leave the end of the PVC pipe smooth and clean. |
Deburring the edges may seem like a small step, but it’s crucial in joining PVC pipes. Failure to deburr could result in an unstable joint that may not last long. Remember to take care when using the chamfering tool or sandpaper to avoid injuring yourself.
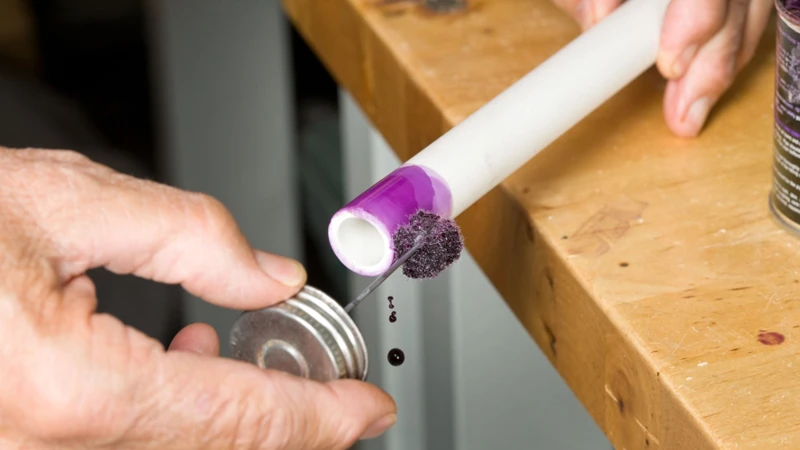
Step 3: Apply Primer
Before applying the glue or solvent cement, it’s crucial to apply primer on the ends of the pipes. The primer is a liquid solution that helps to soften the PVC surface, thereby making it easier to join with the glue or solvent cement.
Below is a step-by-step guide on how to apply primer to your PVC pipes:
| Step | Instructions |
|---|---|
| Step 1 | Clean the Pipes: Before applying the primer, make sure that the pipes are clean and free of any debris or dust. Use a clean cloth or rag to wipe the surface of the pipes. |
| Step 2 | Shake the Can: Shake the can of primer well, as the liquid may settle at the bottom of the can if left unused for a long time. |
| Step 3 | Apply the Primer: Apply the primer to both the inside of the fitting and the outside of the pipe. Use a brush or an applicator to ensure that the primer is applied evenly across the surface. |
| Step 4 | Wait: Wait for 10 to 15 seconds to allow the primer to dry. The surface of the primer will become tacky once it’s dry. |
It’s important to note that the primer contains chemicals that are harmful if ingested or inhaled. It’s recommended to wear gloves and a mask while applying the primer. Additionally, always use the primer in a well-ventilated area to avoid inhaling the fumes.
Not applying primer before gluing the pipes together can result in a weak joint that may fail over time. Consequently, taking the time to apply primer before gluing the pipes together will ensure a strong and long-lasting joint.
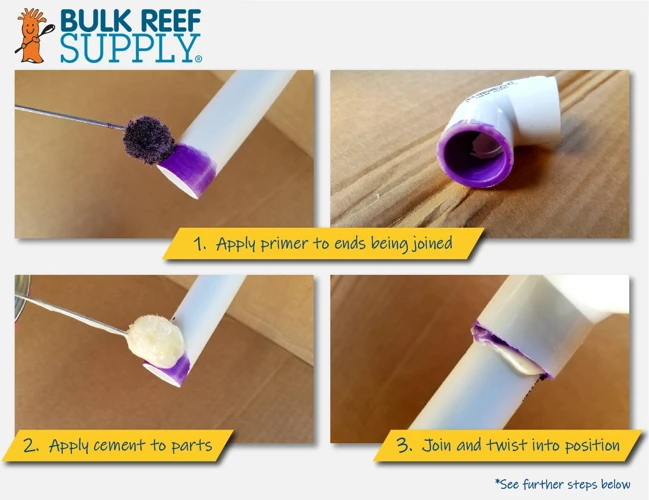
Step 4: Apply Glue/Solvent Cement
After applying the primer, it’s time to apply the glue or solvent cement, which is the most crucial step in joining PVC pipes. Make sure to select the appropriate glue or solvent cement based on the type of PVC pipe you are joining, as there are different types of these adhesives available in the market. Here is the step-by-step process for applying glue or solvent cement:
- Step 1: Open the glue/solvent cement can and stir its contents thoroughly.
- Step 2: Using a brush, apply the glue/solvent cement evenly on the inside of the fitting in a circular motion, covering 50% of the surface area. Do the same on the end of the PVC pipe, covering about one-third of the end’s surface area.
- Step 3: Repeat step 2 on the other end of the PVC pipe you’ll be using, ensuring that the glue/solvent cement covers the entire fitting’s inside surface.
- Step 4: While the glue/solvent cement is still wet, insert the PVC pipe into the fitting. Make sure to give it a quarter turn to ensure an even distribution of cement.
- Step 5: Hold the PVC pipe and fitting together for about 30 seconds and wait for the glue to cure.
Remember to work quickly when applying the glue or solvent cement, as they tend to dry fast. Avoid applying excessive amounts of the glue/solvent cement, as this may lead to unwanted dripping, and always perform this step in a well-ventilated area to prevent inhaling toxic fumes.
Step 5: Join the Pipes Together
Once the primer has dried and the glue/cement is applied, it’s time to join the PVC pipes together. This is a critical step that requires precision to ensure a strong and leak-proof joint.
Here are the steps to follow for joining the pipes together:
| Step | Description | Tip |
|---|---|---|
| 1 | Insert one end of the PVC pipe into the fitting/socket. | Ensure the pipe is fully inserted into the socket to avoid gaps. |
| 2 | Twist the pipe to spread the glue/cement inside the fitting/socket. | Do this quickly before the glue/cement dries. |
| 3 | Insert the other end of the pipe into the other end of the fitting/socket. | Ensure the pipe is fully inserted into the socket to avoid gaps. |
| 4 | Twist the pipe to spread the glue/cement inside the fitting/socket. | Do this quickly before the glue/cement dries. |
It’s important to note that PVC pipes cannot be repositioned once they are joined together. It’s crucial to ensure that your measurement and fitting are accurate before applying the glue/cement. Also, avoid disturbing the pipes while they are drying to prevent weakening the joint.
Once you have joined the pipes together, ensure they are held in place until the glue/cement is fully cured. This can take anywhere from a few minutes to several hours, depending on the type of glue/cement used. Check the manufacturer’s instructions for curing time and follow them accordingly.
Tip: It’s a good idea to apply a bead of glue/cement around the outside of the joint to provide additional protection against leaks.
Step 6: Hold the Pipes in Place
Once you have applied the glue/solvent cement to the edges of your PVC pipes and joined them together, it is important to hold them in place to ensure a strong joint. This step can be a bit tricky as the pipes can easily shift and result in a weak bond. Here are some tips for holding the pipes in place during the gluing process:
| Option 1 | Option 2 |
|---|---|
| Use clamps – you can clamp the pipes together to hold them in place until the glue/solvent cement has dried completely. This is a great option for larger pipes and joints. | Use your hands – if you are working with smaller pipes, you can hold them together with your hands. Be sure to keep the pipes aligned and stationary, and avoid any unnecessary movements until the glue has fully dried. |
| Use braces – braces are a great option for holding pipes in place when you don’t have access to clamps. You can place braces (wooden planks, for example) on either side of the joint, and secure them in place with screws until the glue dries. | Use tape – tape can be used to hold the pipes in place temporarily while the glue dries. Simply wrap tape tightly around the joint, making sure that the pipes are aligned, and leave it in place until the glue has set. |
It is important to remember that once the glue/solvent cement has dried, the joint will be extremely strong and durable. However, during the curing process, the bond can be easily disrupted, resulting in a weak joint. Make sure to hold the pipes in place until the glue has fully dried according to the manufacturer’s instructions.
Step 7: Wait for the Glue to Dry
After applying the glue, you need to wait for it to dry sufficiently before moving or using the newly joined pipes. Patience is essential at this stage to ensure a strong, secure joint. Here are some key points to keep in mind as you wait for the glue to dry:
- Wait for at least 15-30 minutes for the glue to dry before moving the pipes.
- Make sure the joint is secure and stays in place as you wait for the glue to dry.
- Avoid disturbing the joint or moving the pipes too much as it can weaken the bond.
- A hot and humid environment can slow down the drying process while a dry, cold environment can speed it up.
- If you live in a humid environment or it is raining outside, give the glue an extra 30 minutes to dry completely.
- Don’t add any pressure or stress on the joint immediately after gluing. Allow the joint to set completely before using or applying any pressure.
- For larger diameter pipes (more than 4 inches), you may need to wait for up to two hours for the glue to dry completely.
- Check the curing time mentioned on the glue packaging and wait accordingly.
Remember, giving enough time for the glue to dry is critical to ensuring a strong, leak-proof joint that will last for the long-term. Rushing the drying process or using the pipe before the glue is completely dried can compromise the joint, leading to leaks, breaks, or even complete failure of the system.
Step 8: Inspect Your Joint
After waiting for the glue to dry, it is important to inspect your joint to ensure that it was done properly. Follow these steps to inspect your joint:
- Check for leaks: Turn on the water or fluid supply to check for any leaks. If the joint is leaking, it means that it wasn’t properly sealed. You will need to redo the joint.
- Check for visible glue: Take a close look at your joint. Make sure that there are no visible glue marks around the joint. If there are, it means that there was too much glue in the joint or it wasn’t properly wiped off.
- Check for cracks or misalignments: Inspect the joint thoroughly for any cracks or misalignments. These imperfections can weaken the joint and lead to leaks in the future. If you find any, redo the joint before using it.
- Ensure joint has set correctly: The PVC glue typically takes about 2 hours to dry and 24 hours to set. Make sure that you give it the appropriate amount of time to set before putting pressure on it.
- Check final alignment: Finally, make sure that the pipes are still aligned properly and that the joint is secure. If it is loose, try redoing it just to be safe.
It is important to take the time to inspect your joint to make sure it is solid and secure. This will save you from potential leaks or other issues down the line.
Do’s and Don’ts
When it comes to gluing PVC pipes, there are certain things you should and shouldn’t do to ensure a successful joint. It’s important to follow these guidelines to avoid any leaks or cracks in your plumbing system. Before you begin gluing, take a moment to familiarize yourself with these crucial do’s and don’ts of PVC pipe gluing to ensure your project’s success. Here are some essential tips to keep in mind when working with PVC pipes.
Do’s
To ensure that your PVC pipe joint holds strong for a long time, here are some of the essential do’s that you need to follow:
| Do’s | Explanation |
|---|---|
| Use the Right Type of Glue | Before starting the process, make sure you have the right type of glue for your PVC pipe. Solvent cement is the most common and recommended glue for PVC, but if you are joining pipes of different materials, make sure to use the appropriate glue. Two-part epoxy or multi-purpose adhesive may be suitable for some cases. |
| Clean the Pipes | Make sure to thoroughly clean the PVC pipes that need to be joined. Any dirt, dust, or debris can affect the adhesive quality of the glue which may result in a weak joint. |
| Deburr the Edges | After cutting the PVC pipes, use sandpaper or a deburring tool to smooth out the edges. This will ensure that the pipes fit together snugly and the glue adheres properly. |
| Apply Primer | Before applying the glue, apply primer on the exposed surface of the pipe. This will soften the surface of the PVC and improve the bonding strength of the glue. |
| Apply Glue/Solvent Cement Evenly | Apply the glue or solvent cement evenly on the surface of the pipe and the inside of the fitting. This will ensure an even bond and a leak-proof joint. |
| Join the Pipes Quickly | After applying the glue, join the pipes together before the glue starts to dry. This will ensure that the joint is tight and secure. |
| Hold the Pipes in Place | To prevent the pipes from shifting or moving during the drying process, hold the pipes in place for at least 30 seconds after joining them together. |
| Leave the Joint Undisturbed | After joining the pipes together, leave the joint undisturbed for at least 24 hours to give the glue time to dry and cure completely. |
By following these essential do’s, you can ensure that your PVC pipe joint is strong, leak-proof, and long-lasting. Don’t take shortcuts or skip any of these important steps as it can lead to a weak joint and damage to your PVC pipes.
Don’ts
When it comes to gluing PVC pipes, there are some important “don’ts” that you should keep in mind to ensure a successful joint. Here are some things you should avoid doing:
- Don’t use too much glue: Applying too much glue can actually weaken the joint. Instead, apply a thin, even layer of glue to both surfaces.
- Don’t forget to deburr: Failing to deburr the edges of your PVC pipes can cause the joint to fail. Make sure to use a deburring tool to remove any rough edges.
- Don’t rush: It’s important to take your time and follow all the steps carefully. Rushing the process can result in an improper joint that may leak or fail over time.
- Don’t mix different types of glue: Mixing different types of glue can cause a chemical reaction that can weaken the joint. Stick with the same type of glue throughout the entire process.
- Don’t use PVC cleaner instead of primer: PVC cleaner is not a substitute for primer and can compromise the integrity of the joint. Make sure to use a primer specifically designed for PVC pipes.
- Don’t attempt to reuse fittings: Once a joint has been made, it cannot be undone. Attempting to reuse fittings can result in a weak joint and potential leaks.
By keeping these “don’ts” in mind, you can avoid common mistakes and achieve a strong, long-lasting joint when gluing PVC pipes.
Tips for Joint Strengthening
Once you’ve successfully joined two PVC pipes together, you’ll want to ensure that the joint is strong and secure. Here are some tips on how to strengthen your PVC joint for maximum durability:
1. Add More Cement/Glue: After applying the initial layer of glue, add another layer of glue on top of it. This will help create a stronger bond between the two pipes.
2. Use Primer: Primer prepares the surface of the PVC pipe by softening the material and creating a better adhesion surface for the glue. Be sure to let the primer dry completely before applying the glue.
3. Use a Longer Pipe: Using a longer pipe allows for a greater surface area for gluing and can create a stronger joint.
4. Reinforce with Fittings: Adding fittings or couplings to your joint can strengthen the connection. Make sure to glue these fittings securely and allow the glue to dry completely.
5. Apply Pressure: Hold the pipes together for a longer period of time to allow the glue to set and create a stronger bond.
6. Avoid Movement: Avoid moving the pipes while the glue is drying, as this can weaken the joint.
By following these tips, you can ensure that your PVC joint is as strong and durable as possible. Remember to always follow safety guidelines when working with PVC pipes and glue.
How to Fix a Wrongly Joined PVC Pipe?
It’s a common mistake to join PVC pipes incorrectly, and when this happens, the only solution is to make corrections. Fixing a wrongly joined PVC pipe can seem like a daunting task, but with a few careful steps, it’s possible to make the necessary corrections.
Step 1: Identify the Problem
Before you can fix a wrongly joined PVC pipe, you need to identify the problem. There are several ways in which PVC pipes can be joined improperly. The most common issue is misalignment, where the pipes are not joined at the correct angle. Other issues include insufficient glue application, incorrect timing, and using the wrong glue.
Step 2: Cut Out the Problem Area
Once you have identified the issue, you will need to cut out the problem area. Using a saw, cut around the joint where the issue exists. Be sure to cut straight and remove enough material to allow room for a new joint.
Step 3: Clean Up the Pipes
After you have cut out the problem area, clean up the pipes to remove any old glue residue. Use a knife or sandpaper to remove any leftover glue. This will ensure a clean and smooth surface for the new joint.
Step 4: Apply Glue & Attach the New Fitting
Apply a generous amount of glue to both the pipe ends and the new fitting. Then, attach the new fitting to the pipe, ensuring a tight fit. Hold the pipes in place for a minimum of 30 seconds or until the joint is secure.
Step 5: Check for Leaks
Once the joint has been secured, check for leaks. Turn on the water supply and observe the joint for any signs of leaking. If there is no leakage, the joint is secure and ready to use. If leaks are present, repeat the process until a tight seal is achieved.
Fixing a wrongly joined PVC pipe requires a few careful steps, but it’s possible to correct the issue with the right tools and technique. Be sure to identify the problem, cut out the problematic area, clean up the pipes, apply glue, attach the new fitting, and check for leaks.
When to Hire a Professional?
It’s normal for homeowners to feel confident enough to fix things around the house themselves. However, for certain tasks, it’s best to leave them to professionals. The same goes for gluing PVC pipes together. While it may seem like an easy task, certain situations call for expert help.
Complex Projects
If your PVC pipe project is complex, it is highly recommended that you seek professional help. For instance, if your project involves intricate curves, it is best to have an expert who can solder and bend the pipes without causing any damage.
When Working with High-Pressure Systems
If your PVC pipe system is going to carry water, gas, or any other liquid material under high amounts of pressure, it’s better to call an experienced plumber to handle the job. High-pressure systems require perfect and precise gluing for them to function correctly. A small mistake could lead to disastrous results.
When Dealing with Unknown Pipelines
If you are unsure about your pipeline’s composition, it is better to call in a professional to avoid any potential disasters. Some old pipelines contain hazardous substances that require specialized handling; for the safety of yourself and your loved ones, it is best to seek expert help.
When Time is of the Essence
If you need to get your PVC piping system up and running quickly, it’s best to call in an expert. Professionals have the necessary tools, experience, and training to get the job done quickly and efficiently.
In Conclusion
While gluing PVC pipes together may seem like an easy task, some situations call for expert help. If you’re dealing with complex projects, high-pressure systems, unknown pipelines, or time constraints, it’s best to call in a professional to handle the job and ensure the job is done correctly and safely. Hiring a professional may save you time, money, and headaches down the line.
Conclusion
In conclusion, gluing PVC pipes together is a simple process if you follow the steps correctly and choose the appropriate glue for the job. Remember to always wear the necessary safety equipment, such as goggles and gloves, when working with glue and PVC pipes.
Always cut the PVC pipe carefully and precisely, using a pipe cutter or a saw. Never use a dull blade, as this can create uneven edges that will not fit together properly.
Deburring the edges of the PVC pipe is an essential step that should never be skipped. This will ensure that the glue properly adheres to the surface and creates a strong bond.
Applying primer is crucial, as it helps to clean and prepare the surface for the glue. Without primer, the glue may not bond properly and could come loose over time.
Choosing the right glue is essential to ensure a strong bond. Solvent cement is the most commonly used glue for PVC pipes, but two-part epoxy and multi-purpose glue can also be used depending on your specific needs.
Following the step-by-step guide provided in this article will help you to glue your PVC pipes together correctly and securely. However, it is important to remember that mistakes can happen, and if you do not feel comfortable with the process, it is best to hire a professional.
Lastly, always take care when working with PVC pipes and glue and follow the do’s and don’ts provided. With the tips and techniques provided in this ultimate guide, you can confidently glue PVC pipes together like a pro!
Frequently Asked Questions
What is the best glue for PVC pipes?
The best glue for PVC pipes is solvent cement, as it creates a strong and reliable bond that can last for years.
Can you use regular glue on PVC pipes?
No, regular glue is not suitable for use on PVC pipes. Only special types of glue, like solvent cement or two-part epoxy, should be used.
How long does it take for PVC glue to dry?
The drying time for PVC glue depends on the type of glue used and the environmental conditions. Typically, it takes 15-30 minutes for the glue to dry, but it is recommended to wait at least 24 hours before testing the joint.
Do you need to use primer before gluing PVC pipes?
Yes, primer is an essential part of the process when gluing PVC pipes. It cleans the surface of the pipe and makes it more receptive to the glue, ensuring a stronger bond.
How do you strengthen a joint between PVC pipes?
You can strengthen a joint between PVC pipes by adding a piece of reinforcing material, like a slip-joint fitting or a coupling, or by using a stronger type of glue, like two-part epoxy.
Can you remove glued PVC pipes?
Yes, it is possible to remove glued PVC pipes, but it can be difficult and may result in damage to the pipes. It is usually best to cut the pipes and replace them with new ones.
Can you reuse PVC fittings?
It is not recommended to reuse PVC fittings, as they may be weakened by exposure to solvents or UV radiation. It is safer to use new fittings for each project.
Can you paint over glued PVC pipes?
Yes, you can paint over glued PVC pipes. However, it is important to use a paint that is compatible with PVC and to wait for the glue to dry completely before painting.
What is the average lifespan of a PVC joint?
The average lifespan of a PVC joint depends on a variety of factors, including the quality of the materials used, the environmental conditions, and the type of adhesive used. In general, a well-made PVC joint can last for many years.
When should you call a professional to glue PVC pipes?
You should call a professional to glue PVC pipes if you are unsure about your ability to complete the task or if you are dealing with a complicated installation or repair project. A professional can ensure that the job is done correctly and safely.