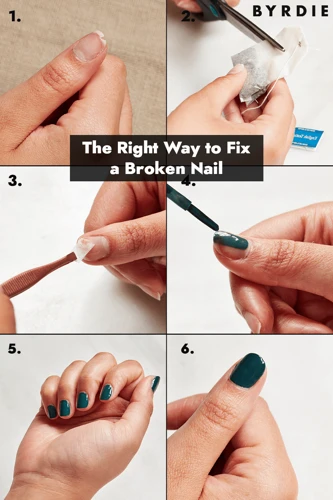
You’re going about your day, when suddenly you hear that dreaded sound: the sound of a broken nail. It’s a frustrating moment for anyone who has put time and effort into growing their nails. But fear not, as fixing a broken nail is not the end of the world. With a few tips and tricks, you can restore your nail to its former glory. In this article, we will provide you with step-by-step instructions on how to glue a broken nail, while also sharing some aftercare tips to ensure your nails remain strong and healthy. So grab your tools and let’s get started!
Tools You Will Need
When it comes to fixing a broken nail, having the right tools is essential. There are a few items you will need to make sure you can fix your broken nail effectively. These tools include cyanoacrylate glue, nail buffer, and cuticle oil. Cyanoacrylate glue is also known as nail glue and is the perfect product to use to fix a broken nail. It’s easily accessible, so you can find it at your local drugstore or beauty supply store. A nail buffer will help you smooth out the nail’s surface, and cuticle oil is essential for keeping your nails healthy and moisturized. With these tools, you will be able to repair your broken nail in no time.
Cyanoacrylate Glue
Cyanoacrylate Glue is the best glue to use for fixing a broken nail. It is a strong adhesive that bonds quickly and effectively. This type of glue is also commonly used in UV nail glue and nail tips. Here is a table outlining the key details you need to know about cyanoacrylate glue:
| Type of glue | Bonding time | Drying time | Removal |
|---|---|---|---|
| Cyanoacrylate glue | Instant bond | 10 seconds | Acetone |
It’s essential to use cyanoacrylate glue sparingly, as overapplication can lead to clumps and bumps on the nail. Additionally, excessive glue can be difficult to remove if necessary, causing further damage to the nail. In case of overapplication, the glue can be removed using acetone. However, it is important to avoid applying too much acetone on the nail as it can make it brittle and fragile. It is important to remove the glue only when necessary.
Cyanoacrylate glue is the best glue option to fix a broken nail as it works quickly and effectively. When used correctly, the glue can bond the nail instantly, which means that there is no need to wait for several minutes for it to dry. However, it is crucial to use this glue sparingly to avoid any potential damage to the nail.
Nail Buffer
Using a nail buffer is an important step in preparing your nails for gluing. A nail buffer is a tool used to smooth out the surface of the nail and make it easier for the glue to adhere. Not only will a nail buffer help the glue stick better, but it will also help the nail look smoother and more uniform once it’s repaired.
There are many different types of nail buffers available, but the most common are:
- Emery board buffer
- Four-way buffer
- Buffing block
An emery board buffer is a small, rectangular file that has a rough texture. It is typically used for shaping and roughing up the surface of the nail before applying glue. A four-way buffer is a larger tool that has four different surfaces with varying levels of coarseness. This tool can be used to shape, buff, and polish the nails. A buffing block is a square block with four sides, each with a different texture. It can be used to shape the nails, remove ridges, and buff the surface of the nail to a shine.
No matter which type of nail buffer you choose, it’s important to use it correctly. Start by gently filing the surface of the nail in one direction, using a back-and-forth motion. Be careful not to file too hard, as this can damage the nail. Next, use the buffer to smooth out any rough edges or bumps on the nail. Finally, use the buffer to polish the surface of the nail to a shine.
Pro tip: If you cannot find a nail buffer, you can use a fine-grit sandpaper to rough up the surface of the nail instead. However, be careful not to file too hard, as this can damage the nail.
Using a nail buffer is an essential step in preparing your nails for gluing. By roughing up the surface of the nail and smoothing out any rough edges, you’ll help the glue adhere better and ensure a smoother, more uniform nail once it’s repaired. For more information on nail care, check out our tips for making glue-on nails look real.
Cuticle Oil
Cuticle oil is an essential tool to have when gluing a broken nail. It helps keep the cuticles moisturized and prevents the glue from drying out the surrounding skin. The following table lists some benefits of using cuticle oil:
| Benefits of Cuticle Oil |
| Helps prevent hangnails |
| Keeps the nails and cuticles moisturized |
| Induces healthy nail growth |
| Strengthens brittle nails |
To use cuticle oil, simply apply a small amount onto each cuticle and massage it in. This will help to nourish the cuticles and promote healthy nail growth.
Tip: For an extra nourishing treatment, apply the cuticle oil before going to bed and wear cotton gloves overnight. This will help the oil to penetrate deeply into the cuticles and nails.
It is important to note that using cuticle oil is not a substitute for properly gluing a broken nail. While it can help strengthen and nourish the nails, it will not hold the broken pieces together. For a step-by-step guide on how to glue a broken nail, check out our article on How to Glue a Broken Nail – Tips and Tricks.
How to Glue a Broken Nail
Ready to fix that broken nail? It can be frustrating when a nail breaks, but don’t worry – with a few tools and some glue, you can quickly repair it at home. Gluing a broken nail is an easy process that can save you time and money at the salon. Before we get started, make sure you have the necessary tools on hand. (For more information about how long nail glue lasts, click here.)
Clean Your Nail
To begin fixing your broken nail, the first step is to clean it properly. This may seem like a small step, but it’s essential to ensure that the glue adheres well to your nail. Start by washing your hands with warm water and soap, then dry them with a clean towel. Using a nail polish remover and a cotton ball, remove any dirt, oils, or residual nail polish from the affected area.
Next, take a soft-bristled brush, such as a toothbrush, and gently scrub the remainder of your nail to remove any remaining debris. Be sure to get under the broken nail and around the sides as well. If you don’t clean your nail properly, it may lead to the glue not sticking accordingly, which can cause the nail to break again.
Important note: Avoid using harsh chemicals or products that contain alcohol or acetone, as they can damage your nail’s natural oils and moisture. If you don’t have any nail polish remover, try using a mixture of warm water and soap instead.
After cleaning your nails, dry them thoroughly with a towel to remove any excess water and avoid moisture. Your nail needs to be completely dry for the glue to stick correctly. Now that your nail is clean, it’s ready for the next step.
If you’re interested in making your nail glue at home, you can check out this tutorial.
Trim the Nail
Trimming the nail is an important step to ensure a smooth and even surface for gluing. By trimming the nail, you remove any excess nail that may be in the way of reattaching the broken piece. To trim your nail, you will need a nail clipper or scissors. It is important to use a clean and sharp tool to avoid splitting or damaging the nail further.
Pro Tip: Trim the nail to a slightly shorter length than desired to allow for filing and buffing in the next steps.
Here are some guidelines to follow when trimming your nail:
| DOs | DON’Ts |
|---|---|
| Do use a clean and sharp tool. | Don’t use your teeth to bite or tear the nail. |
| Do trim your nail straight across to avoid ingrown nails. | Don’t trim your nail too short or at an angle. |
| Do trim the broken piece of the nail if it is still attached. | Don’t trim too much of the nail, leaving it too short to reattach the broken piece. |
| Do trim slowly and carefully to avoid further damage. | Don’t rush or force the tool through the nail. |
Once you have trimmed the nail, you can move on to the next step of filing down the rough edges to ensure a seamless reattachment. If you need guidance on how to do this, check out our article on How to Use Beetles Nail Art Foil Glue.
File Down the Rough Edges
When you break a nail, the edges can be sharp and rough. Filing down the rough edges is an important step in the process of gluing a broken nail. This will prevent the rough edges from catching on things and causing further damage to your nail.
To file down the rough edges, you will need a nail file. It’s best to choose a fine-grit file, as a coarse file can actually cause more damage to your nail. It’s important to file in one direction rather than back and forth, as this can weaken the nail and cause it to split further.
Here are the steps to file down the rough edges of your broken nail:
| Step 1: | Hold the nail file at a 45-degree angle to your nail. |
| Step 2: | Gently file the rough edges in one direction, using light pressure. |
| Step 3: | File until the rough edges are smooth to the touch. |
It’s important not to over-file your nail, as this can make it weaker and more prone to breaking again. If you’re unsure about how much to file, it’s best to err on the side of caution and file less rather than more.
Once you’ve filed down the rough edges of your broken nail, you’re ready to apply the glue. But before you do that, it’s important to make sure your nail is clean and free of any debris. You can learn how to clean your nail in the previous step of this article.
Note: If you’re having trouble opening your glue, check out our article on how to open glue for fake nails for some helpful tips. And if you’re concerned about the effects of nail glue on your nails, read our article on how bad nail glue is for your nails.
Apply Glue to the Nail
Before you start applying the glue, make sure that the broken edge of your nail is still close enough to the nail bed. If the edges are far apart, then you might have to trim your nail a bit more. Once you’ve prepared your nail and glued the tip of your nail to the broken part, proceed to apply glue to the nail so you can stick the two parts together.
Here are the steps to apply glue to the nail:
| Step | Description |
|---|---|
| Step 1: | Get your bottle of cyanoacrylate glue ready and unscrew the lid. You can also use an Ardell Nail Glue with a brush applicator for easier application. |
| Step 2: | Slowly apply a small amount of glue to the broken area of your nail. Be cautious not to overdo it, as too much glue can make the nail look unnatural and clumsy. |
| Step 3: | Press the broken nail and its tip together, holding for about 15 seconds. Make sure they stick firmly together. |
| Step 4: | Wipe off any excess glue on your nails with a tissue or a cotton swab. Be careful not to touch the broken area of your nail as it might shift and ruin the glue’s hold. |
Remember, if you’re using Ardell Nail Glue, you can follow this guide on how to open the bottle to avoid any spills. Also, if you want to know how long do tooth gems last with nail glue, you can check out this article for more information.
Press the Nail Together
Once you’ve applied the glue to your broken nail, it’s time to press the nail together to ensure a tight bond. Here are the steps on how to do it:
- Hold the broken nail in place: Using your other hand, hold the broken piece of nail in place near the base of your finger.
- Press the nail together: Gently press the broken piece of nail back onto your nail bed. Apply slight pressure on the nail for 10-15 seconds to ensure that the glue sets in.
- Use a cotton swab: Dip a cotton swab into acetone and wipe around the nail, especially the edges. This will remove any extra glue that may have oozed out of the sides.
- Wait for the glue to dry: Allow the glue to dry completely before moving your fingers. Try to avoid using your glued nail until the glue is completely set. It usually takes about 10-15 minutes for the glue to dry completely.
Remember, the pressure you use to press the nail together should be gentle so as not to cause any pain or discomfort. Once the nail is in place, do not pull or tug on it, as this may cause the glue to loosen or even detach the nail. Proper pressure and care will help ensure a strong bond and a smooth, natural-looking repair.
Smooth Out the Glue
Once you’ve pressed the broken nail together with the glue, you need to smooth out any excess glue that may have seeped out. Here are some tips to help you do that:
- Use a Nail File: Take a fine nail file and gently file down the excess glue. Be very careful not to file too much, or you may end up damaging the nail further.
- Buff the Nail: If you have a nail buffer, you can use it to gently buff away any remaining glue. Use light pressure and a circular motion to ensure that the glue is evenly distributed and buffed away.
- Apply a Top Coat: Applying a top coat will not only give your nail a finished look, but it will also seal in the glue and prevent it from coming apart.
It’s important to take your time with this step to ensure that the nail is smooth and even. Rough edges can snag on clothing or hair, causing further damage to the nail. Additionally, smoothing out the glue will make the nail less noticeable and help it blend in with the rest of your natural nails.
Aftercare
Now that you’ve successfully glued your broken nail back together, it’s important to take proper care of it in the following days to ensure it stays strong and healthy. Aftercare is crucial in preventing the nail from breaking again and promoting optimal nail growth. Below are some tips and tricks on how to properly care for your newly glued nail. Don’t neglect these steps and give your nail the love and care it deserves.
Avoid Water
After successfully gluing your broken nail back together, it is important to take some precautions to ensure that the bond is not weakened or altered in any way. A crucial step in this aftercare process is avoiding water. Water can seep in between the crack of the nail and the glue and break down the adhesive properties of the glue, causing your nail to break again.
To prevent this, make sure to keep your hands dry for at least 12 hours after you have glued your nail. This means avoiding activities such as washing dishes, doing laundry or swimming. If you need to wash your hands, use lukewarm water and keep the damaged finger outside the water as much as possible.
If you cannot avoid getting your hands wet, you may need to reapply the glue after the nail has dried completely.
It is also important to keep your nail away from any source of moisture such as steam from cooking or sweat from physical activity. You can protect your nail by covering it with a finger cot or a band-aid.
To summarise, here are some tips to help you avoid water after gluing a broken nail:
- Avoid washing your hands for at least 12 hours
- If you must wash your hands, keep the damaged finger out of the water as much as possible
- Avoid activities that will expose your hands and nails to moisture
- Protect your nail with a finger cot or a band-aid if necessary
- Always remember that water can weaken the bond of the glue, and reapplication may be necessary if the nail gets wet.
By taking these simple steps to avoid water and protect your newly glued nail, you can ensure that it stays strong and intact for as long as possible.
Apply Cuticle Oil
To keep your nails healthy and strong after gluing a broken nail, it is essential to apply cuticle oil. Cuticle oil helps to moisturize and nourish the cuticles and nail bed, promoting healthy nail growth.
Here are some tips for applying cuticle oil:
| Step 1: | Choose a high-quality cuticle oil that contains nourishing ingredients such as vitamin E, jojoba oil, or sweet almond oil. |
| Step 2: | Apply a small amount of cuticle oil to each nail bed. Use the dropper or applicator that comes with the oil to avoid making a mess. |
| Step 3: | Gently massage the oil into your cuticles and the skin surrounding your nails. This will help to increase blood flow and promote healthy nail growth. |
| Step 4: | Leave the cuticle oil on for at least 10-15 minutes so it can fully absorb into your skin and nails. |
| Step 5: | After the oil has been absorbed, wipe the excess off of your nails using a tissue or paper towel. |
Remember to apply cuticle oil regularly to keep your nails healthy and promote strong nail growth. By taking care of your nails and cuticles, you can prevent future nail breakage and maintain beautiful, healthy nails.
Be Gentle with Your Nails
After gluing your broken nail back together, it’s important to be gentle with it to avoid causing further damage. Here are some tips to keep your nails healthy and strong:
- Avoid using your nails as tools: Your nails are not designed to pry, scratch, or scrape things, so avoid using them as tools. Instead, use appropriate tools to perform these tasks.
- Avoid biting your nails: Biting your nails can weaken them and make them more prone to breakage. Resist the urge to bite your nails and keep them looking healthy.
- Use gloves when doing household chores: Household cleaners and chemicals can be harsh on your nails and cuticles. Protect them from damage by wearing gloves while cleaning or doing other household chores.
- Don’t pick at your nail polish: Picking at your nail polish can cause damage to your nails, including peeling and brittleness. Instead, remove your polish gently with polish remover.
- Avoid exposing your nails to harsh chemicals: Avoid exposing your nails to harsh chemicals, like acetone and chlorine. These chemicals can dry out your nails and make them more prone to breakage.
By following these simple tips, you can ensure that your nails stay healthy and strong, and prevent further damage or breakage. Remember to always handle your nails with care and avoid anything that could potentially cause harm.
Conclusion
In conclusion, learning how to glue a broken nail can be a game-changer when it comes to maintaining healthy and beautiful nails. By following the simple steps listed above and having the necessary tools at hand, you can fix a broken nail in no time. Using cyanoacrylate glue, a nail buffer, and cuticle oil will become your go-to solution in case of a nail emergency.
Remember to always be gentle with your nails, especially after fixing a broken nail. Avoid water and apply cuticle oil regularly to keep your nails hydrated and healthy. It’s important to note that while gluing a broken nail can fix the issue temporarily, you should still prioritize nail health and avoid any habits that can weaken or damage them, such as biting your nails or using harsh chemicals.
In summary, knowing how to glue a broken nail can save you from a potential nail disaster and keep your nails looking their best. With the right tools and techniques, your nails can stay strong and healthy, allowing you to show them off with confidence.
Frequently Asked Questions
How long will it take for the glue to dry?
It typically takes 10-20 seconds for the glue to dry completely.
Can I use regular glue instead of cyanoacrylate glue?
No, it’s important to use cyanoacrylate glue specifically designed for nails, as regular glue can damage your nails.
What do I do if I accidentally get glue on my skin?
You can remove the glue by rubbing it with acetone or nail polish remover.
How long will the glued nail last?
It depends on how well you take care of your nails, but typically a glued nail will last 1-2 weeks before it needs to be re-glued or removed.
Can I still paint my nails after gluing a broken nail?
Yes, you can still paint your nails, but it’s recommended to wait at least a day after gluing to make sure the glue is fully dry.
What should I do if the nail continues to break or feels loose after gluing?
If the nail continues to break or feels loose, it’s best to remove the glued nail and seek professional help to prevent further damage to your natural nail.
What steps can I take to prevent my nails from breaking in the future?
You can prevent nail breakage by keeping your nails moisturized, avoiding using your nails as tools, and using nail strengtheners.
Is it safe to glue a nail while pregnant?
It’s recommended to avoid using chemicals such as cyanoacrylate glue while pregnant, so it’s best to consult with your doctor before attempting to glue a broken nail.
Can I go to the salon to have a broken nail glued?
Yes, many salons offer nail repair services that use the same technique as gluing a broken nail at home.
Can I glue a toenail if it breaks?
Yes, you can use the same technique to glue a broken toenail as you would with a fingernail.