Have you been searching for a unique way to add some character to your walls? Look no further than the rag rolling technique! This method, often used by professional painters, creates a subtle and textured effect that can liven up any room. If you’re not familiar with rag rolling, don’t worry – we’ll explain exactly what it is and why you should consider it for your next home improvement project. Additionally, we’ll provide a step-by-step guide on how to achieve this beautiful effect and make your walls stand out. So, get ready to roll up your sleeves and create a stunning new look for your home.
What is Rag Rolling?
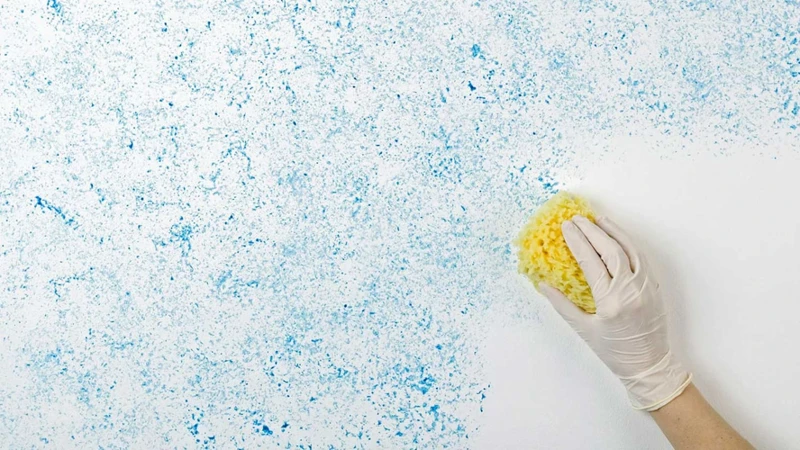
Have you ever heard of achieving a textured effect on your walls using rags? Rag rolling is a technique that involves rolling a rag over a base coat of paint to create depth and texture. This method is perfect for adding a subtle touch to your walls without overwhelming them with a busy pattern or design. If you’re interested in learning more about rag rolling, continue reading or check out our article on using paint colors for rag rolling.
Why Choose Rag Rolling?
Why Choose Rag Rolling?
Rag rolling is a popular painting technique that adds texture and depth to your walls. Here are some reasons why you might choose rag rolling over other techniques:
- Creates a Subtle Effect: Unlike some techniques that can create a bold or dramatic effect, rag rolling creates a subtle and nuanced texture that can add warmth and depth to your walls.
- Adds Visual Interest: Rag rolling can add visual interest to your walls without being too distracting or overpowering.
- Easy to Do: This technique is relatively straightforward and easy to do, which makes it a great DIY project for beginners or those who don’t have a lot of painting experience.
- Works on Large Wall Surfaces: Since rag rolling creates a random pattern, you don’t have to worry about getting it perfect. This makes it a great technique for covering large wall surfaces.
- Works with Various Paint Types: You can use various types of paint like satin, eggshell, or flat for rag rolling which makes it a versatile technique. To get the best results, you can use the right paint for rag rolling that suits your preference.
- Creates Textured Look: Rag rolling adds a subtle texture that can give your walls a unique look. If you’re looking to create a textured look, this technique might be the perfect choice for you.
Rag rolling is a unique technique that can give your walls a subtle texture and depth without being too bold or distracting. Whether you’re an experienced painter or a beginner, this technique is a great way to add visual interest and warmth to your home.
What Materials Do You Need?
To create the perfect rag rolling effect, you’ll need to ensure that you have all the necessary materials on hand. Here’s a table listing them for your convenience:
| Materials | Quantity |
|---|---|
| Paint | 2 different colors (1 for base coat, 1 for ragging) |
| Roller | 1 |
| Tray | 1 |
| Rags | 2-3 (lint-free) |
| Sandpaper | 1 sheet (120-150 grit) |
| Tape | 1 roll (for covering edges and trim) |
| Plastic Coverings | 1 roll (for covering furniture and floors) |
These materials can easily be found at your local hardware store or online. Keep in mind that the amount of paint and rags needed will depend on the size of the project, so you may need to adjust accordingly. If you’re working on a large wall surface, be sure to check out our article on rag rolling a large wall surface (/rag-roll-large-wall-surface/) for additional tips and tricks.
Choosing Your Paint and Colors
When choosing paint and colors for rag rolling, there are a few things to consider. Firstly, choose two compatible colors that complement each other well. The base color should be a light or neutral color, while the top color should be darker. Choose paints that are specifically designed for rag rolling, as they will have a smoother consistency and better blendability.
Consider the finish of the paints as well. Eggshell or satin finishes work well for rag rolling as they provide a subtle shine that complements the technique. Additionally, consider the size of the space you are painting. Lighter colors make smaller spaces feel more open and airy, while darker colors can make larger spaces feel cozier.
Finally, take the style of your room into account. If you have a classic or traditional style room, choose colors that reflect that aesthetic, such as warm neutrals like beige or cream. On the other hand, if you have a modern or contemporary style room, consider bolder colors that will make a statement, like dark blues or grays. Make sure the colors you choose will work with the rest of your decor and furniture.
To summarize, when choosing your paint and colors for rag rolling, consider the following:
- Choose two compatible colors that complement each other well
- Use paints specifically designed for rag rolling
- Consider the finish of the paints
- Consider the size of the space you are painting
- Take the style of your room into account
Preparing Your Walls

Before you start creating the subtle effect of rag rolling on your walls, it’s important to properly prepare the surface. This step is crucial in ensuring that the final result will be smooth and flawless. Taking the time to clean, sand and tape the walls will make the painting process much easier and faster. In this section, we’ll walk you through the necessary steps so that your walls are ready for the rag rolling technique.
Clean and Sand the Walls
Before getting started with rag rolling, it’s crucial to prepare your walls properly. This means cleaning and sanding them to ensure that the paint applies evenly and adheres to the surface properly. Here are the steps you need to follow:
| Step 1: | Clear the room of any furniture, decorations, or other objects that may get in the way while you’re cleaning and sanding. If possible, cover the floors and any large objects with plastic to protect them from dust and debris. |
| Step 2: | Start by cleaning the walls using a soft cloth or sponge and a mild detergent mixed with water. Make sure to remove any dirt, dust, or grime from the walls. Rinse the walls with clean water and let them dry completely before moving on to the next step. |
| Step 3: | Next, use sandpaper to smooth out any rough spots or bumps on the wall. You don’t need to sand the entire surface, just focus on areas that may be uneven or have flaking paint. Use a fine-grit sandpaper for best results. |
| Step 4: | After sanding, wipe the walls down with a clean, damp cloth to remove any dust or debris that may have accumulated. Let the walls dry completely before moving on to the next step. |
By taking the time to properly clean and sand your walls, you’ll ensure that the paint adheres well and results in a smooth finish. This step is crucial to the success of your rag rolling project, so don’t skip it!
Tape and Cover Any Areas You Don’t Want to Paint
One important step in preparing your walls for rag rolling is to tape and cover any areas you don’t want to paint. This will help you achieve a clean and polished look when you’re finished. Here are some tips to guide you through this process:
- Start by gathering your supplies, which should include painter’s tape, plastic sheeting or drop cloths, and a ladder.
- Inspect the walls and identify areas that you want to protect, such as trim, ceilings, and window frames.
- Apply the painter’s tape to the edges of the areas you want to protect, being sure to press it down firmly to create a seal.
- Cover any remaining surfaces with plastic sheeting or drop cloths, securing them at the edges with additional painter’s tape if necessary.
- If you’ll be painting near electrical outlets or other fixtures, be sure to turn off the power or remove the covers before you begin.
- Remember to be thorough and take your time during this step. It may seem tedious, but it will save you time and frustration in the long run.
By taking the time to tape and cover your surfaces, you’ll be able to focus on creating the perfect rag rolling effect without worrying about making a mess or damaging other surfaces.
Applying the Base Coat
Now that you have prepared your walls, it’s time to start applying the base coat. This step sets the foundation for the rag rolling technique and provides a subtle backdrop for the rag effect. The base coat should be a lighter color than your desired final result, as the rag rolling technique will build upon it. Here’s how to apply the base coat using a roller.
Choose a Lighter Color for Your Base Coat
When choosing the color for your base coat, it is important to pick a color that is lighter than the color you plan to use for your rag effect. This will allow the textured effect to stand out more prominently.
Consider the following factors when choosing a lighter color for your base coat:
- The overall color scheme of the room
- The amount of natural light the room receives
- The size and shape of the room
- The desired mood or ambiance of the room
Some tips for selecting the perfect lighter shade for your base coat include:
- Choosing colors from the same color family to create a cohesive look
- Using online color swatches or paint samples to ensure the color will work in your space
- Considering the finish of the paint, such as matte or satin, to create the desired texture and look
- Testing the color on a small, inconspicuous section of the wall before committing to the entire room
With a carefully chosen lighter shade for the base coat, paired with the perfect color for your rag effect, your walls will have a stunning and subtle textured finish that will add depth and interest to any room.
Apply the Base Coat Using a Roller
When applying the base coat, it’s important to use a roller to ensure even coverage. Here are the steps to follow:
- Step 1: Pour your chosen basecoat paint into a paint tray.
- Step 2: Dip your roller into the paint, rolling it back and forth until it’s evenly coated.
- Step 3: Start with a small section of the wall, using the roller to apply the paint in straight lines from top to bottom. Only paint a section that you can comfortably reach without overstretching.
- Step 4: Apply gentle, even pressure on the roller, guiding it in one direction. Avoid pressing too hard, which can result in paint buildup or uneven areas. Keep it light and even for uniform coverage.
- Step 5: Repeat these steps section by section, continuing until the entire wall is evenly coated with the base coat. It’s important to check for any missed areas or subtle differences in coverage, as the base coat will serve as the foundation for the rag rolling effect in later steps.
Remember to let the base coat dry completely before moving on to the next steps. This can take several hours or even overnight, depending on the paint and climate conditions. Patience is essential to ensure a flawless finished result.
Let the Base Coat Dry
After applying the base coat to your walls, it is crucial to give it ample time to dry before moving on to the next step. Allowing the base coat to dry fully will ensure that the rag rolling technique is applied smoothly and effectively.
To help you keep track of how long the base coat has been drying, set a timer for the suggested drying time provided on the paint can. Typically, it takes around four to six hours for the first coat to dry completely.
During this period, it is best to avoid touching the walls or attempting to apply any other coatings or layers. Resist the temptation to rush the process as this can lead to unwanted results in the final output.
Once the base coat is completely dry, you can move on to the next step of the rag rolling technique to create the subtle and textured effect you desire in your wall design.
Creating the Rag Effect
Now that your base coat is dry and your walls are prepped, it’s time to move on to the fun part – creating the subtle rag effect! This technique is achieved by applying a second coat of paint with a rag, rather than a roller, to create a textured and unique finish. By using this method, you can add depth and interest to your walls without drawing too much attention away from your decor. But how exactly do you achieve this effect? Let’s dive into the step-by-step process.
Prepare the Rags
To achieve a subtle effect with rag rolling, it’s important to properly prepare the rags you’ll be using to apply the second coat of paint. Here are the steps to follow:
| Step | Instructions |
|---|---|
| 1 | Cut the Rags: Start by cutting old cotton or linen rags into squares that are large enough to hold comfortably. Avoid using synthetic or wool fabrics as they may leave fibers on the wall. |
| 2 | Crumple the Rags: Take each cut rag and crumple it into a loose ball. Avoid flattening and pressing the rag as this will create a different effect on the wall. |
| 3 | Dip the Rag: Dip the crumpled rag into the paint, making sure to saturate it evenly. Use a bucket or tray to hold the paint and avoid dipping the rag directly into the paint can. |
| 4 | Squeeze Out Excess Paint: Once the rag is saturated with paint, wring out any excess paint by pressing it against the edge of the bucket or tray. This will help you achieve a more subtle effect on the wall. |
Following these steps to prepare the rags will help you achieve a cohesive and subtle rag rolling effect on your walls.
Apply the Second Coat Using a Rag
To create the rag effect on your walls, you’ll be using a rag to apply the second coat of paint. This technique will give your walls a subtle texture that adds depth and dimension to your space.
Step 1: Prepare the Rags
Before applying the second coat of paint, you’ll need to prepare your rags. Choose cotton rags that are soft and absorbent, and cut them into manageable sizes. You can use one rag for the entire wall or switch between a few different rags for a more varied effect.
Step 2: Apply the Second Coat Using a Rag
Dip your rag into the paint, making sure to remove any excess. You don’t want too much paint on your rag, as it can result in a heavy and uneven texture. Simply dab the rag onto the wall, twisting and turning it as you go, to create a mottled effect.
Step 3: Work in Small Sections
It’s important to work in small sections when applying the second coat. This allows you to control the amount of texture you’re creating and prevent the paint from drying before you can create the desired effect.
Step 4: Avoid Overlap and Pattern Repetition
To create a natural and subtle finish, avoid overlapping your rag strokes and repeating the same pattern in adjacent areas. Instead, vary the size and direction of your strokes to create a more organic look.
Step 5: Let the Second Coat Dry
After finishing one section, step back and examine your work. If necessary, add more texture to certain spots or smooth out any areas that are too heavy. Let the second coat dry completely before moving on to the next section or adding any additional coats.
Step 6: Repeat If Necessary
Depending on how subtle or pronounced you want the effect to appear, you may need to apply a third or even fourth coat of paint using the same rag technique. Allow each coat to dry completely before deciding if more layers are necessary.
By applying the second coat of paint with a rag, you can create a unique and subtle effect that adds visual interest to your walls. Remember to work in small sections, vary your strokes, and let each coat dry completely for the best results.
Work in Small Sections
When creating the rag effect on your walls, it is important to work in small sections to achieve the desired look. This helps to ensure that the paint stays wet enough to properly blend and create the subtle texture you’re aiming for.
Here are some tips for working in small sections:
- Divide the Wall: Divide the wall into smaller sections of about 3 feet by 3 feet. Paint each section one at a time in a systematic order, starting from the top and working your way to the bottom.
- Apply the Paint: Apply the paint in a consistent pattern, such as a W or X shape. Be sure to keep a wet edge as you work across the section to prevent overlap marks.
- Roll Over the Edges: When you’re finished with each section, gently roll over the edges with the roller to blend the sections together. This helps to ensure a seamless finish without any harsh lines.
- Use a Damp Rag: If the paint starts to dry before you can apply the rag effect, use a damp rag to lightly blend the edges to prevent any visible lines.
Working in small sections can be time-consuming, but it pays off in the end with a subtle and natural-looking texture that enhances the beauty of your walls.
Avoid Overlap and Pattern Repetition
When creating a subtle effect with Rag Rolling for your walls, it’s important to avoid overlap and pattern repetition. This will help to achieve a more natural and unique look for your walls. To do this, there are a few techniques you can follow:
| Technique: | Description: |
| Alternate the Rag: | Use different parts of the rag when applying the paint, so that the pattern doesn’t become too repetitive. |
| Change the Direction: | Vary the direction of your rolling motion from section to section, so that the pattern appears more random and natural. |
| Overlap: | Make sure not to overlap the paint too much between sections, as this can create a distinct pattern and ruin the natural look. |
By following these techniques, you can achieve a beautifully unique and natural-looking Rag Rolling effect on your walls. Remember to take your time and work in small sections to ensure consistent and even coverage throughout your painting process.
Let the Second Coat Dry
After applying the second coat using a rag, it is essential to let it dry completely before proceeding to the next step. This will ensure that the desired effect is achieved without any smudging or bleeding of the paint.
The drying time for the second coat will vary depending on the type of paint used and the ambient temperature and humidity levels in the room. Typically, it may take anywhere from 6-8 hours for the paint to dry completely.
To check if the paint is dry, gently touch the wall with your fingertips. If it feels dry and there is no residue left on your fingers, it’s safe to continue working on the wall. However, if the paint feels tacky or wet, allow it more time to dry before proceeding.
Patience is the key to achieving the perfect rag rolling effect on your walls. Rushing the process by painting over damp or wet areas can lead to unsightly smudges or undesirable patterns.
It is recommended to work on one small section of the wall at a time, allowing each section to dry completely before moving on. You can use a fan or open windows to improve air circulation and speed up the drying process.
In case you need to apply another coat to enhance the effect, it is paramount to let the previous coat dry completely before proceeding with the next coat. This will ensure that the layers of paint adhere properly to each other and prevent them from peeling or separating over time.
Remember, patience and careful attention to detail will produce a beautifully subtle rag rolling effect that you’ll be proud of for years to come.
Repeat If Necessary
After applying the second coat of paint with the rag rolling technique, it is important to step back and evaluate the overall look of your walls. If you are satisfied with the level of subtle texture achieved, then you can skip this step and move onto the finishing touches. However, if you feel like your walls need a bit more depth, you can repeat the process to amplify the effect.
The Importance of Patience and Evaluation
Before repeating the process, it is important to exercise patience and allow the second coat of paint to dry completely. This will ensure that you accurately evaluate the texture and avoid overworking the walls.
Adjusting the Pressure of the Rag
If you decide to do another coat, be sure to adjust the pressure of the rag and vary the direction of your rolling, as this will help to create a more natural and varied effect. Applying too much pressure or repeating the same pattern can result in an unnatural look.
Assessing the Result
Once you have completed the third coat, step back and reassess the look. Keep in mind that too much texture can make a room feel overwhelming, so consider the overall aesthetic and purpose of the space before deciding whether or not to add additional coats.
| Step | Description |
|---|---|
| 1 | Allow the second coat of paint to dry completely |
| 2 | Adjust the pressure of the rag and vary the direction of rolling |
| 3 | Apply a third coat if desired |
| 4 | Step back and reassess the look to avoid over-textured walls |
Finishing Touches
As you wrap up your rag rolling project, it’s important not to overlook the final touches that will truly bring your walls to life. With a few simple steps, you can enhance the subtle effect you’ve already created and ensure a flawless finish that will impress anyone who enters the room. Let’s take a closer look at the finishing touches you should consider.
Remove the Tape and Plastic Coverings
After the final coat has dried completely, it’s time to put the finishing touches on your rag rolling project. The last step is to carefully remove the tape and plastic coverings that were used to protect any areas that you didn’t want to paint. It’s important to remove them slowly and gently to avoid accidentally pulling any paint off with them. Here are some detailed steps to follow when removing the tape and plastic coverings:
| Step | Action |
|---|---|
| Step 1: | Use a sharp knife or razor blade to score along the edge of the tape that’s closest to the painted surface. This will help to prevent the paint from coming off with the tape as you remove it. |
| Step 2: | Gently pull the tape away from the painted surface at a 45 degree angle. Pulling the tape straight out can cause the paint to lift, so be careful to angle it away from the painted surface as you remove it. |
| Step 3: | Continue removing the tape slowly and carefully, making sure not to rush the process. If you notice any areas where the paint has lifted with the tape, use a small brush to touch up the area with additional paint. |
| Step 4: | Once all the tape has been removed, you can also remove any plastic coverings that were used to protect floors or furniture during the painting process. Be sure to dispose of all materials properly. |
| Step 5: | Finally, step back and take a look at your newly rag rolled walls. If you notice any imperfections or areas that need touch up, now is the time to take care of them before the paint fully dries. |
By following these steps with care, you can ensure that the tape and plastic coverings are removed properly without causing any damage to your newly rag rolled walls. This final step brings your project to its completion, and you can now enjoy your beautifully textured walls for years to come.
Touch Up Any Imperfections
After completing the rag rolling technique on your walls, it’s important to inspect the surface for any imperfections or mistakes. Here are the steps to take when touching up any flaws:
- Identify the imperfections: Stand back and observe your walls from a distance to spot any areas that need touching up. Make sure the light is hitting the walls at different angles to identify any missed spots or uneven areas.
- Clean the area: Use a damp cloth to gently clean the area you’ll be touching up. This will remove any debris or dust that can affect the paint’s consistency. Allow it to dry before continuing.
- Retouch with a brush: If the imperfection is a missed spot or a small scar, use a small paintbrush to apply paint in the same direction as the strokes made during the initial rag rolling process. Make sure you use a small enough brush to avoid touching up surrounding areas.
- Feather the edges: If you’re retouching a larger area, use the rag rolling technique to blend the imperfection in with the rest of the wall. Start by applying the base coat with a roller to the retouched area, and then use a rag to apply the second coat in the same direction as the surrounding surfaces.
- Let it dry: Allow the retouching to dry completely before continuing. This will ensure that the touch-up blends seamlessly into the rest of the wall without any noticeable differences.
- Repeat if necessary: If the touch-up is not satisfactory, repeat the process until it blends in perfectly with the surrounding area.
Remember to take your time when touching up any imperfections, as the final result will depend on the amount of care and precision you put into the process. Once you’re satisfied with the outcome, you can enjoy your newly rag-rolled walls for years to come.
Conclusion
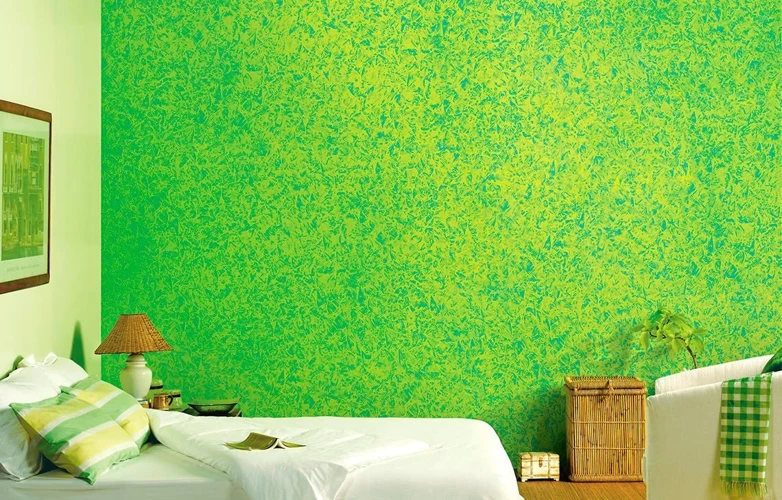
In conclusion, rag rolling is a great technique to use for creating a subtle and textured effect on your walls. It not only adds visual interest but also creates a unique and sophisticated atmosphere in your space.
To achieve the best results, it is important to prepare your walls properly by cleaning, sanding, and covering any areas you don’t want to paint. Choosing the right colors and materials for the job is also crucial.
When it comes to the actual rag rolling process, it is important to work in small sections and avoid overlap and pattern repetition. Don’t be afraid to repeat the process if necessary to achieve the desired effect.
Once the rag rolling is complete, remove any tape and plastic coverings and touch up any imperfections. With a little bit of patience and attention to detail, you can transform your walls into an eye-catching feature of your home.
Overall, rag rolling is a fun and creative way to add texture and depth to your walls. Give it a try and see the amazing results for yourself!
Frequently Asked Questions
What is the difference between rag rolling and other faux paint techniques?
Rag rolling involves using a rag to apply the paint to the walls, creating a subtle textured effect. Other faux paint techniques may use tools like sponges, brushes, or combs to create different textures and patterns.
Can rag rolling be done on any type of wall surface?
Rag rolling can be done on most wall surfaces, including plaster, drywall, and wallpaper. However, it is important to clean and prepare the surface beforehand to ensure that the paint adheres properly.
What is the best type of paint for rag rolling?
Matte or eggshell finish paint works best for rag rolling, as it allows for the texture of the rag to show through more clearly. Glossy or semi-glossy paint may not work as well for this technique.
Can multiple colors be used with rag rolling?
Yes, multiple colors can be used with rag rolling to create a more complex effect. However, be sure to let each layer of paint dry completely before applying the next one.
How can I avoid creating a messy work environment?
Tape and cover any areas you don’t want to paint before starting the process. Use drop cloths or old sheets to cover floors and furniture.
What types of rags work best for rag rolling?
Old t-shirts, rags, or towels work best for rag rolling. Be sure to wash them thoroughly and wring them out before using.
What is the best technique for creating a subtle rag rolling effect?
Dabbing the rag gently on the wall in a random pattern can create a subtle effect. Avoid pressing too hard or using a repetitive pattern.
How long does it take for the paint to dry between coats?
The drying time will depend on the type of paint used and the humidity in the room. Check the paint can for specific drying times and wait until the first layer is completely dry before applying a second coat.
Do I need to seal or protect the rag rolled walls?
If the walls will be exposed to moisture or harsh cleaning chemicals, it is recommended to apply a polyurethane clear coat to protect the finish.
Is rag rolling a beginner-friendly technique?
Yes, rag rolling is generally considered a beginner-friendly technique. It is a simple and forgiving process, even for those with little to no painting experience.