You’ve just finished painting a room and step back to admire your handiwork, only to discover a small imperfection. A crack or hole on the wall that seems to stand out like a sore thumb. Don’t worry though, fixing it is easier than you might think. With the right filler and techniques, you can have that wall looking flawless once again. In this article, we’ll take you through everything you need to know about applying and smoothing filler for a perfect finish.
Choosing the Right Filler
When it comes to applying filler for a flawless finish, selecting the appropriate type of filler is crucial. Choosing the right filler can make all the difference in achieving a smooth and polished surface. It’s important to take into consideration several factors before deciding on a filler, such as the surface material, size of the hole or crack, and drying time. The use of the appropriate filler can make the process much smoother and leave you with an impressive end result. To learn more about the types of fillers available for holes and cracks, check out our article on Types of Fillers for Holes and Cracks.
Consider the Surface Material
When choosing the right filler for your project, it is important to consider the surface material. Using the wrong type of filler can lead to a lack of adhesion, cracking, and an overall unprofessional finish.
| Surface Material | Recommended Filler |
|---|---|
| Drywall or Plaster | Joint compound (spackle) |
| Wood | Wood filler (1-part or 2-part) |
| Masonry or Concrete | Epoxy filler |
For drywall or plaster surfaces, joint compound or spackle is the recommended filler. This type of filler is easy to sand and can be painted over once dry. For wood surfaces, use a wood filler, which can come in either a 1-part or 2-part formula. This type of filler can be sanded and painted over as well. For masonry or concrete surfaces, an epoxy filler is recommended as it provides a strong, durable finish.
Choosing the appropriate filler based on the surface material is essential to achieving a flawless finish. It ensures that the filler will adhere properly and can be finished in a way that is appropriate for the material.
Size of the Hole or Crack
Size of the Hole or Crack
When it comes to filling holes and cracks, the size of the imperfection will determine the type of filler you should use. If the hole or crack is small, using spackle or putty might be all that’s needed. However, if the hole or crack is larger than 1/4 inch in diameter, using a joint compound or a patching plaster is recommended.
Filler comes in different sizes, ranging from small 4 oz. containers to larger multi-pound packages. It’s important to purchase the correct amount of filler to fill the hole or crack properly. An overfilled area can cause the filler to excess and may need additional sanding, which can be frustrating and waste your time.
To determine the size of the hole or crack, use a ruler to measure the width and length of the imperfection. Then, use a depth gauge or probe to determine the depth of the hole or crack. Knowing the size of the imperfection will help you choose the correct filler and determine how much material you’ll need to complete the job.
For larger holes or cracks, it’s important to prep the area properly before applying the filler. This may involve cutting away any loose drywall or plaster with a utility knife and filling any large gaps with a foam backer rod before applying the filler. For more information on preparing the surface, check out our article on hole and crack prep and cleaning.
Choosing the right filler for the size of the hole or crack is essential to achieving a flawless finish. To learn more about filling holes and cracks for painting, check out our detailed guide.
Drying Time
When choosing a filler, it is important to consider the drying time. Drying time can vary based on the type of filler and can range from a few minutes to several hours. For example, pre-mixed fillers tend to have a shorter drying time compared to powdered fillers, which may require more time to dry.
Here is a table outlining some common types of fillers and their approximate drying times:
| Type of Filler | Drying Time |
|---|---|
| Pre-mixed filler | 30 minutes to 1 hour |
| Quick-drying spackle | 15 minutes to 1 hour |
| Powdered filler | 2-4 hours, depending on thickness |
| Joint compound | 2-24 hours, depending on thickness and humidity |
It’s important to allow the filler to fully dry before attempting to sand or paint over it. If the filler is not fully dry, it may not sand smoothly or may cause the paint to bubble or peel. To ensure proper drying time, refer to the manufacturer’s instructions and take into account the temperature and humidity in the room where the filler is being applied.
Preparing the Surface
Before applying filler to any surface, it is crucial to properly prepare the area. This means ensuring that the surface is clean and free of debris, as well as priming the spot to ensure the best possible adhesion of the filler. In this section, we will explore the necessary steps for preparing the surface to ensure a flawless finish.
Clean the Wall Surface
Before applying the filler, it is important to clean the wall surface thoroughly to remove any dirt, debris, grease or grime. Proper cleaning will help the filler adhere better to the surface and ensure a smooth finish. Here are some steps to help you clean the wall surface effectively:
- Gather your cleaning supplies: Before starting, make sure you have all the necessary cleaning supplies such as a bucket, sponge, cleaning solution, and clean water.
- Dip the sponge into the cleaning solution: Fill the bucket with warm water and add a small amount of gentle cleaning solution. Dip the sponge into the solution and wring it out to remove any excess water.
- Start cleaning: Starting at the top of the wall, begin cleaning the surface with the sponge and cleaning solution. Use a gentle circular motion to remove any dirt or grime that may be on the surface. Work your way down the wall, rinsing the sponge frequently and changing the cleaning solution as needed.
- Rinse the surface: Once you have finished cleaning the wall surface, rinse it thoroughly with clean water. Use a clean sponge to remove any remaining soap residue.
- Dry the surface: Use a clean, dry cloth or towel to wipe down the wall surface and remove any excess water. Allow the wall to air dry completely before applying the filler.
By following these steps to clean the wall surface, you’ll be able to ensure that the filler will adhere to the surface properly and provide the desired flawless finish.
Sandpaper the Spot
After cleaning the wall surface, the next step in preparing the area for the filler is to sandpaper the spot. This process is necessary to ensure that the filler adheres properly to the surface and to create a clean and smooth finish.
What You’ll Need:
| Item | Description |
| Sandpaper | Choose sandpaper that is appropriate for the surface material and the size of the hole or crack. |
| Sanding Block or Tool | Use a sanding block, sponge or other tool to ensure even sanding and to protect your fingers. |
| Dust Mask | Wear a dust mask to protect yourself from inhaling dust and debris. |
Steps:
1. Choose the appropriate grit of sandpaper for the surface material and the size of the hole or crack. Coarse grit will remove material quickly, but may damage the surface. Fine grit will produce a smoother finish but may take longer to remove material.
2. Wrap the sandpaper around a sanding block, sponge or other tool to protect your fingers and ensure even sanding.
3. Sand the area lightly in a circular motion. Make sure to sand beyond the edges of the hole or crack to create a smooth transition.
4. Remove any dust and debris with a clean cloth or brush.
5. Repeat steps 3 and 4 until the surface feels smooth and even to the touch.
Pro Tips:
– Be careful not to oversand the area, as this can create a depression that will be difficult to fill.
– If you are sanding a large area, consider using an electric sander to save time and reduce fatigue.
– Always wear a dust mask to protect yourself from inhaling dust and debris.
Prime the Spot
Before applying the filler, it’s important to prime the spot. Priming the spot will not only help the filler adhere better, but it will also prevent any moisture or stains from affecting the surface. Follow these steps to prime the spot:
| Step 1: | Clean the area with soap and water to remove any dirt or debris. |
| Step 2: | Let the surface dry completely before proceeding. |
| Step 3: | Using a paintbrush, apply a coat of primer to the spot. Make sure to choose a primer that is appropriate for the surface material. |
| Step 4: | Let the primer dry completely before applying the filler. This will usually take at least an hour, but may take longer depending on the humidity and temperature. |
Remember, properly priming the spot will help ensure a flawless finish!
Applying the Filler
After prepping the surface, it’s finally time to start filling in the holes or cracks with the appropriate filler. However, applying it correctly is crucial to achieve a seamless surface. The process of applying filler involves several steps, and it’s essential to follow each one carefully to get a flawless finish. In this section, we’ll guide you through the tips and techniques for applying filler correctly to ensure your finished product looks professionally done.
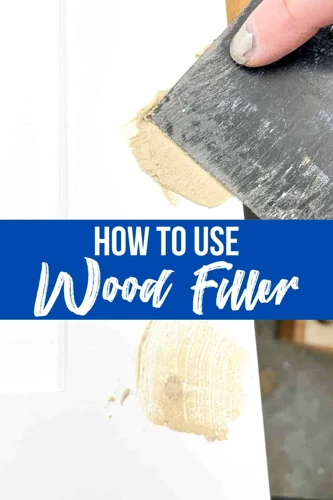
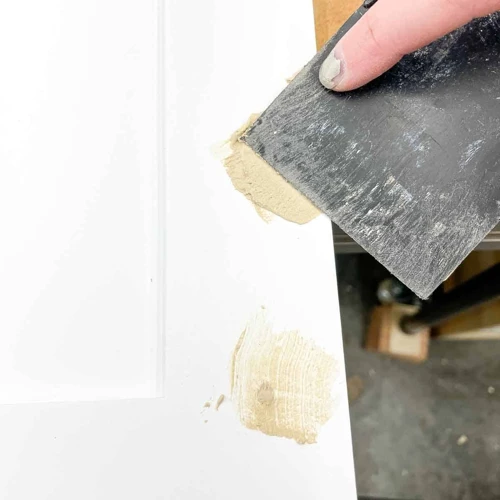
Use an Appropriate Tool
When it comes to applying filler for a flawless finish, using an appropriate tool is crucial. Here are some options to consider:
- Putty knife: This is a common tool used for applying filler to small holes or cracks. It has a flat edge and a pointed tip that makes it easy to apply the filler evenly.
- Taping knife: This tool has a wide rectangular blade and is great for covering larger holes or cracks. It allows you to spread the filler smoothly and evenly over a larger surface area.
- Caulking gun: This is the tool to use when filling larger gaps. It allows you to apply the filler quickly and evenly, and is particularly useful for filling gaps between trim and drywall.
- Finger: In some cases, using your finger to apply filler may be the best option. This is particularly true when dealing with small or hard-to-reach areas. Just be sure to wear gloves to protect your skin.
Using the right tool will help ensure that your filler is applied evenly and correctly, which is key to achieving a flawless finish. So take the time to consider your options and choose the tool that is best suited to your project.
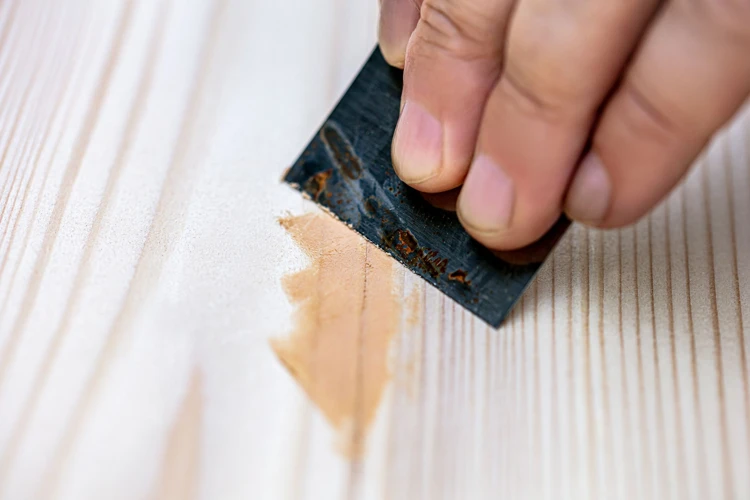
Apply the Filler Evenly
When it comes to applying filler, it is important to do so evenly to achieve a flawless finish. Here are some tips to help you apply the filler evenly:
| Tip #1: | Start by applying a small amount of filler to the hole or crack with a putty knife. It is easier to add more filler than to remove excess filler. |
| Tip #2: | Spread the filler in a thin layer, making sure it covers the entire hole or crack. Avoid leaving any gaps or pockets. |
| Tip #3: | Apply pressure to the putty knife as you spread the filler. This will help to ensure that the filler is pressed firmly into the hole or crack. |
| Tip #4: | When using a large quantity of filler, it is important to work in sections to prevent the filler from drying before you can spread it out evenly. |
| Tip #5: | Make sure the filler is level with the surrounding surface. You can use the putty knife to smooth out any uneven areas. |
By following these tips, you can apply the filler evenly and achieve a smooth finish that will blend seamlessly with the surrounding surface. Remember to take your time and work carefully to achieve the best results.
Check for Bubble and Air Holes
When applying the filler, it’s important to check for any bubble or air holes that may have formed. These imperfections can ruin the smooth finish that you’re going for. To avoid this, follow these steps:
- Step 1: Let the filler dry completely before checking. Depending on the size of the hole or crack, this could take anywhere from a few hours to a day. Refer to the drying time instructions on the filler packaging for guidance.
- Step 2: Once the filler is dry, lightly run your hand over the surface. This will help you identify any raised bumps or air pockets that may be present.
- Step 3: If you do find any imperfections, use a putty knife to scrape away the excess filler, being careful not to remove too much or damage the surrounding area.
- Step 4: Fill in any holes or air pockets with additional filler, using the same technique as before. Smooth the surface again and allow the filler to dry completely.
It may take a few attempts to get the surface completely smooth, but taking the time to check for and fill any air pockets or bubbles will result in a flawless finish. Remember to let each layer of filler dry completely before moving onto the next step.
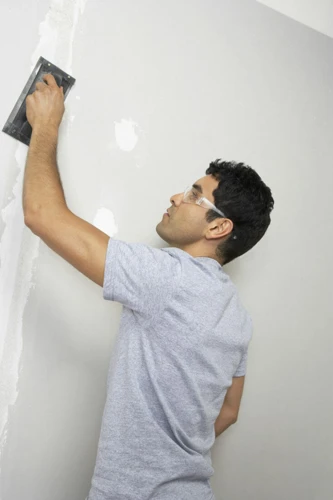
Smoothing the Filler
Now that the filler has been applied to the wall and allowed to dry, it’s time to move on to the next step in achieving a flawless finish – smoothing out the filler. This step is crucial as it ensures that the surface is even and free from any bumps or imperfections. By following these tips for smoothing the filler, you’ll be able to achieve a seamless and professional-looking finish that will make your walls look as good as new. Let’s dive in!
Use the Right Sandpaper Grit
When it comes to smoothing the filler, using the right sandpaper grit is crucial to achieving a flawless finish. Choosing the wrong grit can result in either too coarse or too fine of a surface, making it difficult to paint over.
Generally, the larger the imperfection, the coarser the sandpaper grit should be. For instance, for deeper holes and scratches, start with a grit of 80 to 100. This will help smooth out the rough edges and create a more even surface for the next layer of filler or paint.
For smaller imperfections and for smoothing out the surface, a finer grit between 120 to 150 is ideal. This will create a smoother surface without creating additional scratches or marks that would be visible under paint.
It’s always a good practice to start with a coarser grit and gradually work to a finer one. This helps to remove any excess filler and smooth out the surface without creating additional imperfections.
Using a lower grit sandpaper can create scratches that are too deep, which can be difficult to remove later. On the other hand, using too fine of a grit can result in a surface that is too smooth, making it difficult for the second layer of filler or paint to adhere to the surface.
It’s important to use a sandpaper that is meant for wet sanding when working with water-based fillers, and dry sandpaper for oil-based fillers. Wet sanding helps to keep the paper from clogging up and makes it easier to smooth the surface without leaving behind marks or scratches.
Remember, always start with a coarse grit and work up to a finer one to achieve the best possible finish.
| Imperfection Size | Recommended Sandpaper Grit |
|---|---|
| Deep holes and scratches | 80 – 100 |
| Smaller imperfections and surface smoothing | 120 – 150 |
Sand in a Circular Motion
When it comes to sanding the filler, it’s important to use the right technique to avoid creating further imperfections on the surface. Sanding in a circular motion is a commonly recommended method that helps to ensure a smooth finish. Here are some tips on how to sand in a circular motion:
- Start with a coarser grit: Begin by using a coarse-grit sandpaper, such as 80-grit, to remove any high spots or excess filler material.
- Work in circular motions: Hold the sandpaper at a slight angle and move it in circular motions over the filled area. Cover the entire area, ensuring that you don’t sand too much in one spot, which can create unevenness.
- Gradually move to a finer grit: Once you have sanded the surface with the coarse-grit sandpaper, move on to a finer grit, such as 120-grit. Sand the surface again in circular motions until you have a smooth, even finish.
- Check for imperfections: After sanding, wipe away any dust or debris and inspect the surface for imperfections. If you notice any uneven spots, you may need to apply more filler and sand again.
Sanding in a circular motion is a straightforward technique that can help to achieve a flawless finish when working with filler. Just be sure to take your time and use the right grit sandpaper to get the best results.
Clean the Wall Surface
When preparing the surface for filler application, cleaning the wall surface is crucial in achieving a smooth and flawless finish. Follow these steps to ensure your wall surface is clean and free of debris:
- Remove any loose debris: Begin by removing any wallpaper, loose paint, or excessive debris using a scraper or putty knife. Be sure to wear safety glasses and a mask to avoid inhaling any dust particles.
- Wipe down the surface: Once the initial debris has been removed, use a damp cloth or sponge to wipe down the surface. This will remove any remaining dust or dirt and ensure a clean surface for the filler application.
- Allow the surface to dry: Before applying the filler, be sure to allow the surface to completely dry. This will prevent any water from mixing with the filler and compromising the integrity of the product.
- Inspect the surface: Before applying filler, inspect the surface for any cracks or imperfections that may have been missed. Addressing these issues before the filler application will ensure a smooth and flawless finish.
Taking the time to properly clean the wall surface before applying the filler will help to ensure that your final product is both durable and aesthetically pleasing.
Finishing Up
The end is in sight! After all the hard work of applying and smoothing filler to the wall, it’s time to take the final steps to achieve a flawless finish. With a few more steps and a little patience, your walls will look as good as new. So, let’s grab our tools and get ready to finish this project strong.
Apply Final Coat of Paint
Once you have applied and smoothed the filler for a flawless finish, it’s time to apply the final coat of paint. This step is crucial to achieving a seamless and polished look. Here are the steps to follow:
| Clean the Surface: | Before applying the paint, make sure the surface is clean and free from any debris or dust. Wipe it down with a damp cloth and allow it to dry completely before moving on to the next step. |
|---|---|
| Choose the Right Paint: | Select a paint that matches the color and finish of the surrounding area. Use a small brush or roller to apply the paint in thin layers, allowing each layer to dry completely before applying the next one. |
| Avoid Drips and Runs: | Be careful not to apply too much paint at once, as it can lead to drips and runs. Instead, apply a light coat and let it dry before adding another layer. |
| Inspect for Imperfections: | After the paint has dried, inspect the surface for any imperfections or missed spots. If necessary, touch up those areas and allow the paint to dry before re-inspecting. |
| Enjoy the Finished Product: | Once you are satisfied with the final result, step back and admire your handiwork! With the right tools and techniques, you can achieve a flawless finish that will make your walls look like new. |
Keep in mind that applying the final coat of paint is the last step in a larger process. It’s important to prepare the surface properly and apply the filler evenly and smoothly before moving on to this final step. By following these tips and taking your time, you can achieve a professional-looking finish that will last for years to come.
Check the Surface for Imperfections
After completing the smoothing process, it’s crucial to inspect the surface for any imperfections before moving on to painting. Here are some steps to follow when checking for flaws:
- Step 1: Check the surface by running your hands over it to feel for bumps or uneven spots. This will help you identify any areas that need more sanding.
- Step 2: Look closely at the surface from different angles to identify any small imperfections that may be difficult to feel but visible to the naked eye.
- Step 3: Shine a bright light over the surface to highlight any gaps or dents that may have gone unnoticed. Shadows can make small imperfections more noticeable.
- Step 4: Use a putty knife to scrape along the surface and check for any areas that may be loose or not properly adhered to the wall.
- Step 5: Correct any imperfections with a small amount of filler, sanding it down again until it’s perfectly smooth.
Keep in mind that any imperfections on the surface will become more apparent once the paint is applied, so it’s crucial to take the time to thoroughly check for any flaws in the surface. By doing so, you’ll be able to achieve a flawless finish that will stand the test of time.
Admire the Finished Product
Now that you have applied and smoothed the filler for a flawless finish, take a moment to admire the final product. It’s always satisfying to see a job well done, especially when it comes to home improvement projects. Below are some ways to admire and showcase your finished wall:
- Take photos: Take a few photos of the newly repaired area to document your progress. You can use these photos later on for your own reference or to show off your work to friends and family.
- Use accent lighting: Consider installing accent lighting near the newly repaired area to draw attention to it. This is a great way to highlight your hard work and add a bit of ambiance to the room.
- Hang artwork: If the repaired area is on a prominent wall, consider hanging artwork or a photo frame to draw attention away from the repair. This is a great way to add some personal style to the room while also hiding any imperfections that may still be visible.
- Enjoy your improved space: Finally, take the time to enjoy your newly improved space. Whether it’s a bedroom, living room, or hallway, take a moment to appreciate the effort you put into making it look its best. You’ll be glad you did.
Remember, a flawless finish takes time and effort, but the end result is well worth it. By following these tips for applying and smoothing filler, you can achieve a professional-looking repair in no time.
Conclusion
After following these tips for applying and smoothing filler for a flawless finish, you can achieve professional-looking results on your own. It’s important to choose the right filler for the surface material and size of the hole or crack, considering the drying time as well.
Preparing the surface with proper cleaning, sanding, and priming will help the filler adhere and make a smoother overall finish. When applying the filler, use an appropriate tool and apply it evenly while checking for bubble and air holes.
Smoothing the filler is also important for a flawless finish. Use the right sandpaper grit and sand in a circular motion, making sure to clean the wall surface before moving on.
Of course, finishing up with a final coat of paint and checking for imperfections is crucial to the final product. Once complete, take some time to admire the finished product and the hard work put into it.
By following these tips, you’ll be able to tackle any hole or crack in your walls with ease and achieve a professional-looking finish.
Frequently Asked Questions
What should I consider when choosing the right filler?
You should consider the surface material, size of the hole or crack, and drying time when choosing the right filler for your project.
Why is preparing the surface important?
Preparing the surface ensures that the filler adheres properly and helps to achieve a seamless finish.
What should I use to clean the wall surface?
You should use a damp cloth or sponge to clean the wall surface before applying the filler.
How do I know when the filler is dry?
Refer to the drying time specified by the manufacturer. You can also touch the surface to see if it is dry to the touch.
What tool should I use to apply the filler?
You should use an appropriate tool such as a putty knife or a filling knife to apply the filler.
What should I do if there are bubbles or air holes in the filler?
You should use a pin to pop the bubbles or air holes, and then apply another layer of filler on top.
What grit sandpaper should I use to smooth the filler?
You should use a fine grit sandpaper, such as 120-grit or higher, to smooth the filler.
What motion should I use to sand the filler?
You should sand in a circular motion to blend the filler with the surrounding surface.
What should I do after I finish sanding the filler?
You should clean the wall surface with a damp cloth or sponge to remove any dust or debris.
Do I need to apply a final coat of paint after smoothing the filler?
Yes, you should apply a final coat of paint to the surface to achieve a seamless finish.