When it comes to electronics, dealing with glue can be a messy and challenging task. Whether you need to remove adhesive residue left over from a sticker, or clean up excessive glue from a hardware repair, it’s important to learn how to do it properly. Improper glue removal can damage your device and affect its performance. In this article, we will provide you with step-by-step instructions and valuable tips and tricks on how to remove glue from electronics safely and effectively. So, grab the tools and materials you need, and let’s get started!
Why is it Important to Remove Glue Properly from Electronics?
Removing glue properly from electronics is crucial for various reasons. Failure to remove glue properly can cause long-term damage that can render expensive electronic devices unusable. Additionally, removing glue from electronics is important because it can interfere with electronic signals, create long-term damage to electronic components, and trap heat.
1. Glue interferes with electronic signals
When glue is left unchecked on electronic devices, it can interfere with electronic signals. Some electronic devices have components that require exact electrical requirements to function optimally. Any interference can cause malfunctions and result in permanent damage. It is essential to remove glue properly from electronic devices to maintain optimal signal quality.
2. Improper glue removal can cause permanent damage
Removing glue improperly can also cause permanent damage, especially when dealing with delicate electronic components. Every electronic device has fragile components that require careful handling. Failure to remove glue properly can lead to damage to these sensitive components, which can cause permanent damage.
3. Glue can trap heat and damage components
Some electronic devices have internal components that can generate high levels of heat. If glue is left on electronic devices, it can trap heat, leading to long-term damage or even fire outbreaks. It is, therefore, pertinent to remove glue from electronic devices to ensure they function optimally and avoid the risk of malfunction due to heat damage.
It is essential to remove glue properly from electronic devices to avoid interfering with electronic signals, causing permanent damage, and trapping heat. Taking proper precautions and following the right steps will help maintain electronic devices’ optimal functionality and prevent costly repairs in the future. To learn more about how to remove glue from different surfaces like porcelain, concrete, wood, and tools like tweezers and stair treads, check out our different guides.
1. Glue interferes with electronic signals
Have you ever noticed that your electronic device isn’t working as it should? One of the reasons behind malfunctioning electronic devices could be the presence of glue or adhesive residue interfering with electronic signals. It’s important to remove the glue properly to ensure that your device works as it should. If you’re not sure about how to remove glue from electronics, then you’ve come to the right place. In this article, we will discuss the tips and tricks for removing glue from electronics, including why removing glue properly is essential for electronic devices to function normally.
Looking for ways to remove super glue from porcelain? Check out our step-by-step guide.
2. Improper glue removal can cause permanent damage
Improper glue removal can cause permanent damage to your electronic device. It’s important to follow the correct steps and use the right tools to avoid damaging the device.
For example, using a sharp object or excessive force to remove glue can scratch or dent the surface of the device, making it susceptible to further damage and reducing its resale value. Attempting to remove glue with water or soap can result in water damage to the internal components.
It’s also important to be cautious when using heat to remove glue. Applying too much heat can cause the device’s components to melt, warp, or become dislodged, resulting in irreversible damage.
For these reasons, it’s important to use the tools and materials recommended in this article to safely remove glue from your electronics. If you are uncertain about a certain technique or product, always test it in a small, inconspicuous area first.
Remember that taking your time and using gentle pressure is key for avoiding permanent damage to your electronic device. If you have any doubts, do not hesitate to seek advice from a professional or consult additional resources like links to guides on what loosens glue or what dissolves crazy glue depending on the type of glue you are dealing with.
3. Glue can trap heat and damage components
When working with electronics, it’s important to understand that glue can trap heat and damage components. This can happen if the glue is blocking the airflow needed to cool down the device or if the glue itself is conducting heat. If a component becomes too hot, it can fail or even melt, causing irreparable damage to the device.
It’s crucial to perform glue removal carefully and thoroughly to avoid any potential heat-related damage.
To avoid this problem, it’s essential to remove glue from electronics properly. The following steps will help you remove the glue without causing any damage to the internal components of the device:
- Power off the device: Before you start removing the glue, make sure the device is turned off and unplugged from any sockets. This is a safety precaution to avoid any electrical hazards.
- Remove any loose glue or debris: Use a plastic spudger or a guitar pick to remove any loose glue or debris from the device’s surface. This will make the glue removal process easier and quicker.
- Apply isopropyl alcohol to a cotton swab or cloth: Apply isopropyl alcohol to a cotton swab or soft cloth. The alcohol will help loosen the glue without damaging the electronics.
- Gently rub the glue with the cotton swab or cloth: Use the alcohol-soaked cotton swab or cloth to gently rub the glue. Avoid using excessive force, which can cause damage to the components.
- Use a plastic spudger or guitar pick to remove the glue: Use a plastic spudger or a guitar pick to scrape away the glue gently. Be careful not to pry or push too hard, as this can cause internal damage to the device.
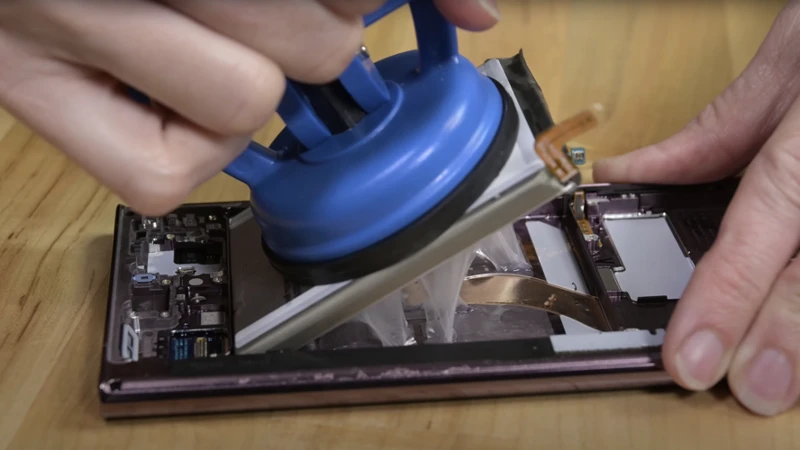
- Apply heat (optional): If the glue is not coming off, you can gently apply heat to the device using a heat gun or hairdryer. This will soften the glue, allowing it to be removed more easily. However, use heat with caution, as too much can cause heat damage to the components.
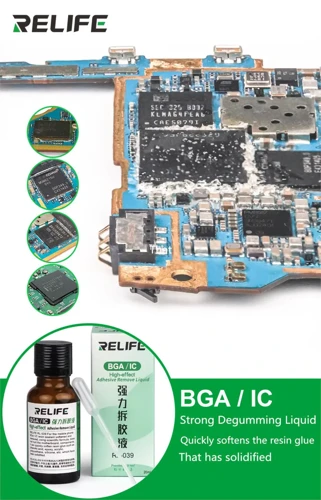
- Use adhesive remover (optional): If the glue is particularly stubborn, you can use an adhesive remover. Ensure the product is safe for electronics and use it sparingly.
- Wipe away any remaining residue with isopropyl alcohol: Use isopropyl alcohol again to wipe away any remaining residue. This will also help to remove any adhesive remover that you may have used.
- Allow device to air dry completely before powering back on: Before starting the device again, allow it to dry completely. This will prevent any moisture from being trapped inside the device, which can cause further problems.
Remember to take your time and not rush the glue removal process. Using excessive force or taking shortcuts can cause permanent damage to the device.
If you need additional information about removing glue from other surfaces such as tweezers, concrete, wall or carpets you can check out the articles below:
– How to Get Lash Glue Off Tweezers
– How to Get Wood Glue Off Walls
– How to Remove Epoxy Glue from Concrete
– How to Remove Glue from Stair Treads
– How to Get Super Glue Off Car
– How to Break ABS Glue
– How to Get Carpet Glue Off Concrete
Tools and Materials You Will Need
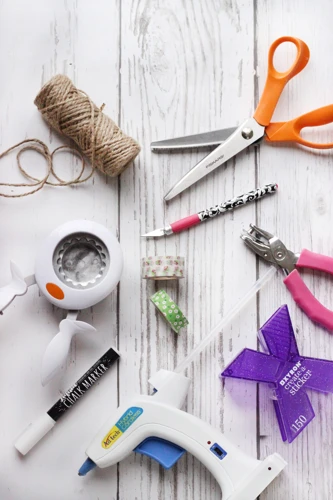
Before attempting to remove glue from electronics, it’s important to gather the necessary tools and materials to ensure a safe and successful process. You don’t want to cause any damage to your device, so it’s crucial to use the right techniques and products. Below are the items you’ll need to get started:
1. Isopropyl alcohol
One of the most important tools you will need to properly remove glue from electronics is isopropyl alcohol. Isopropyl alcohol, also known as rubbing alcohol, is a common household item that can be found at most drugstores and supermarkets. Here are some key features of isopropyl alcohol that make it an effective tool for removing glue:
- Highly Volatile: Isopropyl alcohol is highly volatile, meaning it evaporates quickly. This makes it an ideal solvency agent for removing glue, as it can dissolve the glue without leaving any residue behind.
- Safe for Electronics: Isopropyl alcohol is safe for use on electronics, as it does not conduct electricity and does not leave any harmful residue behind.
- Effective Solvent: Isopropyl alcohol is an effective solvent for many types of adhesives, including cyanoacrylate (super glue). It can dissolve the glue, making it easier to remove.
- Easy to Use: Isopropyl alcohol is easy to use, as it can be applied directly to a cotton swab or soft cloth. It is also readily available and inexpensive.
- Multiple Uses: Isopropyl alcohol has multiple uses beyond glue removal, including cleaning keyboards, removing ink stains, and disinfecting surfaces.
Before using isopropyl alcohol, be sure to power off the device and remove any loose debris. Apply the alcohol to a cotton swab or soft cloth and gently rub the glue. Be careful not to use excessive force, as this can damage the device. Wipe away any remaining residue with isopropyl alcohol and allow the device to air dry completely before powering it back on. Isopropyl alcohol is just one of the tools you will need for effective glue removal from electronics.
2. Cotton swabs or soft cloth
When it comes to removing glue from electronics, having the right tools and materials is key to success. One important item to have on hand are cotton swabs or a soft cloth. These materials are gentle enough to avoid causing damage to delicate components while also effectively removing glue residue.
Cotton swabs are particularly useful for getting into small crevices and tight spaces where glue may have seeped in. They are also effective for applying solutions like isopropyl alcohol to specific areas without oversaturating the surrounding components. However, it is important to use a gentle touch when using cotton swabs to avoid accidentally dislodging any small parts.
Soft cloths can also be useful for removing larger areas of glue residue or for ensuring a more thorough cleaning. They can be slightly dampened with isopropyl alcohol or a cleaning solution and gently rubbed over the surface of the electronic device.
It is important to note that using any type of abrasive cloth or sponge can cause scratches to the surface of the electronics, which can lead to further damage. It is best to stick with a soft, non-abrasive cloth when possible.
Here’s a table summarizing the pros and cons of using cotton swabs vs. a soft cloth for removing glue from electronics:
| Materials | Pros | Cons |
|---|---|---|
| Cotton Swabs | – Can reach small crevices – Good for applying solutions to specific areas – Gentle to delicate components |
– May dislodge small parts with excessive force – Need to use multiple swabs for larger areas |
| Soft Cloth | – Better for larger areas – Can be more thorough – Gentle to delicate components |
– May not reach small crevices as well – Need to make sure cloth is non-abrasive |
Both cotton swabs and soft cloths are essential tools for removing glue from electronics. The choice will ultimately depend on the specific electronic device and the area that needs to be cleaned. Regardless of the choice, always work gently and carefully when removing glue to avoid causing further damage to the device.
3. Plastic spudger or guitar pick
When it comes to removing glue from electronics, having the right tools is crucial. One such tool you will need is a plastic spudger or guitar pick. These tools are thin and flat, making them perfect for gently scraping away glue without damaging delicate electronic components.
A plastic spudger is a versatile tool that is commonly used for prying open electronic devices and removing small components. Its flat edge is ideal for scraping away glue along the edges of electronic components. A guitar pick, on the other hand, is a smaller version of a plastic spudger. Its pointed end can be used for more precise scraping, while the flat edge is perfect for larger areas.
It’s important to note that when using these tools, you should apply gentle pressure and be careful not to scrape too hard or deep. This can cause scratches or damage to the surface of the electronic component.
If you don’t have a plastic spudger or guitar pick, you can use other alternatives such as a credit card or plastic scraper. However, make sure they are made of soft plastic to avoid scratches.
Remember to clean the plastic spudger or guitar pick after each use with isopropyl alcohol and a cloth to prevent any glue residue from transferring onto other electronic components.
A plastic spudger or guitar pick is a valuable tool in removing glue from electronics. They are affordable, easy to use, and will help you remove glue effectively without damaging the delicate electronic components. Just be careful to use them with gentle pressure and clean them after each use for maximum efficiency.
4. Heat gun or hairdryer (optional)
If the glue proves difficult to remove with just isopropyl alcohol and a cotton swab or cloth, you may want to consider using a heat gun or hairdryer to soften the glue. This optional step will make it easier to remove the glue without damaging the underlying electronics. Keep in mind that the heat should be used sparingly and the device should never become too hot to handle.
Here are the steps to use a heat gun or hairdryer for removing glue from electronics:
- Set the heat gun or hairdryer to a low or medium setting.
- Hold the heat gun or hairdryer several inches away from the glue, pointing downward.
- Moving the heat source in circular motions over the glue, gently heat the glue until it softens.
- Be careful not to apply too much heat in one spot for too long, and never hold the heat source on or near any one area for more than a few seconds at a time.
- After the glue has softened, use a plastic spudger or guitar pick to gently pry it away from the electronics, being careful not to damage any of the underlying components.
- If you still encounter resistance, repeat the earlier steps as necessary, reapplying heat and gently prying away the glue.
Remember, using heat to remove glue from electronics is an optional step and should be done with care. If you’re unsure whether to apply heat or not, or if you’re not comfortable using a heat gun or hairdryer, it may be best to skip this step and proceed with just isopropyl alcohol and a cotton swab or cloth.
5. Adhesive remover (optional)
If the glue is particularly stubborn, you may want to try using an adhesive remover as an additional step. There are a variety of adhesive removers available on the market, but it’s important to choose one that is safe for use on electronics. Here are some options to consider:
- Rubbing alcohol: Isopropyl alcohol, which we mentioned earlier, can also be used as an adhesive remover. Simply dampen a cloth with rubbing alcohol and gently rub the glue until it dissolves.
- Goo Gone: This popular adhesive remover is safe for use on plastics and electronics. Apply the solution to a cloth and gently rub the glue until it dissolves.
- Nail polish remover: Acetone-based nail polish remover can be effective at removing glue, but it’s important to check that it won’t damage your electronics first. Apply the solution to a cloth and gently rub the glue, being careful not to let the liquid drip onto any sensitive components.
- Contact cleaner: Some contact cleaners are formulated to safely dissolve adhesives without damaging electronics. Look for one that is labeled as safe for plastics and apply the solution to a cloth before rubbing the glue.
Remember, if you choose to use an adhesive remover, use it sparingly and with caution. Avoid letting the liquid drip or pool on your device, and wipe away any residue with isopropyl alcohol once the glue is dissolved.
Steps to Remove Glue from Electronics
Looking to remove glue from your beloved device without causing any damage? Follow our step-by-step guide below. Removing glue from electronics is a delicate process that requires patience and the right tools. You should always take the time to properly remove glue from your device to prevent irreversible damage. We’ll show you how to do it safely and effectively using common household items.
1. Power off the device
Before attempting to remove glue from your electronics, it is crucial to power off the device to prevent any potential damage. Turning off the power will eliminate any chances of electrical shocks, short-circuits, or other mishaps that can occur during the cleaning process.
Table: Steps to Power Off the Device
| Step | Description |
|---|---|
| Step 1 | Power off the device from the on/off button, or by removing the battery if it’s easily removable. |
| Step 2 | If there’s a power outlet, unplug any cords or cables from the device. |
| Step 3 | If the device has a removable back cover or casing, remove it to access the internal components. |
| Step 4 | If the device is not easily powered off, avoid any contact with the electrical components and seek professional help. |
Following these steps will ensure that your device is safe from any accidental damage while you are removing glue from it. Once you have powered off the device and disassembled it, you can proceed to the next step of removing any loose glue or debris from its surface.
2. Remove any loose glue or debris
Before tackling the glue, it’s important to remove any loose debris or glue fragments from the device. This will prevent them from interfering with the adhesive removal process and potentially causing more damage. Below are some steps to properly remove any loose glue or debris.
| Step 1: | Use a soft brush or compressed air to gently remove any loose debris or dirt from the surface of the device. |
| Step 2: | If there are any large chunks of dried glue, carefully try to remove them with your fingers or a plastic spudger. |
| Step 3: | For any remaining glue residue, use a cotton swab or cloth dampened with isopropyl alcohol to loosen it up. |
| Step 4: | Once the residue has been loosened, gently scrape it away using a plastic spudger or guitar pick. Be careful not to use too much force, as you can cause damage to the electronic components. |
| Step 5: | Continue to remove any remaining debris or glue fragments until the surface is clean. |
By taking the time to remove any loose debris or glue fragments, you can ensure that the adhesive removal process goes smoothly and that you do not cause further damage to your electronics. Remember to be patient and gentle, and to use the appropriate tools and materials for the job.
3. Apply isopropyl alcohol to a cotton swab or cloth
When it comes to removing glue from your electronics, isopropyl alcohol is one of the most effective solutions. It is a common household item and is readily available at most drugstores.
To get started, you will need to apply the isopropyl alcohol to a cotton swab or cloth. Here are some tips to keep in mind:
| Step | Description |
|---|---|
| 1 | Choose a well-ventilated area to work in to avoid inhaling fumes. |
| 2 | Wear gloves to protect your skin from the alcohol. |
| 3 | Apply enough isopropyl alcohol to the cotton swab or cloth to moisten it, but not saturate it to the point of dripping. |
| 4 | Make sure the cotton swab or cloth is clean and free of any debris before using it on your electronics. |
| 5 | Gently dab the affected area with the alcohol-soaked cotton swab or cloth. Be careful not to apply too much pressure, as this could damage the electronics. |
By following these steps, you can effectively use isopropyl alcohol to remove glue from your electronics without causing any damage. Remember to take your time and be gentle in your approach.
4. Gently rub the glue with the cotton swab or cloth
When it comes to actually removing the glue from your electronic device, one of the most important steps is to gently rub the affected area with a cotton swab or soft cloth. Here are some tips to keep in mind during this process:
- Be cautious: It’s important to be gentle when rubbing the area. Applying too much pressure could cause damage to delicate components.
- Use the right amount of alcohol: You don’t want to use too much alcohol, as it could seep into other areas of the device. Use just enough to dampen the cloth or cotton swab.
- Work in small sections: If you’re dealing with a lot of glue, it’s best to work in small sections to avoid overwhelming yourself or the device.
- Patiently repeat the process: Removing glue from electronics can be a tedious and time-consuming process. Don’t rush, and be prepared to repeat steps as necessary until all of the glue is removed.
By gently rubbing the glue with a cloth or cotton swab, you’ll be able to gradually break down the adhesive and remove it from the device. Just remember to work slowly, use caution, and be patient, and the process should be a success.
5. Use a plastic spudger or guitar pick to remove the glue
When it comes to removing glue from electronics, using a plastic spudger or a guitar pick can be incredibly helpful. These tools allow you to gently scrape away any remaining glue without damaging delicate electronic components.
It is important to choose a plastic spudger or guitar pick because metal tools can scratch or puncture the surface of electronic devices, causing irreparable damage. Plastic tools are much softer and won’t scratch or damage the device.
To use a plastic spudger or guitar pick, simply place the edge of the tool underneath the glue and gently lift it away from the surface of the device. You may need to use a back-and-forth motion to work the glue loose. Be patient and take your time, especially if the glue has hardened or is particularly stubborn.
Make sure to avoid using excessive force, as this could damage the device. It’s also important to use the tool only on the glue itself, and not on the surrounding electronic components.
Using a plastic spudger or guitar pick is especially effective for removing glue from small crevices or hard-to-reach areas on the device, where cotton swabs or cloths may not be as effective.
Using a plastic spudger or guitar pick can be an incredibly useful way to remove glue from electronics without causing damage. Just remember to use a gentle touch and take your time, and you should be able to remove even the most stubborn glue from your device.
The following table summarizes the key points to keep in mind when using a plastic spudger or guitar pick to remove glue from electronics:
| Do: | Use a plastic spudger or guitar pick |
| Do: | Be patient and take your time |
| Do: | Use a gentle back-and-forth motion to work the glue loose |
| Do: | Use only on the glue and not on surrounding components |
| Don’t: | Use excessive force |
| Don’t: | Use metal tools |
6. Apply heat (optional)
If the glue is particularly stubborn, applying heat can be a useful technique to soften it and make it easier to remove. Here are the steps to follow if you decide to use heat:
1. Prepare Your Device
Before applying heat, make sure your device is turned off and unplugged (if applicable) and that any loose glue or debris has been removed.
2. Choose Your Heat Source
A heat gun or hairdryer on its highest setting can be used to apply heat to the glue. Hold the heat source approximately six inches away from the device.
3. Apply Heat Gently
Gently apply heat to the area of the glue. Be careful not to overheat the device, as this can cause damage to internal components.
4. Test and Repeat
Test to see if the glue has softened by gently trying to remove it with a plastic spudger or guitar pick. If it has not softened, repeat the process, being careful not to overheat the device.
If the glue has softened, you can then proceed with the other steps to remove it, as described in the previous sections.
Keep in mind that applying heat can be risky, as it can cause damage to your device if not done properly. It is important to approach this technique with caution and only use it if absolutely necessary.
7. Use adhesive remover (optional)
If the glue on your electronics is particularly stubborn, you might consider using an adhesive remover. Adhesive removers are formulated to break down and dissolve adhesive substances, making them easier to remove without damaging the surface underneath. Here are a few things to keep in mind when using adhesive remover on your electronics:
- Choose the right adhesive remover: Not all adhesive removers are created equal. Some are designed specifically for certain types of adhesive or certain surfaces, so it’s important to choose one that’s appropriate for your particular task. Read the label carefully to ensure that you’re using the right product.
- Apply the adhesive remover sparingly: Adhesive removers are powerful chemicals, and they can damage sensitive electronic components if used improperly. Apply the adhesive remover sparingly, using only as much as you need to dissolve the glue. Avoid getting the remover on any exposed wiring or other delicate parts.
- Give the adhesive remover time to work: Depending on the strength and type of glue you’re dealing with, you may need to let the adhesive remover sit for a few minutes to fully dissolve the glue. Check the label for instructions regarding how long to let the remover sit before wiping it away.
- Wear protective gear: Adhesive removers can be harsh on your skin and eyes, so it’s important to wear gloves and eye protection while using them. Also, make sure you’re working in a well-ventilated area to avoid inhaling fumes.
- Clean up thoroughly: After using an adhesive remover, be sure to wipe away any residue with a clean cloth or cotton swab dipped in isopropyl alcohol. This will help ensure that no traces of the remover are left behind to damage your electronics.
Remember, using an adhesive remover should be a last resort. It’s always best to try less harsh methods first, as these are less likely to damage your electronics. If you do decide to use an adhesive remover, be sure to choose the right product and use it carefully and sparingly to avoid damaging your device.
8. Wipe away any remaining residue with isopropyl alcohol
After using the plastic spudger or guitar pick to remove as much glue as possible from your electronic device, there may still be some stubborn residue left behind. To remove any remaining glue residue, you will need isopropyl alcohol and a soft cloth or cotton swab.
Step 1: Soak the cloth or cotton swab with isopropyl alcohol, making sure it is damp but not dripping.
Step 2: Gently wipe the area where the glue residue remains. Avoid using excessive pressure or rubbing too hard, as this can damage your device.
Step 3: If necessary, use a new, clean cloth or cotton swab for each pass to avoid spreading the glue residue around.
Step 4: Continue wiping the area until all of the glue residue is removed.
Step 5: For hard-to-reach areas or small components, use a cotton swab dipped in isopropyl alcohol to carefully apply the alcohol and remove the glue residue.
It’s important to make sure that all of the glue residue is completely removed before continuing to use your electronic device. Any remaining residue can trap heat and cause damage to your device over time. So be sure to take your time and thoroughly clean the area. Avoid using harsh chemicals or solvents that could damage your device. Isopropyl alcohol is a safe and effective solution for removing glue residue from electronics.
9. Allow device to air dry completely before powering back on
After following all the previous steps to remove glue from electronics, it’s crucial to let the device air dry completely before turning it back on. This is to avoid any potential damage caused by residual moisture.
Why is it important to allow the device to air dry completely?
Leaving any excess liquid on electronic components can lead to short circuits and damage. When devices are powered on, the current flowing through the electrical components can be impeded by any remaining moisture, which can both decrease performance and damage the device. Properly drying the device is just as important as removing the glue.
How to air dry a device?
The easiest way to allow your device to air dry is by starting with a soft cloth or paper towel to pat any remaining moisture from the device. Place the device on a clean, dry surface and allow it to sit untouched for several hours or overnight, depending on how much alcohol was used.
What should you avoid when drying your device?
Do not use a hair dryer or any other external heat source to dry the device as this could cause further damage from excessive heat exposure. Also, avoid placing the device under direct sunlight as this could cause warping or discoloration.
Once your device is completely dry, it is safe to turn it back on and start using it again. By following these steps, you can safely remove glue from your electronic devices without any long-lasting damage.
| To Allow Device to Air Dry Completely: | Do: | Don’t: |
|---|---|---|
| Pat any remaining moisture from the device with a soft cloth or paper towel. | Wait several hours or overnight until the device is completely dry. | Use a hair dryer or any other external heat source. |
| Place the device on a clean, dry surface. | Expose the device to direct sunlight. |
Tips and Tricks
When it comes to removing glue from electronics, it’s important to proceed with caution in order to avoid damaging the delicate components. In addition to following the step-by-step guide we’ve provided, there are a few tips and tricks you can keep in mind to make the process go more smoothly. Pay close attention to the following advice to ensure that your electronics are restored to their original condition without any unintended consequences.
1. Take your time
When it comes to removing glue from electronics, it is important to take your time and proceed with caution. Rushing through the process can cause permanent damage to your device, which can be costly to repair or replace. Here are some reasons why taking your time is crucial:
| Reasons to Take Your Time | Description |
|---|---|
| 1 | Removing glue requires patience and precision, so that you do not inadvertently damage any delicate components of your electronics. |
| 2 | The longer you take to remove the glue, the more time you have to assess its condition and plan your approach. This can help you avoid costly mistakes or accidents that could permanently damage your device. |
| 3 | When removing glue from electronics, it is important to avoid using any excessive force, as this can cause the device to become damaged or even break. This is especially true if the glue is particularly stubborn or difficult to remove. |
| 4 | By taking your time and proceeding carefully, you can ensure that the adhesive is removed thoroughly, without leaving behind any residue that could compromise the function or appearance of your electronics. |
| 5 | Remember that removing glue can be a slow and tedious process, but it is crucial to do it right to avoid further damage. Allow enough time to ensure that the glue is completely removed, and take breaks if needed to prevent fatigue or eye strain. |
In short, taking your time when removing glue from electronics is essential to preventing further damage and ensuring that the device is restored to its original condition. Be sure to proceed carefully, use the appropriate tools and materials, and avoid excessive force to protect your device and prolong its lifespan.
2. Don’t use excessive force
When trying to remove glue from electronics, it’s important to remember not to use excessive force. This is because applying too much pressure or pulling too hard on the adhesive can cause damage to the delicate components inside the device. Here are a few tips to keep in mind:
1. Be patient: Removing glue from electronics can be a time-consuming process, especially if it’s a large or stubborn adhesive. Rushing through the task by using force will only result in potential damage and frustration.
2. Use gentle pressure: Rather than using force, try applying gentle pressure when removing the glue. This can be done by gently rubbing the area with a cotton swab or cloth soaked in isopropyl alcohol, or by using a plastic spudger or guitar pick to carefully scrape the glue away.
3. Avoid using sharp tools: While it may be tempting to use a knife or razor blade to remove the glue, this can lead to scratches or other damage to the surface of the electronics. Stick to using plastic or wooden tools instead.
4. Test small areas first: If you’re unsure how much pressure to apply when removing the glue, try testing a small, inconspicuous area first. This will give you a better idea of how much pressure is needed without risking damage to the device.
By following these tips, you can safely and effectively remove glue from your electronics without causing any damage. Remember to take your time, use gentle pressure, and avoid using sharp tools to ensure the best possible results.
3. Test any new techniques or products on a small, inconspicuous area first
Before attempting to remove glue from any electronic device, it is important to test any new techniques or products on a small, inconspicuous area first. This will help ensure that you do not accidentally damage or harm the device during the removal process.
To do this, follow these steps:
- Choose a small and unobtrusive area on the device, such as a corner or the back of the device.
- Apply a small amount of the technique or product you plan to use to this area.
- Wait the recommended amount of time or until the product has dried, depending on what you are testing.
- Check the area for any damage, discoloration, or adverse effects.
Note: It is important to wait until the product has dried or the recommended time has passed before checking for any adverse effects. If you check too soon, you may not notice any damage that could occur later.
If the area appears undamaged and there are no adverse effects, you can proceed with using the same technique or product on the rest of the glue. However, if you notice any damage or adverse effects, you should discontinue use and try a different technique or product.
By following this step, you can avoid causing any additional damage to your electronic device and ensure that the removal process goes as smoothly as possible.
Conclusion
In conclusion, removing glue from electronics may seem like a daunting task, but it’s important to do it properly to avoid further damage to your devices. Remember that glue can interfere with electronic signals, cause permanent damage, and trap heat that can damage components.
To effectively remove glue, you will need tools and materials such as isopropyl alcohol, cotton swabs or soft cloth, plastic spudger or guitar pick, and optionally, a heat gun or hairdryer and adhesive remover.
Follow the steps outlined in this article, including powering off the device, removing any loose glue or debris, applying isopropyl alcohol, gently rubbing the glue, using a plastic spudger or guitar pick, and optionally applying heat or adhesive remover.
Remember to take your time, not use excessive force, and test any new techniques or products on a small, inconspicuous area first. After removing the glue, wipe away any remaining residue with isopropyl alcohol and allow the device to air dry completely before powering it back on.
By properly removing glue from electronics, you can ensure that your devices continue to function properly and last longer. So, don’t hesitate to try these tips and tricks to remove any unwanted glue from your electronics safely and effectively.
Frequently Asked Questions
1. Can I use any type of adhesive remover to remove glue from electronics?
It is recommended to use an adhesive remover specifically designed for electronics to avoid damaging the components.
2. How long should I let the isopropyl alcohol sit on the glue before wiping it away?
You only need to let the isopropyl alcohol sit on the glue for a few seconds before wiping it away with a cloth or cotton swab.
3. Can I use a metal tool to remove the glue?
It is not recommended to use a metal tool as it can damage the delicate components of the electronic device. Instead, use a plastic spudger or guitar pick.
4. Can I blow dry the device after using a heat gun?
It is not recommended to use a blow dryer, as the heat may not be distributed evenly and can cause damage to the device. Instead, let the device air dry completely.
5. Can I use rubbing alcohol instead of isopropyl alcohol?
Rubbing alcohol contains additives that can leave a residue and potentially damage the electronic device. It is recommended to use isopropyl alcohol.
6. Can I use a toothbrush to remove the glue?
A toothbrush may not be gentle enough and can damage the device. It is recommended to use a cotton swab or soft cloth instead.
7. Can I use vinegar as an adhesive remover?
Vinegar can corrode the metal components of an electronic device and is not recommended as an adhesive remover.
8. Can I use a Q-tip instead of a cotton swab?
A Q-tip can leave behind fibers that can get stuck in small spaces and damage the device. It is recommended to use a cotton swab instead.
9. Can I remove glue from a smartphone screen?
You can use the tips in this article to remove glue from a smartphone screen, as long as you are gentle and avoid damaging the screen.
10. Can I use a hair dryer instead of a heat gun?
A hair dryer may not get hot enough and can cause damage to the device. It is recommended to use a heat gun.